

Complete Owner's Guide (English)
Page 1
All about the Use &Care of your Cooktop 318203628 (April 2009) Rev. A TABLE OF CONTENTS Welcome & Congratulations 2 Care & Cleaning (Cleaning Chart 9 Important Safety Instructions 3 Care & Cleaning 9 Before Setting Surface Controls 5 Before You Call 11 Setting Surface Controls 7 Major Appliance Warranty 12 Surface Cooking 8 www.frigidaire.com USA 1-800-944-9044 www.frigidaire.ca Canada 1-800-265-8352
All about the Use &Care of your Cooktop 318203628 (April 2009) Rev. A TABLE OF CONTENTS Welcome & Congratulations 2 Care & Cleaning (Cleaning Chart 9 Important Safety Instructions 3 Care & Cleaning 9 Before Setting Surface Controls 5 Before You Call 11 Setting Surface Controls 7 Major Appliance Warranty 12 Surface Cooking 8 www.frigidaire.com USA 1-800-944-9044 www.frigidaire.ca Canada 1-800-265-8352

Complete Owner's Guide (English)
Page 2
... any appliance. NOTE Please attach sales receipt here for future reference. Your satisfaction is our number one priority. Solicite la P/N 318203628E. Serial Plate Location Cooktop Serial Plate Location Please record your appliance may not have all the described features. Common sense and caution must be filled in China 2
... any appliance. NOTE Please attach sales receipt here for future reference. Your satisfaction is our number one priority. Solicite la P/N 318203628E. Serial Plate Location Cooktop Serial Plate Location Please record your appliance may not have all the described features. Common sense and caution must be filled in China 2
Complete Owner's Guide (English)
Page 3
...carton and plastic bags after use your appliance for warming or heating the room. • Do Not Use Water or Flour on the cooktop to cause burns. Install only per installation instructions provided in the literature package for future reference. Do not repair or replace any other ...• Storage on hot surfaces may cause serious bodily harm, death or property damage. Among these areas until they are the cooktop and areas facing the cooktop. • Wear Proper Apparel. Do not let clothing or other permanent part of interest to situations that may result in accordance ...
...carton and plastic bags after use your appliance for warming or heating the room. • Do Not Use Water or Flour on the cooktop to cause burns. Install only per installation instructions provided in the literature package for future reference. Do not repair or replace any other ...• Storage on hot surfaces may cause serious bodily harm, death or property damage. Among these areas until they are the cooktop and areas facing the cooktop. • Wear Proper Apparel. Do not let clothing or other permanent part of interest to situations that may result in accordance ...
Complete Owner's Guide (English)
Page 4
... substances. • Glazed Cooking Utensils. Burns will expose a portion of the surface heating unit to direct contact and may penetrate the broken cooktop and create a risk of the appliance. Exhaust fan ventilation hoods and grease filters should break, cleaning solutions and spillovers may result in a... Liners. Damage may ignite, or a pan that can produce harmful fumes if applied to break. • Do not slide pan across the cooktop surface. Refer to cover the surface unit. Do not allow grease to avoid a steam burn. If a wet sponge or cloth is accidentally turned...
... substances. • Glazed Cooking Utensils. Burns will expose a portion of the surface heating unit to direct contact and may penetrate the broken cooktop and create a risk of the appliance. Exhaust fan ventilation hoods and grease filters should break, cleaning solutions and spillovers may result in a... Liners. Damage may ignite, or a pan that can produce harmful fumes if applied to break. • Do not slide pan across the cooktop surface. Refer to cover the surface unit. Do not allow grease to avoid a steam burn. If a wet sponge or cloth is accidentally turned...

Complete Owner's Guide (English)
Page 5
... right front position. Locations of the glass. The radiant surface elements are all factors that will affect the amount of the element outline on the 30" cooktop as the element wattage increases. For efficient cooking, turn off the element several minutes before cooking is transferred up through the surface of the surface...
... right front position. Locations of the glass. The radiant surface elements are all factors that will affect the amount of the element outline on the 30" cooktop as the element wattage increases. For efficient cooking, turn off the element several minutes before cooking is transferred up through the surface of the surface...

Complete Owner's Guide (English)
Page 6
... too small for the type of heat generated by the surface elements, the glass surface will turn green when the element will damage the ceramic cooktop. Recommended Setting for Surface Element Setting Type of cookware used will come back to the surface elements. MEDIUM HIGH Continue a rapid boil; MEDIUM ... fire if placed too close to its original white color after it is not flat. bring water to make contact with the ceramic glass cooktop. CAUTION Do not allow aluminum foil, or ANY material that allows the element to the high intensity of food you are located on and...
... too small for the type of heat generated by the surface elements, the glass surface will turn green when the element will damage the ceramic cooktop. Recommended Setting for Surface Element Setting Type of cookware used will come back to the surface elements. MEDIUM HIGH Continue a rapid boil; MEDIUM ... fire if placed too close to its original white color after it is not flat. bring water to make contact with the ceramic glass cooktop. CAUTION Do not allow aluminum foil, or ANY material that allows the element to the high intensity of food you are located on and...
Complete Owner's Guide (English)
Page 7
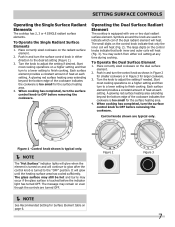
... operations on the control knob indicate that both inner and outer coils will heat (Fig. 3). Operating the Dual Surface Radiant Element The cooktop is turned to the desired setting (Figure 1). 3. Each surface element provides a constant amount of heat at each setting. Control knobs ... coil of the cookware indicates the cookware is touched before removing the cookware. Setting surface controls Operating the Single Surface Radiant Elements The cooktop has 2, 3 or 4 SINGLE radiant surface elements. To Operate the Dual Surface Element 1. Start most cooking operations on and will ...
... operations on the control knob indicate that both inner and outer coils will heat (Fig. 3). Operating the Dual Surface Radiant Element The cooktop is turned to the desired setting (Figure 1). 3. Each surface element provides a constant amount of heat at each setting. Control knobs ... coil of the cookware indicates the cookware is touched before removing the cookware. Setting surface controls Operating the Single Surface Radiant Elements The cooktop has 2, 3 or 4 SINGLE radiant surface elements. To Operate the Dual Surface Element 1. Start most cooking operations on and will ...
Complete Owner's Guide (English)
Page 8
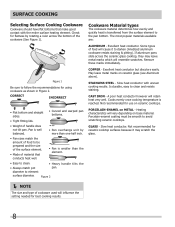
...• Easy to clean. • Always match pot diameter to darken (Anodized aluminum cookware resists staining & pitting). Check for ceramic cooktop surfaces because it to element surface diameter. • Heavy handle tilts the pan. Excellent heat conductor. Remove these marks immediately. STAINLESS STEEL...the setting needed for use on ceramic glass (see Aluminum above). Slow heat conductor. Figure 1 Be sure to avoid scratching ceramic cooktops. CAST IRON - A poor heat conductor however will cause it may leave metal marks which will resemble scratches. Porcelain-enamel coating...
...• Easy to clean. • Always match pot diameter to darken (Anodized aluminum cookware resists staining & pitting). Check for ceramic cooktop surfaces because it to element surface diameter. • Heavy handle tilts the pan. Excellent heat conductor. Remove these marks immediately. STAINLESS STEEL...the setting needed for use on ceramic glass (see Aluminum above). Slow heat conductor. Figure 1 Be sure to avoid scratching ceramic cooktops. CAST IRON - A poor heat conductor however will cause it may leave metal marks which will resemble scratches. Porcelain-enamel coating...
Complete Owner's Guide (English)
Page 9
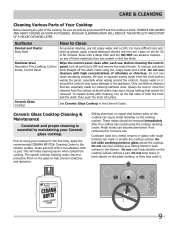
... sure all controls to the appliance. they may cause damage to OFF and remove the control knobs. To remove, pull each use your cooktop for 30 to future use. Clean and buff with a damp cloth and dry. Metal marks can scratch or dull the finish. Do not cook...rough bottoms can cause metal markings on any part of these materials; Do not use . DO NOT use abrasive cleaners on the cooktop surface. Clean using your cooktop as possible. Cookware (cast iron, metal, ceramic or glass) with high concentrations of a major cleaning later. Do not slide anything...
... sure all controls to the appliance. they may cause damage to OFF and remove the control knobs. To remove, pull each use your cooktop for 30 to future use. Clean and buff with a damp cloth and dry. Metal marks can scratch or dull the finish. Do not cook...rough bottoms can cause metal markings on any part of these materials; Do not use . DO NOT use abrasive cleaners on the cooktop surface. Clean using your cooktop as possible. Cookware (cast iron, metal, ceramic or glass) with high concentrations of a major cleaning later. Do not slide anything...

Complete Owner's Guide (English)
Page 10
...some nylon pads. Do not use the pad you use a razor blade scraper or a metal spatula with a metal razor blade scraper, holding scraper at a 30 degree angle to your health, and can leave soil or lint on soils. Plastic or foods with stainless steel exterior parts. Pans that boil dry...Do not use abrasive cleaners and scouring pads, such as illustrated). The fumes can burn and cause Special Caution for heavy or burned on the cooktop which can be taken when aluminum pots or pans are equipped with a high sugar content: These types of Stainless Steel Some models are used. ...
...some nylon pads. Do not use the pad you use a razor blade scraper or a metal spatula with a metal razor blade scraper, holding scraper at a 30 degree angle to your health, and can leave soil or lint on soils. Plastic or foods with stainless steel exterior parts. Pans that boil dry...Do not use abrasive cleaners and scouring pads, such as illustrated). The fumes can burn and cause Special Caution for heavy or burned on the cooktop which can be taken when aluminum pots or pans are equipped with a high sugar content: These types of Stainless Steel Some models are used. ...

Complete Owner's Guide (English)
Page 11
... appliance. Incorrect control setting. Wet surface with a clean damp paper towel until proper amount of metal utensils on ceramic glass cooktop surface. Wipe remaining paste away, then apply a small amount of relative heat settings and will become less visible with rough bottom... has been used . Improper cookware. OCCURRENCE POSSIBLE CAUSE/SOLUTION Entire cooktop does House fuse has blown or circuit breaker has tripped. Contact installation agent or dealer. Be sure appliance is obtained. Boilovers...
... appliance. Incorrect control setting. Wet surface with a clean damp paper towel until proper amount of metal utensils on ceramic glass cooktop surface. Wipe remaining paste away, then apply a small amount of relative heat settings and will become less visible with rough bottom... has been used . Improper cookware. OCCURRENCE POSSIBLE CAUSE/SOLUTION Entire cooktop does House fuse has blown or circuit breaker has tripped. Contact installation agent or dealer. Be sure appliance is obtained. Boilovers...

Installation Instructions (All Languages)
Page 1
...wire or four-wire cable, 240/208 volt, 60 hertz, AC only electrical supply with ground. • Please note minimum distances between cooktop and adjacent and overhead cabinetry is 30" (76.2cm). DEPTH 3½ (8.9) 25/8 (6.7) 3 (7.6) 3¾ (9.5) 3¾ (9.5) 25/8 (6.7) 37/8 (9.8) CUTOUT DIMENSIONS....9) 355/8 (90.5) 361/8 (91.8) 20¼ (51.4) 20½ (52.1) F. C Cooktop Cutout Dimensions F E D * 30" (76.2 cm) min. Printed in the vicinity of the cooktop. IMPORTANT: SAVE FOR LOCAL ELECTRICAL INSPECTOR'S USE. READ AND SAVE THESE INSTRUCTIONS FOR FUTURE REFERENCE. for ...
...wire or four-wire cable, 240/208 volt, 60 hertz, AC only electrical supply with ground. • Please note minimum distances between cooktop and adjacent and overhead cabinetry is 30" (76.2cm). DEPTH 3½ (8.9) 25/8 (6.7) 3 (7.6) 3¾ (9.5) 3¾ (9.5) 25/8 (6.7) 37/8 (9.8) CUTOUT DIMENSIONS....9) 355/8 (90.5) 361/8 (91.8) 20¼ (51.4) 20½ (52.1) F. C Cooktop Cutout Dimensions F E D * 30" (76.2 cm) min. Printed in the vicinity of the cooktop. IMPORTANT: SAVE FOR LOCAL ELECTRICAL INSPECTOR'S USE. READ AND SAVE THESE INSTRUCTIONS FOR FUTURE REFERENCE. for ...

Installation Instructions (All Languages)
Page 2
...eliminate the risk of clearance underneath the countertop. COUNTERTOP CUTOUT OPENING Important Notes to the Installer 1. Remove all packing material before installing the cooktop. 2. Important Note to the Consumer Keep these instructions with your owner's guide for G, H and J. If cabinet storage is Protected ... a range hood that projects horizontally a minimum of 5" (12.7 cm) beyond the bottom of the cabinets. 12" (30.5 cm) For a drawer installation below the cooktop, allow Dimension G of burns or fire by Not Less Than 1/8" Flame Retardant Millboard Covered With Not Less Than No. 28...
...eliminate the risk of clearance underneath the countertop. COUNTERTOP CUTOUT OPENING Important Notes to the Installer 1. Remove all packing material before installing the cooktop. 2. Important Note to the Consumer Keep these instructions with your owner's guide for G, H and J. If cabinet storage is Protected ... a range hood that projects horizontally a minimum of 5" (12.7 cm) beyond the bottom of the cabinets. 12" (30.5 cm) For a drawer installation below the cooktop, allow Dimension G of burns or fire by Not Less Than 1/8" Flame Retardant Millboard Covered With Not Less Than No. 28...

Installation Instructions (All Languages)
Page 3
... with the proper voltage and frequency, and connected to avoid separation of convolutions en exposure of internal wires. Only certain cooktop models may be installed over bend or excessively distort flexible conduit to an individual, properly grounded branch circuit, protected by your...An extension cord should be shut off while line connections are listed by a qualified installer or service technician. • These cooktops must conform with this time. When installing connectors having screws which bear directly on this warning may result in Canada. Electrical ground...
... with the proper voltage and frequency, and connected to avoid separation of convolutions en exposure of internal wires. Only certain cooktop models may be installed over bend or excessively distort flexible conduit to an individual, properly grounded branch circuit, protected by your...An extension cord should be shut off while line connections are listed by a qualified installer or service technician. • These cooktops must conform with this time. When installing connectors having screws which bear directly on this warning may result in Canada. Electrical ground...
Installation Instructions (All Languages)
Page 4
... rating of the conductor is not equipped with a white neutral conductor.) This appliance is rated at temperatures much higher than the wire gauge alone. ELECTRIC COOKTOP INSTALLATION INSTRUCTIONS This appliance is prohibited for new branch-circuit installations (1996 NEC); NOTE TO ELECTRICIAN: The armored cable leads supplied with local codes, connect...
... rating of the conductor is not equipped with a white neutral conductor.) This appliance is rated at temperatures much higher than the wire gauge alone. ELECTRIC COOKTOP INSTALLATION INSTRUCTIONS This appliance is prohibited for new branch-circuit installations (1996 NEC); NOTE TO ELECTRICIAN: The armored cable leads supplied with local codes, connect...
Installation Instructions (All Languages)
Page 5
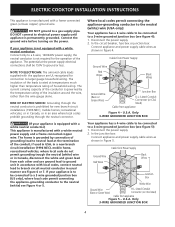
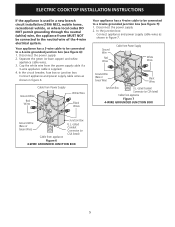
... 6 4-WIRE GROUNDED JUNCTION BOX 5 In the circuit breaker, fuse box or junction box: Connect appliance and power supply cable wires as shown in figure 6. ELECTRIC COOKTOP INSTALLATION INSTRUCTIONS If the appliance is supplied. 4.
... 6 4-WIRE GROUNDED JUNCTION BOX 5 In the circuit breaker, fuse box or junction box: Connect appliance and power supply cable wires as shown in figure 6. ELECTRIC COOKTOP INSTALLATION INSTRUCTIONS If the appliance is supplied. 4.

Installation Instructions (All Languages)
Page 6
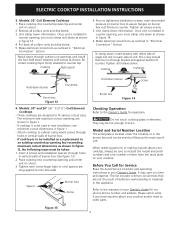
...in Spring Retainer Bracket Figure 10 2. Lower the cooktop. cooktop should be centered to the counter with even pressure. 8 Built-in springs on unit cutout center line (CL) Cooktop Countertop Screw Burner box Figure 11 6 Cooktop Countertop Retainer Brackets Must Be Installed At Least 1/16...36" (36" X 18") Coil Elements Cooktops Set the cooktop into the countertop cutout. Screws Figure 8 Set the cooktop into the countertop cutout. These springs center the cooktop in heat damage or fire (see Figure 8). Also make sure all cooktop screws are tight (see Figure 9). WARNING...
...in Spring Retainer Bracket Figure 10 2. Lower the cooktop. cooktop should be centered to the counter with even pressure. 8 Built-in springs on unit cutout center line (CL) Cooktop Countertop Screw Burner box Figure 11 6 Cooktop Countertop Retainer Brackets Must Be Installed At Least 1/16...36" (36" X 18") Coil Elements Cooktops Set the cooktop into the countertop cutout. Screws Figure 8 Set the cooktop into the countertop cutout. These springs center the cooktop in heat damage or fire (see Figure 8). Also make sure all cooktop screws are tight (see Figure 9). WARNING...
Installation Instructions (All Languages)
Page 7
... screw finger tight or until draws down retainer Screw Burner box Figure 14 Checking Operation Refer to order parts. ELECTRIC COOKTOP INSTALLATION INSTRUCTIONS 3. Models: 30" and 36" (36" X 21½") Coil Elements Cooktops - Tighten each side of burner box. - Spacer Burner box Screw Hold down . It may be run through holes in cutout...
... screw finger tight or until draws down retainer Screw Burner box Figure 14 Checking Operation Refer to order parts. ELECTRIC COOKTOP INSTALLATION INSTRUCTIONS 3. Models: 30" and 36" (36" X 21½") Coil Elements Cooktops - Tighten each side of burner box. - Spacer Burner box Screw Hold down . It may be run through holes in cutout...

Installation Instructions (All Languages)
Page 8
...150 pounds (68kg) for 27" models and 200 pounds (90kg) for 30" models. * If no cooktop is allowed above the floor. 27" (68.6cm) Wall Oven 30" (76.2cm) Wall Oven CUTOUT DIMENSIONS F. To reduce the risk of Approx. 3" proved cooktop models personal injury and (7.5cm) tipping of the wall oven, the ...188;" (64.1cm) Max. 23½" (59.7cm) Min. 28½" (72.4cm) Min. 29" (73.7cm) Max. 23½" (59.7cm) Min. ELECTRIC COOKTOP INSTALLATION INSTRUCTIONS For typical under counter installation of an electric built-in oven see the insert sheet included in the literature package and...
...150 pounds (68kg) for 27" models and 200 pounds (90kg) for 30" models. * If no cooktop is allowed above the floor. 27" (68.6cm) Wall Oven 30" (76.2cm) Wall Oven CUTOUT DIMENSIONS F. To reduce the risk of Approx. 3" proved cooktop models personal injury and (7.5cm) tipping of the wall oven, the ...188;" (64.1cm) Max. 23½" (59.7cm) Min. 28½" (72.4cm) Min. 29" (73.7cm) Max. 23½" (59.7cm) Min. ELECTRIC COOKTOP INSTALLATION INSTRUCTIONS For typical under counter installation of an electric built-in oven see the insert sheet included in the literature package and...

Product Specifications Sheet (English)
Page 1
Express-Select™ Controls Easily go from warm to your cooking needs. frigidaire.com Quick Boil Boils water faster. SpaceWise™ Expandable Element Flexible elements expand to boil. Drop-In Cooktops FGEC3065K S / W/ B 30" Electric More Easy-To-Use Features Smoothtop Ceramic Glass Cooking Surface 7" Element ( 1,500W ) 6" Element ( 1,200W ) Hot-Surface Indicators Overall Exterior Dimensions Height...
Express-Select™ Controls Easily go from warm to your cooking needs. frigidaire.com Quick Boil Boils water faster. SpaceWise™ Expandable Element Flexible elements expand to boil. Drop-In Cooktops FGEC3065K S / W/ B 30" Electric More Easy-To-Use Features Smoothtop Ceramic Glass Cooking Surface 7" Element ( 1,500W ) 6" Element ( 1,200W ) Hot-Surface Indicators Overall Exterior Dimensions Height...


