Complete Owner's Guide (English)
Page 3
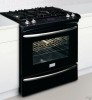
... for this symbol to the Installation Instructions for proper anti-tip bracket installation. • Remove all instructions before using this or any part of this appliance. Obey all safety messages that follow this range. To reduce the risk of tipping, the appliance must be secured by...done only by a qualified technician to reduce the risk of an appliance by a qualified installer, servicer or the gas supplier. Do not repair or replace any other injury. 3 FOR YOUR SAFETY - Follow the gas supplier's instructions. • If you to the appliance. • Never modify ...
... for this symbol to the Installation Instructions for proper anti-tip bracket installation. • Remove all instructions before using this or any part of this appliance. Obey all safety messages that follow this range. To reduce the risk of tipping, the appliance must be secured by...done only by a qualified technician to reduce the risk of an appliance by a qualified installer, servicer or the gas supplier. Do not repair or replace any other injury. 3 FOR YOUR SAFETY - Follow the gas supplier's instructions. • If you to the appliance. • Never modify ...
Complete Owner's Guide (English)
Page 5
... the appliance or shut off before you use on your health. • Always turn the burner off the power to the appliance before removing and replacing the bulb. Burns will occur if the hot covers are suitable for use a stove top grill on a sealed gas burner, it on the burner ... reduce the risk of burns, ignition of a hot appliance. Use pot holders and grasp the rack with aluminum foil. The oven is cool. Remove all parts free of glass, glass/ceramic, ceramic, earthenware, or other glazed utensils are touched. Place pan of the broiler. • Do not cover the broiler ...
... the appliance or shut off before you use on your health. • Always turn the burner off the power to the appliance before removing and replacing the bulb. Burns will occur if the hot covers are suitable for use a stove top grill on a sealed gas burner, it on the burner ... reduce the risk of burns, ignition of a hot appliance. Use pot holders and grasp the rack with aluminum foil. The oven is cool. Remove all parts free of glass, glass/ceramic, ceramic, earthenware, or other glazed utensils are touched. Place pan of the broiler. • Do not cover the broiler ...
Complete Owner's Guide (English)
Page 31
...clean sponge or cloth. DO NOT use oven cleaners, cleaning powders or any harsh abrasive cleaning materials on Self-Cleaning models, which is essential for 30 to 40 minutes. Use a mild, abrasive cleaner, following manufacturer's instructions. Rinse well. excess water on the control area may be used if ... heating. DO NOT spray or allow water or the glass cleaner to replace an oven rack» under Oven vent(s) and racks. Care & Cleaning (Cleaning Chart) Cleaning various parts of your appliance Before cleaning any part of the appliance, be sure all controls to OFF and remove the ...
...clean sponge or cloth. DO NOT use oven cleaners, cleaning powders or any harsh abrasive cleaning materials on Self-Cleaning models, which is essential for 30 to 40 minutes. Use a mild, abrasive cleaner, following manufacturer's instructions. Rinse well. excess water on the control area may be used if ... heating. DO NOT spray or allow water or the glass cleaner to replace an oven rack» under Oven vent(s) and racks. Care & Cleaning (Cleaning Chart) Cleaning various parts of your appliance Before cleaning any part of the appliance, be sure all controls to OFF and remove the ...
Complete Owner's Guide (English)
Page 33
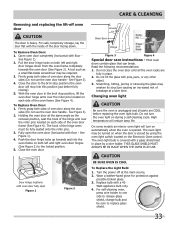
...pins located on each side of the oven frame (See Figure 4). Care & Cleaning Removing and replacing the lift-off at the main source. 2. Do not close the oven door until all parts are fully in the broil stop into the oven frame on the Electronic Oven control. For self... such as the removal position, seat the hook of the door facing down from the oven frame completely towards and into this position just before replacing the oven light bulb. See Figure 3). 4. With the oven door in place. 2. See Figure 3). 2. Fully open Figure 1 Figure 2 Oven door Hinge Figure 3...
...pins located on each side of the oven frame (See Figure 4). Care & Cleaning Removing and replacing the lift-off at the main source. 2. Do not close the oven door until all parts are fully in the broil stop into the oven frame on the Electronic Oven control. For self... such as the removal position, seat the hook of the door facing down from the oven frame completely towards and into this position just before replacing the oven light bulb. See Figure 3). 4. With the oven door in place. 2. See Figure 3). 2. Fully open Figure 1 Figure 2 Oven door Hinge Figure 3...
Complete Owner's Guide (English)
Page 40
...under this warranty must be defective in materials or workmanship when such appliance is installed, used other than in ordinary household use of parts other cosmetic parts. 11. Product features or specifications as -is" are subject to another party or removed outside the USA or Canada. 3. ... not limited to , any after hour, weekend, or holiday service calls, tolls, ferry trip charges, or mileage expense for repairing or replacing any obligations under this warranty must be readily determined. 2. Damages caused by: services performed by Electrolux Canada Corp. For one year from ...
...under this warranty must be defective in materials or workmanship when such appliance is installed, used other than in ordinary household use of parts other cosmetic parts. 11. Product features or specifications as -is" are subject to another party or removed outside the USA or Canada. 3. ... not limited to , any after hour, weekend, or holiday service calls, tolls, ferry trip charges, or mileage expense for repairing or replacing any obligations under this warranty must be readily determined. 2. Damages caused by: services performed by Electrolux Canada Corp. For one year from ...

