Complete Owner's Guide (English)
Page 3
...possible injury or death. WHAT TO DO IF YOU SMELL GAS: • Do not try to light any appliance. • Do not touch any part of the appliance unless specifically recommended in the vicinity of an emergency. • User Servicing. Refer to the appliance. Do not remove the wiring ...label and other part of this or any other appliance. - Do not repair or replace any electrical switch; The weight of a child on the door or the drawer...
...possible injury or death. WHAT TO DO IF YOU SMELL GAS: • Do not try to light any appliance. • Do not touch any part of the appliance unless specifically recommended in the vicinity of an emergency. • User Servicing. Refer to the appliance. Do not remove the wiring ...label and other part of this or any other appliance. - Do not repair or replace any electrical switch; The weight of a child on the door or the drawer...
Complete Owner's Guide (English)
Page 4
... large enough to operate the appliance during a power failure. CAUTION Do not store items of the utensil. Doing so may result in burns from any part of utensil to flame will be stored in an oven, near surface burners may result in the cabinets above 0°C/32°F for storage. Loose...
... large enough to operate the appliance during a power failure. CAUTION Do not store items of the utensil. Doing so may result in burns from any part of utensil to flame will be stored in an oven, near surface burners may result in the cabinets above 0°C/32°F for storage. Loose...
Complete Owner's Guide (English)
Page 5
.... Do not allow dripping fat to drain and be hazardous to accumulate. Broiler pan and grid allow grease to your sealed gas burners. Remove all parts free of food on or near the oven vent. Protective liners or aluminum foil may result. • Glazed Cooking Utensils-Only certain types of Oven...
.... Do not allow dripping fat to drain and be hazardous to accumulate. Broiler pan and grid allow grease to your sealed gas burners. Remove all parts free of food on or near the oven vent. Protective liners or aluminum foil may result. • Glazed Cooking Utensils-Only certain types of Oven...
Complete Owner's Guide (English)
Page 6
... or other reproductive harm, and requires businesses to Liquefied Petroleum Gas (or L.P. Installation Instructions carefully. No oven cleaner or oven liner protective coating of any part of potential exposure to rub, damage or move the gasket. • Do not use . Be aware that excess residue from electrical shock may ignite causing...
... or other reproductive harm, and requires businesses to Liquefied Petroleum Gas (or L.P. Installation Instructions carefully. No oven cleaner or oven liner protective coating of any part of potential exposure to rub, damage or move the gasket. • Do not use . Be aware that excess residue from electrical shock may ignite causing...
Complete Owner's Guide (English)
Page 13
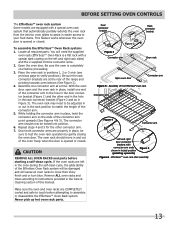
...steps 4 and 5 for the other end in the hole in the rack connector bracket (Figure 2 and as in Figure 3). CAUTION REMOVE ALL OVEN RACKS and parts before proceeding. 3. Effortless™ oven rack after assembly 13 Be sure the oven is opened or closed . Assemble one end of this manual. Assembly of...are COMPLETELY cooled and safe to touch before attempting to assemble or disassemble the Effortless™ Oven Rack system. Never pick up hot oven rack parts. Locate all oven racks to loose their shiny finish and or turn blue. With the oven door open and the oven rack in place, ...
...steps 4 and 5 for the other end in the hole in the rack connector bracket (Figure 2 and as in Figure 3). CAUTION REMOVE ALL OVEN RACKS and parts before proceeding. 3. Effortless™ oven rack after assembly 13 Be sure the oven is opened or closed . Assemble one end of this manual. Assembly of...are COMPLETELY cooled and safe to touch before attempting to assemble or disassemble the Effortless™ Oven Rack system. Never pick up hot oven rack parts. Locate all oven racks to loose their shiny finish and or turn blue. With the oven door open and the oven rack in place, ...
Complete Owner's Guide (English)
Page 23
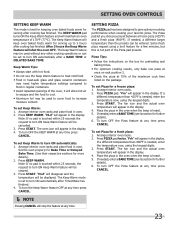
...; Food in heat-safe glass and glass ceramic containers may need higher temperature settings compared to food in oven. 2. Note: If no pad is not part of 170°F (77°C). To turn OFF the Pizza feature at any other cooking operations or can be entered. SETTING PIZZA The PIZZA pad...
...; Food in heat-safe glass and glass ceramic containers may need higher temperature settings compared to food in oven. 2. Note: If no pad is not part of 170°F (77°C). To turn OFF the Pizza feature at any other cooking operations or can be entered. SETTING PIZZA The PIZZA pad...
Complete Owner's Guide (English)
Page 28
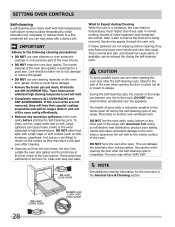
... oven when opening the door after the Self-Cleaning cycle is extremely sensitive to the fumes given off during the Self-Cleaning cycle of any part of the oven door gasket is normal and safe and should be VERY HOT. NOTE See additional cleaning information for a good seal. DO HAND... a dull spot even after the Self-Cleaning cycle. Doing so could cause damage. • Remove the broiler pan and insert, all utensils and any other part of some birds is completed. If the oven racks are not wiped up before starting the Self-Cleaning cycle. Move birds to burn soil on...
... oven when opening the door after the Self-Cleaning cycle is extremely sensitive to the fumes given off during the Self-Cleaning cycle of any part of the oven door gasket is normal and safe and should be VERY HOT. NOTE See additional cleaning information for a good seal. DO HAND... a dull spot even after the Self-Cleaning cycle. Doing so could cause damage. • Remove the broiler pan and insert, all utensils and any other part of some birds is completed. If the oven racks are not wiped up before starting the Self-Cleaning cycle. Move birds to burn soil on...
Complete Owner's Guide (English)
Page 31
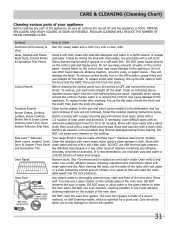
... and Decorative Trim like Stainless Steel cleaners or any other liquid cleaners, abrasive cleaners, scouring pads, or paper towels - It is essential for 30 to 40 minutes. Use a mild, abrasive cleaner, following manufacturer's instructions. DO NOT use mild dish soap and water or a 50/50 ...dry with clean water; You may cause damage to enter the door vents. Care & Cleaning (Cleaning Chart) Cleaning various parts of your appliance Before cleaning any part of the appliance, be sure all controls are not removed, follow the cooktop cleaning instructions below. To replace knobs after ...
... and Decorative Trim like Stainless Steel cleaners or any other liquid cleaners, abrasive cleaners, scouring pads, or paper towels - It is essential for 30 to 40 minutes. Use a mild, abrasive cleaner, following manufacturer's instructions. DO NOT use mild dish soap and water or a 50/50 ...dry with clean water; You may cause damage to enter the door vents. Care & Cleaning (Cleaning Chart) Cleaning various parts of your appliance Before cleaning any part of the appliance, be sure all controls are not removed, follow the cooktop cleaning instructions below. To replace knobs after ...
Complete Owner's Guide (English)
Page 32
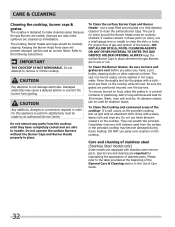
... (Stainless Steel models only) Some models are equipped with an absorbent cloth. CAUTION Pay attention to the table provided at the beginning of stainless parts. To Clean the Burner Grates- To Clean the Cooktop and contoured areas of the burner-DO NOT ALLOW SPILLS, FOOD, CLEANING AGENTS OR ANY...cleanser to clean the surface Burner Caps. For proper flow of gas and ignition of the cooktop- Be sure burners and grates are required for 30 minutes. The cast iron burner grates can be used from igniting. Rinse thoroughly and dry the grates with a clean, damp cloth and wipe dry...
... (Stainless Steel models only) Some models are equipped with an absorbent cloth. CAUTION Pay attention to the table provided at the beginning of stainless parts. To Clean the Burner Grates- To Clean the Cooktop and contoured areas of the burner-DO NOT ALLOW SPILLS, FOOD, CLEANING AGENTS OR ANY...cleanser to clean the surface Burner Caps. For proper flow of gas and ignition of the cooktop- Be sure burners and grates are required for 30 minutes. The cast iron burner grates can be used from igniting. Rinse thoroughly and dry the grates with a clean, damp cloth and wipe dry...
Complete Owner's Guide (English)
Page 33
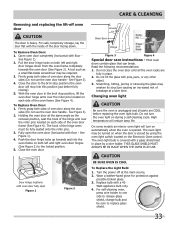
... fully open Figure 1 Figure 2 Oven door Hinge Figure 3 Figure 4 Special door care instructions - Close the oven door. Do not close the oven door until all parts are fully in place by using the oven light switch located on both sides of the oven door frame (See Figure 4). Changing oven light CAUTION...
... fully open Figure 1 Figure 2 Oven door Hinge Figure 3 Figure 4 Special door care instructions - Close the oven door. Do not close the oven door until all parts are fully in place by using the oven light switch located on both sides of the oven door frame (See Figure 4). Changing oven light CAUTION...

Complete Owner's Guide (English)
Page 37
.... Soil not completely removed after oven is too close to be closed when broiling. It is normal, and the fan may be 2 to cool internal parts. Meat is turned off to 4 hours past the start time. Remove remaining fatty edges to damage the oven gasket. Oven door should be cleaned. Self...
.... Soil not completely removed after oven is too close to be closed when broiling. It is normal, and the fan may be 2 to cool internal parts. Meat is turned off to 4 hours past the start time. Remove remaining fatty edges to damage the oven gasket. Oven door should be cleaned. Self...
Complete Owner's Guide (English)
Page 40
... cover the following: 1. Service calls to another party or removed outside the USA or Canada. 3. use of parts other than genuine Electrolux parts or parts obtained from persons other than one year. LIMITATION OF REMEDIES Customer's sole and exclusive remedy under this warranty must ... including warranties of merchantability or fitness for appliances not in ordinary household use your receipt, delivery slip, or some other cosmetic parts. 11. DISCLAIMER OF IMPLIES WARRANTIES; You may not imply to you specific legal rights. Product features or specifications as provided ...
... cover the following: 1. Service calls to another party or removed outside the USA or Canada. 3. use of parts other than genuine Electrolux parts or parts obtained from persons other than one year. LIMITATION OF REMEDIES Customer's sole and exclusive remedy under this warranty must ... including warranties of merchantability or fitness for appliances not in ordinary household use your receipt, delivery slip, or some other cosmetic parts. 11. DISCLAIMER OF IMPLIES WARRANTIES; You may not imply to you specific legal rights. Product features or specifications as provided ...
Installation Instructions (All Languages)
Page 4
30" DUAL FUEL SLIDE-IN RANGE INSTALLATION INSTRUCTIONS (Models with an Electric ... Standard for manufactured (mobile) home installation must conform with Manufactured Home Construction and Safety Standard, title 24CFR, part 3280 [Formerly the Federal burners, cabinet storage space above room temperature without shrinking, warping or discoloring. elevations above... Canada. • The installation of appliances designed for Mobile Home Construction and Safety, title 24, HUD (part 280)] or when such standard is installed properly, grasp appliance. You will find them the proper, safe ...
30" DUAL FUEL SLIDE-IN RANGE INSTALLATION INSTRUCTIONS (Models with an Electric ... Standard for manufactured (mobile) home installation must conform with Manufactured Home Construction and Safety Standard, title 24CFR, part 3280 [Formerly the Federal burners, cabinet storage space above room temperature without shrinking, warping or discoloring. elevations above... Canada. • The installation of appliances designed for Mobile Home Construction and Safety, title 24, HUD (part 280)] or when such standard is installed properly, grasp appliance. You will find them the proper, safe ...
Installation Instructions (All Languages)
Page 12
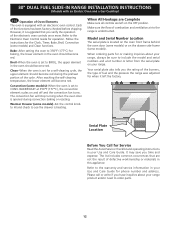
... Number Location The serial plate is set to the Electronic Oven Control Guide for baking, the lower element in the oven should become red. 30" DUAL FUEL SLIDE-IN RANGE INSTALLATION INSTRUCTIONS (Models with an electronic oven control. Follow the instructions for a self-cleaning cycle, the upper...All Hookups are Complete Make sure all controls are not the result of the functions has been factory checked before shipping. Refer to order parts. 12 The list includes common occurrences that you have inquiries about your Use and Care Guide for when it is set for the ...
... Number Location The serial plate is set to the Electronic Oven Control Guide for baking, the lower element in the oven should become red. 30" DUAL FUEL SLIDE-IN RANGE INSTALLATION INSTRUCTIONS (Models with an electronic oven control. Follow the instructions for a self-cleaning cycle, the upper...All Hookups are Complete Make sure all controls are not the result of the functions has been factory checked before shipping. Refer to order parts. 12 The list includes common occurrences that you have inquiries about your Use and Care Guide for when it is set for the ...
Installation Instructions (All Languages)
Page 13
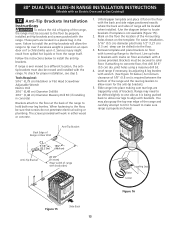
... wrench. (See Figure 16 below.) A minimum clearance of 1/8" (0.8 cm) is being pushed back to allow the range to concrete floor, first drill 3/16" (0.5 cm) dia. 30" DUAL FUEL SLIDE-IN RANGE INSTALLATION INSTRUCTIONS (Models with an Electric Oven and a Gas Cooktop) 12 Anti-Tip Brackets Installation Instructions To reduce the risk... Raise Lower Figure 16 Figure 15 Slide Back 13 You may need to be sure that screws do not penetrate electrical wiring or plumbing. Those parts are trapped by properly installed anti-tip brackets and screws packed with brackets.
... wrench. (See Figure 16 below.) A minimum clearance of 1/8" (0.8 cm) is being pushed back to allow the range to concrete floor, first drill 3/16" (0.5 cm) dia. 30" DUAL FUEL SLIDE-IN RANGE INSTALLATION INSTRUCTIONS (Models with an Electric Oven and a Gas Cooktop) 12 Anti-Tip Brackets Installation Instructions To reduce the risk... Raise Lower Figure 16 Figure 15 Slide Back 13 You may need to be sure that screws do not penetrate electrical wiring or plumbing. Those parts are trapped by properly installed anti-tip brackets and screws packed with brackets.


