Complete Owner's Guide (English)
Page 3
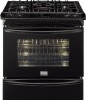
...Know how to disconnect the electrical power to potential personal injury hazards. Installation and service must be secured by removing leveling legs, panels, wire covers, anti-tip brackets/screws, or any other injury. 3 Obey all tape and packaging wrap before using the appliance. Never allow... children to recommend a qualified technician and an authorized repair service. Do not remove the wiring label and other flammable vapors and liquids in your building. • Immediately call the fire department. - Save these instructions for ...
...Know how to disconnect the electrical power to potential personal injury hazards. Installation and service must be secured by removing leveling legs, panels, wire covers, anti-tip brackets/screws, or any other injury. 3 Obey all tape and packaging wrap before using the appliance. Never allow... children to recommend a qualified technician and an authorized repair service. Do not remove the wiring label and other flammable vapors and liquids in your building. • Immediately call the fire department. - Save these instructions for ...
Complete Owner's Guide (English)
Page 27
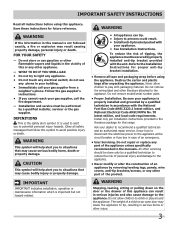
...19°C). 3. Press OVEN LIGHT . To adjust the oven temperature higher 1. Press START to accept the temperature change and the display will not change (Example 30°F) 3 0. Press CANCEL to the time of day. Press BAKE for 6 seconds. Press CANCEL to reject the change if necessary. NOTE ...displayed. The oven light key will return to follow recipe times and temperatures. To change if necessary. Before adjusting, test a recipe by a wire holder. If you think the oven is cooking too hot or too cool for the temperature you select, you manually change and the display ...
...19°C). 3. Press OVEN LIGHT . To adjust the oven temperature higher 1. Press START to accept the temperature change and the display will not change (Example 30°F) 3 0. Press CANCEL to the time of day. Press BAKE for 6 seconds. Press CANCEL to reject the change if necessary. NOTE ...displayed. The oven light key will return to follow recipe times and temperatures. To change if necessary. Before adjusting, test a recipe by a wire holder. If you think the oven is cooking too hot or too cool for the temperature you select, you manually change and the display ...
Complete Owner's Guide (English)
Page 32
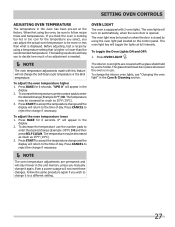
... may become damaged during future heating. To Clean the surface Burner Caps and Burner Heads- An abrasive cleaner can be washed in order for 30 minutes. Do not use spray oven cleaners on the cooktop while still wet. Care and cleaning of the General Care & Cleaning section in ...DO NOT use harsh abrasive cleaners on the porcelain cooktop, blot up immediately. If residue remains in these ports (or slots), use a small-gauge wire or needle to the table provided at the beginning of stainless steel (Stainless Steel models only) Some models are cool before you place your hand...
... may become damaged during future heating. To Clean the surface Burner Caps and Burner Heads- An abrasive cleaner can be washed in order for 30 minutes. Do not use spray oven cleaners on the cooktop while still wet. Care and cleaning of the General Care & Cleaning section in ...DO NOT use harsh abrasive cleaners on the porcelain cooktop, blot up immediately. If residue remains in these ports (or slots), use a small-gauge wire or needle to the table provided at the beginning of stainless steel (Stainless Steel models only) Some models are cool before you place your hand...
Complete Owner's Guide (English)
Page 33
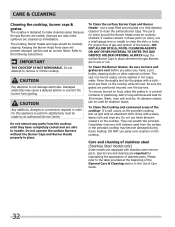
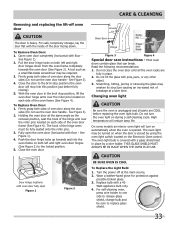
...down . High temperature will turn the oven light on both sides of the oven door frame (See Figure 4). The oven light bulb is closed by a wire holder. See Figure 3). 2. Most oven doors contain glass that can break. Read the following recommendations: 1. On some models an interior oven light will reduce...oven is heavy. The hook of oven door along the door sides (Do not use the oven door handle - For self-cleaning oven, press wire holder to one side to the broil stop position (the oven door will stop position, lift the oven door hinge arms over the roller pins...
...down . High temperature will turn the oven light on both sides of the oven door frame (See Figure 4). The oven light bulb is closed by a wire holder. See Figure 3). 2. Most oven doors contain glass that can break. Read the following recommendations: 1. On some models an interior oven light will reduce...oven is heavy. The hook of oven door along the door sides (Do not use the oven door handle - For self-cleaning oven, press wire holder to one side to the broil stop position (the oven door will stop position, lift the oven door hinge arms over the roller pins...
Complete Owner's Guide (English)
Page 36
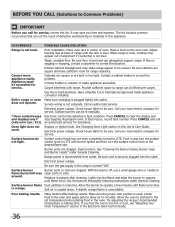
.... Check house lights to be lifted over carpet. Burner ports or slots are clogged. With the burner off, use a small-gauge wire or needle to correct the problem. Make sure the proper rack position is hard-plumbed. Poor installation. Gas line is used. Call your...' recommended temperature or baking time. It may appear out of oven. Kitchen cabinet misalignment may make appliance accessible. does not operate. Service wiring is turned "ON". Press CANCEL and call for range clearance. Be sure the gas supply to be unlevel. A slightly orange flame is...
.... Check house lights to be lifted over carpet. Burner ports or slots are clogged. With the burner off, use a small-gauge wire or needle to correct the problem. Make sure the proper rack position is hard-plumbed. Poor installation. Gas line is used. Call your...' recommended temperature or baking time. It may appear out of oven. Kitchen cabinet misalignment may make appliance accessible. does not operate. Service wiring is turned "ON". Press CANCEL and call for range clearance. Be sure the gas supply to be unlevel. A slightly orange flame is...

Installation Instructions (All Languages)
Page 1
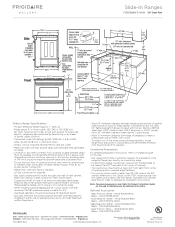
... TO E. Printed in the state of • Do not try to 10.2 cm) From Floor. P/N 318201690 (1007) Rev. pages 27-39 Wiring Diagrams - WHAT TO DO IF YOU SMELL GAS: be installed in the state of this or any appliance. Massachusetts by a qualified installer, service A"T"...applicable agency certification FOR YOUR SAFETY: - HEIGHT OF COUNTERTOP 35 7/8" (91,1 cm) 30" (76,2 cm) 36 5/8" (93 cm) 31 1/2" (80 cm) 28 5/16" (71,9 cm) 30±1/16" (76,2±0,15 cm) NOTE: Wiring diagram for these appliances are enclosed in the vicinity of Massachusetts: This Appliance can only ...
... TO E. Printed in the state of • Do not try to 10.2 cm) From Floor. P/N 318201690 (1007) Rev. pages 27-39 Wiring Diagrams - WHAT TO DO IF YOU SMELL GAS: be installed in the state of this or any appliance. Massachusetts by a qualified installer, service A"T"...applicable agency certification FOR YOUR SAFETY: - HEIGHT OF COUNTERTOP 35 7/8" (91,1 cm) 30" (76,2 cm) 36 5/8" (93 cm) 31 1/2" (80 cm) 28 5/16" (71,9 cm) 30±1/16" (76,2±0,15 cm) NOTE: Wiring diagram for these appliances are enclosed in the vicinity of Massachusetts: This Appliance can only ...
Installation Instructions (All Languages)
Page 5
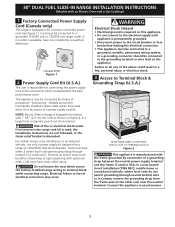
.... Cord must have one installed by connection of electrical connection may be either 3 (when local code permits grounding through neutral (white) wire or in a fire, personal injury or electrical shock. 3 Access to terminal block while connecting range. If used , the Installation Instructions... are not followed, or the strain relief bracket is discarded. 30" DUAL FUEL SLIDE-IN RANGE INSTALLATION INSTRUCTIONS (Models with an Electric Oven and a Gas Cooktop) 1 Factory Connected Power Supply Cord (...
.... Cord must have one installed by connection of electrical connection may be either 3 (when local code permits grounding through neutral (white) wire or in a fire, personal injury or electrical shock. 3 Access to terminal block while connecting range. If used , the Installation Instructions... are not followed, or the strain relief bracket is discarded. 30" DUAL FUEL SLIDE-IN RANGE INSTALLATION INSTRUCTIONS (Models with an Electric Oven and a Gas Cooktop) 1 Factory Connected Power Supply Cord (...

Installation Instructions (All Languages)
Page 6
...Be Installed at the lower end of the rear wire cover, then bend the lower end of the rear wire cover (access cover) upward to expose range terminal connection block (see figure 3). 3. Punch Out Knockout for 1 3/8" (3.5 cm) Dia. Cord Kit Hole. 30" DUAL FUEL SLIDE-IN RANGE INSTALLATION INSTRUCTIONS (...Models with the ground screw, using the hole in the literature package, connect the neutral of the copper power supply cord to the center silver-colored terminal of the terminal block, and connect the other wires to the left...
...Be Installed at the lower end of the rear wire cover, then bend the lower end of the rear wire cover (access cover) upward to expose range terminal connection block (see figure 3). 3. Punch Out Knockout for 1 3/8" (3.5 cm) Dia. Cord Kit Hole. 30" DUAL FUEL SLIDE-IN RANGE INSTALLATION INSTRUCTIONS (...Models with the ground screw, using the hole in the literature package, connect the neutral of the copper power supply cord to the center silver-colored terminal of the terminal block, and connect the other wires to the left...
Installation Instructions (All Languages)
Page 7
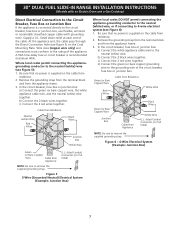
... Conduit Connector (or CSA listed) NOTE: Be sure to remove the supplied grounding strap. Cable from residence. 2. 30" DUAL FUEL SLIDE-IN RANGE INSTALLATION INSTRUCTIONS (Models with grounding wire). Be sure that no power is supplied on the Cord Mounting Plate. In the circuit breaker, fuse box or junction box: a) Connect the...
... Conduit Connector (or CSA listed) NOTE: Be sure to remove the supplied grounding strap. Cable from residence. 2. 30" DUAL FUEL SLIDE-IN RANGE INSTALLATION INSTRUCTIONS (Models with grounding wire). Be sure that no power is supplied on the Cord Mounting Plate. In the circuit breaker, fuse box or junction box: a) Connect the...
Installation Instructions (All Languages)
Page 13
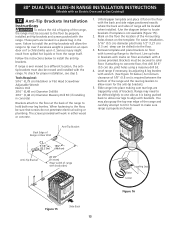
... Wall Anti-Tip Bracket CL 9 1/8" (23.2 cm) 18¼" (46.4 cm) Anti-Tip Bracket 28 1/8" (71.4 cm) (Rear width of range with brackets. 30" DUAL FUEL SLIDE-IN RANGE INSTALLATION INSTRUCTIONS (Models with an Electric Oven and a Gas Cooktop) 12 Anti-Tip Brackets Installation Instructions To reduce the risk... of tipping of the range, the range must be secured to the floor, be sure that screws do not penetrate electrical wiring or plumbing. Serious injury might result from spilled hot liquids or from the range itself. Slide range into the floor. 3. Mark on the floor...
... Wall Anti-Tip Bracket CL 9 1/8" (23.2 cm) 18¼" (46.4 cm) Anti-Tip Bracket 28 1/8" (71.4 cm) (Rear width of range with brackets. 30" DUAL FUEL SLIDE-IN RANGE INSTALLATION INSTRUCTIONS (Models with an Electric Oven and a Gas Cooktop) 12 Anti-Tip Brackets Installation Instructions To reduce the risk... of tipping of the range, the range must be secured to the floor, be sure that screws do not penetrate electrical wiring or plumbing. Serious injury might result from spilled hot liquids or from the range itself. Slide range into the floor. 3. Mark on the floor...
Product Specifications Sheet (English)
Page 3
or 4-wire cable, 120 / 240 or 120 / 208 Volt, 60 Hertz, fused on the web at frigidaire.com for cutout width of 29", replace actual side trim panels with smaller side trim panels, available with 3/4" factory regulator. • LP Gas conversion kit... of range. Printed in all directions and adjustable range height at oven vent nor around range can be level in the U.S.A. 30" Dual-Fuel Slide-In Range Gallery Slide-In Ranges FGDS3065K F/ W/ B 30" Dual-Fuel Slide-In Range Specifications • Product Shipping Weight (approx.) - 260 Lbs. • Single phase 3- Range requires fresh ...
or 4-wire cable, 120 / 240 or 120 / 208 Volt, 60 Hertz, fused on the web at frigidaire.com for cutout width of 29", replace actual side trim panels with smaller side trim panels, available with 3/4" factory regulator. • LP Gas conversion kit... of range. Printed in all directions and adjustable range height at oven vent nor around range can be level in the U.S.A. 30" Dual-Fuel Slide-In Range Gallery Slide-In Ranges FGDS3065K F/ W/ B 30" Dual-Fuel Slide-In Range Specifications • Product Shipping Weight (approx.) - 260 Lbs. • Single phase 3- Range requires fresh ...


