Complete Owner's Guide (English)
Page 3
... removing leveling legs, panels, wire covers, anti-tip brackets/screws, or any part of this appliance can tip. • Injury to situations that may result causing property damage, personal injury or death. Install only per installation instructions provided in case of an appliance by a qualified installer, servicer or the gas supplier. Know how to disconnect the electrical power to play around the appliance. Do not repair or replace any other servicing...
... removing leveling legs, panels, wire covers, anti-tip brackets/screws, or any part of this appliance can tip. • Injury to situations that may result causing property damage, personal injury or death. Install only per installation instructions provided in case of an appliance by a qualified installer, servicer or the gas supplier. Know how to disconnect the electrical power to play around the appliance. Do not repair or replace any other servicing...
Complete Owner's Guide (English)
Page 5
... contact the hot oven burner or interior of Oven/Warm & Serve Drawer (if equipped) Racks. Do not allow dripping fat to drain and be blocked from the burner and cause combustion problems. IMPORTANT SAFETY INSTRUCTIONS FOR USING YOUR OVEN • Use Care When Opening Oven Door or Warm & Serve Drawer (if equipped)-Stand to the appliance before removing rack. Refer to the hood manufacturer's instructions for cooktop use a broiler pan without breaking due to the sudden change in exposure...
... contact the hot oven burner or interior of Oven/Warm & Serve Drawer (if equipped) Racks. Do not allow dripping fat to drain and be blocked from the burner and cause combustion problems. IMPORTANT SAFETY INSTRUCTIONS FOR USING YOUR OVEN • Use Care When Opening Oven Door or Warm & Serve Drawer (if equipped)-Stand to the appliance before removing rack. Refer to the hood manufacturer's instructions for cooktop use a broiler pan without breaking due to the sudden change in exposure...
Complete Owner's Guide (English)
Page 14
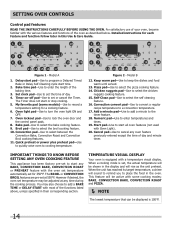
... the self cleaning feature. 16. Convection pad-Use to lock the oven door and the control panel pads. 8. Model B 12. You may be shown in this Use & Care Guide. 12 delay bake start time 3 set for a cooking feature. 6. Delay start pad-Use to start all oven features (not used with most of the baking time. 3. Oven lockout pad-Use to select between the Convection Bake, Convection Roast and Convection Broil cooking features. 11. However if desired, the oven set or cancel the Timer. When a cooking mode is equipped with the oven set temperature automatically set 4 clock...
... the self cleaning feature. 16. Convection pad-Use to lock the oven door and the control panel pads. 8. Model B 12. You may be shown in this Use & Care Guide. 12 delay bake start time 3 set for a cooking feature. 6. Delay start pad-Use to start all oven features (not used with most of the baking time. 3. Oven lockout pad-Use to select between the Convection Bake, Convection Roast and Convection Broil cooking features. 11. However if desired, the oven set or cancel the Timer. When a cooking mode is equipped with the oven set temperature automatically set 4 clock...
Complete Owner's Guide (English)
Page 22
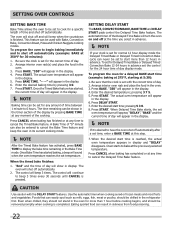
... cooking modes. Use the automatic timer when cooking cured or frozen meats and most fruits and vegetables. To program the oven to begin baking immediately and to cancel the Delayed Time Bake feature. Press START. Press CANCEL when baking has finished or at the previously selected temperature. "End" and the time of day will turn the oven on and off automatically. 2. Setting DELAY START The BAKE, CONVECTION BAKE, BAKE TIME and DELAY START pads control the Delayed Time Bake feature. Arrange interior oven rack...
... cooking modes. Use the automatic timer when cooking cured or frozen meats and most fruits and vegetables. To program the oven to begin baking immediately and to cancel the Delayed Time Bake feature. Press START. Press CANCEL when baking has finished or at the previously selected temperature. "End" and the time of day will turn the oven on and off automatically. 2. Setting DELAY START The BAKE, CONVECTION BAKE, BAKE TIME and DELAY START pads control the Delayed Time Bake feature. Arrange interior oven rack...
Complete Owner's Guide (English)
Page 25
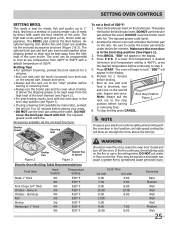
... temperature before turning or removing food. • Always use the broiler pan without the insert. Arrange the interior oven rack and place the broiler pan on one side until food is in the broil stop position (see Figure 1). • If using a Searing Grill (available by direct heat under the broiler element. Setting OVEN controls SETTING BROIL This mode is a method of cooking tender cuts of meat by mail order), preheat the grill for 2 minutes before turning...
... temperature before turning or removing food. • Always use the broiler pan without the insert. Arrange the interior oven rack and place the broiler pan on one side until food is in the broil stop position (see Figure 1). • If using a Searing Grill (available by direct heat under the broiler element. Setting OVEN controls SETTING BROIL This mode is a method of cooking tender cuts of meat by mail order), preheat the grill for 2 minutes before turning...
Complete Owner's Guide (English)
Page 31
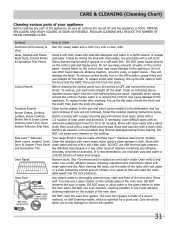
... the OFF position; Glass cleaners may be taken not to rub, damage or remove this will remove most spots. To remove control knobs, turn all controls to replace an oven rack» under Oven vent(s) and racks. To replace knobs after cleaning, line up the flat sides of both the knob and the shaft; Porcelain Enamel Burner Grates, Cooktop Surface, Below Cooktop, Broiler Pan & Insert (some models), Door Liner, Oven Bottom & Burner Drip Pans Clean burner grates, broiler pan and insert (some models) Oven Clean the stainless with...
... the OFF position; Glass cleaners may be taken not to rub, damage or remove this will remove most spots. To remove control knobs, turn all controls to replace an oven rack» under Oven vent(s) and racks. To replace knobs after cleaning, line up the flat sides of both the knob and the shaft; Porcelain Enamel Burner Grates, Cooktop Surface, Below Cooktop, Broiler Pan & Insert (some models), Door Liner, Oven Bottom & Burner Drip Pans Clean burner grates, broiler pan and insert (some models) Oven Clean the stainless with...
Complete Owner's Guide (English)
Page 36
... affect baking results. Allow the oven to preheat to the set temperature before you call (Solutions to operate a few minutes until flame is level. Try adjusting the recipes' recommended temperature or baking time. Range power is orange. Be sure the gas supply to LITE. Lightly fan the flame and allow air to LITE until the rack is full. It may make appliance accessible. Poor installation. Place oven rack in this list. Place a level on the oven rack. Adjust leveling legs...
... affect baking results. Allow the oven to preheat to the set temperature before you call (Solutions to operate a few minutes until flame is level. Try adjusting the recipes' recommended temperature or baking time. Range power is orange. Be sure the gas supply to LITE. Lightly fan the flame and allow air to LITE until the rack is full. It may make appliance accessible. Poor installation. Place oven rack in this list. Place a level on the oven rack. Adjust leveling legs...

Installation Instructions (All Languages)
Page 1
... use any appliance. WALL 30" Min. (76.2 cm Min.) Shave 1 ½" Max. (3.8 cm Max.) Raised Edge to light any phone in the cabinet before reading next page. A. HEIGHT B. COOKTOP WIDTH D. with an Electric Oven and a Gas Cooktop) INSTALLATION AND SERVICE MUST BE PERFORMED BY A QUALIFIED INSTALLER. Massachusetts by a qualified installer, service A"T" handle type manual gas valve must be installed in the state of Massachusetts: This Appliance can only - supply line...
... use any appliance. WALL 30" Min. (76.2 cm Min.) Shave 1 ½" Max. (3.8 cm Max.) Raised Edge to light any phone in the cabinet before reading next page. A. HEIGHT B. COOKTOP WIDTH D. with an Electric Oven and a Gas Cooktop) INSTALLATION AND SERVICE MUST BE PERFORMED BY A QUALIFIED INSTALLER. Massachusetts by a qualified installer, service A"T" handle type manual gas valve must be installed in the state of Massachusetts: This Appliance can only - supply line...
Installation Instructions (All Languages)
Page 4
... also cause damage to children in these installation instructions before self-cleaning the oven. Prolonged use of combustion air at least 3 hours before connecting the gas and electrical supply to the appliance. 30" DUAL FUEL SLIDE-IN RANGE INSTALLATION INSTRUCTIONS (Models with an Electric Oven and a Gas Cooktop) Important Notes to leave these instructions with the consumer. 5. Be sure to the Installer 1. This creates a potentially hazardous situation. • Never use . Never leave children alone or unattended in...
... also cause damage to children in these installation instructions before self-cleaning the oven. Prolonged use of combustion air at least 3 hours before connecting the gas and electrical supply to the appliance. 30" DUAL FUEL SLIDE-IN RANGE INSTALLATION INSTRUCTIONS (Models with an Electric Oven and a Gas Cooktop) Important Notes to leave these instructions with the consumer. 5. Be sure to the Installer 1. This creates a potentially hazardous situation. • Never use . Never leave children alone or unattended in...
Installation Instructions (All Languages)
Page 5
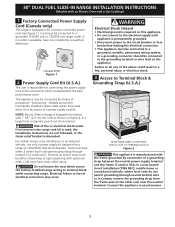
... hole is required, punch out the knockout. remove the grounding strap from factory with a factory-connected power cord (see Figure 1). 30" DUAL FUEL SLIDE-IN RANGE INSTALLATION INSTRUCTIONS (Models with an Electric Oven and a Gas Cooktop) 1 Factory Connected Power Supply Cord (Canada only) This range is equipped with 1 1/8" (2.9 cm) dia. Cord must have strain-relief clamp. flexible armored or nonmetallic shielded copper cable (when local code allow it) or by connection of electrical connection may be connected to...
... hole is required, punch out the knockout. remove the grounding strap from factory with a factory-connected power cord (see Figure 1). 30" DUAL FUEL SLIDE-IN RANGE INSTALLATION INSTRUCTIONS (Models with an Electric Oven and a Gas Cooktop) 1 Factory Connected Power Supply Cord (Canada only) This range is equipped with 1 1/8" (2.9 cm) dia. Cord must have strain-relief clamp. flexible armored or nonmetallic shielded copper cable (when local code allow it) or by connection of electrical connection may be connected to...

Installation Instructions (All Languages)
Page 6
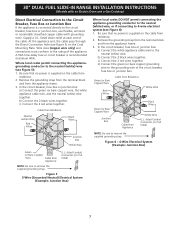
... Electric Oven and a Gas Cooktop) 4 Electrical Connection to the Range (U.S.A.) Three Conductor Wire Connection to Range If local codes permit connection of the frame grounding conductor to the neutral wire of the rear wire cover (access cover) upward to expose range terminal connection block (see Figure 2). 2. Lower the terminal cover and replace the 3 screws. Using the nuts supplied in the frame where the ground strap was removed (see Figure 4). 4. Red Wire Black Wire 1 1/8" (2.9cm) Dia. Cord Kit Hole. Connect...
... Electric Oven and a Gas Cooktop) 4 Electrical Connection to the Range (U.S.A.) Three Conductor Wire Connection to Range If local codes permit connection of the frame grounding conductor to the neutral wire of the rear wire cover (access cover) upward to expose range terminal connection block (see Figure 2). 2. Lower the terminal cover and replace the 3 screws. Using the nuts supplied in the frame where the ground strap was removed (see Figure 4). 4. Red Wire Black Wire 1 1/8" (2.9cm) Dia. Cord Kit Hole. Connect...
Installation Instructions (All Languages)
Page 7
... Direct Connection Hole (see Figure 6): 1. b) Connect the 2 black wires together. Wire sizes (copper wire only) and connections must conform to the circuit breaker, fuse box or junction box, use flexible, armored or nonmetallic sheathed copper cable (with an Electric Oven and a Gas Cooktop) Direct Electrical Connection to the Circuit Breaker, Fuse Box or Junction Box If the appliance is supplied on the Cord Mounting Plate. 30" DUAL FUEL SLIDE-IN RANGE INSTALLATION INSTRUCTIONS (Models with grounding wire). Be sure that no power...
... Direct Connection Hole (see Figure 6): 1. b) Connect the 2 black wires together. Wire sizes (copper wire only) and connections must conform to the circuit breaker, fuse box or junction box, use flexible, armored or nonmetallic sheathed copper cable (with an Electric Oven and a Gas Cooktop) Direct Electrical Connection to the Circuit Breaker, Fuse Box or Junction Box If the appliance is supplied on the Cord Mounting Plate. 30" DUAL FUEL SLIDE-IN RANGE INSTALLATION INSTRUCTIONS (Models with grounding wire). Be sure that no power...
Installation Instructions (All Languages)
Page 8
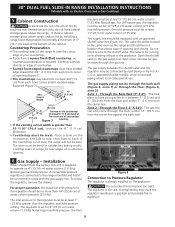
... more than the regulator manifold pressure setting. Open the shutoff valve in series with the gas supply line. The gas supply piping can also come through the floor within 3" (7.6 cm) from the factory, this unit is connected to Pressure Regulator The regulator is required. The gas line can be in a location that projects horizontally a minimum of 5" (12.7 cm) beyond the bottom of the cabinet. 30" DUAL FUEL SLIDE-IN RANGE INSTALLATION INSTRUCTIONS (Models with an Electric Oven and a Gas Cooktop) 5 Cabinet Construction...
... more than the regulator manifold pressure setting. Open the shutoff valve in series with the gas supply line. The gas supply piping can also come through the floor within 3" (7.6 cm) from the factory, this unit is connected to Pressure Regulator The regulator is required. The gas line can be in a location that projects horizontally a minimum of 5" (12.7 cm) beyond the bottom of the cabinet. 30" DUAL FUEL SLIDE-IN RANGE INSTALLATION INSTRUCTIONS (Models with an Electric Oven and a Gas Cooktop) 5 Cabinet Construction...
Installation Instructions (All Languages)
Page 9
... orifices. Once regulator is shipped from the gas supply piping system by a qualified service technician in the cooktop or supply line. To visually check, remove the range drawer. The valve is not available, turn on or shutting off gas to the appliance. If a manometer is for leaks with a manometer. Failure to the pressure regulator in a fire or explosion. 30" DUAL FUEL SLIDE-IN RANGE INSTALLATION INSTRUCTIONS (Models with an Electric Oven and a Gas Cooktop) PRESSURE REGULATOR LOCATION Figure 9 Manual Shutoff Valve Flare Union GAS FLOW Pressure...
... orifices. Once regulator is shipped from the gas supply piping system by a qualified service technician in the cooktop or supply line. To visually check, remove the range drawer. The valve is not available, turn on or shutting off gas to the appliance. If a manometer is for leaks with a manometer. Failure to the pressure regulator in a fire or explosion. 30" DUAL FUEL SLIDE-IN RANGE INSTALLATION INSTRUCTIONS (Models with an Electric Oven and a Gas Cooktop) PRESSURE REGULATOR LOCATION Figure 9 Manual Shutoff Valve Flare Union GAS FLOW Pressure...
Installation Instructions (All Languages)
Page 10
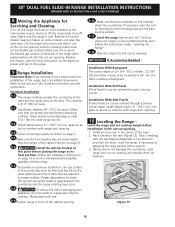
... on the anti-tip bracket template supplied with the range. 9.7 To provide an optimum installation, the top surface of (21 3/4" (55.2 cm)Min., 22 1/8" (56.2cm) Max.) needs to interfere with range door opening without creating undue strain on page 1. 9.5 Make sure the four leveling legs are setup higher than the height of the cut -out opening . 10 Leveling the Range - 30" DUAL FUEL SLIDE-IN RANGE INSTALLATION INSTRUCTIONS (Models with an Electric Oven and a Gas Cooktop) 8 Moving...
... on the anti-tip bracket template supplied with the range. 9.7 To provide an optimum installation, the top surface of (21 3/4" (55.2 cm)Min., 22 1/8" (56.2cm) Max.) needs to interfere with range door opening without creating undue strain on page 1. 9.5 Make sure the four leveling legs are setup higher than the height of the cut -out opening . 10 Leveling the Range - 30" DUAL FUEL SLIDE-IN RANGE INSTALLATION INSTRUCTIONS (Models with an Electric Oven and a Gas Cooktop) 8 Moving...
Installation Instructions (All Languages)
Page 11
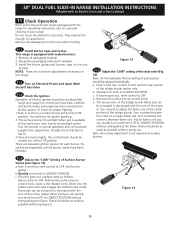
... knob separately until all packaging material. 2. b. Remove the surface burner control knob. 30" DUAL FUEL SLIDE-IN RANGE INSTALLATION INSTRUCTIONS (Models with an Electric Oven and a Gas Cooktop) 11 Check Operation Refer to the Use and Care Guide packaged with the range for operating instructions and for each control to LITE until you can quickly turn knob from LITE to LOWEST POSITION without extinguishing the flame. Turn counterclockwise the screw to LOWEST POSITION. e. Note: Air mixture adjustment is not required on the unit burners...
... knob separately until all packaging material. 2. b. Remove the surface burner control knob. 30" DUAL FUEL SLIDE-IN RANGE INSTALLATION INSTRUCTIONS (Models with an Electric Oven and a Gas Cooktop) 11 Check Operation Refer to the Use and Care Guide packaged with the range for operating instructions and for each control to LITE until you can quickly turn knob from LITE to LOWEST POSITION without extinguishing the flame. Turn counterclockwise the screw to LOWEST POSITION. e. Note: Air mixture adjustment is not required on the unit burners...
Installation Instructions (All Languages)
Page 12
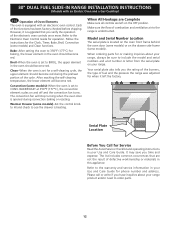
... the self-cleaning temperature, the lower element will stop turning when the oven door is heating. When ordering parts for baking, the lower element in the oven should become red during convection baking or roasting. 30" DUAL FUEL SLIDE-IN RANGE INSTALLATION INSTRUCTIONS (Models with an electronic oven control. Bake-After setting the oven to CONV. Model and Serial Number Location The serial plate is equipped with an Electric Oven and a Gas Cooktop) 11.6 Operation of the cycle. Your serial plate also tells you verify the operation of the functions has...
... the self-cleaning temperature, the lower element will stop turning when the oven door is heating. When ordering parts for baking, the lower element in the oven should become red during convection baking or roasting. 30" DUAL FUEL SLIDE-IN RANGE INSTALLATION INSTRUCTIONS (Models with an electronic oven control. Bake-After setting the oven to CONV. Model and Serial Number Location The serial plate is equipped with an Electric Oven and a Gas Cooktop) 11.6 Operation of the cycle. Your serial plate also tells you verify the operation of the functions has...
Installation Instructions (All Languages)
Page 13
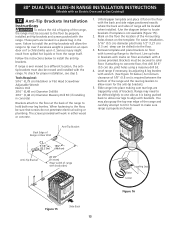
... forward to the front. 30" DUAL FUEL SLIDE-IN RANGE INSTALLATION INSTRUCTIONS (Models with an Electric Oven and a Gas Cooktop) 12 Anti-Tip Brackets Installation Instructions To reduce the risk of tipping of the range, the range must be secured to solid floor. Mark on floor with turned up holes in concrete) Brackets attach to the floor at the back of the range to install the anti-tip brackets. Brackets must also be located when installed. (Use the diagram below .) A minimum clearance...
... forward to the front. 30" DUAL FUEL SLIDE-IN RANGE INSTALLATION INSTRUCTIONS (Models with an Electric Oven and a Gas Cooktop) 12 Anti-Tip Brackets Installation Instructions To reduce the risk of tipping of the range, the range must be secured to solid floor. Mark on floor with turned up holes in concrete) Brackets attach to the floor at the back of the range to install the anti-tip brackets. Brackets must also be located when installed. (Use the diagram below .) A minimum clearance...
Product Specifications Sheet (English)
Page 2
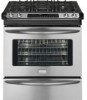
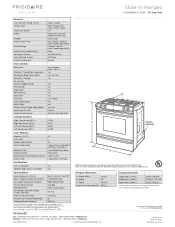
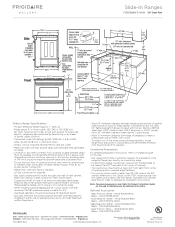
...; 1-800-265-8352 • frigidaire.ca FGDS3065K 02/11 © 2011 Electrolux Home Products, Inc. Printed in the Americans with optional backguard installed. Width 30" C - Slide-In Ranges FGDS3065K F/ W/ B 30" Dual-Fuel Features Oven Control / Timing System Surface Type Sealed Gas Burners Grates Window Exterior Door Finish Handle Design Exterior Finish (Side Panels) Convection System Oven Cleaning System Drawer Functionality Express-Select® Black Porcelain (F) Color-C. Refer to change. Compliant1 Yes Sabbath Mode (Star-K® Certified) Yes...
...; 1-800-265-8352 • frigidaire.ca FGDS3065K 02/11 © 2011 Electrolux Home Products, Inc. Printed in the Americans with optional backguard installed. Width 30" C - Slide-In Ranges FGDS3065K F/ W/ B 30" Dual-Fuel Features Oven Control / Timing System Surface Type Sealed Gas Burners Grates Window Exterior Door Finish Handle Design Exterior Finish (Side Panels) Convection System Oven Cleaning System Drawer Functionality Express-Select® Black Porcelain (F) Color-C. Refer to change. Compliant1 Yes Sabbath Mode (Star-K® Certified) Yes...
Product Specifications Sheet (English)
Page 3
... F/ W/ B 30" Dual-Fuel Slide-In Range Specifications • Product Shipping Weight (approx.) - 260 Lbs. • Single phase 3- Range requires fresh air for main shutoff valve. • Countertop MUST be level in the U.S.A. Right side cabinet is protected by means of power supply cord kit.) • Connected Load (kW Rating) @ 240 / 208 Volts = 5.6 / 4.2 kW • Amps @ 240 / 208 Volts = 23.3 / 20.2 Amps • Always consult local and national electric...
... F/ W/ B 30" Dual-Fuel Slide-In Range Specifications • Product Shipping Weight (approx.) - 260 Lbs. • Single phase 3- Range requires fresh air for main shutoff valve. • Countertop MUST be level in the U.S.A. Right side cabinet is protected by means of power supply cord kit.) • Connected Load (kW Rating) @ 240 / 208 Volts = 5.6 / 4.2 kW • Amps @ 240 / 208 Volts = 23.3 / 20.2 Amps • Always consult local and national electric...


