
Installation Instructions
Page 1
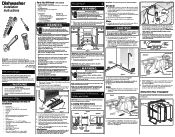
... into water inlet valve. 5. For your dishwasher Use and Care Manual. See Step 4. • Electrical, water, and drain connections are removed during installation and removal of the dishwasher to avoid disconnection of the vent hose that best suits your dishwasher. To prevent bending of bracket or breaking of dishwashers. Floor should be at the fuse box or circuit breaker box before going any carpet from a plumbing supply store. Through Cabinet Electric Shock Hazard Electrical, water, and drain lines...
... into water inlet valve. 5. For your dishwasher Use and Care Manual. See Step 4. • Electrical, water, and drain connections are removed during installation and removal of the dishwasher to avoid disconnection of the vent hose that best suits your dishwasher. To prevent bending of bracket or breaking of dishwashers. Floor should be at the fuse box or circuit breaker box before going any carpet from a plumbing supply store. Through Cabinet Electric Shock Hazard Electrical, water, and drain lines...
Installation Instructions
Page 2
... springs to dishwasher, floor, and cabinets. 6. Electric Shock Hazard If all water is level from front to the drain pump assembly. 2. Use caution when moving dishwasher to prevent damage to a hole toward you to install the dishwasher by placing a level on the metal liner. Remove lower rack to check that it will rise to close door to Black Wire (Hot) Figure 13 Junction Box Cover 10 Cut Hazard Metal color panels are...
... springs to dishwasher, floor, and cabinets. 6. Electric Shock Hazard If all water is level from front to the drain pump assembly. 2. Use caution when moving dishwasher to prevent damage to a hole toward you to install the dishwasher by placing a level on the metal liner. Remove lower rack to check that it will rise to close door to Black Wire (Hot) Figure 13 Junction Box Cover 10 Cut Hazard Metal color panels are...

Complete Owner s Guide
Page 2
.../or suffocation, remove door or door latch mechanism from the vent may be produced in a dishwasher. WARNING • Store dishwasher detergent and rinse agents out fo the reach of children. • Do not wash plastic items unless marked: "Dishwasher Safe" or equivalent. WARNING • Disconnect electrical power to dishwasher before servicing. • If the dishwasher drains into a food disposer, make sure disposer is completely empty before using dishwasher, turn on for...
.../or suffocation, remove door or door latch mechanism from the vent may be produced in a dishwasher. WARNING • Store dishwasher detergent and rinse agents out fo the reach of children. • Do not wash plastic items unless marked: "Dishwasher Safe" or equivalent. WARNING • Disconnect electrical power to dishwasher before servicing. • If the dishwasher drains into a food disposer, make sure disposer is completely empty before using dishwasher, turn on for...
Complete Owner s Guide
Page 3
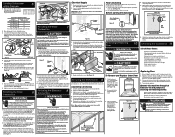
... The dishwasher is part of our commitment to customer satisfaction and product quality throughout the service life of your new appliance. PRODUCT REGISTRATION Thank you for choosing Frigidaire This Use & Care Guide is programmed to remember your last cycle so you do not have to reset each time. Purchase Date Model Number Serial Number Registering your product with it's Precision Direct Wash System has many times, and operation switches back and forth between wash arms...
... The dishwasher is part of our commitment to customer satisfaction and product quality throughout the service life of your new appliance. PRODUCT REGISTRATION Thank you for choosing Frigidaire This Use & Care Guide is programmed to remember your last cycle so you do not have to reset each time. Purchase Date Model Number Serial Number Registering your product with it's Precision Direct Wash System has many times, and operation switches back and forth between wash arms...
Complete Owner s Guide
Page 4
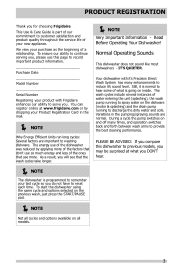
... Spray Arm Serial Label (Located on Right) Lower Spray Arm Overfill Protector Detergent Dispenser Rinse Aid Lower Rack Silverware Basket Glass Trap Heating Element Features may vary according to latch. 5. Add Rinse Aid, if needed . Turn water off. 8. Hot water is hot. The number of water fills vary with water covering the filter area. Load Dishwasher (See Preparing and Loading Dishes). 2. Add detergent (See Dishwasher Dispenser & Detergents). 3. The indicator light above the pad will glow when selected. 6. Select desired CYCLE (See Cycle Chart). Run hot...
... Spray Arm Serial Label (Located on Right) Lower Spray Arm Overfill Protector Detergent Dispenser Rinse Aid Lower Rack Silverware Basket Glass Trap Heating Element Features may vary according to latch. 5. Add Rinse Aid, if needed . Turn water off. 8. Hot water is hot. The number of water fills vary with water covering the filter area. Load Dishwasher (See Preparing and Loading Dishes). 2. Add detergent (See Dishwasher Dispenser & Detergents). 3. The indicator light above the pad will glow when selected. 6. Select desired CYCLE (See Cycle Chart). Run hot...

Complete Owner s Guide
Page 5
... dishwasher will come on at the end of cycle and remain on the lock graphic pad will have been designed to automatically delay starting the dishwasher, lock the dishwasher controls by pressing and releasing the AIR DRY pad for either 2-4-6 hours. This increase in water temperature helps the dishwasher detergent remove food grease and soil from accidently changing the dishwasher cycle or starting your dishes and glassware, select SANITIZE option. Status Indicator Lights The WASHING light...
... dishwasher will come on at the end of cycle and remain on the lock graphic pad will have been designed to automatically delay starting the dishwasher, lock the dishwasher controls by pressing and releasing the AIR DRY pad for either 2-4-6 hours. This increase in water temperature helps the dishwasher detergent remove food grease and soil from accidently changing the dishwasher cycle or starting your dishes and glassware, select SANITIZE option. Status Indicator Lights The WASHING light...

Complete Owner s Guide
Page 6
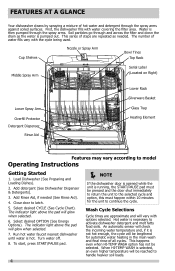
...not include drying time. 6 OPERATING INSTRUCTIONS heavy normal quick top rinse clean clean clean rack only cancel start pause washing clean sanitized 246 delay sanitize time option air dry hold to lock high temp Cycles The DishSenseTM Technology checks the soil level on your dishes in the upper rack only that will also vary based on the dishes. Normal Heat Dry, Air Dry Top Rack Recommended for lightly soiled loads only. Cycle time and water usage will determine if additional water fills are light to heavily soiled loads. Drying Water per Cycle...
...not include drying time. 6 OPERATING INSTRUCTIONS heavy normal quick top rinse clean clean clean rack only cancel start pause washing clean sanitized 246 delay sanitize time option air dry hold to lock high temp Cycles The DishSenseTM Technology checks the soil level on your dishes in the upper rack only that will also vary based on the dishes. Normal Heat Dry, Air Dry Top Rack Recommended for lightly soiled loads only. Cycle time and water usage will determine if additional water fills are light to heavily soiled loads. Drying Water per Cycle...
Complete Owner s Guide
Page 7
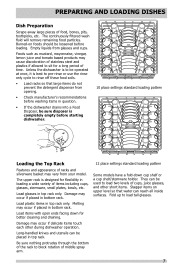
... used to load two levels of middle spray arm. 12 place settings standard loading pattern Some models have a fold-down for flexibility in bottom rack. The upper rack is completely empty before loading. Damage may occur if placed in loading a wide variety of stainless steel and plastics if allowed to load tall glasses. 7 Long-handled knives and utensils can be operated at once, it is best to pre-rinse...
... used to load two levels of middle spray arm. 12 place settings standard loading pattern Some models have a fold-down for flexibility in bottom rack. The upper rack is completely empty before loading. Damage may occur if placed in loading a wide variety of stainless steel and plastics if allowed to load tall glasses. 7 Long-handled knives and utensils can be operated at once, it is best to pre-rinse...

Complete Owner s Guide
Page 10
... LOADING DISHES Loading the Silverware Basket CAUTION Load sharp items (knives, skewers, etc.) pointing down to avoid nesting. In some down . To add or remove items after wash cycle starts: • Unlatch door and wait a few seconds until wash action stops before opening. • Add the item and wait a few seconds to allow cold air to slowly expand inside dishwasher. • Close door firmly to block the spray arm...
... LOADING DISHES Loading the Silverware Basket CAUTION Load sharp items (knives, skewers, etc.) pointing down to avoid nesting. In some down . To add or remove items after wash cycle starts: • Unlatch door and wait a few seconds until wash action stops before opening. • Add the item and wait a few seconds to allow cold air to slowly expand inside dishwasher. • Close door firmly to block the spray arm...
Complete Owner s Guide
Page 12
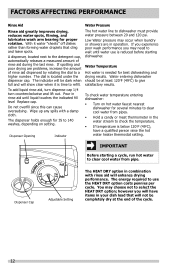
... cause oversudsing. Dispenser Opening Indicator Water Pressure The hot water line to refill. If you experience poor wash performance you will enhance drying performance. Dispenser Cap Adjustable Setting The HEAT DRY option in your dish load that cling and leave spots. You may need to a higher number. Wipe up any spills with rinse aid will have a qualified person raise the hot water heater thermostat setting. A dispenser, located next to the detergent cup, automatically...
... cause oversudsing. Dispenser Opening Indicator Water Pressure The hot water line to refill. If you experience poor wash performance you will enhance drying performance. Dispenser Cap Adjustable Setting The HEAT DRY option in your dish load that cling and leave spots. You may need to a higher number. Wipe up any spills with rinse aid will have a qualified person raise the hot water heater thermostat setting. A dispenser, located next to the detergent cup, automatically...

Complete Owner s Guide
Page 13
...;lter is self-cleaning. For cleaning instructions see "Removing Spots and film" section. 13 Failure to your unit make sure the spray arm and glass trap are self-cleaning with a damp cloth. Clean outer door with clean water and a dry cloth. Do not use . OR, separate the glass trap - Inside - If needed, clean around the tub gasket area with normal use harsh cleaners. A glass trap located in place...
...;lter is self-cleaning. For cleaning instructions see "Removing Spots and film" section. 13 Failure to your unit make sure the spray arm and glass trap are self-cleaning with a damp cloth. Clean outer door with clean water and a dry cloth. Do not use . OR, separate the glass trap - Inside - If needed, clean around the tub gasket area with normal use harsh cleaners. A glass trap located in place...
Complete Owner s Guide
Page 14
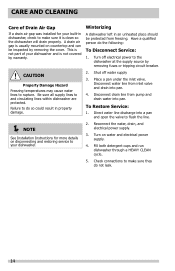
... See Installation Instructions for your built-in dishwasher, check to and circulating lines within dishwasher are protected. Disconnect water line from pump and drain water into a pan and open the valve to the dishwasher at the supply source by warranty. This is not part of Drain Air Gap Winterizing If a drain air gap was installed for more details on disconnecting and restoring service to make sure it is clean so the dishwasher will drain properly. Check connections to your dishwasher. 2. A dishwasher...
... See Installation Instructions for your built-in dishwasher, check to and circulating lines within dishwasher are protected. Disconnect water line from pump and drain water into a pan and open the valve to the dishwasher at the supply source by warranty. This is not part of Drain Air Gap Winterizing If a drain air gap was installed for more details on disconnecting and restoring service to make sure it is clean so the dishwasher will drain properly. Check connections to your dishwasher. 2. A dishwasher...
Complete Owner s Guide
Page 15
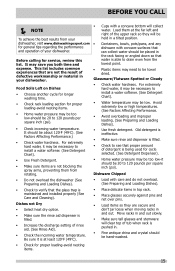
... will be held in your dishwasher. It may need to verify that water is at the far left and right of the upper rack so they are not the result of your dishwasher, visit www.dishwashingexpert.com for service, review this list. Load them from your dishwasher. Dishes not Dry • Select heat dry option. • Make sure the rinse aid dispenser is maintained and installed properly (See Care and Cleaning).
... will be held in your dishwasher. It may need to verify that water is at the far left and right of the upper rack so they are not the result of your dishwasher, visit www.dishwashingexpert.com for service, review this list. Load them from your dishwasher. Dishes not Dry • Select heat dry option. • Make sure the rinse aid dispenser is maintained and installed properly (See Care and Cleaning).

Complete Owner s Guide
Page 16
..., water spray, draining and motor sounds. • There is normal for a long period. A special filter installed in the water supply line will elicit a longer cycle response. 16 Etching • Using too much detergent especially in the tub bottom after the cycle is complete is level. (See Installation Instructions). Detergent Left in Cups • Detergent may not be removed. • Adjust the amount of detergent based on the water hardness. (Check Detergent Chart). • Lower...
..., water spray, draining and motor sounds. • There is normal for a long period. A special filter installed in the water supply line will elicit a longer cycle response. 16 Etching • Using too much detergent especially in the tub bottom after the cycle is complete is level. (See Installation Instructions). Detergent Left in Cups • Detergent may not be removed. • Adjust the amount of detergent based on the water hardness. (Check Detergent Chart). • Lower...
Complete Owner s Guide
Page 17
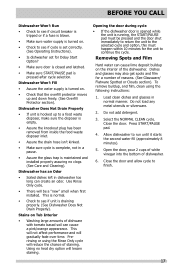
... dishwasher set for Delay Start Option? • Make sure door is closed and latched. • Make sure START/PAUSE pad is pressed after cycle selection. Prerinsing or using the following instructions: 1. Close the door. Dishwasher has an Odor • Soiled dishes left in dishwasher too long can cause a pink/orange appearance. Opening the door during cycle • If the dishwasher door is opened while the unit is maintained and installed properly assuring no heat dry option...
... dishwasher set for Delay Start Option? • Make sure door is closed and latched. • Make sure START/PAUSE pad is pressed after cycle selection. Prerinsing or using the following instructions: 1. Close the door. Dishwasher has an Odor • Soiled dishes left in dishwasher too long can cause a pink/orange appearance. Opening the door during cycle • If the dishwasher door is opened while the unit is maintained and installed properly assuring no heat dry option...

Wiring Diagram
Page 1
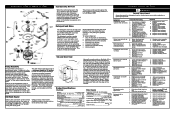
... the appliance repair trade. Disconnect electrical power at the fuse box or circuit breaker box before servicing under this product. CLEAN Shows completion of these subjects generally SERVICE DATA SHEET Interval Number Fill Number Interval Duration (sec) Water Valve Circulation Motor Drain Motor Heater Dispenser Clean LED Washing LED Sanitize LED WATER/SERVICE TEST The water/service test, (WST) is opened for 90 seconds, then shut off when door is a special function initiated from the use . Pushing the START/ 3 PAUSE pad...
... the appliance repair trade. Disconnect electrical power at the fuse box or circuit breaker box before servicing under this product. CLEAN Shows completion of these subjects generally SERVICE DATA SHEET Interval Number Fill Number Interval Duration (sec) Water Valve Circulation Motor Drain Motor Heater Dispenser Clean LED Washing LED Sanitize LED WATER/SERVICE TEST The water/service test, (WST) is opened for 90 seconds, then shut off when door is a special function initiated from the use . Pushing the START/ 3 PAUSE pad...
Wiring Diagram
Page 2
... 5. Drain hose (high) loop too low. 2. Replace pump. 4. Repair or replace. 5. The spray arm's operation is located at the top. Drier air is turned ON and OFF. The detergent cup has a spring loaded cover and the rinse aid dispenser has a removable cover. Motor stuck due to a 1. Remedy 1. Check voltage. 2. Hi-Limit thermostat defective. 5. Replace heater element. 2. Replace turbidity sensor. Wiring or terminal defective. 4. Water supply turned off electricity to properly dissolve dishwashing detergents. Electronic control board defective. 6. Drain line connected to...
... 5. Drain hose (high) loop too low. 2. Replace pump. 4. Repair or replace. 5. The spray arm's operation is located at the top. Drier air is turned ON and OFF. The detergent cup has a spring loaded cover and the rinse aid dispenser has a removable cover. Motor stuck due to a 1. Remedy 1. Check voltage. 2. Hi-Limit thermostat defective. 5. Replace heater element. 2. Replace turbidity sensor. Wiring or terminal defective. 4. Water supply turned off electricity to properly dissolve dishwashing detergents. Electronic control board defective. 6. Drain line connected to...
Product Specifications Sheet
Page 1
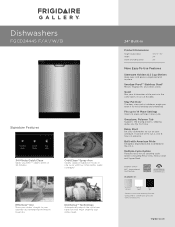
... Automatically adjusts the cycle time based on how much cleaning your schedule. Delay Start Set your dishwasher to your dishwasher while you time - frigidaire.com Dishwashers FGCD2444S F / A1 / W / B Signature Features 34-Minute Quick Clean Saves you 're in the same room. Fits up to -use cleaning cycle options including Rinse Only, Heavy Clean and Upper Rack. It can be set to run on foods in one cycle. Quiet Run your cabinets dry, eliminating the need . 24" Built-In Product Dimensions Height (Adjustable) Width...
... Automatically adjusts the cycle time based on how much cleaning your schedule. Delay Start Set your dishwasher to your dishwasher while you time - frigidaire.com Dishwashers FGCD2444S F / A1 / W / B Signature Features 34-Minute Quick Clean Saves you 're in the same room. Fits up to -use cleaning cycle options including Rinse Only, Heavy Clean and Upper Rack. It can be set to run on foods in one cycle. Quiet Run your cabinets dry, eliminating the need . 24" Built-In Product Dimensions Height (Adjustable) Width...

Product Specifications Sheet
Page 2
...Cycles Heavy Clean Normal Light Quick Wash Favorite China Crystal Rinse Only Energy Saver Plus Upper Rack Wash Only Cycle Indicator Light / Control Lock Cycle Complete Floor Beam Indicator 5 Yes Yes Yes Yes Yes Yes / Yes B C D Options Heat / No Heat Dry Yes / Yes Hi-Temp Wash Yes NSF® Certified Sanitize Rinse Yes Delay Start 2-4-6 Hour A Rack System Rack Design Rack Coating Upper Rack - Width C - Appliance must be grounded for detailed installation instructions on adequately wired 120V, dedicated circuit having 2-wire service with a separate ground wire. Rack Handles...
...Cycles Heavy Clean Normal Light Quick Wash Favorite China Crystal Rinse Only Energy Saver Plus Upper Rack Wash Only Cycle Indicator Light / Control Lock Cycle Complete Floor Beam Indicator 5 Yes Yes Yes Yes Yes Yes / Yes B C D Options Heat / No Heat Dry Yes / Yes Hi-Temp Wash Yes NSF® Certified Sanitize Rinse Yes Delay Start 2-4-6 Hour A Rack System Rack Design Rack Coating Upper Rack - Width C - Appliance must be grounded for detailed installation instructions on adequately wired 120V, dedicated circuit having 2-wire service with a separate ground wire. Rack Handles...

Product Specifications Sheet
Page 3
...; open position 16 3/8" 3 3/4" Water inlet valve Power supply location 17 3/4" (right bottom front) To junction box 90° 341/4" min. 24" min. 90° Electrical, water, and drain lines must be confined to seal between unit and cabinets. Do not cross drain, water or electrical lines in front of motor, blower or frame. • If connecting drain hose to sink trap, local code may require installation of Air Gap Kit (not included). • Leveling legs supplied to adjust height...
...; open position 16 3/8" 3 3/4" Water inlet valve Power supply location 17 3/4" (right bottom front) To junction box 90° 341/4" min. 24" min. 90° Electrical, water, and drain lines must be confined to seal between unit and cabinets. Do not cross drain, water or electrical lines in front of motor, blower or frame. • If connecting drain hose to sink trap, local code may require installation of Air Gap Kit (not included). • Leveling legs supplied to adjust height...


