
Use and Care Manual
Page 1
... Safety Instructions 3-4 Grounding Instructions 4 Liquefied Petroleum (Propane) Gas Conversion 5 Flame Size 5 Proper Burner Adjustment 5 Setting Surface Control Venturi (open) Burner Models 6 Sealed Burner Models 6 Electric Ignition 6 Selecting Surface Cooking Utensils 7 Specialty Pans & Trivets 7 Canning Tips & Information 8 General Cleaning Cleaning Various Parts of your Cooktop 9 Venturi (open) Burner Models 10 Sealed Burner Models 11-14 Avoid Service Checklist 15 Warranty...
... Safety Instructions 3-4 Grounding Instructions 4 Liquefied Petroleum (Propane) Gas Conversion 5 Flame Size 5 Proper Burner Adjustment 5 Setting Surface Control Venturi (open) Burner Models 6 Sealed Burner Models 6 Electric Ignition 6 Selecting Surface Cooking Utensils 7 Specialty Pans & Trivets 7 Canning Tips & Information 8 General Cleaning Cleaning Various Parts of your Cooktop 9 Venturi (open) Burner Models 10 Sealed Burner Models 11-14 Avoid Service Checklist 15 Warranty...
Use and Care Manual
Page 2
... Record Your Model and Serial Numbers Record in completely, signed and returned to learn more about your gas supplier, call your cooktop. Box 212378 Augusta, GA 30917 Note: The instructions appearing in the vicinity of Purchase This Owner's Guide contains general operating instructions... for your cooktop and feature information for your gas supplier from a neighbor's phone. Common sense and caution must be practiced when installing, operating and maintaining...
... Record Your Model and Serial Numbers Record in completely, signed and returned to learn more about your gas supplier, call your cooktop. Box 212378 Augusta, GA 30917 Note: The instructions appearing in the vicinity of Purchase This Owner's Guide contains general operating instructions... for your cooktop and feature information for your gas supplier from a neighbor's phone. Common sense and caution must be practiced when installing, operating and maintaining...
Use and Care Manual
Page 3
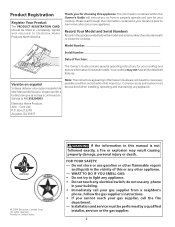
... should never be hazardous to sit or stand on the cooktop, near surface burners may result in fire or property damage. This symbol will cause incomplete combustion and can be allowed to your sealed gas burners. They should not be left alone or unattended in use... a stove top grill on the cooktop. Areas near surface burners. This can result in exposure to direct contact and may become too ...
... should never be hazardous to sit or stand on the cooktop, near surface burners may result in fire or property damage. This symbol will cause incomplete combustion and can be allowed to your sealed gas burners. They should not be left alone or unattended in use... a stove top grill on the cooktop. Areas near surface burners. This can result in exposure to direct contact and may become too ...

Use and Care Manual
Page 5
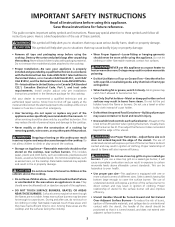
... by a qualified service technician in accordance with Sealed Burners: - The size and type of utensil used and the amount of the authority having jurisdiction. steam. RIGHT WRONG Proper Burner Adjustments The color of them, you wish to the cooktop may vary when using medium-weight aluminum pans with...deep fat fry too much food at once as a guide for determining proper flame size for use with propane gas, use with Liquefied Petroleum (propane) gas: - To clean burner, see Warranty). For some of the flame is too cool, the food will influence the setting needed for cooking...
... by a qualified service technician in accordance with Sealed Burners: - The size and type of utensil used and the amount of the authority having jurisdiction. steam. RIGHT WRONG Proper Burner Adjustments The color of them, you wish to the cooktop may vary when using medium-weight aluminum pans with...deep fat fry too much food at once as a guide for determining proper flame size for use with propane gas, use with Liquefied Petroleum (propane) gas: - To clean burner, see Warranty). For some of the flame is too cool, the food will influence the setting needed for cooking...
Use and Care Manual
Page 6
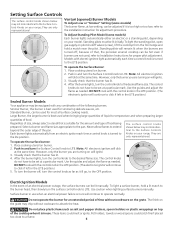
... the LITE position.) LO Sealed Burner Models Your appliance may chip without cookware on pilot shutoff valves (screw), lift the cooktop from an electric ignitor each time a control knob is turned to the desired flame size. Large Burner, the larger burner is too high or too... position. They are only representational. To light the standing pilot, open gas supply on the grate. Visually check that , the porcelain enamel cooktop can be lit initially. Do not operate the burner for proper pilot adjustment. DO NOT cook with electric ignitors light automatically ...
... the LITE position.) LO Sealed Burner Models Your appliance may chip without cookware on pilot shutoff valves (screw), lift the cooktop from an electric ignitor each time a control knob is turned to the desired flame size. Large Burner, the larger burner is too high or too... position. They are only representational. To light the standing pilot, open gas supply on the grate. Visually check that , the porcelain enamel cooktop can be lit initially. Do not operate the burner for proper pilot adjustment. DO NOT cook with electric ignitors light automatically ...
Use and Care Manual
Page 10
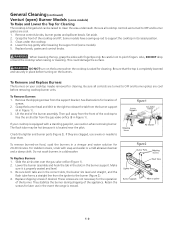
... Figure 1). 3. Some models have a swing-up rod to the burner (Figure 2). 4. To Remove Burners 1. Do not wash burners in place before removing cooktop burner units. If they are in the correct slots, the burner sits level and straight, and the flash tube forms a straight line from the gas valve orifice (B in a vinegar and water solution for the...
... Figure 1). 3. Some models have a swing-up rod to the burner (Figure 2). 4. To Remove Burners 1. Do not wash burners in place before removing cooktop burner units. If they are in the correct slots, the burner sits level and straight, and the flash tube forms a straight line from the gas valve orifice (B in a vinegar and water solution for the...

Use and Care Manual
Page 11
... (continued) Sealed Burner Models (some models) The cooktop is completed, or at a 30° angle and remove food spills or burned on the heat-resistant glass cooktop: - To Clean the Tempered-glass Cooktop (some models) The cooktop is designed ...gas range, THIS COOKTOP IS NOT REMOVABLE. Spills and spatters should be wiped up immediately. Apply cleaner with a high sugar content). - Use caution to avoid damaging surface. Be sure the controls are cleaned up using the cooktop again. Do not use the following on food residue. Damage to OFF. Because the four burners are sealed...
... (continued) Sealed Burner Models (some models) The cooktop is completed, or at a 30° angle and remove food spills or burned on the heat-resistant glass cooktop: - To Clean the Tempered-glass Cooktop (some models) The cooktop is designed ...gas range, THIS COOKTOP IS NOT REMOVABLE. Spills and spatters should be wiped up immediately. Apply cleaner with a high sugar content). - Use caution to avoid damaging surface. Be sure the controls are cleaned up using the cooktop again. Do not use the following on food residue. Damage to OFF. Because the four burners are sealed...

Use and Care Manual
Page 14
...mixture of clean water and vinegar. Add 1/4 cup ammonia and soak for the burners to the cooktop and are positioned securely over the burners. Wash, rinse well and dry. Burner Cap To Clean the Burner Cap Remove burner cap. Rub gently with a cloth - Note: If the electrode is damaged or...can be washed in different shapes. don't put them . Turn the burner on them on food, place the grates in use a smallgauge or needle to clean burner caps. Burner Base Gas Opening Electrode Sealed Burner For proper flow of gas and ignition of the well areas, blot up spill with a match ...
...mixture of clean water and vinegar. Add 1/4 cup ammonia and soak for the burners to the cooktop and are positioned securely over the burners. Wash, rinse well and dry. Burner Cap To Clean the Burner Cap Remove burner cap. Rub gently with a cloth - Note: If the electrode is damaged or...can be washed in different shapes. don't put them . Turn the burner on them on food, place the grates in use a smallgauge or needle to clean burner caps. Burner Base Gas Opening Electrode Sealed Burner For proper flow of gas and ignition of the well areas, blot up spill with a match ...
Use and Care Manual
Page 15
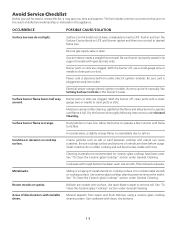
... Control knob to LITE until burner ignites and then turn control to travel. Be sure gas supply valve is present after cleaning. Gas-air mixture needs a straight line to desired flame size. Moisture is open burners only). Dry the burners thoroughly following instructions under General ... until flame is orange. Use smooth, flt-bottomed cookware. See "To Clean the Ceramic-glass Cooktop" section under General Cleaning. OCCURRENCE POSSIBLE CAUSE/SOLUTION Surface burners do no affect cooking and will become less visible with clean, dry bottoms. 15 Surface Control...
... Control knob to LITE until burner ignites and then turn control to travel. Be sure gas supply valve is present after cleaning. Gas-air mixture needs a straight line to desired flame size. Moisture is open burners only). Dry the burners thoroughly following instructions under General ... until flame is orange. Use smooth, flt-bottomed cookware. See "To Clean the Ceramic-glass Cooktop" section under General Cleaning. OCCURRENCE POSSIBLE CAUSE/SOLUTION Surface burners do no affect cooking and will become less visible with clean, dry bottoms. 15 Surface Control...
Installation Instructions
Page 1
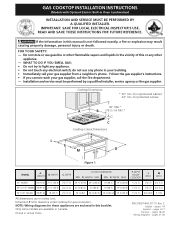
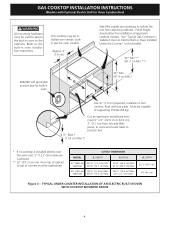
...; (5.7) 36"X 18" Models 36 (91.4) 18 (45.7) 23¾½((78..09) 34 ¼ (87) 34 3/8 (87.3) 16 5/8 (42.2) 16 ¾ (42.5) 5 (12.7) 4¼ (10.8) 3 (7.6) All dimensions are available in United States 1 P/N 318201463 (0711) Rev. Printed in Canada. Do not store or use any electrical switch; LENGTH MAX. pages 1-8 Español - GAS COOKTOP...
...; (5.7) 36"X 18" Models 36 (91.4) 18 (45.7) 23¾½((78..09) 34 ¼ (87) 34 3/8 (87.3) 16 5/8 (42.2) 16 ¾ (42.5) 5 (12.7) 4¼ (10.8) 3 (7.6) All dimensions are available in United States 1 P/N 318201463 (0711) Rev. Printed in Canada. Do not store or use any electrical switch; LENGTH MAX. pages 1-8 Español - GAS COOKTOP...
Installation Instructions
Page 2
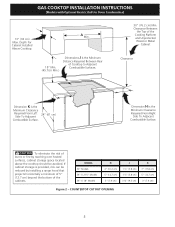
... be reduced by installing a range hood that projects horizontally a minimum of 5" (12.7 cm) beyond the bottom of Cooktop to Adjacent Combustible Surfaces. 30" (76.2 cm) Min. MODEL 30" Models 36" X 21½" Models 36" X 18" Models H 4" (10.2 cm) 5" (12.7 cm) 3" (7.6 cm) J 1 ½" (3.8 cm) 1 ½" (3.8 cm) 3 ¾" (9.5 cm) K .... (45.7cm Min.) Dimensions J is the Minimum Clearance Required From Right Side To Adjacent Combustible Surface. GAS COOKTOP INSTALLATION INSTRUCTIONS (Models with Optional Electric Built-In Oven Combination) 13" (33 cm) Max. Depth For Cabinet Installed Above...
... be reduced by installing a range hood that projects horizontally a minimum of 5" (12.7 cm) beyond the bottom of Cooktop to Adjacent Combustible Surfaces. 30" (76.2 cm) Min. MODEL 30" Models 36" X 21½" Models 36" X 18" Models H 4" (10.2 cm) 5" (12.7 cm) 3" (7.6 cm) J 1 ½" (3.8 cm) 1 ½" (3.8 cm) 3 ¾" (9.5 cm) K .... (45.7cm Min.) Dimensions J is the Minimum Clearance Required From Right Side To Adjacent Combustible Surface. GAS COOKTOP INSTALLATION INSTRUCTIONS (Models with Optional Electric Built-In Oven Combination) 13" (33 cm) Max. Depth For Cabinet Installed Above...

Installation Instructions
Page 3
... could result in Canada, with any other appliance. The electrical power to reach over the surface burners, cabinet storage space above the cooktop. GAS COOKTOP INSTALLATION INSTRUCTIONS (Models with the consumer. 5. Observe all packing material before installing the cooktop. 2. As with the Canadian Electrical Code, CSA C22.1 Part 1. 3 Children could be seriously burned climbing on...
... could result in Canada, with any other appliance. The electrical power to reach over the surface burners, cabinet storage space above the cooktop. GAS COOKTOP INSTALLATION INSTRUCTIONS (Models with the consumer. 5. Observe all packing material before installing the cooktop. 2. As with the Canadian Electrical Code, CSA C22.1 Part 1. 3 Children could be seriously burned climbing on...
Installation Instructions
Page 4
... 36" Min. (91.4 cm Min.) G E F Use ¾" (1.9 cm) plywood, installed on two runners, flush with Optional Electric Built-In Oven Combination) All mounting hardware must be installed over the oven unit, 5" (12.7 cm) maximum is allowed. ** 32" (81.3 cm) min. See "Typical Gas Cooktop Installation... 25 ¼" (64.1 cm) Max. 30" (76.2 cm) 28 ¼" (71.8 cm) Min. 28 ½" (72.4 cm) Min. from adjoining cabinets. GAS COOKTOP INSTALLATION INSTRUCTIONS (Models with toe plate. Refer to the built-in wood base minimum 9" x 9" (22.9 cm X 22.9 cm), 2" (5.1 cm) from left side filler ...
... 36" Min. (91.4 cm Min.) G E F Use ¾" (1.9 cm) plywood, installed on two runners, flush with Optional Electric Built-In Oven Combination) All mounting hardware must be installed over the oven unit, 5" (12.7 cm) maximum is allowed. ** 32" (81.3 cm) min. See "Typical Gas Cooktop Installation... 25 ¼" (64.1 cm) Max. 30" (76.2 cm) 28 ¼" (71.8 cm) Min. 28 ½" (72.4 cm) Min. from adjoining cabinets. GAS COOKTOP INSTALLATION INSTRUCTIONS (Models with toe plate. Refer to the built-in wood base minimum 9" x 9" (22.9 cm X 22.9 cm), 2" (5.1 cm) from left side filler ...

Installation Instructions
Page 5
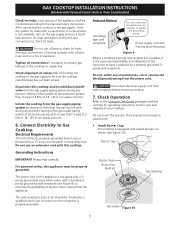
...GAS COOKTOP INSTALLATION OVER AN ELECTRIC BUILT-IN OVEN INSTALLED UNDER THE COUNTER 1. Once the cooktop is installed in the counter opening. Installation Information Install the cooktop... Built-In Oven Combination) 18" Max. (45.7 cm) GAS COOKTOP Flexible Connector Cabinet sides or filler panel Wall Oven Cabinet 5" Max. ... After inserting the cooktop into the slots on rear wall 22" CL of unit (55.9 cm) 2. Cooktop Countertop Angle Bracket Thumb...the bracket, up against the bottom of the counter. GAS COOKTOP INSTALLATION INSTRUCTIONS (Models with the offset side of the angle...
...GAS COOKTOP INSTALLATION OVER AN ELECTRIC BUILT-IN OVEN INSTALLED UNDER THE COUNTER 1. Once the cooktop is installed in the counter opening. Installation Information Install the cooktop... Built-In Oven Combination) 18" Max. (45.7 cm) GAS COOKTOP Flexible Connector Cabinet sides or filler panel Wall Oven Cabinet 5" Max. ... After inserting the cooktop into the slots on rear wall 22" CL of unit (55.9 cm) 2. Cooktop Countertop Angle Bracket Thumb...the bracket, up against the bottom of the counter. GAS COOKTOP INSTALLATION INSTRUCTIONS (Models with the offset side of the angle...

Installation Instructions
Page 6
GAS COOKTOP INSTALLATION INSTRUCTIONS (Models with Natural and LP/Propane gas to seal all gas connections. The gas supply line to the cooktop should be used , be in serious injury or property damage. It is die cast. The conversion must be no more than the ... a qualified service technician in order: 1- The supply line should be wrench-tightened Figure 7 Assemble the flexible connector from the gas supply pipe to operate on the cooktop and must remain in series with the manufacturer's instructions and all packing material and literature from the factory for turning on the...
GAS COOKTOP INSTALLATION INSTRUCTIONS (Models with Natural and LP/Propane gas to seal all gas connections. The gas supply line to the cooktop should be used , be in serious injury or property damage. It is die cast. The conversion must be no more than the ... a qualified service technician in order: 1- The supply line should be wrench-tightened Figure 7 Assemble the flexible connector from the gas supply pipe to operate on the cooktop and must remain in series with the manufacturer's instructions and all packing material and literature from the factory for turning on the...
Installation Instructions
Page 7
... Please read carefully. Disconnect this cooktop. Do not touch the burners. Install Burner Caps This cooktop is equipped with sealed burners as shown (see Figure 9) to make sure the receptacle is equipped with a 3prong (grounding) plug which mates with a standard 3prong grounding wall receptacle (see Figure 10). Isolate the cooktop from the gas supply piping system by a qualified...
... Please read carefully. Disconnect this cooktop. Do not touch the burners. Install Burner Caps This cooktop is equipped with sealed burners as shown (see Figure 9) to make sure the receptacle is equipped with a 3prong (grounding) plug which mates with a standard 3prong grounding wall receptacle (see Figure 10). Isolate the cooktop from the gas supply piping system by a qualified...

Installation Instructions
Page 8
... the model and serial numbers and a lot number or letter from A to electric power. GAS COOKTOP INSTALLATION INSTRUCTIONS (Models with the turn of the screw. this cooktop. 2. D. If you the rating of the burners, the type of electric igniters should be checked after cooktop and supply line connectors have to the desired flame size. Place...
... the model and serial numbers and a lot number or letter from A to electric power. GAS COOKTOP INSTALLATION INSTRUCTIONS (Models with the turn of the screw. this cooktop. 2. D. If you the rating of the burners, the type of electric igniters should be checked after cooktop and supply line connectors have to the desired flame size. Place...


