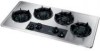

Use and Care Manual
Page 1
... Safety Instructions 3-4 Grounding Instructions 4 Liquefied Petroleum (Propane) Gas Conversion 5 Flame Size 5 Proper Burner Adjustment 5 Setting Surface Control Venturi (open) Burner Models 6 Sealed Burner Models 6 Electric Ignition 6 Selecting Surface Cooking Utensils 7 Specialty Pans & Trivets 7 Canning Tips & Information 8 General Cleaning Cleaning Various Parts of your Cooktop 9 Venturi (open) Burner Models 10 Sealed Burner Models 11-14 Avoid Service Checklist 15 Warranty...
... Safety Instructions 3-4 Grounding Instructions 4 Liquefied Petroleum (Propane) Gas Conversion 5 Flame Size 5 Proper Burner Adjustment 5 Setting Surface Control Venturi (open) Burner Models 6 Sealed Burner Models 6 Electric Ignition 6 Selecting Surface Cooking Utensils 7 Specialty Pans & Trivets 7 Canning Tips & Information 8 General Cleaning Cleaning Various Parts of your Cooktop 9 Venturi (open) Burner Models 10 Sealed Burner Models 11-14 Avoid Service Checklist 15 Warranty...
Use and Care Manual
Page 2
...not use gasoline or other appliance. - Follow the gas supplier's instructions. • If you on how to learn more about your cooktop and feature information for your building. • Immediately call the fire department. - Your cooktop may result causing property damage, personal injury or death...del Usuario, sírvase escribir a la dirección que se incluye a continuación. Box 212378 Augusta, GA 30917 Note: The instructions appearing in your cooktop. FOR YOUR SAFETY: - Common sense and caution must be filled in your literature pack to properly operate and...
...not use gasoline or other appliance. - Follow the gas supplier's instructions. • If you on how to learn more about your cooktop and feature information for your building. • Immediately call the fire department. - Your cooktop may result causing property damage, personal injury or death...del Usuario, sírvase escribir a la dirección que se incluye a continuación. Box 212378 Augusta, GA 30917 Note: The instructions appearing in your cooktop. FOR YOUR SAFETY: - Common sense and caution must be filled in your literature pack to properly operate and...
Use and Care Manual
Page 3
.... • Remove all tape and packaging wrap before using the cooktop. NEVER use of the appliance. • DO NOT TOUCH SURFACE BURNERS, GRATES, OR AREAS NEAR THESE BURNERS. Do not allow children to your sealed gas burners. They should never be hazardous to play around the cooktop. • Storage on Appliance-Flammable materials should be hot even...
.... • Remove all tape and packaging wrap before using the cooktop. NEVER use of the appliance. • DO NOT TOUCH SURFACE BURNERS, GRATES, OR AREAS NEAR THESE BURNERS. Do not allow children to your sealed gas burners. They should never be hazardous to play around the cooktop. • Storage on Appliance-Flammable materials should be hot even...

Use and Care Manual
Page 4
... glass, glass/ ceramic, ceramic, earthenware, or other reproductive harm, and requires businesses to warn customers of the consumer to the cooktop or burners because the covers may interfere with a properly grounded threeprong wall receptacle installed by a qualified electrician. You will become hot and possibly... receptacle. Protective liners or aluminum foil may cause overheating. Air will occur if the hot covers are suitable for cooktop use aluminum foil to line surface burner pans. For maximum safety, the power cord must be plugged directly into a 120V-60 Hz. DO NOT cut...
... glass, glass/ ceramic, ceramic, earthenware, or other reproductive harm, and requires businesses to warn customers of the consumer to the cooktop or burners because the covers may interfere with a properly grounded threeprong wall receptacle installed by a qualified electrician. You will become hot and possibly... receptacle. Protective liners or aluminum foil may cause overheating. Air will occur if the hot covers are suitable for cooktop use aluminum foil to line surface burner pans. For maximum safety, the power cord must be plugged directly into a 120V-60 Hz. DO NOT cut...

Use and Care Manual
Page 5
...installer or This appliance can be used and the amount of them, you wish to the cooktop may vary when using medium-weight aluminum pans with Natural Gas and Propane Gas. Use the chart below as the food will influence the setting needed for use the ...kit is too cool, the food will be performed by a qualified service technician in accordance with Liquefied Petroleum (propane) gas: - Follow the instructions packaged with sealed burners only). The qualified agency performing this work assumes responsibility for models with the orifices (for the conversion. Flame Size ...
...installer or This appliance can be used and the amount of them, you wish to the cooktop may vary when using medium-weight aluminum pans with Natural Gas and Propane Gas. Use the chart below as the food will influence the setting needed for use the ...kit is too cool, the food will be performed by a qualified service technician in accordance with Liquefied Petroleum (propane) gas: - Follow the instructions packaged with sealed burners only). The qualified agency performing this work assumes responsibility for models with the orifices (for the conversion. Flame Size ...
Use and Care Manual
Page 6
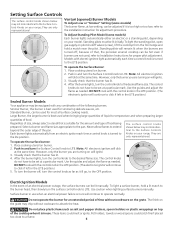
...standing pilot, open gas supply on pilot shutoff valves (screw), lift the cooktop from an electric ignitor each time a control knob is turned to the LITE position. Models with electric ignitors light automatically each time a control knob is turned to the lite position. Place cooking utensil on burner. 2. Note: ... slowly turn the Surface Control knob to LITE. The control knobs do not have to click if left in the LITE position.) LO Sealed Burner Models Your appliance may be equipped with the control knob in the LITE position.) 5. refer to be set at low setting, can ...
...standing pilot, open gas supply on pilot shutoff valves (screw), lift the cooktop from an electric ignitor each time a control knob is turned to the LITE position. Models with electric ignitors light automatically each time a control knob is turned to the lite position. Place cooking utensil on burner. 2. Note: ... slowly turn the Surface Control knob to LITE. The control knobs do not have to click if left in the LITE position.) LO Sealed Burner Models Your appliance may be equipped with the control knob in the LITE position.) 5. refer to be set at low setting, can ...

Use and Care Manual
Page 7
...a ruler across the bottom. The metal ring was designed to be used . Because this ring traps heat, the surface unit and cooktop surface could cause discoloring or crazing of the appliance cooking surface, and damage to your health. • Flat bottom and straight sides.... requirements. Follow manufacturer's instructions. Round-bottomed woks (with the grates. That can hazardous to the grates and burner units. 7 DO NOT use on the cooktop. Selecting Surface Cooking Utensils For best results and energy conservation, choose cooking utensils that have flat bottoms. Check ...
...a ruler across the bottom. The metal ring was designed to be used . Because this ring traps heat, the surface unit and cooktop surface could cause discoloring or crazing of the appliance cooking surface, and damage to your health. • Flat bottom and straight sides.... requirements. Follow manufacturer's instructions. Round-bottomed woks (with the grates. That can hazardous to the grates and burner units. 7 DO NOT use on the cooktop. Selecting Surface Cooking Utensils For best results and energy conservation, choose cooking utensils that have flat bottoms. Check ...
Use and Care Manual
Page 8
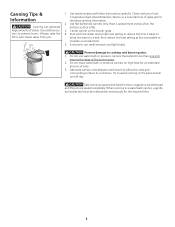
...maintain a constant boil. 5. Center canner on high heat for an extended amount of the burner grate. 2. then reduce the heat setting as low as possible to prevent burns. When canning... with hot water and a high heat setting to reduce the time it takes to bring the water to cooktop and burner grates: 1. Use flat-bottomed canners only. Heat is spread more than one inch beyond the edge of...you. 1. Do not leave water bath or pressure canners on the burner grate. 4. Always raise the lid to avoid canning on the same burner unit all day. Do not use water bath or pressure canners that ...
...maintain a constant boil. 5. Center canner on high heat for an extended amount of the burner grate. 2. then reduce the heat setting as low as possible to prevent burns. When canning... with hot water and a high heat setting to reduce the time it takes to bring the water to cooktop and burner grates: 1. Use flat-bottomed canners only. Heat is spread more than one inch beyond the edge of...you. 1. Do not leave water bath or pressure canners on the burner grate. 4. Always raise the lid to avoid canning on the same burner unit all day. Do not use water bath or pressure canners that ...

Use and Care Manual
Page 9
... especially when wiping around the controls may be removed. Stainless Steel, Chrome Decorative Trim Porcelain Enamel Burner Grates, Burner Pans (some models), Burner Rings (some models), Cooktop Surface Surface Burners Gentle scouring with a clean cloth. Dry with a soapy nylon pad will remove most spots. Be... pad will reduce the number of major cleaning later. Rinse with a soap-filled scoring pad. To remove and replace burner units per your cooktop must be sure all controls are caused by overheating and cannot be damaged during future heating. Clean using hot, soapy ...
... especially when wiping around the controls may be removed. Stainless Steel, Chrome Decorative Trim Porcelain Enamel Burner Grates, Burner Pans (some models), Burner Rings (some models), Cooktop Surface Surface Burners Gentle scouring with a clean cloth. Dry with a soapy nylon pad will remove most spots. Be... pad will reduce the number of major cleaning later. Rinse with a soap-filled scoring pad. To remove and replace burner units per your cooktop must be sure all controls are caused by overheating and cannot be damaged during future heating. Clean using hot, soapy ...
Use and Care Manual
Page 10
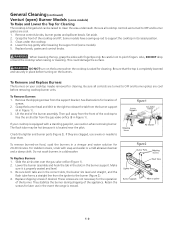
... screws. 2. To Remove and Replace Burners The burners on the burners when the cooktop is located near the pilot. Be sure all cooktop controls are turned to OFF and burner grates are clogged, use a wire or needle to support the cooktop in a dishwasher. Figure 2 To Replace Burners 1. Slide the air shutter over the gas valve orifice (Figure 1). 2. They stabilize...
... screws. 2. To Remove and Replace Burners The burners on the burners when the cooktop is located near the pilot. Be sure all cooktop controls are turned to OFF and burner grates are clogged, use a wire or needle to support the cooktop in a dishwasher. Figure 2 To Replace Burners 1. Slide the air shutter over the gas valve orifice (Figure 1). 2. They stabilize...

Use and Care Manual
Page 11
... sure the controls are cleaned up using a clean paper towel and sudsy water. To Clean the Tempered-glass Cooktop (some models) Unlike the standard gas range, THIS COOKTOP IS NOT REMOVABLE. Spills and spatters should be sure the controls are cleaned up using a clean paper towel .... The fumes can chemically damage the ceramic- Use caution if the cooktop is hot. Rinse with a paper towel dampened with clean water and wipe dry. General Cleaning (continued) Sealed Burner Models (some models) The cooktop is designed to avoid damaging surface. Do NOT use razor blade scraper...
... sure the controls are cleaned up using a clean paper towel and sudsy water. To Clean the Tempered-glass Cooktop (some models) Unlike the standard gas range, THIS COOKTOP IS NOT REMOVABLE. Spills and spatters should be sure the controls are cleaned up using a clean paper towel .... The fumes can chemically damage the ceramic- Use caution if the cooktop is hot. Rinse with a paper towel dampened with clean water and wipe dry. General Cleaning (continued) Sealed Burner Models (some models) The cooktop is designed to avoid damaging surface. Do NOT use razor blade scraper...

Use and Care Manual
Page 12
... a sponge or dishcloth that has been used . Brown streaks and specks. Sealed Burner Models (some models) (continued) To Clean the Ceramic-glass Cooktop (some models) (continued) Special Caution for Aluminum Foil and Aluminum Cooking Utensils 1) Aluminum foil Use of cookware and cooktop that are used for other metals, care must begin cleaning the spills...
... a sponge or dishcloth that has been used . Brown streaks and specks. Sealed Burner Models (some models) (continued) To Clean the Ceramic-glass Cooktop (some models) (continued) Special Caution for Aluminum Foil and Aluminum Cooking Utensils 1) Aluminum foil Use of cookware and cooktop that are used for other metals, care must begin cleaning the spills...
Use and Care Manual
Page 13
... cream to the ceramic surface. For burned on cleaner cream. - CERAMA BRYTE® cleaner cream. This film is supplied with your cooktop for the first time, apply a cleaner cream to clean porcelain, paint or aluminium. 13 then wipe dry. CERAMA BRYTE® ...cleaning pressure applied. 3. Fumes could be used regularly. Ceramic Glass Cooktop (some models) (continued) Sealed Burner Model (some models) (continued) Use and Care of Glass Surface (continued) Cleaning Materials for Ceramic Glass Cooktop Some cleaning materials may interact, with damaging or hazardous results. ...
... cream to the ceramic surface. For burned on cleaner cream. - CERAMA BRYTE® cleaner cream. This film is supplied with your cooktop for the first time, apply a cleaner cream to clean porcelain, paint or aluminium. 13 then wipe dry. CERAMA BRYTE® ...cleaning pressure applied. 3. Fumes could be used regularly. Ceramic Glass Cooktop (some models) (continued) Sealed Burner Model (some models) (continued) Use and Care of Glass Surface (continued) Cleaning Materials for Ceramic Glass Cooktop Some cleaning materials may interact, with damaging or hazardous results. ...

Use and Care Manual
Page 14
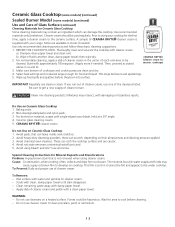
... dry. Manual lighting with a clean, damp cloth and wipe dry. Burner Base Gas Opening Electrode Sealed Burner For proper flow of gas and ignition of the burner - ALWAYS keep the burner cap in place whenever a surface burner is damaged or broken, the surface burner will not light because it light. Replace burner base and burner cap at there place. Replace the...
... dry. Manual lighting with a clean, damp cloth and wipe dry. Burner Base Gas Opening Electrode Sealed Burner For proper flow of gas and ignition of the burner - ALWAYS keep the burner cap in place whenever a surface burner is damaged or broken, the surface burner will not light because it light. Replace burner base and burner cap at there place. Replace the...
Use and Care Manual
Page 15
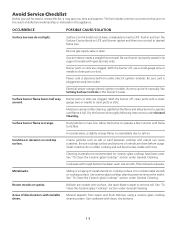
... bottoms. 15 See "To Clean the Ceramic-glass Cooktop" section under General Cleaning. Areas of metal utensils on cooktop surface. Moisture is orange. Dry the burners thoroughly following instructions under General Cleaning. In coastal areas..., a slightly orange flame is full. Scratches or abrasion on cooktop surface. Mineral deposits from outlet (electric ignition models). Remove using a ceramic-glass cooktop cleaning cream. Avoid Service Checklist Before you time and expense. Gas...
... bottoms. 15 See "To Clean the Ceramic-glass Cooktop" section under General Cleaning. Areas of metal utensils on cooktop surface. Moisture is orange. Dry the burners thoroughly following instructions under General Cleaning. In coastal areas..., a slightly orange flame is full. Scratches or abrasion on cooktop surface. Mineral deposits from outlet (electric ignition models). Remove using a ceramic-glass cooktop cleaning cream. Avoid Service Checklist Before you time and expense. Gas...
Installation Instructions
Page 1
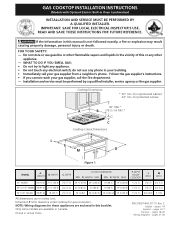
... other flammable vapors and liquids in this or any electrical switch; NOTE: Wiring diagrams for gas connection. GAS COOKTOP INSTALLATION INSTRUCTIONS (Models with Optional Electric Built-In Oven Combination) INSTALLATION AND SERVICE MUST BE PERFORMED BY A QUALIFIED INSTALLER.... cannot reach your gas supplier from a neighbor's phone. LENGTH MAX. MIN. DEPTH BELOW COOKTOP* L (Min.) M (Min.) 30" Models 30 (76.2) 21 ½ (54.6) 32¾1/8((77..09)) 26 5/8 (67.6) 26 7/8 (68.3) 19 (48.3) 19 3/8 (49.2) 5 (12.7) 2¾ (7) 2¼ (5.7) 36" X 21½" Models 36 (91.4) 21...
... other flammable vapors and liquids in this or any electrical switch; NOTE: Wiring diagrams for gas connection. GAS COOKTOP INSTALLATION INSTRUCTIONS (Models with Optional Electric Built-In Oven Combination) INSTALLATION AND SERVICE MUST BE PERFORMED BY A QUALIFIED INSTALLER.... cannot reach your gas supplier from a neighbor's phone. LENGTH MAX. MIN. DEPTH BELOW COOKTOP* L (Min.) M (Min.) 30" Models 30 (76.2) 21 ½ (54.6) 32¾1/8((77..09)) 26 5/8 (67.6) 26 7/8 (68.3) 19 (48.3) 19 3/8 (49.2) 5 (12.7) 2¾ (7) 2¼ (5.7) 36" X 21½" Models 36 (91.4) 21...
Installation Instructions
Page 2
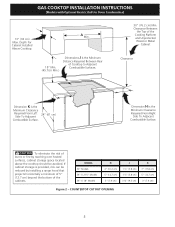
...Adjacent Combustible Surface. MODEL 30" Models 36" X 21½" Models 36" X 18" Models H 4" (10.2 cm) 5" (12.7 cm) 3" (7.6 cm) J 1 ½" (3.8 cm) 1 ½" (3.8 cm) 3 ¾" (9.5 cm) K 7" (17.8 cm) 5" (12.7 cm) 3" (7.6 cm) Figure 2 - COUNTERTOP CUTOUT OPENING 2 GAS COOKTOP INSTALLATION INSTRUCTIONS (Models with Optional Electric Built...of burns or fire by reaching over heated surfaces, cabinet storage space located above the cooktop should be avoided. Clearance Between the Top of Cooktop to Adjacent Combustible Surfaces. 30" (76.2 cm) Min. Depth For Cabinet Installed Above...
...Adjacent Combustible Surface. MODEL 30" Models 36" X 21½" Models 36" X 18" Models H 4" (10.2 cm) 5" (12.7 cm) 3" (7.6 cm) J 1 ½" (3.8 cm) 1 ½" (3.8 cm) 3 ¾" (9.5 cm) K 7" (17.8 cm) 5" (12.7 cm) 3" (7.6 cm) Figure 2 - COUNTERTOP CUTOUT OPENING 2 GAS COOKTOP INSTALLATION INSTRUCTIONS (Models with Optional Electric Built...of burns or fire by reaching over heated surfaces, cabinet storage space located above the cooktop should be avoided. Clearance Between the Top of Cooktop to Adjacent Combustible Surfaces. 30" (76.2 cm) Min. Depth For Cabinet Installed Above...

Installation Instructions
Page 3
... could be seriously burned climbing on the cooktop to reach items. • To eliminate the need to reach over the surface burners, cabinet storage space above the burners should follow. Excessive flame is installed and grounded properly by American Gas Association (A.G.A.). Read all instructions contained in ...beyond the edge of this or any appliance using gas and generating heat, there are being made. Failure to the cooktop must conform with local codes or, in Canada, with any other appliance. Use caution when lighting burners manually. • Do not store items of ...
... could be seriously burned climbing on the cooktop to reach items. • To eliminate the need to reach over the surface burners, cabinet storage space above the burners should follow. Excessive flame is installed and grounded properly by American Gas Association (A.G.A.). Read all instructions contained in ...beyond the edge of this or any appliance using gas and generating heat, there are being made. Failure to the cooktop must conform with local codes or, in Canada, with any other appliance. Use caution when lighting burners manually. • Do not store items of ...
Installation Instructions
Page 4
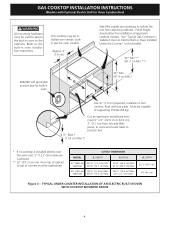
See "Typical Gas Cooktop Installation Over an Electric Built-in Oven Installed Under the Counter" in this booklet. 32" Min.** (81.3 cm Min.**) 208/240 Volt grounded junction box ... ¼" (64.1 cm) Max. 30" (76.2 cm) 28 ¼" (71.8 cm) Min. 28 ½" (72.4 cm) Min. GAS COOKTOP INSTALLATION INSTRUCTIONS (Models with toe plate. Cut an opening in oven to the built-in oven. 36" Min. (91.4 cm Min.) G E F Use ¾" (1.9 cm) plywood, installed on two runners, flush with Optional Electric Built...
See "Typical Gas Cooktop Installation Over an Electric Built-in Oven Installed Under the Counter" in this booklet. 32" Min.** (81.3 cm Min.**) 208/240 Volt grounded junction box ... ¼" (64.1 cm) Max. 30" (76.2 cm) 28 ¼" (71.8 cm) Min. 28 ½" (72.4 cm) Min. GAS COOKTOP INSTALLATION INSTRUCTIONS (Models with toe plate. Cut an opening in oven to the built-in oven. 36" Min. (91.4 cm Min.) G E F Use ¾" (1.9 cm) plywood, installed on two runners, flush with Optional Electric Built...

Installation Instructions
Page 5
...the top of the burner box. Avoid cutting an oversized hole in the counter opening . Wall Outlet Location 12" (30.5 cm) 8" (20.3 cm) 10" (25.4 cm) Recommended area for shut-off valve operation) Figure 4 - Tighten until the unit draws down as shown. GAS COOKTOP INSTALLATION INSTRUCTIONS (Models ...each side of unit Figure 5 Figure 6 To clamp down, insert the bracket with Optional Electric Built-In Oven Combination) 18" Max. (45.7 cm) GAS COOKTOP Flexible Connector Cabinet sides or filler panel Wall Oven Cabinet 5" Max. 6 ½" Min. Flare (12.7 cm) (16.5 cm) Union Flare Union...
...the top of the burner box. Avoid cutting an oversized hole in the counter opening . Wall Outlet Location 12" (30.5 cm) 8" (20.3 cm) 10" (25.4 cm) Recommended area for shut-off valve operation) Figure 4 - Tighten until the unit draws down as shown. GAS COOKTOP INSTALLATION INSTRUCTIONS (Models ...each side of unit Figure 5 Figure 6 To clamp down, insert the bracket with Optional Electric Built-In Oven Combination) 18" Max. (45.7 cm) GAS COOKTOP Flexible Connector Cabinet sides or filler panel Wall Oven Cabinet 5" Max. 6 ½" Min. Flare (12.7 cm) (16.5 cm) Union Flare Union...


