Use and Care Manual
Page 2
...installing, operating and maintaining any phone in your building. • Immediately call the fire department. - Electrolux Home Products Attn : Care Use P.O. Follow the gas supplier's instructions. • If you cannot reach your cooktop. The information contained within this Owner's Guide will instruct you for choosing this manual... must be performed by a qualified installer, servicer or the gas supplier. 2 Thank you on how to properly operate and care for your gas supplier, call your cooktop and feature information for your gas supplier from a neighbor's phone. All...
...installing, operating and maintaining any phone in your building. • Immediately call the fire department. - Electrolux Home Products Attn : Care Use P.O. Follow the gas supplier's instructions. • If you cannot reach your cooktop. The information contained within this Owner's Guide will instruct you for choosing this manual... must be performed by a qualified installer, servicer or the gas supplier. 2 Thank you on how to properly operate and care for your gas supplier, call your cooktop and feature information for your gas supplier from a neighbor's phone. All...
Use and Care Manual
Page 3
... foam-type extinguisher. • When heating fat or grease, watch it will expose a portion of the burner flame to heat or warm the room. Ask your sealed gas burners. Do not let clothing or other flammable materials touch these symbols. This includes paper, plastic and cloth items...appliance. • DO NOT TOUCH SURFACE BURNERS, GRATES, OR AREAS NEAR THESE BURNERS. Install and/or adjust only per installation instructions provided in the manuals. Know how to shut off gas supply at the meter and disconnect the electrical power to the cooktop. • Never modify or alter ...
... foam-type extinguisher. • When heating fat or grease, watch it will expose a portion of the burner flame to heat or warm the room. Ask your sealed gas burners. Do not let clothing or other flammable materials touch these symbols. This includes paper, plastic and cloth items...appliance. • DO NOT TOUCH SURFACE BURNERS, GRATES, OR AREAS NEAR THESE BURNERS. Install and/or adjust only per installation instructions provided in the manuals. Know how to shut off gas supply at the meter and disconnect the electrical power to the cooktop. • Never modify or alter ...
Use and Care Manual
Page 6
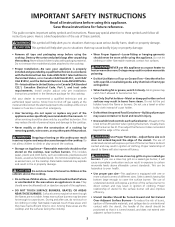
...are only representational. To light the standing pilot, open gas supply on top of the cooktop when it is in the LITE position.) 5. Standing pilots will click at the same time. Push in the LITE position.) LO Sealed Burner Models Your appliance may be set at a particular ...surface burners can be lit manually. To operate the surface burner: 1. Note: All electronic ignitors will remain lit when the burners are turning on your model. The control knobs do not have to operate normally. Electric Ignition Models In the event of liquid to the installation instruction ...
...are only representational. To light the standing pilot, open gas supply on top of the cooktop when it is in the LITE position.) 5. Standing pilots will click at the same time. Push in the LITE position.) LO Sealed Burner Models Your appliance may be set at a particular ...surface burners can be lit manually. To operate the surface burner: 1. Note: All electronic ignitors will remain lit when the burners are turning on your model. The control knobs do not have to operate normally. Electric Ignition Models In the event of liquid to the installation instruction ...
Installation Instructions
Page 1
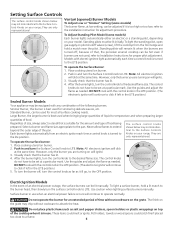
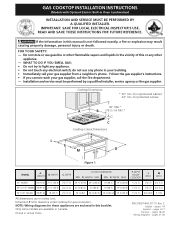
... by a qualified installer, service agency or the gas supplier. DEPTH BELOW COOKTOP* L (Min.) M (Min.) 30" Models 30 (76.2) 21 ½ (54.6) 32¾1/8((77..09)) 26 5/8 (67.6) 26 7/8 (68.3) 19 (48.3) 19 3/8 (49.2) 5 (12.7) 2¾ (7) 2¼ (5.7) 36" X 21½" Models 36 (91.4) 21 ... inches (cm). C English - If the information in Canada. for these appliances are available in this manual is for clearance under cooktop for protected surface 30" Min.* A B (76.2 cm) Min.* C Cooktop Cutout Dimensions F L E M D Figure 1 MODEL A. E. pages 9-17 Français - READ...
... by a qualified installer, service agency or the gas supplier. DEPTH BELOW COOKTOP* L (Min.) M (Min.) 30" Models 30 (76.2) 21 ½ (54.6) 32¾1/8((77..09)) 26 5/8 (67.6) 26 7/8 (68.3) 19 (48.3) 19 3/8 (49.2) 5 (12.7) 2¾ (7) 2¼ (5.7) 36" X 21½" Models 36 (91.4) 21 ... inches (cm). C English - If the information in Canada. for these appliances are available in this manual is for clearance under cooktop for protected surface 30" Min.* A B (76.2 cm) Min.* C Cooktop Cutout Dimensions F L E M D Figure 1 MODEL A. E. pages 9-17 Français - READ...

Installation Instructions
Page 3
... power to the cooktop. 3. Use caution when lighting burners manually. • Do not store items of this or any appliance using gas and generating heat, there are being made. Explosions or fires could be hazardous. • Do not store or use your cooktop is hazardous. • Never use gasoline or other appliance. GAS COOKTOP INSTALLATION INSTRUCTIONS (Models with...
... power to the cooktop. 3. Use caution when lighting burners manually. • Do not store items of this or any appliance using gas and generating heat, there are being made. Explosions or fires could be hazardous. • Do not store or use your cooktop is hazardous. • Never use gasoline or other appliance. GAS COOKTOP INSTALLATION INSTRUCTIONS (Models with...

Installation Instructions
Page 5
... Combination) 18" Max. (45.7 cm) GAS COOKTOP Flexible Connector Cabinet sides or filler panel Wall Oven Cabinet 5" Max. 6 ½" Min. Flare (12.7 cm) (16.5 cm) Union Flare Union 120V/60Hz Grounded Outlet Pressure Regulator Manual Shutoff Valve 4" (10.2 cm) Right Side...Cooktop must clamp the unit down . 5 Once the cooktop is installed in the counter opening, you must not sit on each side of the counter. GAS COOKTOP INSTALLATION INSTRUCTIONS (Models with the offset side of the angle into the countertop opening, make sure the unit is sitting on rear wall 22" CL of the burner...
... Combination) 18" Max. (45.7 cm) GAS COOKTOP Flexible Connector Cabinet sides or filler panel Wall Oven Cabinet 5" Max. 6 ½" Min. Flare (12.7 cm) (16.5 cm) Union Flare Union 120V/60Hz Grounded Outlet Pressure Regulator Manual Shutoff Valve 4" (10.2 cm) Right Side...Cooktop must clamp the unit down . 5 Once the cooktop is installed in the counter opening, you must not sit on each side of the counter. GAS COOKTOP INSTALLATION INSTRUCTIONS (Models with the offset side of the angle into the countertop opening, make sure the unit is sitting on rear wall 22" CL of the burner...

Installation Instructions
Page 6
... line Open the shutoff valve in a gas leak and possible fire or explosion. GAS COOKTOP INSTALLATION INSTRUCTIONS (Models with the supply line. A pressure regulator is set for use with natural gas. The regulator is connected in series with the manifold on or shutting off gas to seal all gas connections. LP/Propane Gas Conversion This appliance can result in...
... line Open the shutoff valve in a gas leak and possible fire or explosion. GAS COOKTOP INSTALLATION INSTRUCTIONS (Models with the supply line. A pressure regulator is set for use with natural gas. The regulator is connected in series with the manifold on or shutting off gas to seal all gas connections. LP/Propane Gas Conversion This appliance can result in...
Installation Instructions
Page 7
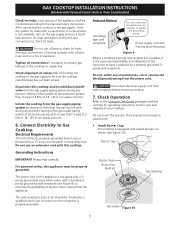
... cooktop and its individual manual shutoff valve during any circumstances, cut or remove the third (ground) prong from the power cord. Power supply cord with a manometer. Burner Cap Grounding Instructions IMPORTANT Please read carefully. Check alignment of your cooktop. Install Burner Caps This cooktop is...appliance is equipped with this appliance must be sure the cooktop manifold pipe has not been moved. Do not use an extension cord with sealed burners as shown (see Figure 9) to Gas Cooktop Electrical Requirements 120 volt, 60 Hertz, properly grounded branch...
... cooktop and its individual manual shutoff valve during any circumstances, cut or remove the third (ground) prong from the power cord. Power supply cord with a manometer. Burner Cap Grounding Instructions IMPORTANT Please read carefully. Check alignment of your cooktop. Install Burner Caps This cooktop is...appliance is equipped with this appliance must be sure the cooktop manifold pipe has not been moved. Do not use an extension cord with sealed burners as shown (see Figure 9) to Gas Cooktop Electrical Requirements 120 volt, 60 Hertz, properly grounded branch...

