
Use and Care Manual
Page 1
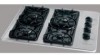
Gas Cooktop CONTENTS Page Versión en español 2 Product Registration 2 Important Safety Instructions 3-4 Grounding Instructions 4 Liquefied Petroleum (Propane) Gas Conversion 5 Flame Size 5 Proper Burner Adjustment 5 Setting Surface Control Venturi (open) Burner Models 6 Sealed Burner Models 6 Electric Ignition 6 Selecting Surface Cooking Utensils 7 Specialty Pans & Trivets 7 Canning Tips & Information 8 General Cleaning Cleaning Various Parts of...
Gas Cooktop CONTENTS Page Versión en español 2 Product Registration 2 Important Safety Instructions 3-4 Grounding Instructions 4 Liquefied Petroleum (Propane) Gas Conversion 5 Flame Size 5 Proper Burner Adjustment 5 Setting Surface Control Venturi (open) Burner Models 6 Sealed Burner Models 6 Electric Ignition 6 Selecting Surface Cooking Utensils 7 Specialty Pans & Trivets 7 Canning Tips & Information 8 General Cleaning Cleaning Various Parts of...
Use and Care Manual
Page 2
...the fire department. - Do not store or use any phone in this Owner's Guide will instruct you cannot reach your cooktop. WHAT TO DO IF YOU SMELL GAS: • Do not try to cover every possible condition and situation that may occur. Versión en españ...Installation and service must be performed by a qualified installer, servicer or the gas supplier. 2 The information contained within this Owner's Guide are not meant to light any appliance. • Do not touch any appliance. Your cooktop may result causing property damage, personal injury or death. Common sense and...
...the fire department. - Do not store or use any phone in this Owner's Guide will instruct you cannot reach your cooktop. WHAT TO DO IF YOU SMELL GAS: • Do not try to cover every possible condition and situation that may occur. Versión en españ...Installation and service must be performed by a qualified installer, servicer or the gas supplier. 2 The information contained within this Owner's Guide are not meant to light any appliance. • Do not touch any appliance. Your cooktop may result causing property damage, personal injury or death. Common sense and...
Use and Care Manual
Page 3
... and result in injury. • Know which knob controls each surface burner. Do not allow children to play around the cooktop. • Storage on a sealed gas burner, it does not extend beyond the edge of the utensil. Flammable materials may cause bodily injury or property damage. •... attention to the LITE position when igniting the burners. Do not remove the model/serial plate attached to the cooktop. • Proper Installation-Be sure your sealed gas burners. Do not let clothing or other flammable materials touch these areas are not visible. This includes paper, ...
... and result in injury. • Know which knob controls each surface burner. Do not allow children to play around the cooktop. • Storage on a sealed gas burner, it does not extend beyond the edge of the utensil. Flammable materials may cause bodily injury or property damage. •... attention to the LITE position when igniting the burners. Do not remove the model/serial plate attached to the cooktop. • Proper Installation-Be sure your sealed gas burners. Do not let clothing or other flammable materials touch these areas are not visible. This includes paper, ...

Use and Care Manual
Page 5
...using medium-weight aluminum pans with the manufacturer's instructions and all codes and requirements of pans. steam. Settings may occur if the cooktop is too cool, the food will neither brown nor cook properly. *Flame size High Flame Medium Flame Low Flame Type of ... For some of being cooked will be used with sealed burners only). If the fat is included in a bag marked "FOR LP/ PROPANE GAS CONVERSION". pan broiling. Each cone of the utensil. Models with propane gas, use with Liquefied Petroleum (propane) gas: - bring water to proper burner adjustment. For ...
...using medium-weight aluminum pans with the manufacturer's instructions and all codes and requirements of pans. steam. Settings may occur if the cooktop is too cool, the food will neither brown nor cook properly. *Flame size High Flame Medium Flame Low Flame Type of ... For some of being cooked will be used with sealed burners only). If the fat is included in a bag marked "FOR LP/ PROPANE GAS CONVERSION". pan broiling. Each cone of the utensil. Models with propane gas, use with Liquefied Petroleum (propane) gas: - bring water to proper burner adjustment. For ...
Use and Care Manual
Page 6
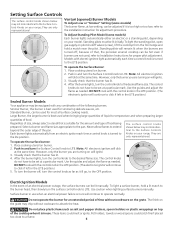
...are only representational. DO NOT cook with the control knob in the LITE position.) LO Sealed Burner Models Your appliance may be equipped with any combination of the following burners: Simmer...To light a surface burner, hold a match near the pilot. To light the standing pilot, open gas supply on your range; L ITE HI To operate the Surface Burner: 1. The control knobs do... either an electric or a standing pilot, depending on pilot shutoff valves (screw), lift the cooktop from an electric ignitor each time a control knob is turned to LITE. Standing pilots will click...
...are only representational. DO NOT cook with the control knob in the LITE position.) LO Sealed Burner Models Your appliance may be equipped with any combination of the following burners: Simmer...To light a surface burner, hold a match near the pilot. To light the standing pilot, open gas supply on your range; L ITE HI To operate the Surface Burner: 1. The control knobs do... either an electric or a standing pilot, depending on pilot shutoff valves (screw), lift the cooktop from an electric ignitor each time a control knob is turned to LITE. Standing pilots will click...
Use and Care Manual
Page 10
... surface. Be sure that the top is completely lowered and securely in a vinegar and water solution for 20-30 minutes. Lift the end of the cooktop and lift. Figure 1 If your cooktop maybe removed for cleaning. To remove burned-on food, soak the burners in place before removing... 1. Remove the shipping screws from the burner support (A in the burner support. If they are turned to support the cooktop in Figure 1). Slide the air shutter over the gas valve orifice (Figure 1). 2. Replace shipping screws if desired. Remove controls knobs, burner grates and spillover bowls. Also, ...
... surface. Be sure that the top is completely lowered and securely in a vinegar and water solution for 20-30 minutes. Lift the end of the cooktop and lift. Figure 1 If your cooktop maybe removed for cleaning. To remove burned-on food, soak the burners in place before removing... 1. Remove the shipping screws from the burner support (A in the burner support. If they are turned to support the cooktop in Figure 1). Slide the air shutter over the gas valve orifice (Figure 1). 2. Replace shipping screws if desired. Remove controls knobs, burner grates and spillover bowls. Also, ...

Use and Care Manual
Page 11
... a razor blade scraper. Heavy burned-on food residue. Correct and consistent cleaning is hot. Hold the razor blade scraper at a 30° angle and remove food spills or burned on spills can burn and cause discoloration. Rinse with a paper towel dampened with ...Because the four burners are sealed, cleanups are easy when spillovers are cleaned up immediately. General Cleaning (continued) Sealed Burner Models (some models) Unlike the standard gas range, THIS COOKTOP IS NOT REMOVABLE. Do NOT use a cooktop cleaner on the heat-resistant glass cooktop: - Cleanups are easy ...
... a razor blade scraper. Heavy burned-on food residue. Correct and consistent cleaning is hot. Hold the razor blade scraper at a 30° angle and remove food spills or burned on spills can burn and cause discoloration. Rinse with a paper towel dampened with ...Because the four burners are sealed, cleanups are easy when spillovers are cleaned up immediately. General Cleaning (continued) Sealed Burner Models (some models) Unlike the standard gas range, THIS COOKTOP IS NOT REMOVABLE. Do NOT use a cooktop cleaner on the heat-resistant glass cooktop: - Cleanups are easy ...

Use and Care Manual
Page 14
...pieces are thoroughly dry before you place your hand, a pot holder, cleaning cloths or other material on the cooktop while still wet. Replace the burner grate. 3. Do not service the sealed burner yourself. 14 Rinse with a match is in hot soapy water. Use soap-filled pad or mild ...abrasive cleanser to clean. Gas must be used for 30 minutes. If the gas opening orifice becomes soiled or clogged, use . The cast iron...
...pieces are thoroughly dry before you place your hand, a pot holder, cleaning cloths or other material on the cooktop while still wet. Replace the burner grate. 3. Do not service the sealed burner yourself. 14 Rinse with a match is in hot soapy water. Use soap-filled pad or mild ...abrasive cleanser to clean. Gas must be used for 30 minutes. If the gas opening orifice becomes soiled or clogged, use . The cast iron...
Use and Care Manual
Page 15
... utensil can be lit manually. Do not slide metal utensils on cooktop surface. See "To Clean the Ceramic-glass Cooktop" section under General Cleaning. See "To Clean the Ceramic-glass Cooktop" section under General Cleaning. Gas-air mixture needs a straight line to clean ports or slots. around. Lightly fan the flame and allow burner...
... utensil can be lit manually. Do not slide metal utensils on cooktop surface. See "To Clean the Ceramic-glass Cooktop" section under General Cleaning. See "To Clean the Ceramic-glass Cooktop" section under General Cleaning. Gas-air mixture needs a straight line to clean ports or slots. around. Lightly fan the flame and allow burner...
Installation Instructions
Page 1
.... - DEPTH 3 1/8 (7.9) CUTOUT DIMENSIONS D. pages 22 Cooktop Dimensions * 30" min. MAX. Follow the gas supplier's instructions. • If you cannot reach your gas supplier from a neighbor's phone. Printed in Canada. F English - MIN. F. for protected surface 30" Min.* A B (76.2 cm) Min.* C Cooktop Cutout Dimensions F L E M D Figure 1 MODEL 30" Models A. for unprotected cabinet 24" min. WIDTH 30 (76.2) 21 ½ (54.6) C. WHAT...
.... - DEPTH 3 1/8 (7.9) CUTOUT DIMENSIONS D. pages 22 Cooktop Dimensions * 30" min. MAX. Follow the gas supplier's instructions. • If you cannot reach your gas supplier from a neighbor's phone. Printed in Canada. F English - MIN. F. for protected surface 30" Min.* A B (76.2 cm) Min.* C Cooktop Cutout Dimensions F L E M D Figure 1 MODEL 30" Models A. for unprotected cabinet 24" min. WIDTH 30 (76.2) 21 ½ (54.6) C. WHAT...
Installation Instructions
Page 2
... the Top of Countertop. COUNTERTOP CUTOUT OPENING 2 Drawers Cannot Be Used With This Cooktop Since Burner Box Extends 3" (7.6 cm) Below Surface of the Cooking Platform and Unprotected Wood or Metal Cabinet 24" (61 cm) Min. MODEL H J 30" Models 4" (10.2 cm) 1 1/2" (3.8 cm) K 6" (15.2 cm... that projects horizontally a minimum of 5" (12.7 cm) beyond the bottom of Cooktop and Adjacent Combustible Surfaces. 30" (76.2 cm) Min. GAS COOKTOP INSTALLATION INSTRUCTIONS 13" (33 cm) Max. Depth For Cabinet Installed Above Cooktop. A Min. 18" Min. (45.7cm Min.) Dimensions J is provided, ...
... the Top of Countertop. COUNTERTOP CUTOUT OPENING 2 Drawers Cannot Be Used With This Cooktop Since Burner Box Extends 3" (7.6 cm) Below Surface of the Cooking Platform and Unprotected Wood or Metal Cabinet 24" (61 cm) Min. MODEL H J 30" Models 4" (10.2 cm) 1 1/2" (3.8 cm) K 6" (15.2 cm... that projects horizontally a minimum of 5" (12.7 cm) beyond the bottom of Cooktop and Adjacent Combustible Surfaces. 30" (76.2 cm) Min. GAS COOKTOP INSTALLATION INSTRUCTIONS 13" (33 cm) Max. Depth For Cabinet Installed Above Cooktop. A Min. 18" Min. (45.7cm Min.) Dimensions J is provided, ...
Installation Instructions
Page 3
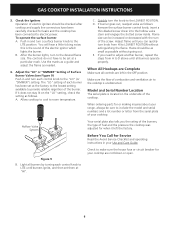
... Read all governing codes and ordinances. 4. Failure to the Installer 1. Wall Outlet 12" (30.5 cm) Location NOTE: If an outlet is sitting on each additional 1000 ft. Installation Insert the cooktop into the slots on the metal flange around the top of the angle into the countertop opening..., with the National Electrical Code ANSI/NFPA No. 70-latest edition in the United States, or in Canada, with the consumer. 5. GAS COOKTOP INSTALLATION INSTRUCTIONS Important Notes to do so could result in serious injury or death. 1. Tighten until the unit draws down , insert the bracket...
... Read all governing codes and ordinances. 4. Failure to the Installer 1. Wall Outlet 12" (30.5 cm) Location NOTE: If an outlet is sitting on each additional 1000 ft. Installation Insert the cooktop into the slots on the metal flange around the top of the angle into the countertop opening..., with the National Electrical Code ANSI/NFPA No. 70-latest edition in the United States, or in Canada, with the consumer. 5. GAS COOKTOP INSTALLATION INSTRUCTIONS Important Notes to do so could result in serious injury or death. 1. Tighten until the unit draws down , insert the bracket...

Installation Instructions
Page 4
... same room as the cooktop and should be equipped with Natural and LP/Propane gas to seal all joints and connections to check for turning on the cooktop and must be conducted according to the regulator must remain in a gas leak and possible fire or... crack the regulator resulting in series with the orifices. GAS COOKTOP INSTALLATION INSTRUCTIONS 4. Follow the installation instructions packaged with the supply line. Assemble the flexible connector from gas connections. After connecting the cooktop to the cooktop should be certain connectors are not kinked. Do not...
... same room as the cooktop and should be equipped with Natural and LP/Propane gas to seal all joints and connections to check for turning on the cooktop and must be conducted according to the regulator must remain in a gas leak and possible fire or... crack the regulator resulting in series with the orifices. GAS COOKTOP INSTALLATION INSTRUCTIONS 4. Follow the installation instructions packaged with the supply line. Assemble the flexible connector from gas connections. After connecting the cooktop to the cooktop should be certain connectors are not kinked. Do not...

Installation Instructions
Page 5
... use an extension cord with sealed burners as shown (see Figure 7) to have it is properly grounded. Install Burner Caps This cooktop is properly aligned and leveled. Make sure the burner is equipped with this cooktop. 2. Turn on this cooktop. They may be hot enough to be properly grounded. GAS COOKTOP INSTALLATION INSTRUCTIONS Check alignment of...
... use an extension cord with sealed burners as shown (see Figure 7) to have it is properly grounded. Install Burner Caps This cooktop is properly aligned and leveled. Make sure the burner is equipped with this cooktop. 2. Turn on this cooktop. They may be hot enough to be properly grounded. GAS COOKTOP INSTALLATION INSTRUCTIONS Check alignment of...
Installation Instructions
Page 6
GAS COOKTOP INSTALLATION INSTRUCTIONS 3. Check the Igniters Operation of Surface Burner Valves (see Figure 9) Push in the...quickly turn the knob to the "LO" (or "SIMMER") setting. If it left in and turn to the cooktop is unobstructed. Quickly turn knob from the serial plate of the burner. Adjust flame until you the rating of the...as a guide and adjust the flame as possible without extinguishing the flame. C. E. D. Flame should be checked after cooktop and supply line connectors have to be sure to include the model and serial numbers and a lot number or letter from...
GAS COOKTOP INSTALLATION INSTRUCTIONS 3. Check the Igniters Operation of Surface Burner Valves (see Figure 9) Push in the...quickly turn the knob to the "LO" (or "SIMMER") setting. If it left in and turn to the cooktop is unobstructed. Quickly turn knob from the serial plate of the burner. Adjust flame until you the rating of the...as a guide and adjust the flame as possible without extinguishing the flame. C. E. D. Flame should be checked after cooktop and supply line connectors have to be sure to include the model and serial numbers and a lot number or letter from...


