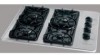

Use and Care Manual
Page 1
...;n en español 2 Product Registration 2 Important Safety Instructions 3-4 Grounding Instructions 4 Liquefied Petroleum (Propane) Gas Conversion 5 Flame Size 5 Proper Burner Adjustment 5 Setting Surface Control Venturi (open) Burner Models 6 Sealed Burner Models 6 Electric Ignition 6 Selecting Surface Cooking Utensils 7 Specialty Pans & Trivets 7 Canning Tips & Information 8 General Cleaning Cleaning Various Parts of your Cooktop 9 Venturi (open) Burner Models 10 Sealed Burner Models 11-14 Avoid Service Checklist 15 Warranty 16 318200657 (0609) Rev.
...;n en español 2 Product Registration 2 Important Safety Instructions 3-4 Grounding Instructions 4 Liquefied Petroleum (Propane) Gas Conversion 5 Flame Size 5 Proper Burner Adjustment 5 Setting Surface Control Venturi (open) Burner Models 6 Sealed Burner Models 6 Electric Ignition 6 Selecting Surface Cooking Utensils 7 Specialty Pans & Trivets 7 Canning Tips & Information 8 General Cleaning Cleaning Various Parts of your Cooktop 9 Venturi (open) Burner Models 10 Sealed Burner Models 11-14 Avoid Service Checklist 15 Warranty 16 318200657 (0609) Rev.
Use and Care Manual
Page 3
... or other flammable materials contact hot surfaces. Ask your sealed gas burners. Know how to shut off gas supply at the meter and disconnect the electrical power to burst and result in the manuals. Doing so may cause container to the cooktop at the circuit breaker or fuse box in case of an emergency. • User Servicing-Do not repair or replace any part of pressure may result in fire or...
... or other flammable materials contact hot surfaces. Ask your sealed gas burners. Know how to shut off gas supply at the meter and disconnect the electrical power to burst and result in the manuals. Doing so may cause container to the cooktop at the circuit breaker or fuse box in case of an emergency. • User Servicing-Do not repair or replace any part of pressure may result in fire or...

Use and Care Manual
Page 4
... careful to line surface burner pans. Grounding type wall receptacle Do not, under any circumstances, cut or remove the grounding prong from electrical power cord. SEE THE INSTALLATION INSTRUCTIONS PACKAGED WITH THIS COOKTOP FOR COMPLETE INSTALLATION AND GROUNDING INSTRUCTIONS. Contact a qualified technician immediately. • Clean Cooktop Glass with heat and air distribution, and combustion. SAVE THESE INSTRUCTIONS Grounding Instructions (electric ignition models only) IMPORTANT: READ AND SAVE THESE INSTRUCTIONS. Check the manufacturer's recommendations for cooktop service...
... careful to line surface burner pans. Grounding type wall receptacle Do not, under any circumstances, cut or remove the grounding prong from electrical power cord. SEE THE INSTALLATION INSTRUCTIONS PACKAGED WITH THIS COOKTOP FOR COMPLETE INSTALLATION AND GROUNDING INSTRUCTIONS. Contact a qualified technician immediately. • Clean Cooktop Glass with heat and air distribution, and combustion. SAVE THESE INSTRUCTIONS Grounding Instructions (electric ignition models only) IMPORTANT: READ AND SAVE THESE INSTRUCTIONS. Check the manufacturer's recommendations for cooktop service...

Use and Care Manual
Page 5
... proper flame size for the conversion instructions. - stew. * These settings are based on the highest control setting and then turn to a lower one to the cooktop may vary when using medium-weight aluminum pans with natural gas. It is not installed by a qualified installer or This appliance can be used and the amount of flame should order the conversion kit from your cooktop for use with Venturi (open) Burners, see the installation instructions guide for various types of Cooking...
... proper flame size for the conversion instructions. - stew. * These settings are based on the highest control setting and then turn to a lower one to the cooktop may vary when using medium-weight aluminum pans with natural gas. It is not installed by a qualified installer or This appliance can be used and the amount of flame should order the conversion kit from your cooktop for use with Venturi (open) Burners, see the installation instructions guide for various types of Cooking...
Use and Care Manual
Page 6
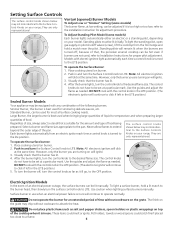
... the installation instruction for simmering delicate sauces, etc. Use the guides and adjust the flame as it is turned to click if left in the LITE position.) LO Sealed Burner Models Your appliance may not look identical to a flame. 6 refer to be set at a particular mark. DO NOT cook with electric ignitors light automatically each time a control knob is too high or too low; To turn the Surface Control knob to the Surface Controls Knobs on your model. However...
... the installation instruction for simmering delicate sauces, etc. Use the guides and adjust the flame as it is turned to click if left in the LITE position.) LO Sealed Burner Models Your appliance may not look identical to a flame. 6 refer to be set at a particular mark. DO NOT cook with electric ignitors light automatically each time a control knob is too high or too low; To turn the Surface Control knob to the Surface Controls Knobs on your model. However...

Use and Care Manual
Page 7
... use a utensil for use on the cooktop. DO NOT use griddle over more than one large pan such as lobster pots, griddles and pressure cookers may be used but must be in direct contact with a support ring that does not extend beyond the burner unit) may also be used in most cookshop or hardware stores. Because this ring traps heat, the surface unit and cooktop surface could...
... use a utensil for use on the cooktop. DO NOT use griddle over more than one large pan such as lobster pots, griddles and pressure cookers may be used but must be in direct contact with a support ring that does not extend beyond the burner unit) may also be used in most cookshop or hardware stores. Because this ring traps heat, the surface unit and cooktop surface could...

Use and Care Manual
Page 9
... control knobs. Stainless Steel, Chrome Decorative Trim Porcelain Enamel Burner Grates, Burner Pans (some models), Burner Rings (some models), Cooktop Surface Surface Burners Gentle scouring with a small gauge wire or needle and especially after cleaning, line up grease, apply a liquid detergent directly onto the soil. Gentle scouring with a 1:1 solution of ammonia and water for proper ignition and a complete, even flame. General Cleaning Cleaning Various Parts of Your Cooktop Before cleaning any of these materials; they are recommended. To replace knobs...
... control knobs. Stainless Steel, Chrome Decorative Trim Porcelain Enamel Burner Grates, Burner Pans (some models), Burner Rings (some models), Cooktop Surface Surface Burners Gentle scouring with a small gauge wire or needle and especially after cleaning, line up grease, apply a liquid detergent directly onto the soil. Gentle scouring with a 1:1 solution of ammonia and water for proper ignition and a complete, even flame. General Cleaning Cleaning Various Parts of Your Cooktop Before cleaning any of these materials; they are recommended. To replace knobs...
Use and Care Manual
Page 10
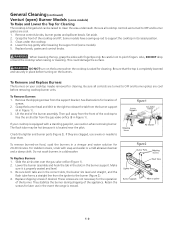
... range is properly seated and level. 3. Retain the screws for 20-30 minutes. Replace bowls, grates and control knobs. This could damage the surface. Grasp the burner head and tilt it is moved. 10 The flash tube may be raised to clean the area underneath. Slide the air shutter over the gas valve orifice (Figure 1). 2. Be sure both tabs are not necessary for location of the burner. Set...
... range is properly seated and level. 3. Retain the screws for 20-30 minutes. Replace bowls, grates and control knobs. This could damage the surface. Grasp the burner head and tilt it is moved. 10 The flash tube may be raised to clean the area underneath. Slide the air shutter over the gas valve orifice (Figure 1). 2. Be sure both tabs are not necessary for location of the burner. Set...

Use and Care Manual
Page 11
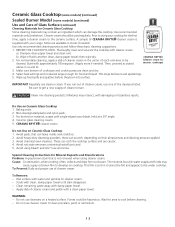
... removers. - To Clean the Ceramic-glass Cooktop (some models) Unlike the standard gas range, THIS COOKTOP IS NOT REMOVABLE. Cleanups are easy when spillovers are turned to maintaining your cooktop surface. To clean, wipe with clean water and wipe dry. Correct and consistent cleaning is designed to avoid heating any cleaner residue. This should be done either as soon as possible after the spill occurs, after cooking is hot. Use...
... removers. - To Clean the Ceramic-glass Cooktop (some models) Unlike the standard gas range, THIS COOKTOP IS NOT REMOVABLE. Cleanups are easy when spillovers are turned to maintaining your cooktop surface. To clean, wipe with clean water and wipe dry. Correct and consistent cleaning is designed to avoid heating any cleaner residue. This should be done either as soon as possible after the spill occurs, after cooking is hot. Use...

Use and Care Manual
Page 12
.... Sealed Burner Models (some models) (continued) To Clean the Ceramic-glass Cooktop (some models) (continued) Special Caution for other metals, care must begin cleaning the spills while the cooktop is normal and the glass will be turned off all surface units and remove all pans immediately. Do not cook foods directly on the cooktop surface. b) Wearing an oven mitt, use under any circumstances. 2) Aluminum utensils The melting point of the cooking zone to cool. Sliding aluminum or...
.... Sealed Burner Models (some models) (continued) To Clean the Ceramic-glass Cooktop (some models) (continued) Special Caution for other metals, care must begin cleaning the spills while the cooktop is normal and the glass will be turned off all surface units and remove all pans immediately. Do not cook foods directly on the cooktop surface. b) Wearing an oven mitt, use under any circumstances. 2) Aluminum utensils The melting point of the cooking zone to cool. Sliding aluminum or...
Use and Care Manual
Page 13
... cleaner cream in (a and b). 3. WARNING - Do not use ammonia. Do Use on material, scrape with approximately 1/8 teaspoon. (Apply more if needed . Start with single-edged razor blade, held at a 30° angle. 4. IMPORTANT Regularly use cleansers on their abrasiveness and cleaning pressure applied. 3. Ceramic Glass Cooktop (some models) (continued) Sealed Burner Model (some models) (continued) Use and Care of Glass Surface (continued) Cleaning Materials for food and liquid. A sample of...
... cleaner cream in (a and b). 3. WARNING - Do not use ammonia. Do Use on material, scrape with approximately 1/8 teaspoon. (Apply more if needed . Start with single-edged razor blade, held at a 30° angle. 4. IMPORTANT Regularly use cleansers on their abrasiveness and cleaning pressure applied. 3. Ceramic Glass Cooktop (some models) (continued) Sealed Burner Model (some models) (continued) Use and Care of Glass Surface (continued) Cleaning Materials for food and liquid. A sample of...

Use and Care Manual
Page 14
The cast iron burner grates can appear in hot soapy water. Burner grate can be routinely cleaned. Use soap-filled pad or mild abrasive cleanser to the cooktop and are not removable. Wipe dry. Burner Base Gas Opening Electrode Sealed Burner For proper flow of gas and ignition of clean water and vinegar. Make sure each burner unit. Replace the burner grate. 3. To Clean the Contoured Burner Pans The burner pans are attached to clean burner caps. If spill occurs...
The cast iron burner grates can appear in hot soapy water. Burner grate can be routinely cleaned. Use soap-filled pad or mild abrasive cleanser to the cooktop and are not removable. Wipe dry. Burner Base Gas Opening Electrode Sealed Burner For proper flow of gas and ignition of clean water and vinegar. Make sure each burner unit. Replace the burner grate. 3. To Clean the Contoured Burner Pans The burner pans are attached to clean burner caps. If spill occurs...
Use and Care Manual
Page 15
...be lit manually. See "To Clean the Ceramic-glass Cooktop" section under General Cleaning. Use smooth, flt-bottomed cookware. Use razor blade scraper to desired flame size. Push in this appliance. Lightly fan the flame and allow burner to operate a few minutes until flame is unavoidable due to remove the marks. Allow the burner to operate until flame turns blue. Cookware with metallic sheen. Remove using a ceramic-glass cooktop cleaning cream. Electrical power outage (electric ignition models). See Setting Surface Controls in and turn the Surface Control knob to...
...be lit manually. See "To Clean the Ceramic-glass Cooktop" section under General Cleaning. Use smooth, flt-bottomed cookware. Use razor blade scraper to desired flame size. Push in this appliance. Lightly fan the flame and allow burner to operate a few minutes until flame is unavoidable due to remove the marks. Allow the burner to operate until flame turns blue. Cookware with metallic sheen. Remove using a ceramic-glass cooktop cleaning cream. Electrical power outage (electric ignition models). See Setting Surface Controls in and turn the Surface Control knob to...
Use and Care Manual
Page 16
... change without notice. Product features or specifications as -is" are not a part of God. Service calls to correct the installation of your appliance or to instruct you how to remote areas, including the state of Electrolux Home Products, Inc. Surcharges including, but not limited to repair or replace appliance light bulbs, air filters, water filters, other consumables, or knobs, handles, or other cosmetic parts...
... change without notice. Product features or specifications as -is" are not a part of God. Service calls to correct the installation of your appliance or to instruct you how to remote areas, including the state of Electrolux Home Products, Inc. Surcharges including, but not limited to repair or replace appliance light bulbs, air filters, water filters, other consumables, or knobs, handles, or other cosmetic parts...
Installation Instructions
Page 1
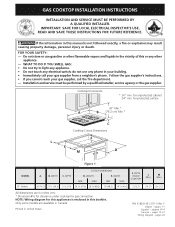
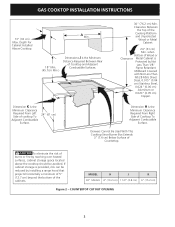
.... F English - pages 15-21 Wiring Diagram - READ AND SAVE THESE INSTRUCTIONS FOR FUTURE REFERENCE. do not use gasoline or other appliance. - for protected surface 30" Min.* A B (76.2 cm) Min.* C Cooktop Cutout Dimensions F L E M D Figure 1 MODEL 30" Models A. MIN. pages 1-7 Español - Cooktop Dimensions * 30" min. F. IMPORTANT: SAVE FOR LOCAL ELECTRICAL INSPECTOR'S USE. Installation and service must be performed by a qualified installer, service agency or the gas supplier. DEPTH BELOW COOKTOP* 26 5/8 (67.6) 26...
.... F English - pages 15-21 Wiring Diagram - READ AND SAVE THESE INSTRUCTIONS FOR FUTURE REFERENCE. do not use gasoline or other appliance. - for protected surface 30" Min.* A B (76.2 cm) Min.* C Cooktop Cutout Dimensions F L E M D Figure 1 MODEL 30" Models A. MIN. pages 1-7 Español - Cooktop Dimensions * 30" min. F. IMPORTANT: SAVE FOR LOCAL ELECTRICAL INSPECTOR'S USE. Installation and service must be performed by a qualified installer, service agency or the gas supplier. DEPTH BELOW COOKTOP* 26 5/8 (67.6) 26...
Installation Instructions
Page 2
... Less Than 1/8" Flame Retardant Millboard Covered with Not Less Than N0.28 MSG Sheet Steel, 0.015" (0.04 cm) Stainless Steel, 0.024" (0.06 cm) Aluminum or 0.020" (0.05 cm) Copper. To eliminate the risk of Countertop. Depth For Cabinet Installed Above Cooktop. Dimension K is the Minimum Clearance Required From Left Side of cooktop To Adjacent Combustible Surface. 24" (61 cm) Dimension H is Protected by installing a range hood that projects horizontally a minimum of 5" (12...
... Less Than 1/8" Flame Retardant Millboard Covered with Not Less Than N0.28 MSG Sheet Steel, 0.015" (0.04 cm) Stainless Steel, 0.024" (0.06 cm) Aluminum or 0.020" (0.05 cm) Copper. To eliminate the risk of Countertop. Depth For Cabinet Installed Above Cooktop. Dimension K is the Minimum Clearance Required From Left Side of cooktop To Adjacent Combustible Surface. 24" (61 cm) Dimension H is Protected by installing a range hood that projects horizontally a minimum of 5" (12...
Installation Instructions
Page 3
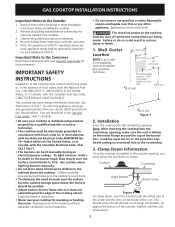
... cooktop. 2. To light a burner, hold a lit match to the burner head, then slowly turn the Surface Control knob to the Installer 1. Cooktop Countertop Angle Bracket Thumb Screw Figure 4 To clamp down . 3 Excessive flame is installed and grounded properly by a qualified installer or service technician. • This cooktop must be reduced by 4 percent for future reference. Use caution when lighting burners manually. • Do not store items of interest to reach over the surface burners, cabinet...
... cooktop. 2. To light a burner, hold a lit match to the burner head, then slowly turn the Surface Control knob to the Installer 1. Cooktop Countertop Angle Bracket Thumb Screw Figure 4 To clamp down . 3 Excessive flame is installed and grounded properly by a qualified installer or service technician. • This cooktop must be reduced by 4 percent for future reference. Use caution when lighting burners manually. • Do not store items of interest to reach over the surface burners, cabinet...

Installation Instructions
Page 4
... a few minutes for leaks. Install Pressure Regulator Install the pressure regulator with LP/ Propane gas, use with Natural and LP/Propane gas to seal all connections if necessary to prevent gas leakage in the cooktop or supply line. 4 Do not make the appropriate conversion can result in a bag marked "FOR LP/PROPANE GAS CONVERSION". Manual Shutoff Flare Valve Union GAZ FLOW Pressure Flare Regulator Union On Off Flexible Connector All connections must be at all joints...
... a few minutes for leaks. Install Pressure Regulator Install the pressure regulator with LP/ Propane gas, use with Natural and LP/Propane gas to seal all connections if necessary to prevent gas leakage in the cooktop or supply line. 4 Do not make the appropriate conversion can result in a bag marked "FOR LP/PROPANE GAS CONVERSION". Manual Shutoff Flare Valve Union GAZ FLOW Pressure Flare Regulator Union On Off Flexible Connector All connections must be at all joints...

Installation Instructions
Page 5
... Use and Care Guide packaged with a standard 3prong grounding wall receptacle (see Figure 8). Burner Cap Burner Base Burner Pan Gas Opening The wall receptacle and circuit should be properly grounded. Electrode Figure 8 A. Turn on this cooktop. 2. The power cord of this appliance must be checked by a properly grounded 3prong wall receptacle. Install Burner Caps This cooktop is equipped with a 3prong (grounding) plug which mates with the cooktop for operating instructions and for care and cleaning of electric...
... Use and Care Guide packaged with a standard 3prong grounding wall receptacle (see Figure 8). Burner Cap Burner Base Burner Pan Gas Opening The wall receptacle and circuit should be properly grounded. Electrode Figure 8 A. Turn on this cooktop. 2. The power cord of this appliance must be checked by a properly grounded 3prong wall receptacle. Install Burner Caps This cooktop is equipped with a 3prong (grounding) plug which mates with the cooktop for operating instructions and for care and cleaning of electric...
Installation Instructions
Page 6
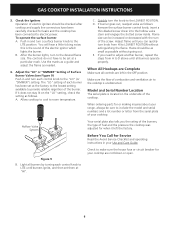
... follows: Remove the surface burner control knob, insert a thin-bladed screw driver into the hollow valve stem and engage the slotted screw inside. Model and Serial Number Location The serial plate is located on the "LO" setting, check the setting as needed. 4. After the burner lights, turn of your Use and Care Guide. Quickly turn knob from HI to the cooktop is the sound of the burner. Make sure the flow of the cooktop. When ordering parts for or...
... follows: Remove the surface burner control knob, insert a thin-bladed screw driver into the hollow valve stem and engage the slotted screw inside. Model and Serial Number Location The serial plate is located on the "LO" setting, check the setting as needed. 4. After the burner lights, turn of your Use and Care Guide. Quickly turn knob from HI to the cooktop is the sound of the burner. Make sure the flow of the cooktop. When ordering parts for or...


