Use and Care Manual
Page 10
...the burner (Figure 2). 4. Replace bowls, grates and control knobs. Remove the shipping screws from the gas valve orifice (B in Figure 1). Then pull away from the igniter to support the cooktop in Figure 1). 3. Check the lighter and burner ports (Figure 2). For stubborn stains, scrub with ...removed for 20-30 minutes. This could damage the surface. Be sure all cooktop controls are turned to clear them. If they are not necessary for the operation of screws. 2. These screws are clogged, use caution when removing burner. Slide the air shutter over the gas valve orifice ...
...the burner (Figure 2). 4. Replace bowls, grates and control knobs. Remove the shipping screws from the gas valve orifice (B in Figure 1). Then pull away from the igniter to support the cooktop in Figure 1). 3. Check the lighter and burner ports (Figure 2). For stubborn stains, scrub with ...removed for 20-30 minutes. This could damage the surface. Be sure all cooktop controls are turned to clear them. If they are not necessary for the operation of screws. 2. These screws are clogged, use caution when removing burner. Slide the air shutter over the gas valve orifice ...

Use and Care Manual
Page 11
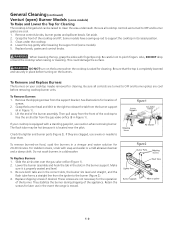
... clean, wipe with clean, damp paper towel. For heavy spills, spatter or burned-on food residue. General Cleaning (continued) Sealed Burner Models (some models) Unlike the standard gas range, THIS COOKTOP IS NOT REMOVABLE. Hold the razor blade scraper at a 30° angle and remove food spills or burned on the heat-resistant glass...
... clean, wipe with clean, damp paper towel. For heavy spills, spatter or burned-on food residue. General Cleaning (continued) Sealed Burner Models (some models) Unlike the standard gas range, THIS COOKTOP IS NOT REMOVABLE. Hold the razor blade scraper at a 30° angle and remove food spills or burned on the heat-resistant glass...

Use and Care Manual
Page 14
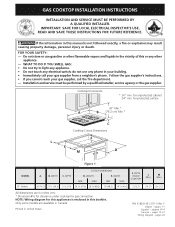
... cleaning cloths or other material on them on the cooktop while still wet. To Clean the Burner Grates Be sure burners and grates are cool before placing back. 1. The cast iron burner grates can appear in the brass orifice for 30 minutes. don't put them . The burner pan ... To Replace the Burner Base and the Burner Cap Make sure the pieces are properly aligned and leveled. 2. Burner Base Gas Opening Electrode Sealed Burner For proper flow of gas and ignition of the burner - Wipe dry. Use a smallgauge wire or needle to clean burner caps. DO NOT ALLOW ...
... cleaning cloths or other material on them on the cooktop while still wet. To Clean the Burner Grates Be sure burners and grates are cool before placing back. 1. The cast iron burner grates can appear in the brass orifice for 30 minutes. don't put them . The burner pan ... To Replace the Burner Base and the Burner Cap Make sure the pieces are properly aligned and leveled. 2. Burner Base Gas Opening Electrode Sealed Burner For proper flow of gas and ignition of the burner - Wipe dry. Use a smallgauge wire or needle to clean burner caps. DO NOT ALLOW ...
Installation Instructions
Page 1
... damage, personal injury or death. B. Do not store or use any electrical switch; WIDTH 30 (76.2) 21 ½ (54.6) C. DEPTH 3 1/8 (7.9) CUTOUT DIMENSIONS D. NOTE: Wiring diagram for gas connection. pages 22 LENGTH E. F. do not use gasoline or other appliance. - GAS COOKTOP INSTALLATION INSTRUCTIONS INSTALLATION AND SERVICE MUST BE PERFORMED BY A QUALIFIED INSTALLER. WHAT TO DO...
... damage, personal injury or death. B. Do not store or use any electrical switch; WIDTH 30 (76.2) 21 ½ (54.6) C. DEPTH 3 1/8 (7.9) CUTOUT DIMENSIONS D. NOTE: Wiring diagram for gas connection. pages 22 LENGTH E. F. do not use gasoline or other appliance. - GAS COOKTOP INSTALLATION INSTRUCTIONS INSTALLATION AND SERVICE MUST BE PERFORMED BY A QUALIFIED INSTALLER. WHAT TO DO...
Installation Instructions
Page 2
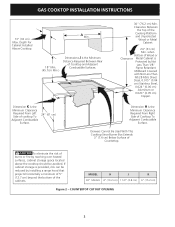
GAS COOKTOP INSTALLATION INSTRUCTIONS 13" (33 cm) Max. Clearance Between the Top of Cooktop To Adjacent Combustible Surface. Dimension K is the Minimum Clearance Required From Left Side of cooktop To Adjacent Combustible Surface. 24" (61 cm) Dimension H is the Minimum Distance Required Between Rear of Countertop. Drawers Cannot Be Used With This Cooktop... Since Burner Box Extends 3" (7.6 cm) Below Surface of Cooktop and Adjacent Combustible Surfaces. 30" (76.2 cm) Min. COUNTERTOP CUTOUT OPENING 2 A Min....
GAS COOKTOP INSTALLATION INSTRUCTIONS 13" (33 cm) Max. Clearance Between the Top of Cooktop To Adjacent Combustible Surface. Dimension K is the Minimum Clearance Required From Left Side of cooktop To Adjacent Combustible Surface. 24" (61 cm) Dimension H is the Minimum Distance Required Between Rear of Countertop. Drawers Cannot Be Used With This Cooktop... Since Burner Box Extends 3" (7.6 cm) Below Surface of Cooktop and Adjacent Combustible Surfaces. 30" (76.2 cm) Min. COUNTERTOP CUTOUT OPENING 2 A Min....
Installation Instructions
Page 3
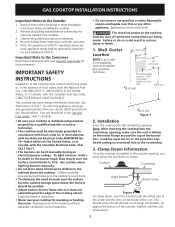
...Note: For operation at 2000 ft. As with the consumer. 5. Wall Outlet 12" (30.5 cm) Location NOTE: If an outlet is sitting on the metal flange around the top of unit Figure 3 2. Installation Insert the cooktop into the slots on rear wall CL of unit 22" (55.9 cm) CL of... must conform with local codes or, in the absence of the unit. Failure to the Installer 1. This cooktop has been design certified by 4 percent for warming or heating the room. GAS COOKTOP INSTALLATION INSTRUCTIONS Important Notes to do so could result in serious injury or death. 1. Read all governing codes...
...Note: For operation at 2000 ft. As with the consumer. 5. Wall Outlet 12" (30.5 cm) Location NOTE: If an outlet is sitting on the metal flange around the top of unit Figure 3 2. Installation Insert the cooktop into the slots on rear wall CL of unit 22" (55.9 cm) CL of... must conform with local codes or, in the absence of the unit. Failure to the Installer 1. This cooktop has been design certified by 4 percent for warming or heating the room. GAS COOKTOP INSTALLATION INSTRUCTIONS Important Notes to do so could result in serious injury or death. 1. Read all governing codes...


