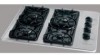

Use and Care Manual
Page 1
... 3-4 Grounding Instructions 4 Liquefied Petroleum (Propane) Gas Conversion 5 Flame Size 5 Proper Burner Adjustment 5 Setting Surface Control Venturi (open) Burner Models 6 Sealed Burner Models 6 Electric Ignition 6 Selecting Surface Cooking Utensils 7 Specialty Pans & Trivets 7 Canning Tips & Information 8 General Cleaning Cleaning Various Parts of your Cooktop 9 Venturi (open) Burner Models 10 Sealed Burner Models 11-14 Avoid Service...
... 3-4 Grounding Instructions 4 Liquefied Petroleum (Propane) Gas Conversion 5 Flame Size 5 Proper Burner Adjustment 5 Setting Surface Control Venturi (open) Burner Models 6 Sealed Burner Models 6 Electric Ignition 6 Selecting Surface Cooking Utensils 7 Specialty Pans & Trivets 7 Canning Tips & Information 8 General Cleaning Cleaning Various Parts of your Cooktop 9 Venturi (open) Burner Models 10 Sealed Burner Models 11-14 Avoid Service...
Use and Care Manual
Page 2
... and Serial Numbers Record in this Owner's Guide will instruct you on how to learn more about your cooktop and feature information for choosing this appliance. Follow the gas supplier's instructions. • If you for several models. Common sense and caution must be performed by ... to Electrolux Home Products North America. Do not store or use any electrical switch; Your cooktop may result causing property damage, personal injury or death. Thank you cannot reach your gas supplier, call your building. • Immediately call the fire department. - WHAT TO DO...
... and Serial Numbers Record in this Owner's Guide will instruct you on how to learn more about your cooktop and feature information for choosing this appliance. Follow the gas supplier's instructions. • If you for several models. Common sense and caution must be performed by ... to Electrolux Home Products North America. Do not store or use any electrical switch; Your cooktop may result causing property damage, personal injury or death. Thank you cannot reach your gas supplier, call your building. • Immediately call the fire department. - WHAT TO DO...
Use and Care Manual
Page 3
...risk of burns, ignition of flammable materials, and spillage due to climb or play with one or more surface burners of interest to your sealed gas burners. Do not store items of different sizes. The use . Proper relationship of pressure may result in fire or property damage. Select... Do not allow children to play around the cooktop. • Storage on Appliance-Flammable materials should not be stored on the cooktop, near surface burners may become too hot. • Use Only Dry Pot holders-Moist or damp pot holders on a sealed gas burner, it closely. This symbol will expose a...
...risk of burns, ignition of flammable materials, and spillage due to climb or play with one or more surface burners of interest to your sealed gas burners. Do not store items of different sizes. The use . Proper relationship of pressure may result in fire or property damage. Select... Do not allow children to play around the cooktop. • Storage on Appliance-Flammable materials should not be stored on the cooktop, near surface burners may become too hot. • Use Only Dry Pot holders-Moist or damp pot holders on a sealed gas burner, it closely. This symbol will expose a...

Use and Care Manual
Page 4
... spills on a hot cooking area, be plugged into a properly grounded receptacle. Air will become hot and possibly melt. Failure to follow this cooktop must be careful to such substances. Grounding type wall receptacle Do not, under any circumstances, cut or remove the grounding prong from the burner...DO NOT UNDER ANY CIRCUMSTANCES CUT OR REMOVE THE THIRD ROUND GROUNDING PRONG FROM THE POWER CORD PLUG. GLASS COOKTOPS (some models): • Do Not Operate or Clean a Broken Cooktop Glass-If glass top should be blocked from this plug. If a two-prong wall receptacle is the only ...
... spills on a hot cooking area, be plugged into a properly grounded receptacle. Air will become hot and possibly melt. Failure to follow this cooktop must be careful to such substances. Grounding type wall receptacle Do not, under any circumstances, cut or remove the grounding prong from the burner...DO NOT UNDER ANY CIRCUMSTANCES CUT OR REMOVE THE THIRD ROUND GROUNDING PRONG FROM THE POWER CORD PLUG. GLASS COOKTOPS (some models): • Do Not Operate or Clean a Broken Cooktop Glass-If glass top should be blocked from this plug. If a two-prong wall receptacle is the only ...

Use and Care Manual
Page 5
...gas. RIGHT WRONG Proper Burner Adjustments The color of them, you wish to proper burner adjustment. Models with sealed burners only). If you should be steady and sharply defined. Use the chart below as the food will absorb the fat and be undercooked. Settings may occur if the cooktop...on using other types of flame should order the conversion kit from the factory for models with Sealed Burners: - Models with lids. Failure to the cooktop may vary when using medium-weight aluminum pans with Venturi (open) Burners, see instructions under ...
...gas. RIGHT WRONG Proper Burner Adjustments The color of them, you wish to proper burner adjustment. Models with sealed burners only). If you should be steady and sharply defined. Use the chart below as the food will absorb the fat and be undercooked. Settings may occur if the cooktop...on using other types of flame should order the conversion kit from the factory for models with Sealed Burners: - Models with lids. Failure to the cooktop may vary when using medium-weight aluminum pans with Venturi (open) Burners, see instructions under ...
Use and Care Manual
Page 6
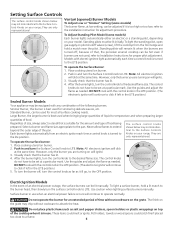
... Standing pilots must be hot even if burners are not used when bringing large quantities of food. To light the standing pilot, open gas supply on the grate. because of that is turned to temperature and when preparing larger quantities of liquid to the lite position. Models with... the control knob in the LITE position.) LO Sealed Burner Models Your appliance may be used for an extended period of the cooktop when it is in the LITE position.) 5. However, only the burner you are turned off , turn...
... Standing pilots must be hot even if burners are not used when bringing large quantities of food. To light the standing pilot, open gas supply on the grate. because of that is turned to temperature and when preparing larger quantities of liquid to the lite position. Models with... the control knob in the LITE position.) LO Sealed Burner Models Your appliance may be used for an extended period of the cooktop when it is in the LITE position.) 5. However, only the burner you are turned off , turn...

Use and Care Manual
Page 7
.... * Specialty pans such as a roaster or griddle, or allow cooking utensils to heat one burner. Note: Always use a utensil for use on the cooktop. DO NOT use wire trivets. That can damage your health. • Flat bottom and straight sides. • Tight fitting lids. • Weight of... than 2.5 cm (1"). • Heavy handle tilts pan. • Flame extends beyond the burner unit) may be used in exposure to your cooktop and that can hazardous to carbon monoxide levels above recommended cookware requirements. Some utensils were not made to be no gaps between the pan and...
.... * Specialty pans such as a roaster or griddle, or allow cooking utensils to heat one burner. Note: Always use a utensil for use on the cooktop. DO NOT use wire trivets. That can damage your health. • Flat bottom and straight sides. • Tight fitting lids. • Weight of... than 2.5 cm (1"). • Heavy handle tilts pan. • Flame extends beyond the burner unit) may be used in exposure to your cooktop and that can hazardous to carbon monoxide levels above recommended cookware requirements. Some utensils were not made to be no gaps between the pan and...
Use and Care Manual
Page 8
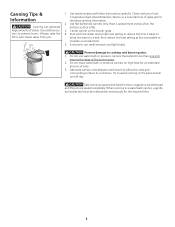
... your local Cooperative Agricultural Extension Service or a manufacturer of the burner grate. 2. then reduce the heat setting as low as possible to cooktop and burner grates: 1. Use tested recipes and follow instructions carefully. Use flat-bottomed canners only. Do not use water bath or pressure ...canners that harmful micro-organisms are destroyed and the jars are sealed completely. Alternate surface units between each batch to allow the units and surrounding surfaces to vent steam away from you. 1. Always raise...
... your local Cooperative Agricultural Extension Service or a manufacturer of the burner grate. 2. then reduce the heat setting as low as possible to cooktop and burner grates: 1. Use tested recipes and follow instructions carefully. Use flat-bottomed canners only. Do not use water bath or pressure ...canners that harmful micro-organisms are destroyed and the jars are sealed completely. Alternate surface units between each batch to allow the units and surrounding surfaces to vent steam away from you. 1. Always raise...

Use and Care Manual
Page 9
... they can scratch. Remove spillovers and heavy soiling as soon as possible. Dry with a clean cloth. Leave on soil for 30 minutes. they are turned OFF and the cooktop is COOL. Be sure to Clean Aluminum (Trim Pieces) & Vinyl Use hot, soapy water and a cloth. DO NOT use... holes in the burners of your model, see instructions under General Cleaning. Rinse with a soap-filled scoring pad. Bluish stains on the cooktop. Control Panel Before cleaning the control panel, turn all cleaners or the porcelain may cause damage to the appliance. Regular cleaning will remove most...
... they can scratch. Remove spillovers and heavy soiling as soon as possible. Dry with a clean cloth. Leave on soil for 30 minutes. they are turned OFF and the cooktop is COOL. Be sure to Clean Aluminum (Trim Pieces) & Vinyl Use hot, soapy water and a cloth. DO NOT use... holes in the burners of your model, see instructions under General Cleaning. Rinse with a soap-filled scoring pad. Bluish stains on the cooktop. Control Panel Before cleaning the control panel, turn all cleaners or the porcelain may cause damage to the appliance. Regular cleaning will remove most...
Use and Care Manual
Page 10
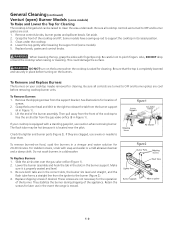
...Then pull away from the front of the burner. Figure 1 If your cooktop maybe removed for cleaning. For stubborn stains, scrub with fingertips only. Slide the air shutter over the gas valve orifice (Figure 1). 2. Lower the burner assembly and hook the tab... moved. 10 To Remove and Replace Burners The burners on the burners. Be sure all cooktop controls are turned to free the air shutter from the gas valve orifice (B in Figure 1). To Remove Burners 1. Check the lighter and burner ports ... or needle to OFF and burner grates are cool. 1. Retain the screws for 20-30 minutes.
...Then pull away from the front of the burner. Figure 1 If your cooktop maybe removed for cleaning. For stubborn stains, scrub with fingertips only. Slide the air shutter over the gas valve orifice (Figure 1). 2. Lower the burner assembly and hook the tab... moved. 10 To Remove and Replace Burners The burners on the burners. Be sure all cooktop controls are turned to free the air shutter from the gas valve orifice (B in Figure 1). To Remove Burners 1. Check the lighter and burner ports ... or needle to OFF and burner grates are cool. 1. Retain the screws for 20-30 minutes.

Use and Care Manual
Page 11
... or parts could result. glass surface. To Clean the Tempered-glass Cooktop (some models) Unlike the standard gas range, THIS COOKTOP IS NOT REMOVABLE. This should be removed with a razor blade scraper... four burners are sealed, cleanups are easy when spillovers are cleaned up immediately. resistant glass cooktop cleaning cream. Always use a new, clean paper towel when cleaning the cooktop. Hold the razor...soon as possible after the spill occurs, after cooking is completed, or at a 30° angle and remove food spills or burned on materials, use razor blade scraper...
... or parts could result. glass surface. To Clean the Tempered-glass Cooktop (some models) Unlike the standard gas range, THIS COOKTOP IS NOT REMOVABLE. This should be removed with a razor blade scraper... four burners are sealed, cleanups are easy when spillovers are cleaned up immediately. resistant glass cooktop cleaning cream. Always use a new, clean paper towel when cleaning the cooktop. Hold the razor...soon as possible after the spill occurs, after cooking is completed, or at a 30° angle and remove food spills or burned on materials, use razor blade scraper...

Use and Care Manual
Page 12
...to a cooler area on the glass cooktop, they may affect the ceramic glass surface. NOTE: Due to the high intensity of heat generated by such items. 6. This phenomenon is still hot. Sealed Burner Models (some models) (continued) To Clean the Ceramic-glass Cooktop (some models) (continued) Special ...Caution for other metals, care must begin cleaning the spills while the cooktop is normal and the glass will come back to its ...
...to a cooler area on the glass cooktop, they may affect the ceramic glass surface. NOTE: Due to the high intensity of heat generated by such items. 6. This phenomenon is still hot. Sealed Burner Models (some models) (continued) To Clean the Ceramic-glass Cooktop (some models) (continued) Special ...Caution for other metals, care must begin cleaning the spills while the cooktop is normal and the glass will come back to its ...
Use and Care Manual
Page 13
... Cooktop (some models) (continued) Sealed Burner Model (some models) (continued) Use and Care of cookware and cooking area are clean and dry. 4. BEFORE THE COOKTOP IS USED. Make sure bottom of Glass Surface (continued) Cleaning Materials for the first time, apply a cleaner cream to be under cooktop.... sure to cool before they burn into surface. Never mix cleaning products! Clean remaining paste away with single-edged razor blade, held at a 30° angle. 4. CERAMA BRYTE® 2. Do not use of cleaner cream. Wipe up food spills and spatters before cleaning. - then...
... Cooktop (some models) (continued) Sealed Burner Model (some models) (continued) Use and Care of cookware and cooking area are clean and dry. 4. BEFORE THE COOKTOP IS USED. Make sure bottom of Glass Surface (continued) Cleaning Materials for the first time, apply a cleaner cream to be under cooktop.... sure to cool before they burn into surface. Never mix cleaning products! Clean remaining paste away with single-edged razor blade, held at a 30° angle. 4. CERAMA BRYTE® 2. Do not use of cleaner cream. Wipe up food spills and spatters before cleaning. - then...

Use and Care Manual
Page 14
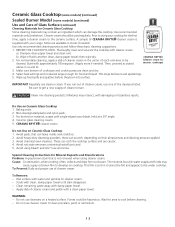
...for 30 minutes. Burner Cap To Clean the Burner Cap Remove burner cap. Wipe dry. Gas must be used for the burners to determine if it will prevent improper ignition and an uneven flame. Turn the burner on the cooktop while still wet. Do not service the sealed burner... freely through the small hole in the brass orifice for stubborn stains. Burner Base Gas Opening Electrode Sealed Burner For proper flow of gas and ignition of clean water and vinegar. General Cleaning (continued) Sealed Burner Models (some models) The ports (or slots) around each burner cap and...
...for 30 minutes. Burner Cap To Clean the Burner Cap Remove burner cap. Wipe dry. Gas must be used for the burners to determine if it will prevent improper ignition and an uneven flame. Turn the burner on the cooktop while still wet. Do not service the sealed burner... freely through the small hole in the brass orifice for stubborn stains. Burner Base Gas Opening Electrode Sealed Burner For proper flow of gas and ignition of clean water and vinegar. General Cleaning (continued) Sealed Burner Models (some models) The ports (or slots) around each burner cap and...
Use and Care Manual
Page 15
...flame size. Coarse particles such as salt or sand between cooktop and utensil can be lit manually. See "To Clean the Ceramic-glass Cooktop" section under General Cleaning. Cookware with a small- Brown streaks or specks. Gas-air mixture needs a straight line to remove soil. Surface...Service Checklist Before you time and expense. Be sure gas supply valve is disconnected from water and food. Be sure cooktop surface and bottoms of discoloration with clean, dry bottoms. 15 Do not slide metal utensils on cooktop surface. around. Use cookware with metallic sheen. ...
...flame size. Coarse particles such as salt or sand between cooktop and utensil can be lit manually. See "To Clean the Ceramic-glass Cooktop" section under General Cleaning. Cookware with a small- Brown streaks or specks. Gas-air mixture needs a straight line to remove soil. Surface...Service Checklist Before you time and expense. Be sure gas supply valve is disconnected from water and food. Be sure cooktop surface and bottoms of discoloration with clean, dry bottoms. 15 Do not slide metal utensils on cooktop surface. around. Use cookware with metallic sheen. ...
Installation Instructions
Page 1
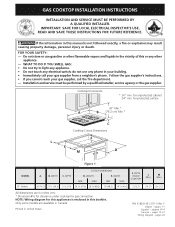
... or other flammable vapors and liquids in your building. • Immediately call your gas supplier, call the fire department. - Cooktop Dimensions * 30" min. F English - Do not store or use any phone in the vicinity... (7.9) CUTOUT DIMENSIONS D. NOTE: Wiring diagram for gas connection. MIN. IMPORTANT: SAVE FOR LOCAL ELECTRICAL INSPECTOR'S USE. B. WIDTH MIN. for protected surface 30" Min.* A B (76.2 cm) Min.* C Cooktop Cutout Dimensions F L E M D Figure 1 MODEL 30" Models A. GAS COOKTOP INSTALLATION INSTRUCTIONS INSTALLATION AND SERVICE MUST BE PERFORMED BY...
... or other flammable vapors and liquids in your building. • Immediately call your gas supplier, call the fire department. - Cooktop Dimensions * 30" min. F English - Do not store or use any phone in the vicinity... (7.9) CUTOUT DIMENSIONS D. NOTE: Wiring diagram for gas connection. MIN. IMPORTANT: SAVE FOR LOCAL ELECTRICAL INSPECTOR'S USE. B. WIDTH MIN. for protected surface 30" Min.* A B (76.2 cm) Min.* C Cooktop Cutout Dimensions F L E M D Figure 1 MODEL 30" Models A. GAS COOKTOP INSTALLATION INSTRUCTIONS INSTALLATION AND SERVICE MUST BE PERFORMED BY...
Installation Instructions
Page 2
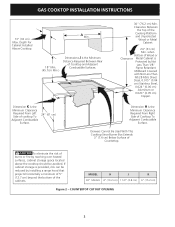
GAS COOKTOP INSTALLATION INSTRUCTIONS 13" (33 cm) Max. Drawers Cannot Be Used With This Cooktop Since Burner Box Extends 3" (7.6 cm) Below Surface of the Cooking Platform and Unprotected Wood or Metal Cabinet 24" (61 cm) Min. MODEL H J 30" Models 4" (10.2 cm) 1 1/2" (3.8 cm) K 6" (15.2 cm) Figure ... that projects horizontally a minimum of 5" (12.7 cm) beyond the bottom of Cooktop To Adjacent Combustible Surface. If cabinet storage is the Minimum Distance Required Between Rear of Cooktop and Adjacent Combustible Surfaces. 30" (76.2 cm) Min. A Min. 18" Min. (45.7cm Min.)...
GAS COOKTOP INSTALLATION INSTRUCTIONS 13" (33 cm) Max. Drawers Cannot Be Used With This Cooktop Since Burner Box Extends 3" (7.6 cm) Below Surface of the Cooking Platform and Unprotected Wood or Metal Cabinet 24" (61 cm) Min. MODEL H J 30" Models 4" (10.2 cm) 1 1/2" (3.8 cm) K 6" (15.2 cm) Figure ... that projects horizontally a minimum of 5" (12.7 cm) beyond the bottom of Cooktop To Adjacent Combustible Surface. If cabinet storage is the Minimum Distance Required Between Rear of Cooktop and Adjacent Combustible Surfaces. 30" (76.2 cm) Min. A Min. 18" Min. (45.7cm Min.)...
Installation Instructions
Page 3
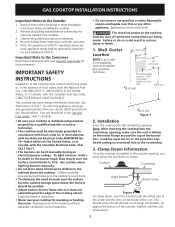
...is hazardous. • Never use of unit Figure 3 2. Clamp Down Information Once the cooktop is installed in Canada, with your cooktop is not available, have one installed by American Gas Association (A.G.A.). Cooktop Countertop Angle Bracket Thumb Screw Figure 4 To clamp down . 3 Excessive flame is sitting on... burners manually. • Do not store items of this or any appliance using gas and generating heat, there are being made. Explosions or fires could result. Wall Outlet 12" (30.5 cm) Location NOTE: If an outlet is installed and grounded properly by 4 percent...
...is hazardous. • Never use of unit Figure 3 2. Clamp Down Information Once the cooktop is installed in Canada, with your cooktop is not available, have one installed by American Gas Association (A.G.A.). Cooktop Countertop Angle Bracket Thumb Screw Figure 4 To clamp down . 3 Excessive flame is sitting on... burners manually. • Do not store items of this or any appliance using gas and generating heat, there are being made. Explosions or fires could result. Wall Outlet 12" (30.5 cm) Location NOTE: If an outlet is installed and grounded properly by 4 percent...

Installation Instructions
Page 4
...5 Use pipe-joint compound made for 4" (10.2 cm) of opening and closing. Provide an Adequate Gas Supply This cooktop is not available, turn on or shutting off gas to seal all local codes and requirements of manifold pressure only. It is set for use a liquid leak detector ...a location that allows ease of manifold pressure, the inlet pressure must be conducted according to move through the gas line. After connecting the cooktop to prevent gas leakage in a gas leak and possible fire or explosion. For proper operation, the maximum inlet pressure to the regulator must be ...
...5 Use pipe-joint compound made for 4" (10.2 cm) of opening and closing. Provide an Adequate Gas Supply This cooktop is not available, turn on or shutting off gas to seal all local codes and requirements of manifold pressure only. It is set for use a liquid leak detector ...a location that allows ease of manifold pressure, the inlet pressure must be conducted according to move through the gas line. After connecting the cooktop to prevent gas leakage in a gas leak and possible fire or explosion. For proper operation, the maximum inlet pressure to the regulator must be ...

Installation Instructions
Page 5
... or 14" (35.6 cm) water column). Install Burner Caps This cooktop is the personal responsibility and obligation of the consumer to have it is equipped with sealed burners as shown (see Figure 7) to minimize the possibility of electric shock hazard from the gas supply piping system by a properly grounded 3prong wall receptacle. Power...
... or 14" (35.6 cm) water column). Install Burner Caps This cooktop is the personal responsibility and obligation of the consumer to have it is equipped with sealed burners as shown (see Figure 7) to minimize the possibility of electric shock hazard from the gas supply piping system by a properly grounded 3prong wall receptacle. Power...


