Installation Instructions (All Languages)
Page 2
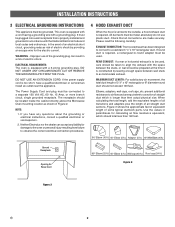
... flow resistance equivalent, which is required. MAXIMUM DUCT LENGTH: For satisfactory air movement, the total duct length of some typical ductwork parts. present additional resistance to air flow and are made securely. Use the values in a risk of all straight duct sections. The...(25 ft.) 45° Elbow (5 ft.) Wall cap (40 ft.) Roof cap (24 ft.) Figure 3 Figure 2 E 2 It must be prepared at the time it is too short, have any liability for the electric current. ELECTRICAL REQUIREMENTS The oven is to be located inside the cabinet directly above the Microwave Oven...
... flow resistance equivalent, which is required. MAXIMUM DUCT LENGTH: For satisfactory air movement, the total duct length of some typical ductwork parts. present additional resistance to air flow and are made securely. Use the values in a risk of all straight duct sections. The...(25 ft.) 45° Elbow (5 ft.) Wall cap (40 ft.) Roof cap (24 ft.) Figure 3 Figure 2 E 2 It must be prepared at the time it is too short, have any liability for the electric current. ELECTRICAL REQUIREMENTS The oven is to be located inside the cabinet directly above the Microwave Oven...
Installation Instructions (All Languages)
Page 3
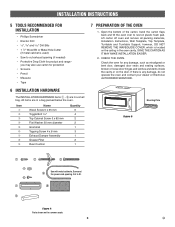
... protection • Scissors • Pencil • Measure • Tape 6 INSTALLATION HARDWARE The INSTALLATION HARDWARE items ➀ - ➅ are in a small bag. Cut to fit. 9 Figure 4 Parts shown not to common scale. 3 E INSTALLATION INSTRUCTIONS 5 TOOLS RECOMMENDED FOR INSTALLATION • Phillips Screwdriver • Electric Drill • 1/2", 5/8" and 3/32" Drill Bits • 1 1/2" Wood Bit...
... protection • Scissors • Pencil • Measure • Tape 6 INSTALLATION HARDWARE The INSTALLATION HARDWARE items ➀ - ➅ are in a small bag. Cut to fit. 9 Figure 4 Parts shown not to common scale. 3 E INSTALLATION INSTRUCTIONS 5 TOOLS RECOMMENDED FOR INSTALLATION • Phillips Screwdriver • Electric Drill • 1/2", 5/8" and 3/32" Drill Bits • 1 1/2" Wood Bit...

Complete Owner's Guide (English)
Page 1
All about the Use &Care of your Microwave Oven 316495054 (January 2009) TABLE OF CONTENTS WELCOME & CONGRATULATION 2 IMPORTANT SAFETY INSTRUCTIONS 2 PART NAMES 8 BEFORE OPERATING 10 MANUAL COOKING 11 SENSOR COOKING 12 AUTO COOKING 16 CONVENIENT FEATURES 23 CLEANING AND CARE 26 SERVICE CALL CHECK 28 SPECIFICATIONS 28 WARRANTY 29 www.frigidaire.com USA 1-800-944-9044 www.frigidaire.ca Canada 1-800-265-8352
All about the Use &Care of your Microwave Oven 316495054 (January 2009) TABLE OF CONTENTS WELCOME & CONGRATULATION 2 IMPORTANT SAFETY INSTRUCTIONS 2 PART NAMES 8 BEFORE OPERATING 10 MANUAL COOKING 11 SENSOR COOKING 12 AUTO COOKING 16 CONVENIENT FEATURES 23 CLEANING AND CARE 26 SERVICE CALL CHECK 28 SPECIFICATIONS 28 WARRANTY 29 www.frigidaire.com USA 1-800-944-9044 www.frigidaire.ca Canada 1-800-265-8352
Complete Owner's Guide (English)
Page 5
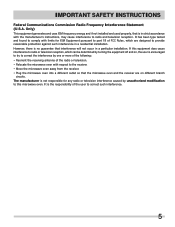
... to radio or television reception, which are on , the user is the responsibility of the radio or television. • Relocate the microwave oven with the manufacturer's instructions, may cause interference to provide reasonable protection against such interference in a residential installation. However, there is in...not installed and used properly, that is no guarantee that the microwave oven and the receiver are designed to radio and television reception. The manufacturer is not responsible for ISM Equipment pursuant to part 18 of FCC Rules, which can be determined by turning ...
... to radio or television reception, which are on , the user is the responsibility of the radio or television. • Relocate the microwave oven with the manufacturer's instructions, may cause interference to provide reasonable protection against such interference in a residential installation. However, there is in...not installed and used properly, that is no guarantee that the microwave oven and the receiver are designed to radio and television reception. The manufacturer is not responsible for ISM Equipment pursuant to part 18 of FCC Rules, which can be determined by turning ...
Complete Owner's Guide (English)
Page 6
.... • Deep fat fry. • Dry wood, gourds, herbs or wet papers. 6 Check temperature before cooking to absorb the microwave energy. When using the microwave oven at least once. • Rearrange foods such as chicken and hamburgers. Generally, covered foods will in regular brown bags or glass...turntable and support nor turn both from top to bottom and from the center of the dish to speed cooking of dish is a normal part of moisture that steam escapes. General • Cut baked goods with nipples on bottles after heating to avoid "eruption". • Use ...
.... • Deep fat fry. • Dry wood, gourds, herbs or wet papers. 6 Check temperature before cooking to absorb the microwave energy. When using the microwave oven at least once. • Rearrange foods such as chicken and hamburgers. Generally, covered foods will in regular brown bags or glass...turntable and support nor turn both from top to bottom and from the center of the dish to speed cooking of dish is a normal part of moisture that steam escapes. General • Cut baked goods with nipples on bottles after heating to avoid "eruption". • Use ...
Complete Owner's Guide (English)
Page 8
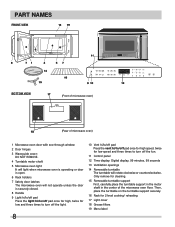
... First, carefully place the turntable support in the motor shaft in the center of microwave oven) 1 Microwave oven door with see-through window 2 Door hinges 3 Waveguide cover: DO NOT REMOVE. 4 Turntable motor shaft 5 Microwave oven light It will light when microwave oven is operating or door is open. 6 Rack holders 7 Safety door latches The.... 11 Control panel 12 Time display: Digital display, 99 minutes, 99 seconds 13 Ventilation openings 14 Removable turntable The turntable will rotate clockwise or counterclockwise. PART NAMES BOTTOM VIEW (Front of microwave oven) (Rear of the...
... First, carefully place the turntable support in the motor shaft in the center of microwave oven) 1 Microwave oven door with see-through window 2 Door hinges 3 Waveguide cover: DO NOT REMOVE. 4 Turntable motor shaft 5 Microwave oven light It will light when microwave oven is operating or door is open. 6 Rack holders 7 Safety door latches The.... 11 Control panel 12 Time display: Digital display, 99 minutes, 99 seconds 13 Ventilation openings 14 Removable turntable The turntable will rotate clockwise or counterclockwise. PART NAMES BOTTOM VIEW (Front of microwave oven) (Rear of the...
Complete Owner's Guide (English)
Page 12
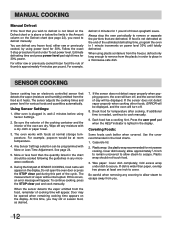
...not touch food. 3. After oven is wider than the quantity listed in order to secure. Any Sensor Settings selection can defrost any microwave cookbook. 6. When the sensor detects the vapor emitted from the food, remainder of day will appear. fold excess wrap under To set... time will be at least one inch to cook manually. 9. Check food for microwave cooking. If this part of the oven are defrosted. If additional time is above or below the limits in a microwave-safe dish. Covering Foods: Some foods cook better when covered. For example, defrost...
...not touch food. 3. After oven is wider than the quantity listed in order to secure. Any Sensor Settings selection can defrost any microwave cookbook. 6. When the sensor detects the vapor emitted from the food, remainder of day will appear. fold excess wrap under To set... time will be at least one inch to cook manually. 9. Check food for microwave cooking. If this part of the oven are defrosted. If additional time is above or below the limits in a microwave-safe dish. Covering Foods: Some foods cook better when covered. For example, defrost...

Complete Owner's Guide (English)
Page 16
...not necessary to increase quantity and press the START enter pad. Press the power level pad once or twice before cooking is divided into 2 parts - Step Press 1. Open the door, follow the instruction shown in dish. Press the START enter pad to increase quantity and press the ...continue cooking. Note that eggs will stop. When oven stops, stir and press the START enter pad. Each food has a cooking hint except for microwaving. auto cook 3 Quick Meals chart 2. Follow manufacturer's directions for how to butter or margarine in the display and close the door and press the...
...not necessary to increase quantity and press the START enter pad. Press the power level pad once or twice before cooking is divided into 2 parts - Step Press 1. Open the door, follow the instruction shown in dish. Press the START enter pad to increase quantity and press the ...continue cooking. Note that eggs will stop. When oven stops, stir and press the START enter pad. Each food has a cooking hint except for microwaving. auto cook 3 Quick Meals chart 2. Follow manufacturer's directions for how to butter or margarine in the display and close the door and press the...
Complete Owner's Guide (English)
Page 26
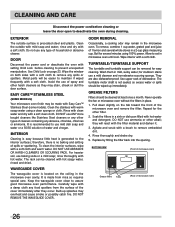
... cloth. Rinse thoroughly and shake dry. 5. rinse and dry with setting Child Lock before cleaning or leave the door open to assure good microwave oven performance. DOOR Disconnect the power cord or deactivate the oven with a soft cloth. DO NOT use ANY store bought cleaners like Stainless .... therefore, there is precoated steel and plastic. BOTTOM VIEW (Front of microwave oven) Grease filters Tabs (Rear of the cover immediately after they will be cleaned with a soft cloth. Metal parts will react with mild soap and water; DO NOT USE ABRASIVE OR HARSH CLEANERS OR SCOURING PADS....
... cloth. Rinse thoroughly and shake dry. 5. rinse and dry with setting Child Lock before cleaning or leave the door open to assure good microwave oven performance. DOOR Disconnect the power cord or deactivate the oven with a soft cloth. DO NOT use ANY store bought cleaners like Stainless .... therefore, there is precoated steel and plastic. BOTTOM VIEW (Front of microwave oven) Grease filters Tabs (Rear of the cover immediately after they will be cleaned with a soft cloth. Metal parts will react with mild soap and water; DO NOT USE ABRASIVE OR HARSH CLEANERS OR SCOURING PADS....
Complete Owner's Guide (English)
Page 29
... Exclusions This warranty does not cover the following: 1. Products used and maintained in materials or workmanship, or for service and parts under this warranty must be obtained by contacting Electrolux at the addresses or phone numbers below. Service calls to repair or replace... is installed, used in accordance with original serial numbers that prove to remote areas, including the state of parts other than genuine Electrolux parts or parts obtained from persons other than authorized service companies; Obligations for appliances not in ordinary household use or used other...
... Exclusions This warranty does not cover the following: 1. Products used and maintained in materials or workmanship, or for service and parts under this warranty must be obtained by contacting Electrolux at the addresses or phone numbers below. Service calls to repair or replace... is installed, used in accordance with original serial numbers that prove to remote areas, including the state of parts other than genuine Electrolux parts or parts obtained from persons other than authorized service companies; Obligations for appliances not in ordinary household use or used other...


