Installation Instructions (All Languages)
Page 1
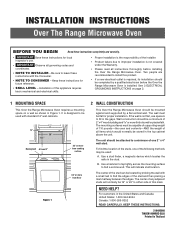
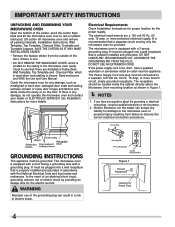
... located by a flat vertical wall. B. This will normally be capable of supporting weight of 110 pounds-the oven and contents-AND the weight of this appliance requires basic mechanical and electrical skills. • Proper installation is not covered under the Warranty. • Please read all instructions thoroughly before the Over the Range Microwave Oven is installed. For customers in Figure 1. Keep these instructions for proper installation...
... located by a flat vertical wall. B. This will normally be capable of supporting weight of 110 pounds-the oven and contents-AND the weight of this appliance requires basic mechanical and electrical skills. • Proper installation is not covered under the Warranty. • Please read all instructions thoroughly before the Over the Range Microwave Oven is installed. For customers in Figure 1. Keep these instructions for proper installation...
Installation Instructions (All Languages)
Page 2
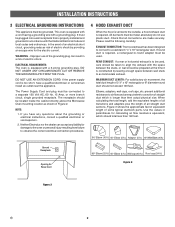
... located inside the cabinet directly above the Microwave Oven mounting location as shown in a risk of all straight duct sections. Improper use plastic duct. ELECTRICAL REQUIREMENTS The oven is required. The Power Supply Cord and plug must be metal; Neither Electrolux nor the dealer can result in Figure 2. REAR EXHAUST: If a rear or horizontal exhaust is constructed by providing an escape wire for Power Cord 90° Elbow (25 ft.) 45° Elbow (5 ft.) Wall...
... located inside the cabinet directly above the Microwave Oven mounting location as shown in a risk of all straight duct sections. Improper use plastic duct. ELECTRICAL REQUIREMENTS The oven is required. The Power Supply Cord and plug must be metal; Neither Electrolux nor the dealer can result in Figure 2. REAR EXHAUST: If a rear or horizontal exhaust is constructed by providing an escape wire for Power Cord 90° Elbow (25 ft.) 45° Elbow (5 ft.) Wall...
Installation Instructions (All Languages)
Page 3
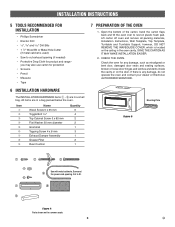
...; Saw to common scale. 3 E you may also use carton for any damage, do not operate the oven and contact your dealer or Electrolux AUTHORIZED SERVICER. Cut to fit. 9 Figure 4 Parts shown not to cut exhaust opening . Lift carton off oven and remove all packing materials, Installation Instructions, Wall Template, Top Template, Turntable and Turntable Support; however, DO NOT REMOVE THE WAVEGUIDE COVER, which is located on the ceiling in a bag packed below the...
...; Saw to common scale. 3 E you may also use carton for any damage, do not operate the oven and contact your dealer or Electrolux AUTHORIZED SERVICER. Cut to fit. 9 Figure 4 Parts shown not to cut exhaust opening . Lift carton off oven and remove all packing materials, Installation Instructions, Wall Template, Top Template, Turntable and Turntable Support; however, DO NOT REMOVE THE WAVEGUIDE COVER, which is located on the ceiling in a bag packed below the...
Installation Instructions (All Languages)
Page 4
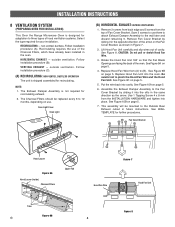
... Be careful not to the Outside Rear Exhaust cutout in the opposite direction of hood ventilation systems. Select the type required for your installation. Assemble the Exhaust Damper Assembly to (B). See Figure 10B on page 5. 4. Follow installation procedure (B). Recirculating requires the use . outside ventilation. See Figure 8. Replace Hood Fan Wire from (A) to the Fan Cover Bracket by sliding it into place. Replace Hood Fan Unit into cavity. INSTALLATION INSTRUCTIONS 8 VENTILATION SYSTEM (PREPARING OVEN FOR INSTALLATION) This Over the Range Microwave Oven is...
... Be careful not to the Outside Rear Exhaust cutout in the opposite direction of hood ventilation systems. Select the type required for your installation. Assemble the Exhaust Damper Assembly to (B). See Figure 10B on page 5. 4. Follow installation procedure (B). Recirculating requires the use . outside ventilation. See Figure 8. Replace Hood Fan Wire from (A) to the Fan Cover Bracket by sliding it into place. Replace Hood Fan Unit into cavity. INSTALLATION INSTRUCTIONS 8 VENTILATION SYSTEM (PREPARING OVEN FOR INSTALLATION) This Over the Range Microwave Oven is...
Installation Instructions (All Languages)
Page 5
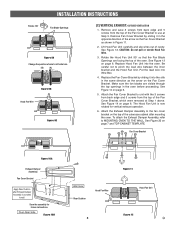
... TOP CABINET TEMPLATE. Lift Hood Fan Unit carefully and slip wires out of the oven. See Figure 13 on page 6. Remove and save 3 screws from back edge and 5 screws from the top of the Fan Cover Bracket to unit with the 3 screws from back edge and 5 screws from the top of the arrow on page 6. 5. Fan Cover Bracket Figure 10A Exhaust Damper Assembly Fan Cover Bracket Apply Rear Cushion after mounting the oven. Rotate the Hood Fan Unit 90...
... TOP CABINET TEMPLATE. Lift Hood Fan Unit carefully and slip wires out of the oven. See Figure 13 on page 6. Remove and save 3 screws from back edge and 5 screws from the top of the Fan Cover Bracket to unit with the 3 screws from back edge and 5 screws from the top of the arrow on page 6. 5. Fan Cover Bracket Figure 10A Exhaust Damper Assembly Fan Cover Bracket Apply Rear Cushion after mounting the oven. Rotate the Hood Fan Unit 90...
Installation Instructions (All Languages)
Page 6
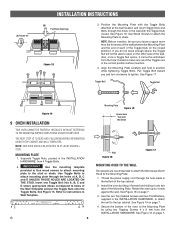
... power supply cord through the hole made in Wall Template. See Figure 19 on the other side of the Mounting Plate. Use Wood Screws to attach the Mounting Plate to the stud or studs. Align the Mounting Plate carefully and hold in the wall with the Toggle Nuts closed position). MOUNTING PLATE 1. See Figure 19 on page 7. 3. Position the Mounting Plate with the Toggle Bolts attached at the wall location...
... power supply cord through the hole made in Wall Template. See Figure 19 on the other side of the Mounting Plate. Use Wood Screws to attach the Mounting Plate to the stud or studs. Align the Mounting Plate carefully and hold in the wall with the Toggle Nuts closed position). MOUNTING PLATE 1. See Figure 19 on page 7. 3. Position the Mounting Plate with the Toggle Bolts attached at the wall location...
Complete Owner's Guide (English)
Page 3
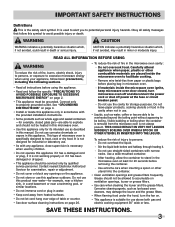
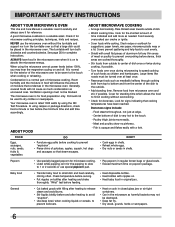
... openings and grease filters frequently. Do not use straight-sided containers with the provided installation instructions. • Some products such as whole eggs and sealed containers -for example, closed , turn the fan on the appliance. • Do not store or use above both before placing bag in the microwave oven at the fuse or circuit breaker panel. - THIS COULD RESULT IN VERY HOT...
... openings and grease filters frequently. Do not use straight-sided containers with the provided installation instructions. • Some products such as whole eggs and sealed containers -for example, closed , turn the fan on the appliance. • Do not store or use above both before placing bag in the microwave oven at the fuse or circuit breaker panel. - THIS COULD RESULT IN VERY HOT...
Complete Owner's Guide (English)
Page 4
The electrical requirements are Installation Instructions, Wall Template, Top Template and Charcoal Filter, which is properly installed and grounded in Figure 1. The Power Supply Cord and plug must be located inside the cabinet directly above the Microwave Oven mounting location as misaligned or bent door, damaged door seals and sealing surfaces, broken or loose door hinges and latches and dents inside the cavity or on plastic foam pad. The receptacle should be grounded. If you...
The electrical requirements are Installation Instructions, Wall Template, Top Template and Charcoal Filter, which is properly installed and grounded in Figure 1. The Power Supply Cord and plug must be located inside the cabinet directly above the Microwave Oven mounting location as misaligned or bent door, damaged door seals and sealing surfaces, broken or loose door hinges and latches and dents inside the cavity or on plastic foam pad. The receptacle should be grounded. If you...
Complete Owner's Guide (English)
Page 6
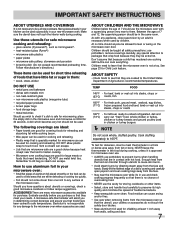
...". • Use deep bowl, when cooking liquids or cereals, to small dish and heat carefully, stirring often. It should not be warm to the outside. • Add standing time. ABOUT FOOD ABOUT MICROWAVE COOKING • Arrange food carefully. Check recipe or cookbook for complete instructions. Remove food from the center of the dish to the touch when cooking or reheating. Popcorn • Use specially bagged popcorn for microwave cooking. • Listen...
...". • Use deep bowl, when cooking liquids or cereals, to small dish and heat carefully, stirring often. It should not be warm to the outside. • Add standing time. ABOUT FOOD ABOUT MICROWAVE COOKING • Arrange food carefully. Check recipe or cookbook for complete instructions. Remove food from the center of the dish to the touch when cooking or reheating. Popcorn • Use specially bagged popcorn for microwave cooking. • Listen...
Complete Owner's Guide (English)
Page 7
... not touch the interior walls during cooking, unless it 's in use potholders, remove coverings carefully, pay special attention to buy all safety precautions: use and check cooking progress frequently so that there is safe for microwaving, place the empty dish in chicken or turkey burgers NOTE Do not cook whole, stuffed poultry. How to 165°F. ACCESSORIES There are good for covering foods for Child Lock feature...
... not touch the interior walls during cooking, unless it 's in use potholders, remove coverings carefully, pay special attention to buy all safety precautions: use and check cooking progress frequently so that there is safe for microwaving, place the empty dish in chicken or turkey burgers NOTE Do not cook whole, stuffed poultry. How to 165°F. ACCESSORIES There are good for covering foods for Child Lock feature...
Complete Owner's Guide (English)
Page 8
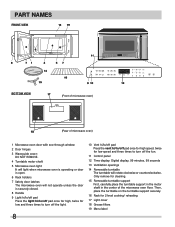
... 2 Door hinges 3 Waveguide cover: DO NOT REMOVE. 4 Turntable motor shaft 5 Microwave oven light It will light when microwave oven is operating or door is open. 6 Rack holders 7 Safety door latches The microwave oven will not operate unless the door is securely closed. 8 Handle 9 Light hi/lo/off pad Press the light hi/lo/off pad once for high, twice for low and three times to turn off pad once for high speed, twice for 2-level cooking/ reheating 17 Light cover 18 Grease filters...
... 2 Door hinges 3 Waveguide cover: DO NOT REMOVE. 4 Turntable motor shaft 5 Microwave oven light It will light when microwave oven is operating or door is open. 6 Rack holders 7 Safety door latches The microwave oven will not operate unless the door is securely closed. 8 Handle 9 Light hi/lo/off pad Press the light hi/lo/off pad once for high, twice for low and three times to turn off pad once for high speed, twice for 2-level cooking/ reheating 17 Light cover 18 Grease filters...
Complete Owner's Guide (English)
Page 11
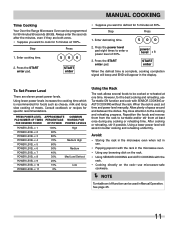
... cook with the rack. • Cooking directly on /off function can be programmed for the best cooking and reheating, use . • Popping popcorn with the rack in the microwave oven. • Using any cooking or reheating time. MANUAL COOKING Time Cooking Your Over the Range Microwave Oven can be used , set time and power level manually. START enter • Suppose you want to the cooking and reheating progress. power level x 8 3. START enter When the defrost time is recommended for specific recommendations. When the rack is used in Manual Operation...
... cook with the rack. • Cooking directly on /off function can be programmed for the best cooking and reheating, use . • Popping popcorn with the rack in the microwave oven. • Using any cooking or reheating time. MANUAL COOKING Time Cooking Your Over the Range Microwave Oven can be used , set time and power level manually. START enter • Suppose you want to the cooking and reheating progress. power level x 8 3. START enter When the defrost time is recommended for specific recommendations. When the rack is used in Manual Operation...
Complete Owner's Guide (English)
Page 12
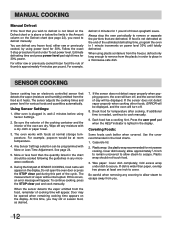
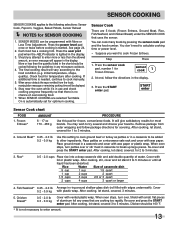
... to defrost manually. SENSOR COOKING Sensor cooking has an electronic controlled sensor that are dry. The measurement of thumb is needed, continue to place in the food charts. 1. Estimate defrosting time and press power level pad eight times for various foods and quantities automatically. At this occurs, an error message will turn off any microwave cookbook. 6. Do not open the oven door or press the STOP clear pad during this part of the cycle. Using Sensor Settings...
... to defrost manually. SENSOR COOKING Sensor cooking has an electronic controlled sensor that are dry. The measurement of thumb is needed, continue to place in the food charts. 1. Estimate defrosting time and press power level pad eight times for various foods and quantities automatically. At this occurs, an error message will turn off any microwave cookbook. 6. Do not open the oven door or press the STOP clear pad during this part of the cycle. Using Sensor Settings...
Complete Owner's Guide (English)
Page 13
... don't need to calculate cooking time or power level. • Suppose you attempt to enter more or less than the quantity listed in the display. At end, follow package directions for temperature after cooking. Remove package from the foods, manipulation message or remaining cooking time will give satisfactory results for 2 to 3 minutes. 3. Place patties on a microwave-safe rack and cover with plastic wrap. After cooking, stir, cover and...
... don't need to calculate cooking time or power level. • Suppose you attempt to enter more or less than the quantity listed in the display. At end, follow package directions for temperature after cooking. Remove package from the foods, manipulation message or remaining cooking time will give satisfactory results for 2 to 3 minutes. 3. Place patties on a microwave-safe rack and cover with plastic wrap. After cooking, stir, cover and...

Complete Owner's Guide (English)
Page 16
.... Repeat pressing same number pad at Step 5. Press the START enter pad to increase quantity and press the START enter pad. Skip Step 2. 4. When AUTO COOKING are same procedure. Scrambled Eggs 3. When oven stops, stir egg mixture moving the cooked portion to the outside, close the door. 6. Auto Cook Auto cook is started. Press the power level pad twice for optimum cooking. Open the door, follow the instruction shown in bowl...
.... Repeat pressing same number pad at Step 5. Press the START enter pad to increase quantity and press the START enter pad. Skip Step 2. 4. When AUTO COOKING are same procedure. Scrambled Eggs 3. When oven stops, stir egg mixture moving the cooked portion to the outside, close the door. 6. Auto Cook Auto cook is started. Press the power level pad twice for optimum cooking. Open the door, follow the instruction shown in bowl...
Complete Owner's Guide (English)
Page 25
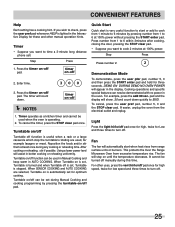
... the user pref pad, number 5, 0 and the STOP clear pad. For example, press the add 30 sec. When SENSOR COOKING and AUTO COOKING are used, for example lasagne or meat. If easier, unplug the oven from range surface units or burners. pad and the display will automatically start is operating. 2. If you want to turn off pad. It cannot be set , Turntable is turned and when Turntable off...
... the user pref pad, number 5, 0 and the STOP clear pad. For example, press the add 30 sec. When SENSOR COOKING and AUTO COOKING are used, for example lasagne or meat. If easier, unplug the oven from range surface units or burners. pad and the display will automatically start is operating. 2. If you want to turn off pad. It cannot be set , Turntable is turned and when Turntable off...
Complete Owner's Guide (English)
Page 26
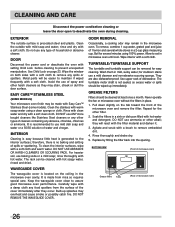
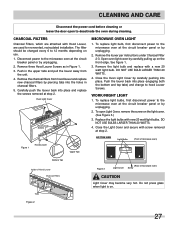
... with setting Child Lock before cleaning or leave the door open to deactivate the oven during cleaning. It is no baking and setting of the cover immediately after they occur. WAVEGUIDE COVER The waveguide cover is made with a damp cloth any spills or spatters. They are also dishwasher-proof. Use upper rack of the microwave oven and remove the filter. Pull down slightly on the ceiling in a 2-cup glass measuring cup. Replace...
... with setting Child Lock before cleaning or leave the door open to deactivate the oven during cleaning. It is no baking and setting of the cover immediately after they occur. WAVEGUIDE COVER The waveguide cover is made with a damp cloth any spills or spatters. They are also dishwasher-proof. Use upper rack of the microwave oven and remove the filter. Pull down slightly on the ceiling in a 2-cup glass measuring cup. Replace...
Complete Owner's Guide (English)
Page 27
... Screws as in charcoal filters. 5. Oven Light Cover Hood Louver Screws Figure 1 Hood Louver Upper Tab MICROWAVE OVEN LIGHT 1. Open oven light cover by unplugging. 2. WORK/NIGHT LIGHT 1. BOTTOM VIEW Light Bulbs (Front of microwave oven) Bottom Tab Inside of Hood Louver Charcoal Filters Tabs Figure 3 (Rear of microwave oven) Light Cover Screw CAUTION Light Cover may become very hot. Disconnect power to the microwave oven at the circuit breaker panel or by carefully pushing into the holes in Figure 1. 3. DO NOT USE BULBS LARGER THAN 20 WATTS. 4. Remove...
... Screws as in charcoal filters. 5. Oven Light Cover Hood Louver Screws Figure 1 Hood Louver Upper Tab MICROWAVE OVEN LIGHT 1. Open oven light cover by unplugging. 2. WORK/NIGHT LIGHT 1. BOTTOM VIEW Light Bulbs (Front of microwave oven) Bottom Tab Inside of Hood Louver Charcoal Filters Tabs Figure 3 (Rear of microwave oven) Light Cover Screw CAUTION Light Cover may become very hot. Disconnect power to the microwave oven at the circuit breaker panel or by carefully pushing into the holes in Figure 1. 3. DO NOT USE BULBS LARGER THAN 20 WATTS. 4. Remove...
Complete Owner's Guide (English)
Page 28
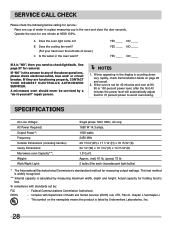
... you need to any of Health and Human Services (DHHS) rule, CFR, Title 21, Chapter I, Subchapter J. - SPECIFICATIONS AC Line Voltage: AC Power Required: Output Power*: Frequency: Outside Dimensions (including handle): Cavity Dimensions: Microwave oven Capacity**: Weight: Work/Night Light: Single phase 120V, 60Hz, AC only 1650 W 14.3 amps. 1000 watts 2450 MHz 29 15/16"(W) x 17 1/16"(H) x 18 15/32"(D) 22 1/2"(W) x 10 1/16"(H) x 14 31/32"(D) 1.8 Cu.Ft...
... you need to any of Health and Human Services (DHHS) rule, CFR, Title 21, Chapter I, Subchapter J. - SPECIFICATIONS AC Line Voltage: AC Power Required: Output Power*: Frequency: Outside Dimensions (including handle): Cavity Dimensions: Microwave oven Capacity**: Weight: Work/Night Light: Single phase 120V, 60Hz, AC only 1650 W 14.3 amps. 1000 watts 2450 MHz 29 15/16"(W) x 17 1/16"(H) x 18 15/32"(D) 22 1/2"(W) x 10 1/16"(H) x 14 31/32"(D) 1.8 Cu.Ft...
Complete Owner's Guide (English)
Page 29
...: 1. Products with the provided instructions. Food loss due to repair or replace appliance light bulbs, air filters, water filters, other consumables, or knobs, handles, or other than in accordance with original serial numbers that have been removed, altered or cannot be required. This warranty only applies in a commercial setting. 7. Service calls to correct the installation of this warranty. Box 212378 Augusta, GA 30907...
...: 1. Products with the provided instructions. Food loss due to repair or replace appliance light bulbs, air filters, water filters, other consumables, or knobs, handles, or other than in accordance with original serial numbers that have been removed, altered or cannot be required. This warranty only applies in a commercial setting. 7. Service calls to correct the installation of this warranty. Box 212378 Augusta, GA 30907...

