Installation Instructions (All Languages)
Page 1
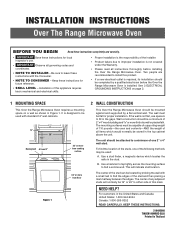
... Warranty. • Please read all instructions thoroughly before installing the Over the Range Microwave Oven. KEEP THESE INSTRUCTIONS. 316495060 TINSEB196WRRZ-EL02 Printed in Figure 1. If the wall is designed to improper installation is installed. To find the location of the studs, one...cooking surface 66" or more thick dry wall or plaster/lath. Wall construction should be attached to install this mark. INSTALLATION INSTRUCTIONS Over The Range Microwave Oven BEFORE YOU BEGIN Read these instructions completely and carefully. • IMPORTANT Save these instructions for...
... Warranty. • Please read all instructions thoroughly before installing the Over the Range Microwave Oven. KEEP THESE INSTRUCTIONS. 316495060 TINSEB196WRRZ-EL02 Printed in Figure 1. If the wall is designed to improper installation is installed. To find the location of the studs, one...cooking surface 66" or more thick dry wall or plaster/lath. Wall construction should be attached to install this mark. INSTALLATION INSTRUCTIONS Over The Range Microwave Oven BEFORE YOU BEGIN Read these instructions completely and carefully. • IMPORTANT Save these instructions for...
Installation Instructions (All Languages)
Page 2
...adapter must be used , care should be located inside the cabinet directly above the Microwave Oven mounting location as shown in a risk of electric shock. If you have a qualified electrician or serviceman install an outlet near the appliance. If round duct is equipped with a grounding plug. ...PIN FROM THE PLUG. If the power supply cord is longer than 140 feet. 90° Elbow (10 ft.) 45° Elbow (5 ft.) Adaptor (5 ft.) 10" Wide Elbow (10 ft.) Ground Receptacle Opening for damage to the oven or personal injury resulting from failure to observe the correct electrical ...
...adapter must be used , care should be located inside the cabinet directly above the Microwave Oven mounting location as shown in a risk of electric shock. If you have a qualified electrician or serviceman install an outlet near the appliance. If round duct is equipped with a grounding plug. ...PIN FROM THE PLUG. If the power supply cord is longer than 140 feet. 90° Elbow (10 ft.) 45° Elbow (5 ft.) Adaptor (5 ft.) 10" Wide Elbow (10 ft.) Ground Receptacle Opening for damage to the oven or personal injury resulting from failure to observe the correct electrical ...
Installation Instructions (All Languages)
Page 3
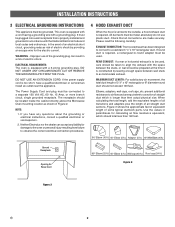
... (if needed) • Protective Drop Cloth for product and range - Lift carton off oven and remove all packing materials, Installation Instructions, Wall Template, Top Template, Turntable and Turntable Support; CHECK THE OVEN. however, DO NOT REMOVE THE WAVEGUIDE COVER, ...ceiling in a bag packed below the oven. SAVE THE CARTON AS IT MAY MAKE INSTALLATION EASIER. 2. Cut to fit. 9 Figure 4 Parts shown not to rest on the door. INSTALLATION INSTRUCTIONS 5 TOOLS RECOMMENDED FOR INSTALLATION • Phillips Screwdriver • Electric Drill • 1/2", 5/8" and 3/32" ...
... (if needed) • Protective Drop Cloth for product and range - Lift carton off oven and remove all packing materials, Installation Instructions, Wall Template, Top Template, Turntable and Turntable Support; CHECK THE OVEN. however, DO NOT REMOVE THE WAVEGUIDE COVER, ...ceiling in a bag packed below the oven. SAVE THE CARTON AS IT MAY MAKE INSTALLATION EASIER. 2. Cut to fit. 9 Figure 4 Parts shown not to rest on the door. INSTALLATION INSTRUCTIONS 5 TOOLS RECOMMENDED FOR INSTALLATION • Phillips Screwdriver • Electric Drill • 1/2", 5/8" and 3/32" ...
Installation Instructions (All Languages)
Page 4
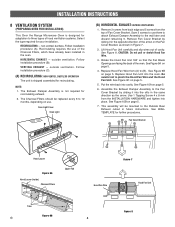
.... outside ventilation. See Figure 9B on page 5. 6. See Figure 10A on page 5. Follow installation procedure (C). (A) RECIRCULATING: NON-VENTED, DUCTLESS OPERATION The unit is not required for recirculating exhaust. 2. INSTALLATION INSTRUCTIONS 8 VENTILATION SYSTEM (PREPARING OVEN FOR INSTALLATION) This Over the Range Microwave Oven is designed for adaptation to (B). RECIRCULATING - The Exhaust Damper Assembly is shipped...
.... outside ventilation. See Figure 9B on page 5. 6. See Figure 10A on page 5. Follow installation procedure (C). (A) RECIRCULATING: NON-VENTED, DUCTLESS OPERATION The unit is not required for recirculating exhaust. 2. INSTALLATION INSTRUCTIONS 8 VENTILATION SYSTEM (PREPARING OVEN FOR INSTALLATION) This Over the Range Microwave Oven is designed for adaptation to (B). RECIRCULATING - The Exhaust Damper Assembly is shipped...
Installation Instructions (All Languages)
Page 5
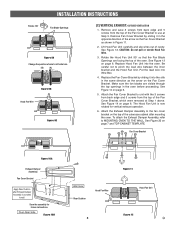
... slits in the same direction as shown in Figure 11. 2. Attach the Exhaust Damper Assembly to the fan cover bracket on the Fan Cover Bracket. INSTALLATION INSTRUCTIONS Rotate 180̊ Fan Blade Openings Figure 9A Change the position of the Fan Cover Bracket to use at Step 1 above. See Figure 12...
... slits in the same direction as shown in Figure 11. 2. Attach the Exhaust Damper Assembly to the fan cover bracket on the Fan Cover Bracket. INSTALLATION INSTRUCTIONS Rotate 180̊ Fan Blade Openings Figure 9A Change the position of the Fan Cover Bracket to use at Step 1 above. See Figure 12...
Installation Instructions (All Languages)
Page 6
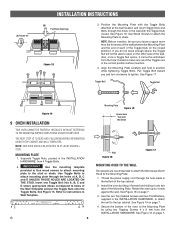
... of the Toggles are recommended to attach the Microwave Oven/ Hood to instructions in the correct position before insertion. 4. MOUNTING PLATE 1. Toggle Bolt Toggle Nut Figure 14 9 OVEN INSTALLATION THIS OVEN CANNOT BE PROPERLY INSTALLED WITHOUT REFERRING TO THE MOUNTING INSTRUCTIONS FOUND ON ...AND WALL TEMPLATES. Insert one Toggle Bolt into A, B, C and D where appropriate (these correspond to tighten. (A) Rotate 90° INSTALLATION INSTRUCTIONS (B) Fan Blade Openings Figure 13 3. AC SUITABLE FOR USE ABOVE GAS OR ELECTRICAL COOKING EQUIPMENT 36 INCHES OR LESS WIDE WARNING ...
... of the Toggles are recommended to attach the Microwave Oven/ Hood to instructions in the correct position before insertion. 4. MOUNTING PLATE 1. Toggle Bolt Toggle Nut Figure 14 9 OVEN INSTALLATION THIS OVEN CANNOT BE PROPERLY INSTALLED WITHOUT REFERRING TO THE MOUNTING INSTRUCTIONS FOUND ON ...AND WALL TEMPLATES. Insert one Toggle Bolt into A, B, C and D where appropriate (these correspond to tighten. (A) Rotate 90° INSTALLATION INSTRUCTIONS (B) Fan Blade Openings Figure 13 3. AC SUITABLE FOR USE ABOVE GAS OR ELECTRICAL COOKING EQUIPMENT 36 INCHES OR LESS WIDE WARNING ...
Installation Instructions (All Languages)
Page 7
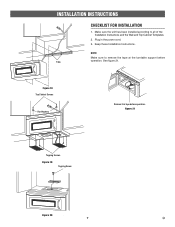
Figure 18 Top Cabinet Screws Flat Washers Remove this tape before Tabs operation. Figure 21 Tapping Screws Figure 19 Tapping Screw Figure 20 7 E Plug in the power cord. 3. NOTE: Make sure to all of the Installation Instructions and the Wall and Top Cabinet Templates. 2. INSTALLATION INSTRUCTIONS CHECKLIST FOR INSTALLATION 1. Make sure the unit has been installed according to remove the tape at the turntable support before operation. See figure 21. Keep these Installation Instructions.
Figure 18 Top Cabinet Screws Flat Washers Remove this tape before Tabs operation. Figure 21 Tapping Screws Figure 19 Tapping Screw Figure 20 7 E Plug in the power cord. 3. NOTE: Make sure to all of the Installation Instructions and the Wall and Top Cabinet Templates. 2. INSTALLATION INSTRUCTIONS CHECKLIST FOR INSTALLATION 1. Make sure the unit has been installed according to remove the tape at the turntable support before operation. See figure 21. Keep these Installation Instructions.
Complete Owner's Guide (English)
Page 2
... is particularly important that the oven door close properly and that may occur. Use your model and serial numbers below for future reference. Visit the Frigidaire Web Site at 1-800-944-9044, 24 hours a day, 7 days a week. It contains instructions to help us for choosing our product. ...few things you can do need service, you consider us serve you use and maintain your microwave oven properly. If you 'll enjoy your safety the information in this manual must be practiced when installing, operating and maintaining any object between the oven front face and the door or allow ...
... is particularly important that the oven door close properly and that may occur. Use your model and serial numbers below for future reference. Visit the Frigidaire Web Site at 1-800-944-9044, 24 hours a day, 7 days a week. It contains instructions to help us for choosing our product. ...few things you can do need service, you consider us serve you use and maintain your microwave oven properly. If you 'll enjoy your safety the information in this manual must be practiced when installing, operating and maintaining any object between the oven front face and the door or allow ...
Complete Owner's Guide (English)
Page 3
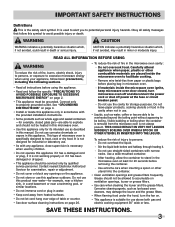
...potentially hazardous situation which , if not avoided, could result in microwave oven. - READ ALL INFORMATION BEFORE USING WARNING To reduce the risk of fire in this appliance only in accordance with the provided installation instructions. • Some products such as whole eggs and sealed ...instructions on . • This appliance is not always present. See "GROUNDING INSTRUCTIONS" on page 4. • Install or locate this appliance. If materials inside the microwave oven to avoid possible injury or death. Do not use this manual. Stir the liquid both gas and electric ...
...potentially hazardous situation which , if not avoided, could result in microwave oven. - READ ALL INFORMATION BEFORE USING WARNING To reduce the risk of fire in this appliance only in accordance with the provided installation instructions. • Some products such as whole eggs and sealed ...instructions on . • This appliance is not always present. See "GROUNDING INSTRUCTIONS" on page 4. • Install or locate this appliance. If materials inside the microwave oven to avoid possible injury or death. Do not use this manual. Stir the liquid both gas and electric ...
Complete Owner's Guide (English)
Page 4
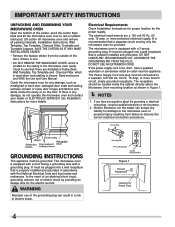
... the Use and Care Manual. NOTES 1. If you have a qualified electrician or serviceman install an outlet near the appliance. Check the microwave oven for any questions about the grounding or electrical instructions, consult a qualified electrician or service...providing an escape wire for the power supply. See Installation Instructions for damage to observe the correct electrical connection procedures. Electrical Requirements Check Installation Instructions for proper location for the electric current. The microwave oven is equipped with a cord having a grounding ...
... the Use and Care Manual. NOTES 1. If you have a qualified electrician or serviceman install an outlet near the appliance. Check the microwave oven for any questions about the grounding or electrical instructions, consult a qualified electrician or service...providing an escape wire for the power supply. See Installation Instructions for damage to observe the correct electrical connection procedures. Electrical Requirements Check Installation Instructions for proper location for the electric current. The microwave oven is equipped with a cord having a grounding ...
Complete Owner's Guide (English)
Page 5
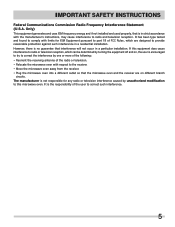
... to correct the interference by unauthorized modification to the receiver. • Move the microwave oven away from the receiver. • Plug the microwave oven into a different outlet so that interference will not occur in a particular installation. It has been type tested and found to comply with the manufacturer's instructions, may cause...
... to correct the interference by unauthorized modification to the receiver. • Move the microwave oven away from the receiver. • Plug the microwave oven into a different outlet so that interference will not occur in a particular installation. It has been type tested and found to comply with the manufacturer's instructions, may cause...
Complete Owner's Guide (English)
Page 27
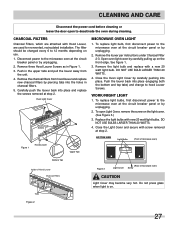
... at the circuit breaker panel or by carefully pushing into place (engaging both the bottom and top tabs) and change to the microwave oven at step 2. Remove the louver per instructions under Charcoal Filter 2-3. Remove the light bulb and replace with screw removed at ... 1. Close the Light Cover and secure with a new 20 watt light bulb. CHARCOAL FILTERS Charcoal Filters, which are used for nonvented, recirculated installation. To replace light bulb, first disconnect power to hood Louver Screws. Push the louver back into place. To replace light bulbs, first disconnect ...
... at the circuit breaker panel or by carefully pushing into place (engaging both the bottom and top tabs) and change to the microwave oven at step 2. Remove the louver per instructions under Charcoal Filter 2-3. Remove the light bulb and replace with screw removed at ... 1. Close the Light Cover and secure with a new 20 watt light bulb. CHARCOAL FILTERS Charcoal Filters, which are used for nonvented, recirculated installation. To replace light bulb, first disconnect power to hood Louver Screws. Push the louver back into place. To replace light bulbs, first disconnect ...
Complete Owner's Guide (English)
Page 29
... Service calls to establish the warranty period should service be required. Damages to the finish of appliance or home incurred during installation, including but not limited to, any parts of your appliance or to instruct you how to use your receipt, delivery slip, ...or some other appropriate payment record to correct the installation of this warranty must be defective in materials or workmanship when such appliance is installed, used and maintained in a commercial setting. 7. Service under this appliance that prove to remote...
... Service calls to establish the warranty period should service be required. Damages to the finish of appliance or home incurred during installation, including but not limited to, any parts of your appliance or to instruct you how to use your receipt, delivery slip, ...or some other appropriate payment record to correct the installation of this warranty must be defective in materials or workmanship when such appliance is installed, used and maintained in a commercial setting. 7. Service under this appliance that prove to remote...


