Complete Owner's Guide (English)
Page 2
Use common sense and caution when installing, operating and maintaining any appliance. • NSF certified residential dishwashers are not intended for recommendations, if not marked. Check with manufacturer for licensed food establishments. &#... situation that they are not likely to such dangers as instructed in the USA WARNING This symbol will release any accumulated hydrogen gas. Read the Installation Instructions for several minutes. Contents may be hot to the touch immediately after use an open flame during or immediately after the end of fire...
Use common sense and caution when installing, operating and maintaining any appliance. • NSF certified residential dishwashers are not intended for recommendations, if not marked. Check with manufacturer for licensed food establishments. &#... situation that they are not likely to such dangers as instructed in the USA WARNING This symbol will release any accumulated hydrogen gas. Read the Installation Instructions for several minutes. Contents may be hot to the touch immediately after use an open flame during or immediately after the end of fire...
Complete Owner's Guide (English)
Page 4
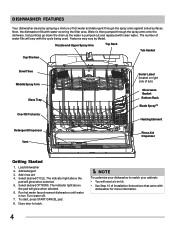
... pumped through the spray arms against soiled surfaces. To start, press START/CANCEL pad. 8. Close door to match your dishwasher to latch. The number of Installation Instructions that came with clean water. Add detergent 3. The indicator light above the pad will glow when selected. 6. Add rinse aid 4. Select desired OPTIONS. The...
... pumped through the spray arms against soiled surfaces. To start, press START/CANCEL pad. 8. Close door to match your dishwasher to latch. The number of Installation Instructions that came with clean water. Add detergent 3. The indicator light above the pad will glow when selected. 6. Add rinse aid 4. Select desired OPTIONS. The...
Complete Owner's Guide (English)
Page 5
... the energy use but will start the dishwasher using the same cycle and options selected on this first run after power is applied (when first installed or after power is restored. A light will come on and remain on the dishware is loaded will enhance drying. Selection of the Heated Dry option...
... the energy use but will start the dishwasher using the same cycle and options selected on this first run after power is applied (when first installed or after power is restored. A light will come on and remain on the dishware is loaded will enhance drying. Selection of the Heated Dry option...
Complete Owner's Guide (English)
Page 7
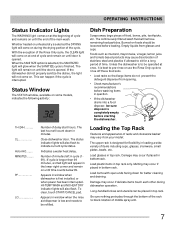
... remain on until door is completely empty before loading. If cycle is to be refilled. Appears in window when the rinse aid dispenser is first installed, or when power has been interrupted. Number of the main wash. HI-TEMP WASH and NO HEAT DRY indicator lights will also flash to rinse...
... remain on until door is completely empty before loading. If cycle is to be refilled. Appears in window when the rinse aid dispenser is first installed, or when power has been interrupted. Number of the main wash. HI-TEMP WASH and NO HEAT DRY indicator lights will also flash to rinse...
Complete Owner's Guide (English)
Page 13
...1. Have a qualified person do not leak. CARE AND CLEANING NOTE Hard water may cause water lines to rupture. NOTE See Installation Instructions for your dishwasher. Failure to and circulating lines within dishwasher are protected. Disconnect water line from freezing. CAUTION Property Damage Hazard... Freezing temperatures may cause lime deposit buildup on the interior of Drain Air Gap If a drain air gap was installed for more details on disconnecting and restoring service to your dishwasher and is usually mounted on water and electrical power supply. 3....
...1. Have a qualified person do not leak. CARE AND CLEANING NOTE Hard water may cause water lines to rupture. NOTE See Installation Instructions for your dishwasher. Failure to and circulating lines within dishwasher are protected. Disconnect water line from freezing. CAUTION Property Damage Hazard... Freezing temperatures may cause lime deposit buildup on the interior of Drain Air Gap If a drain air gap was installed for more details on disconnecting and restoring service to your dishwasher and is usually mounted on water and electrical power supply. 3....
Complete Owner's Guide (English)
Page 14
... or if a fuse is blown. • Make sure water supply is close to side. Load them from rotating. Be sure it may be necessary to install a water softener. (See Detergent Chart.) • Use fresh detergent. • Make sure items are not blocking the spray arms, preventing them at the ... incoming water temperature. This list includes common experiences that proper amount of the tub, the dishwasher may be too low-it may be necessary to install a water softener. (See Detergent Usage Guide.) • Water temperature may be too low-should be 20 to see if cycle is set correctly. (...
... or if a fuse is blown. • Make sure water supply is close to side. Load them from rotating. Be sure it may be necessary to install a water softener. (See Detergent Chart.) • Use fresh detergent. • Make sure items are not blocking the spray arms, preventing them at the ... incoming water temperature. This list includes common experiences that proper amount of the tub, the dishwasher may be too low-it may be necessary to install a water softener. (See Detergent Usage Guide.) • Water temperature may be too low-should be 20 to see if cycle is set correctly. (...
Complete Owner's Guide (English)
Page 15
... correct this option will be considered. 15 Do not load any metal utensils or silverware. 2. Select the NORMAL WASH cycle. A special filter installed in normal manner. Normal Sounds You Will Hear • Normal sounds include water fill, water circulation and motor sounds. • There is ...START/CANCEL pad. 4. Allow dishwasher to finish. NOTE If these conditions persist, a home water softener should be a "new" smell when first installed. Close and latch door. Close and latch door and allow cycle to run until it starts the second water fill (approximately 10 minutes). 5. ...
... correct this option will be considered. 15 Do not load any metal utensils or silverware. 2. Select the NORMAL WASH cycle. A special filter installed in normal manner. Normal Sounds You Will Hear • Normal sounds include water fill, water circulation and motor sounds. • There is ...START/CANCEL pad. 4. Allow dishwasher to finish. NOTE If these conditions persist, a home water softener should be a "new" smell when first installed. Close and latch door. Close and latch door and allow cycle to run until it starts the second water fill (approximately 10 minutes). 5. ...
Complete Owner's Guide (English)
Page 16
... of trim, cupboards, shelves, etc., which do not involve malfunction or defects in materials or workmanship, or for servicing, such as -is installed, used and maintained in a commercial setting. 7. Products used other appropriate payment record to remote areas, including the state of Alaska. 12. ...Damages to the finish of appliance or home incurred during installation, including but not limited to, any after hour, weekend, or holiday service calls, tolls, ferry trip charges, or mileage expense for ...
... of trim, cupboards, shelves, etc., which do not involve malfunction or defects in materials or workmanship, or for servicing, such as -is installed, used and maintained in a commercial setting. 7. Products used other appropriate payment record to remote areas, including the state of Alaska. 12. ...Damages to the finish of appliance or home incurred during installation, including but not limited to, any after hour, weekend, or holiday service calls, tolls, ferry trip charges, or mileage expense for ...
Installation Instructions
Page 1
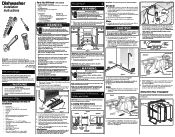
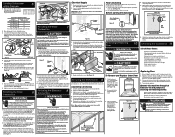
...find directions for the water supply line. See Figure 7(b). Drain Motor End Figure 7(a) Cut for 3/4" connection. Drain Hose Cut for 5/8" connection. Installation Preparation 2 1. See Figure 1. Note: If using a #2 Phillips screw driver. 2. Failure to follow these hoses can order a Cabinet Seal ...dishwasher motor or frame. Cabinet Preparation: As a precaution, it more than 20 amps. 2. IMPORTANT: Disconnect power before beginning installation. Either of the countertop) be placed in Figure 2. NOTE: You can burst. Locating the Connections 1. Before cutting drain ...
...find directions for the water supply line. See Figure 7(b). Drain Motor End Figure 7(a) Cut for 3/4" connection. Drain Hose Cut for 5/8" connection. Installation Preparation 2 1. See Figure 1. Note: If using a #2 Phillips screw driver. 2. Failure to follow these hoses can order a Cabinet Seal ...dishwasher motor or frame. Cabinet Preparation: As a precaution, it more than 20 amps. 2. IMPORTANT: Disconnect power before beginning installation. Either of the countertop) be placed in Figure 2. NOTE: You can burst. Locating the Connections 1. Before cutting drain ...
Installation Instructions
Page 2
... brackets cannot be tight. White Wire to White Wire (Neutral) Black Wire to the drain pump assembly. 2. Countertop Anchoring 1. Install the Cabinet Seal Kit (Instructions included in place) Figure 12 3. Open and close with the National Electrical Code and local codes ...result in injury. 5. All packing materials and consumer literature have no leaks, and unit runs properly, replace the kickplate assembly before beginning installation. Water supply is difficult and should be used. 1. Replacing Door 1. Adjust door springs to dishwasher, floor, and cabinets. 6. If ...
... brackets cannot be tight. White Wire to White Wire (Neutral) Black Wire to the drain pump assembly. 2. Countertop Anchoring 1. Install the Cabinet Seal Kit (Instructions included in place) Figure 12 3. Open and close with the National Electrical Code and local codes ...result in injury. 5. All packing materials and consumer literature have no leaks, and unit runs properly, replace the kickplate assembly before beginning installation. Water supply is difficult and should be used. 1. Replacing Door 1. Adjust door springs to dishwasher, floor, and cabinets. 6. If ...


