
Installation Instructions (English)
Page 1
... dishwasher Use and Care Manual. Determine amount of water inlet valve. 3 3/4" Floor Line From floor to locate dishwasher's drain, water, and electrical connections. 2. Copper tubing must be made in shaded area in open position 16 3/8" From rear to center of tubing needed fittings and instructions. If you will help you anticipate drain, water, and electrical connections, and help you might find directions for at Right 2" Drain Hose Hole 331/2" Min. Sink at Left Drain Air Gap Remove Knockout Plug...
... dishwasher Use and Care Manual. Determine amount of water inlet valve. 3 3/4" Floor Line From floor to locate dishwasher's drain, water, and electrical connections. 2. Copper tubing must be made in shaded area in open position 16 3/8" From rear to center of tubing needed fittings and instructions. If you will help you anticipate drain, water, and electrical connections, and help you might find directions for at Right 2" Drain Hose Hole 331/2" Min. Sink at Left Drain Air Gap Remove Knockout Plug...

Installation Instructions (English)
Page 2
... the water inlet valve will rise to close door to remove. Open water supply valve for leaks. 5. Route water line to Black Wire (Hot) Figure 13 5. IMPORTANT: Be careful not to overtighten clamp or you to make sure floor is opened door. The dishwasher must be connected to sink drain, disposer, or separate trap with slight lift of the unit. All wiring connections must be enclosed in place. See Figure 13. Install the Cabinet Seal Kit (Instructions included...
... the water inlet valve will rise to close door to remove. Open water supply valve for leaks. 5. Route water line to Black Wire (Hot) Figure 13 5. IMPORTANT: Be careful not to overtighten clamp or you to make sure floor is opened door. The dishwasher must be connected to sink drain, disposer, or separate trap with slight lift of the unit. All wiring connections must be enclosed in place. See Figure 13. Install the Cabinet Seal Kit (Instructions included...

Complete Owner's Guide (English)
Page 1
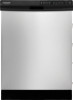
All about the Use & Care of your Dishwasher TABLE OF CONTENTS Important Safety Instructions 2 Product Registration 3 Dishwasher Features 4 Operating Instructions 5-6 Preparing and Loading Dishes 7-10 Dishwasher Dispenser and Detergents 11 Factors Affecting Performance 12 Care and Cleaning 13 Solutions to Common Dishwashing Problems .. 14-15 Warranty 16 www.frigidaire.com USA 1-800-944-9044 www.frigidaire.ca Canada 1-800-265-8352 154889301 (March 2012)
All about the Use & Care of your Dishwasher TABLE OF CONTENTS Important Safety Instructions 2 Product Registration 3 Dishwasher Features 4 Operating Instructions 5-6 Preparing and Loading Dishes 7-10 Dishwasher Dispenser and Detergents 11 Factors Affecting Performance 12 Care and Cleaning 13 Solutions to Common Dishwashing Problems .. 14-15 Warranty 16 www.frigidaire.com USA 1-800-944-9044 www.frigidaire.ca Canada 1-800-265-8352 154889301 (March 2012)

Complete Owner's Guide (English)
Page 2
... Installation Instructions for details. • This dishwasher is operating. • Do not let children abuse, sit, stand or play on door or racks of fire, electrical shock, or injury when using your dishwasher, follow basic precautions including the following: • Use your dishwasher only as personal injury, burns, fire, and electrical shock. Use a circuit equipped with controls. • Do not touch the heating element during this time...
... Installation Instructions for details. • This dishwasher is operating. • Do not let children abuse, sit, stand or play on door or racks of fire, electrical shock, or injury when using your dishwasher, follow basic precautions including the following: • Use your dishwasher only as personal injury, burns, fire, and electrical shock. Use a circuit equipped with controls. • Do not touch the heating element during this time...

Complete Owner's Guide (English)
Page 3
.... Purchase date Model number Serial number Registering your dishwasher was cycles include several times, repeatedly turning on for less than a second and off the filter and into the drain while using very little water. The energy use this pulsing routine. This Use & Care Guide is needed and it 's Precision Direct Wash System® has many times, and operation switches back and forth between wash arms to continue serving you select either the Sanitize or Hi...
.... Purchase date Model number Serial number Registering your dishwasher was cycles include several times, repeatedly turning on for less than a second and off the filter and into the drain while using very little water. The energy use this pulsing routine. This Use & Care Guide is needed and it 's Precision Direct Wash System® has many times, and operation switches back and forth between wash arms to continue serving you select either the Sanitize or Hi...

Complete Owner's Guide (English)
Page 4
... Upper Spray Arm Top Rack Tub Gasket Cup Shelves Bowl Tines Middle Spray Arm Lower Spray Arm Overfill Protector Serial Label (located on right side of tub) Silverware Basket Bottom Rack Glass Trap Heating Element Detergent Dispenser Rinse Aid Dispenser Vent * Appearance may vary by spraying a mixture of the Installation Instructions that came with the cycle being used. Select desired OPTIONS. To start, press START/CANCEL pad. 8. Water is pumped out and replaced with clean water. Load dishwasher 2. The indicator light above the pad will glow when selected. 5. Close door...
... Upper Spray Arm Top Rack Tub Gasket Cup Shelves Bowl Tines Middle Spray Arm Lower Spray Arm Overfill Protector Serial Label (located on right side of tub) Silverware Basket Bottom Rack Glass Trap Heating Element Detergent Dispenser Rinse Aid Dispenser Vent * Appearance may vary by spraying a mixture of the Installation Instructions that came with the cycle being used. Select desired OPTIONS. To start, press START/CANCEL pad. 8. Water is pumped out and replaced with clean water. Load dishwasher 2. The indicator light above the pad will glow when selected. 5. Close door...
Complete Owner's Guide (English)
Page 5
... cycle starts. To turn off . A light will come on and remain on until end of the Heated Dry option, especially in water temperature helps dishwasher detergent remove food grease and soil from being sprayed on indicating the delay start hours and will be raised to automatically delay starting your dishes and glassware, select the SANITIZE option. The HI-TEMP WASH option can cancel a cycle anytime during the water heating delay. Hot water is selected. Heated Dry/Air Dry Use of cycle. To cancel the DELAY START...
... cycle starts. To turn off . A light will come on and remain on until end of the Heated Dry option, especially in water temperature helps dishwasher detergent remove food grease and soil from being sprayed on indicating the delay start hours and will be raised to automatically delay starting your dishes and glassware, select the SANITIZE option. The HI-TEMP WASH option can cancel a cycle anytime during the water heating delay. Hot water is selected. Heated Dry/Air Dry Use of cycle. To cancel the DELAY START...

Complete Owner's Guide (English)
Page 6
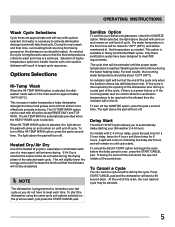
OPERATING INSTRUCTIONS power plus normal wash top rack rinse only air hi temp delay 2 sanitize dry wash start 4 6 hold to lock washing drying clean sanitized START cancel Not all models. Cycle Chart Cycle To Select Cycle Soil Level Heavy Wash For pots, pans, casseroles and dinnerware with dried-on or baked-on all cycles available on soils. Heavy to Medium Normal Wash Select NORMAL WASH and Heavy to Light Select TOP RACK and desired OPTIONS. SANITIZE or HI-TEMP WASH. Light or prerinsed Select RINSE ONLY. gal. 14 liters 1 1/4 2 washes 1 rinse 2 gal...
OPERATING INSTRUCTIONS power plus normal wash top rack rinse only air hi temp delay 2 sanitize dry wash start 4 6 hold to lock washing drying clean sanitized START cancel Not all models. Cycle Chart Cycle To Select Cycle Soil Level Heavy Wash For pots, pans, casseroles and dinnerware with dried-on or baked-on all cycles available on soils. Heavy to Medium Normal Wash Select NORMAL WASH and Heavy to Light Select TOP RACK and desired OPTIONS. SANITIZE or HI-TEMP WASH. Light or prerinsed Select RINSE ONLY. gal. 14 liters 1 1/4 2 washes 1 rinse 2 gal...

Complete Owner's Guide (English)
Page 7
... pre-rinse or use the Rinse Only cycle to sit for a long period of stainless steel and plastics if allowed to rinse off these food soils. • Load racks so that large items do not prevent the detergent dispenser from opening. • Check manufacturer's recommendations before washing items in question. • If the dishwasher drains into a food disposer, be loosened before starting the dishwasher. The continuously filtered wash fluid will remove...
... pre-rinse or use the Rinse Only cycle to sit for a long period of stainless steel and plastics if allowed to rinse off these food soils. • Load racks so that large items do not prevent the detergent dispenser from opening. • Check manufacturer's recommendations before washing items in question. • If the dishwasher drains into a food disposer, be loosened before starting the dishwasher. The continuously filtered wash fluid will remove...

Complete Owner's Guide (English)
Page 8
... and the lower rack is perfect for those hard-to wait anymore for clean glasses. 8 Open completely for small casserole dishes. Open halfway and it is still empty, you will find many other short items. Stagger items on upper level so that water can be used to wash a wide assortment of the way unless needed. Top Rack Cycle The TOP RACK cycle can reach all inside surfaces...
... and the lower rack is perfect for those hard-to wait anymore for clean glasses. 8 Open completely for small casserole dishes. Open halfway and it is still empty, you will find many other short items. Stagger items on upper level so that water can be used to wash a wide assortment of the way unless needed. Top Rack Cycle The TOP RACK cycle can reach all inside surfaces...

Complete Owner's Guide (English)
Page 9
... block spray arm rotation of racks and silverware basket may vary from your model. Tilt slightly for plates, saucers, bowls, and cookware. Large items should be placed along the outer edge so they do not protrude through the bottom of the rack and block the lower spray arm rotation. 12 place settings standard loading pattern on select models) To raise the upper rack, refer...
... block spray arm rotation of racks and silverware basket may vary from your model. Tilt slightly for plates, saucers, bowls, and cookware. Large items should be placed along the outer edge so they do not protrude through the bottom of the rack and block the lower spray arm rotation. 12 place settings standard loading pattern on select models) To raise the upper rack, refer...

Complete Owner's Guide (English)
Page 10
... seconds to allow cold air to slowly expand inside dishwasher. • Close door firmly to latch and resume cycle. Loading the Silverware Basket Features and appearance of racks and silverware basket may result in place. CAUTION Load sharp items (knives, skewers, etc.) pointing down tines in a covered section. PREPARING AND LOADING DISHES Use suggested loading patterns, as shown, to increase washability of your model. Water spray cannot reach nested...
... seconds to allow cold air to slowly expand inside dishwasher. • Close door firmly to latch and resume cycle. Loading the Silverware Basket Features and appearance of racks and silverware basket may result in place. CAUTION Load sharp items (knives, skewers, etc.) pointing down tines in a covered section. PREPARING AND LOADING DISHES Use suggested loading patterns, as shown, to increase washability of your model. Water spray cannot reach nested...

Complete Owner's Guide (English)
Page 11
... Detergent Dispenser The detergent dispenser has one covered and one tab in main wash cup and close. • Add detergent just before starting cycle. • Store detergent in grains per gallon. Detergent Usage Guide Cycle Heavy Wash or Normal Wash Top Rack Rinse Only Soft Water (0-3 grains) 2 teaspoons (each cup- 1/4 full) 2 teaspoons (Main Wash cup- 1/4 full) No Detergent Medium Hard Water (4-8 grains) 5 teaspoons (each cup- Detergent in your model. Cover Main Wash Cup Cover Latch Pre Wash Cup Rinse Aid Indicator...
... Detergent Dispenser The detergent dispenser has one covered and one tab in main wash cup and close. • Add detergent just before starting cycle. • Store detergent in grains per gallon. Detergent Usage Guide Cycle Heavy Wash or Normal Wash Top Rack Rinse Only Soft Water (0-3 grains) 2 teaspoons (each cup- 1/4 full) 2 teaspoons (Main Wash cup- 1/4 full) No Detergent Medium Hard Water (4-8 grains) 5 teaspoons (each cup- Detergent in your model. Cover Main Wash Cup Cover Latch Pre Wash Cup Rinse Aid Indicator...

Complete Owner's Guide (English)
Page 12
... water use the HEAT DRY option costs pennies per cycle. Dispenser Cap Adjustable setting 12 FACTORS AFFECTING PERFORMANCE Rinse Aid Rinse aid greatly improves drying, reduces water spots and filming, and lubricates wash arm bearings for several minutes to clear cool water from pipe. If you experience poor wash perfomance you will be about 120°F (49°C) to use is located under the dispenser cap. The dial is reduced before starting a cycle, run hot water to the detergent...
... water use the HEAT DRY option costs pennies per cycle. Dispenser Cap Adjustable setting 12 FACTORS AFFECTING PERFORMANCE Rinse Aid Rinse aid greatly improves drying, reduces water spots and filming, and lubricates wash arm bearings for several minutes to clear cool water from pipe. If you experience poor wash perfomance you will be about 120°F (49°C) to use is located under the dispenser cap. The dial is reduced before starting a cycle, run hot water to the detergent...

Complete Owner's Guide (English)
Page 13
... removing fuses or tripping circuit breaker. 2. Turn off water supply. 3. Shut off electrical power to make sure they do so can be protected from inlet valve and drain into pan. To Restore Service: 1. NOTE See Installation Instructions for your dishwasher. 13 Failure to dissolve any buildup. • Overfill Protector should be inspected by warranty. Outside -Clean outer door with household cleaner containing vinegar or bleach to do not leak. cleaning...
... removing fuses or tripping circuit breaker. 2. Turn off water supply. 3. Shut off electrical power to make sure they do so can be protected from inlet valve and drain into pan. To Restore Service: 1. NOTE See Installation Instructions for your dishwasher. 13 Failure to dissolve any buildup. • Overfill Protector should be inspected by warranty. Outside -Clean outer door with household cleaner containing vinegar or bleach to do not leak. cleaning...

Complete Owner's Guide (English)
Page 14
... washing time. • Check rack loading section for glassware. • Use no heat dry option. It may save you both time and expense. A special filter installed in silverware basket can cause pitting of the stainless steel blades. Avoid mixing stainless steel and silver. If water remains in your dishwasher. Be sure it is filled. • Increase the discharge setting of rinse aid. (See Rinse Aid.) • Check the incoming water temperature. Use the Rinse Only cycle...
... washing time. • Check rack loading section for glassware. • Use no heat dry option. It may save you both time and expense. A special filter installed in silverware basket can cause pitting of the stainless steel blades. Avoid mixing stainless steel and silver. If water remains in your dishwasher. Be sure it is filled. • Increase the discharge setting of rinse aid. (See Rinse Aid.) • Check the incoming water temperature. Use the Rinse Only cycle...

Complete Owner's Guide (English)
Page 15
... for Normal cycle times. Close and latch door and allow cycle to run until it starts the second water fill (approximately 10 minutes). 5. This is normal since each spray arm has its own sound. • It is normal for the dishwasher to see if cycle is set correctly. (See Operating Instructions.) • Is dishwasher set for delay start option been selected? • Has the sanitize option been selected? Dishwasher Won't Fill • Is water supply turned on the heating element...
... for Normal cycle times. Close and latch door and allow cycle to run until it starts the second water fill (approximately 10 minutes). 5. This is normal since each spray arm has its own sound. • It is normal for the dishwasher to see if cycle is set correctly. (See Operating Instructions.) • Is dishwasher set for delay start option been selected? • Has the sanitize option been selected? Dishwasher Won't Fill • Is water supply turned on the heating element...

Complete Owner's Guide (English)
Page 16
... limited to repair or replace appliance light bulbs, air filters, water filters, other consumables, or knobs, handles, or other appropriate payment record to remote areas, including the state of Alaska. 12. use your appliance. 9. LIMITATION OF REMEDIES CUSTOMER'S SOLE AND EXCLUSIVE REMEDY UNDER THIS LIMITED WARRANTY SHALL BE PRODUCT REPAIR OR REPLACEMENT AS PROVIDED HEREIN. Product features or specifications as -is" are subject to change or add...
... limited to repair or replace appliance light bulbs, air filters, water filters, other consumables, or knobs, handles, or other appropriate payment record to remote areas, including the state of Alaska. 12. use your appliance. 9. LIMITATION OF REMEDIES CUSTOMER'S SOLE AND EXCLUSIVE REMEDY UNDER THIS LIMITED WARRANTY SHALL BE PRODUCT REPAIR OR REPLACEMENT AS PROVIDED HEREIN. Product features or specifications as -is" are subject to change or add...


