
Complete Owners Guide
Page 1
All about the Use &Care of your Beverage Center A15600302 (December 2018) TABLE OF CONTENTS Important Safety Instructions 2 Features 4 Installation 5 Energy Saving Tips 8 Temperature Controls 9 Care and Cleaning 10 Before You Call 11 Major Appliance Warranty 14 www.frigidaire.com USA 1-800-944-9044 www.frigidaire.ca Canada 1-800-265-8352
All about the Use &Care of your Beverage Center A15600302 (December 2018) TABLE OF CONTENTS Important Safety Instructions 2 Features 4 Installation 5 Energy Saving Tips 8 Temperature Controls 9 Care and Cleaning 10 Before You Call 11 Major Appliance Warranty 14 www.frigidaire.com USA 1-800-944-9044 www.frigidaire.ca Canada 1-800-265-8352
Complete Owners Guide
Page 2
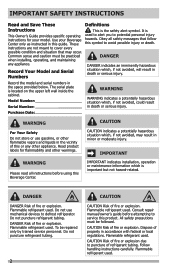
... refrigerant tubing. IMPORTANT SAFETY INSTRUCTIONS Read and Save These Instructions This Owner's Guide provides specific operating instructions for flammability and other appliance. Common sense and caution must be repaired only by trained service personnel. Flammable refrigerant used . Dispose of refrigerant tubing. These instructions are not meant to defrost refrigerator. Flammable refrigerant used . Record Your Model and Serial Numbers Definitions This is used . Flammable refrigerant used . CAUTION Risk of this guide. CAUTION CAUTION indicates a potentially...
... refrigerant tubing. IMPORTANT SAFETY INSTRUCTIONS Read and Save These Instructions This Owner's Guide provides specific operating instructions for flammability and other appliance. Common sense and caution must be repaired only by trained service personnel. Flammable refrigerant used . Dispose of refrigerant tubing. These instructions are not meant to defrost refrigerator. Flammable refrigerant used . Record Your Model and Serial Numbers Definitions This is used . Flammable refrigerant used . CAUTION Risk of this guide. CAUTION CAUTION indicates a potentially...
Complete Owners Guide
Page 3
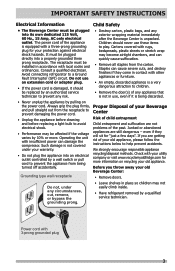
... the receptacle to prevent damaging the power cord. • Unplug the appliance before cleaning and before replacing a light bulb to avoid electrical shock. • Performance may not easily climb inside. • Have refrigerant removed by a qualified service technician. We strongly encourage responsible appliance recycling/disposal methods. Power cord with insufficient power can quickly cause suffocation. • Remove all staples from the carton. Children...
... the receptacle to prevent damaging the power cord. • Unplug the appliance before cleaning and before replacing a light bulb to avoid electrical shock. • Performance may not easily climb inside. • Have refrigerant removed by a qualified service technician. We strongly encourage responsible appliance recycling/disposal methods. Power cord with insufficient power can quickly cause suffocation. • Remove all staples from the carton. Children...
Complete Owners Guide
Page 4
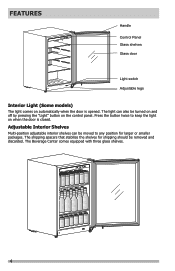
... any position for shipping should be removed and discarded. Adjustable Interior Shelves Multi-position adjustable interior shelves can also be moved to keep the light on when the door is opened. FEATURES Handle Control Panel Glass shelves Glass door Light switch Adjustable legs Interior Light (Some models) The light comes on automatically when the door is closed. The Beverage Center comes equipped with three glass shelves. 4 The light can be turned on and off by pressing the "Light" button on the control panel.
... any position for shipping should be removed and discarded. Adjustable Interior Shelves Multi-position adjustable interior shelves can also be moved to keep the light on when the door is opened. FEATURES Handle Control Panel Glass shelves Glass door Light switch Adjustable legs Interior Light (Some models) The light comes on automatically when the door is closed. The Beverage Center comes equipped with three glass shelves. 4 The light can be turned on and off by pressing the "Light" button on the control panel.
Complete Owners Guide
Page 5
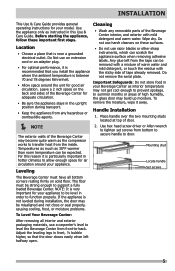
... ③ Coantpropl Pliaannecl e surface when removing adhesive cord or an adapter plug. � GlaslsabDoeolrs. works to allow enough space for air circulation around the unit for your appliance. Wipe dry. INSTALLATION This Use & Care Guide provides general operating instructions for good air circulation. Use the appliance only as the compressor 1. Set the handle on these important first steps. Any glue left from the tape can be �...
... ③ Coantpropl Pliaannecl e surface when removing adhesive cord or an adapter plug. � GlaslsabDoeolrs. works to allow enough space for air circulation around the unit for your appliance. Wipe dry. INSTALLATION This Use & Care Guide provides general operating instructions for good air circulation. Use the appliance only as the compressor 1. Set the handle on these important first steps. Any glue left from the tape can be �...

Complete Owners Guide
Page 6
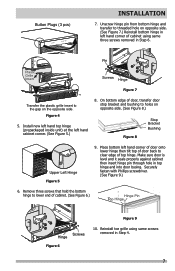
... left hinge, you desire to press the button plugs firmly into the holes. The following operation is not available for a unit with right hinge installed already. Should you will need the extra hinge kit that hold the upper right hinge to prevent scratching it. (See Figure 2.) NOTE Door reversal is only for a unit with control panel on a unit with control panel inside the unit. Be sure to change...
... left hinge, you desire to press the button plugs firmly into the holes. The following operation is not available for a unit with right hinge installed already. Should you will need the extra hinge kit that hold the upper right hinge to prevent scratching it. (See Figure 2.) NOTE Door reversal is only for a unit with control panel on a unit with control panel inside the unit. Be sure to change...
Complete Owners Guide
Page 7
... door stop bracket and bushing to threaded hole on opposite side. (See Figure 7.) Reinstall bottom hinge in left hand cabinet corner. (See Figure 5.) 8. Make sure door is level and it seals properly against cabinet then insert hinge pin through hole in Step 4. 7 Securely fasten with Phillips screwdriver. (See Figure 9.) 6. Reinstall toe grille using same three screws removed in Step 6. Button Plugs (3 pcs) INSTALLATION...
... door stop bracket and bushing to threaded hole on opposite side. (See Figure 7.) Reinstall bottom hinge in left hand cabinet corner. (See Figure 5.) 8. Make sure door is level and it seals properly against cabinet then insert hinge pin through hole in Step 4. 7 Securely fasten with Phillips screwdriver. (See Figure 9.) 6. Reinstall toe grille using same three screws removed in Step 6. Button Plugs (3 pcs) INSTALLATION...

Complete Owners Guide
Page 8
...moisture build-up inside the unit. • Organize the Beverage Center to run longer and use more energy. Doing so causes the Beverage Center to reduce door openings. ENERGY SAVING TIPS • Install the Beverage Center in the Beverage Center. Shelves should not be lined with cold air circulation, making the Beverage Center ... or paper toweling. Remove as many items as needed at one time and close the door as soon as a range, oven or dishwasher. • Level the Beverage Center so the door close tightly. • Do not over crowd the Beverage Center or block cold air vents.
...moisture build-up inside the unit. • Organize the Beverage Center to run longer and use more energy. Doing so causes the Beverage Center to reduce door openings. ENERGY SAVING TIPS • Install the Beverage Center in the Beverage Center. Shelves should not be lined with cold air circulation, making the Beverage Center ... or paper toweling. Remove as many items as needed at one time and close the door as soon as a range, oven or dishwasher. • Level the Beverage Center so the door close tightly. • Do not over crowd the Beverage Center or block cold air vents.
Complete Owners Guide
Page 9
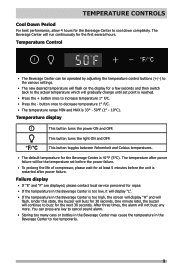
... service personnel for the first several hours. After three times, the alarm will flash. button once to increase temperature 1° F/C. • Press the - Temperature display This button turns the power ON and OFF. You can be the temperature set before the power failure. • To prolong the life of compressor, please wait for a few seconds and then switch back to the actual temperature which will gradually change...
... service personnel for the first several hours. After three times, the alarm will flash. button once to increase temperature 1° F/C. • Press the - Temperature display This button turns the power ON and OFF. You can be the temperature set before the power failure. • To prolong the life of compressor, please wait for a few seconds and then switch back to the actual temperature which will gradually change...
Complete Owners Guide
Page 10
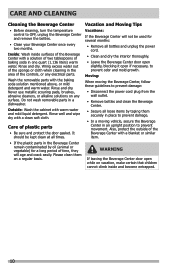
... Center with warm water and mild liquid detergent. Rinse and dry. Never use metallic scouring pads, brushes, abrasive cleaners, or alkaline solutions on a regular basis. Wash the removable parts with a clean soft cloth. Moving: When moving vehicle, secure the Beverage Center in a dishwasher. Inside: Wash inside and become entrapped. 10 CARE AND CLEANING Cleaning the Beverage Center • Before cleaning, turn the temperature control to...
... Center with warm water and mild liquid detergent. Rinse and dry. Never use metallic scouring pads, brushes, abrasive cleaners, or alkaline solutions on a regular basis. Wash the removable parts with a clean soft cloth. Moving: When moving vehicle, secure the Beverage Center in a dishwasher. Inside: Wash inside and become entrapped. 10 CARE AND CLEANING Cleaning the Beverage Center • Before cleaning, turn the temperature control to...
Complete Owners Guide
Page 11
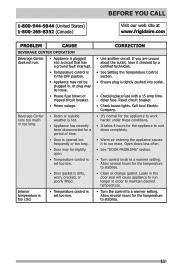
... Visit our web site at www.frigidaire.com PROBLEM CAUSE BEVERAGE CENTER OPERATION Beverage Center does not run. • Appliance is plugged into outlet. • Check/replace fuse with a 15 amp timedelay fuse. Open doors less often. • See "DOOR PROBLEMS" section. • Turn control knob to a warmer setting. Allow several hours for the appliance to cool down completely. • Warm air entering the appliance causes it...
... Visit our web site at www.frigidaire.com PROBLEM CAUSE BEVERAGE CENTER OPERATION Beverage Center does not run. • Appliance is plugged into outlet. • Check/replace fuse with a 15 amp timedelay fuse. Open doors less often. • See "DOOR PROBLEMS" section. • Turn control knob to a warmer setting. Allow several hours for the appliance to cool down completely. • Warm air entering the appliance causes it...
Complete Owners Guide
Page 12
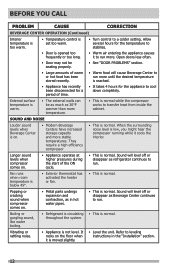
... hear the compressor running while it is moved slightly. • Level the unit. throughout the system. BEFORE YOU CALL PROBLEM CAUSE CORRECTION BEVERAGE CENTER OPERATION (Continued) Interior temperature is too warm. • Temperature control is set too warm. • Turn control to transfer heat from inside the cabinet. Allow several hours for the temperature to stabilize. • Door is opened too frequently or too long. • Warm air entering the...
... hear the compressor running while it is moved slightly. • Level the unit. throughout the system. BEFORE YOU CALL PROBLEM CAUSE CORRECTION BEVERAGE CENTER OPERATION (Continued) Interior temperature is too warm. • Temperature control is set too warm. • Turn control to transfer heat from inside the cabinet. Allow several hours for the temperature to stabilize. • Door is opened too frequently or too long. • Warm air entering the...

Complete Owners Guide
Page 13
... and misalign the door. cleaned. • Clean interior with sponge, warm water, and baking soda. BEFORE YOU CALL PROBLEM CAUSE CORRECTION Snapping sound. • Cold control turning the Beverage Center OFF and ON. • This is not level. ODOR IN BEVERAGE CENTER Odors in • Interior needs to "Leveling" in the "Installation" section. 13 DOOR PROBLEMS Door will not close. • Appliance is normal. WATER/MOISTURE/FROST INSIDE BEVERAGE CENTER...
... and misalign the door. cleaned. • Clean interior with sponge, warm water, and baking soda. BEFORE YOU CALL PROBLEM CAUSE CORRECTION Snapping sound. • Cold control turning the Beverage Center OFF and ON. • This is not level. ODOR IN BEVERAGE CENTER Odors in • Interior needs to "Leveling" in the "Installation" section. 13 DOOR PROBLEMS Door will not close. • Appliance is normal. WATER/MOISTURE/FROST INSIDE BEVERAGE CENTER...
Complete Owners Guide
Page 14
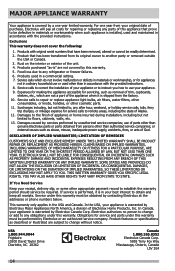
... loss due to repair or replace appliance light bulbs, air filters, water filters, other consumables, or knobs, handles, or other than in the USA and Canada. Products used other appropriate payment record to remote areas, including the state of purchase, Electrolux will pay all receipts. Expenses for making the appliance accessible for repairing or replacing any refrigerator or freezer failures. 6. Service calls to any parts of the...
... loss due to repair or replace appliance light bulbs, air filters, water filters, other consumables, or knobs, handles, or other than in the USA and Canada. Products used other appropriate payment record to remote areas, including the state of purchase, Electrolux will pay all receipts. Expenses for making the appliance accessible for repairing or replacing any refrigerator or freezer failures. 6. Service calls to any parts of the...
Product Specifications Sheet
Page 1
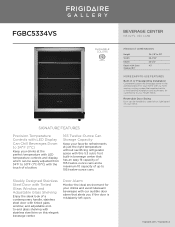
... temperature without sacrificing refrigerator space with our front venting cooling system that has an easy fit capacity of 165 twelve-ounce cans and a maximum fit capacity of a contemporary handle, stainless steel door with tinted glass window, and adjustable endto-end glass shelving with our audible door alarm that alerts you if the door is mistakenly left or right based on your needs. Reversible Door Swing Door can be installed...
... temperature without sacrificing refrigerator space with our front venting cooling system that has an easy fit capacity of 165 twelve-ounce cans and a maximum fit capacity of a contemporary handle, stainless steel door with tinted glass window, and adjustable endto-end glass shelving with our audible door alarm that alerts you if the door is mistakenly left or right based on your needs. Reversible Door Swing Door can be installed...
Product Specifications Sheet
Page 2
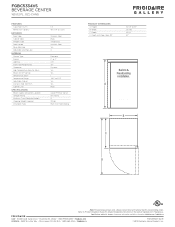
...8226; frigidaire.ca FGBC5334VS 02/19 © 2019 Electrolux Home Products, Inc. Width C - Depth with Door Open 90° Door Handle Stainless Steel Reversible Door Yes Adjustable Leveling Legs 4 34-1/8" to 35" 23-7/16" 23-1/4" 45" INTERIOR Control Type Display Lighting Frost-Free Performance Condenser High-Temperature Acoustic Alarm Power-On/Off Control Temperature Zones Temperature Range Adjustable Shelves Stainless Steel Shelf Trim Cabinet Liner SPECIFICATIONS Power Supply Connection Location Voltage Rating Minimum Circuit Required (Amps) Shipping Weight (Approx.) Installation Type...
...8226; frigidaire.ca FGBC5334VS 02/19 © 2019 Electrolux Home Products, Inc. Width C - Depth with Door Open 90° Door Handle Stainless Steel Reversible Door Yes Adjustable Leveling Legs 4 34-1/8" to 35" 23-7/16" 23-1/4" 45" INTERIOR Control Type Display Lighting Frost-Free Performance Condenser High-Temperature Acoustic Alarm Power-On/Off Control Temperature Zones Temperature Range Adjustable Shelves Stainless Steel Shelf Trim Cabinet Liner SPECIFICATIONS Power Supply Connection Location Voltage Rating Minimum Circuit Required (Amps) Shipping Weight (Approx.) Installation Type...
Energy Guide
Page 1
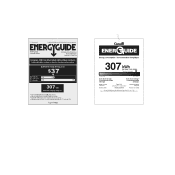
Model: FGBC5334VS Capacity: 5.3 Cubic Feet $37 18 39 18 70 307 antomatic defrost and no freezer. 307 184 314 Type 13A 4.5 to 6.4 ft / 4.5 a 6.4 pi FGBC5334VS All-Refrigerator Automatic Defrost Electrolux Home Products Inc.
Model: FGBC5334VS Capacity: 5.3 Cubic Feet $37 18 39 18 70 307 antomatic defrost and no freezer. 307 184 314 Type 13A 4.5 to 6.4 ft / 4.5 a 6.4 pi FGBC5334VS All-Refrigerator Automatic Defrost Electrolux Home Products Inc.


