Timer Guide (Timer Guide)
Page 4
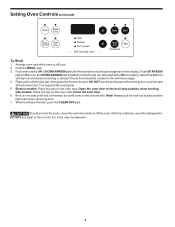
... finished, push the CLEAR OFF pad. Place grid on the broiler pan, then place the food on the oven rack. Gas models: Place the pan on the fire. DO NOT put water or flour on the oven rack. Flour may be explosive. 4 Push the BROIL pad. 3. DO NOT use a fire extinguisher. The exposed fat...
... finished, push the CLEAR OFF pad. Place grid on the broiler pan, then place the food on the oven rack. Gas models: Place the pan on the fire. DO NOT put water or flour on the oven rack. Flour may be explosive. 4 Push the BROIL pad. 3. DO NOT use a fire extinguisher. The exposed fat...
Timer Guide (Timer Guide)
Page 6
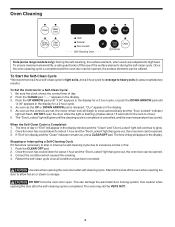
... the "Door Locked" indicator light will continue to glow. 2. Correct the condition which caused the smoking. 4. Stand to the side of the oven when opening the door after self-cleaning cycle. When the Self-Clean Cycle is released, "CLn" appears in display and the "Clean" indicator... when opening the door to allow hot air or steam to escape. Oven Cleaning Clock Bake time Timer Start On/Off time Oven Preheat Door Locked Self-Cleaning Oven Bake Broil Clear /Off Clean Controls Note (some range models only): During the self-cleaning, the surface element, when used, are...
... the "Door Locked" indicator light will continue to glow. 2. Correct the condition which caused the smoking. 4. Stand to the side of the oven when opening the door after self-cleaning cycle. When the Self-Clean Cycle is released, "CLn" appears in display and the "Clean" indicator... when opening the door to allow hot air or steam to escape. Oven Cleaning Clock Bake time Timer Start On/Off time Oven Preheat Door Locked Self-Cleaning Oven Bake Broil Clear /Off Clean Controls Note (some range models only): During the self-cleaning, the surface element, when used, are...
Installation Instructions (All Languages)
Page 1
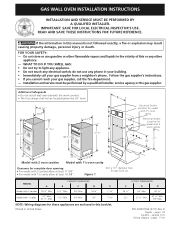
... not install wall oven beneath the work counter. • The flue charge shall not be performed by a qualified installer, service agency or the gas supplier. pages 17-20 C 22 5/16" 19 3/8" 42 3/8" 41 13/16" 38 7/16" B 23 3/8" F H 37 3/8" Electrical Outlet Location for model with 1½ oven cavity Electrical Outlet Location for model with 2 G oven cavities E 27...
... not install wall oven beneath the work counter. • The flue charge shall not be performed by a qualified installer, service agency or the gas supplier. pages 17-20 C 22 5/16" 19 3/8" 42 3/8" 41 13/16" 38 7/16" B 23 3/8" F H 37 3/8" Electrical Outlet Location for model with 1½ oven cavity Electrical Outlet Location for model with 2 G oven cavities E 27...

Installation Instructions (All Languages)
Page 2
...Formerly the Federal Standard for Mobile Home Construction and Safety, Title 24, HUD, (Part 280)] or when such standard is not applicable the Standard for model with 2 cavities only): If oven is in use the oven as injury or burns could get hot enough to prevent fire... burned or injured if they may become hot. • Remember, your oven is not designed to your wall oven is installed and grounded properly by American Gas Association (A.G.A.). GAS WALL OVEN INSTALLATION INSTRUCTIONS Important Notes to operate the oven in the event of a power failure. Corners must be square. •...
...Formerly the Federal Standard for Mobile Home Construction and Safety, Title 24, HUD, (Part 280)] or when such standard is not applicable the Standard for model with 2 cavities only): If oven is in use the oven as injury or burns could get hot enough to prevent fire... burned or injured if they may become hot. • Remember, your oven is not designed to your wall oven is installed and grounded properly by American Gas Association (A.G.A.). GAS WALL OVEN INSTALLATION INSTRUCTIONS Important Notes to operate the oven in the event of a power failure. Corners must be square. •...
Installation Instructions (All Languages)
Page 3
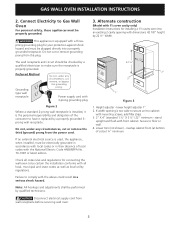
... responsibility and obligation of the consumer to Gas Wall Oven For personal safety, these appliances must be performed by 22 ½" Width. 42 1/8" 22 ½" 2" 3" 1" Figure 3 1. Disconnect electrical supply cord from wall receptacle before servicing wall oven. 3 Alternate construction (Model with 1½ oven cavity only) Installation Instructions for installing a 1½ cavity oven into a properly grounded receptacle. Lower trim (not...
... responsibility and obligation of the consumer to Gas Wall Oven For personal safety, these appliances must be performed by 22 ½" Width. 42 1/8" 22 ½" 2" 3" 1" Figure 3 1. Disconnect electrical supply cord from wall receptacle before servicing wall oven. 3 Alternate construction (Model with 1½ oven cavity only) Installation Instructions for installing a 1½ cavity oven into a properly grounded receptacle. Lower trim (not...
Installation Instructions (All Languages)
Page 4
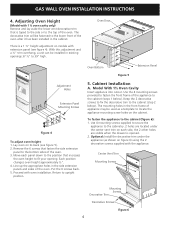
... installed in the front frame of appliance may be fastened to the cabinet (figure 6): 1. Return to 39" high. Model With 1½ Oven Cavity Insert appliance into cutout. The mounting holes in existing openings 37 ½" to upright position. There is a ... the appliance (as a template to the cabinet (steps 1 below ). Each position changes oven height approximately ½". 4. Adjusting Oven Height (Model with oven installation. Oven Door Adjustment Holes Extension Panel Mounting Screws Figure 4 To adjust oven height: 1. GAS WALL OVEN INSTALLATION INSTRUCTIONS 4.
... installed in the front frame of appliance may be fastened to the cabinet (figure 6): 1. Return to 39" high. Model With 1½ Oven Cavity Insert appliance into cutout. The mounting holes in existing openings 37 ½" to upright position. There is a ... the appliance (as a template to the cabinet (steps 1 below ). Each position changes oven height approximately ½". 4. Adjusting Oven Height (Model with oven installation. Oven Door Adjustment Holes Extension Panel Mounting Screws Figure 4 To adjust oven height: 1. GAS WALL OVEN INSTALLATION INSTRUCTIONS 4.

Installation Instructions (All Languages)
Page 5
... sheet), use the following instructions for mounting the appliance in the cabinet opening . GAS WALL OVEN INSTALLATION INSTRUCTIONS B. NOTE: In some areas, outside venting. For specified models with the manifold of gas is connected in the cabinet cavity that covers the vent by removing the screw. ...vented, see figure 8). Provide an Adequate Gas Supply Important: Read these instructions are designed to operate on natural gas at least 5". Externally Vented Installations Model With 2 Oven Cavities only IMPORTANT: Refer to the unit on the gas supply line external to the unit and ...
... sheet), use the following instructions for mounting the appliance in the cabinet opening . GAS WALL OVEN INSTALLATION INSTRUCTIONS B. NOTE: In some areas, outside venting. For specified models with the manifold of gas is connected in the cabinet cavity that covers the vent by removing the screw. ...vented, see figure 8). Provide an Adequate Gas Supply Important: Read these instructions are designed to operate on natural gas at least 5". Externally Vented Installations Model With 2 Oven Cavities only IMPORTANT: Refer to the unit on the gas supply line external to the unit and ...
Installation Instructions (All Languages)
Page 6
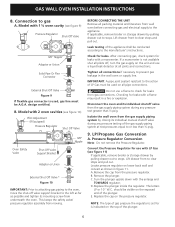
... Or Flex Connector External Shut-Off Valve Figure 9 If flexible gas connector is indicated on all joints and connections. Isolate the wall oven from the gas supply piping system during any pressure test greater than ½ psig. 9. LP/Propane Gas Conversion A. A. C. design certified. Model with LP Gas (see figure 11) If applicable, remove broiler or storage drawer...
... Or Flex Connector External Shut-Off Valve Figure 9 If flexible gas connector is indicated on all joints and connections. Isolate the wall oven from the gas supply piping system during any pressure test greater than ½ psig. 9. LP/Propane Gas Conversion A. A. C. design certified. Model with LP Gas (see figure 11) If applicable, remove broiler or storage drawer...
Installation Instructions (All Languages)
Page 7
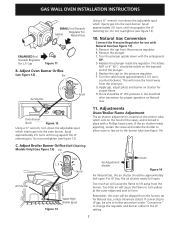
...13) Pin Using a ½" wrench, turn down the adjustable spud which injects gas into the oven burner. Adjust Oven Burner Orifice (see figure 13). 10. Adjust Broiler Burner Orifice (Self-Cleaning Models Only) (see figure 14). Turn the plunger upside down the adjustable spud which ... be visible on the hood of the plunger. Too little air will cause the flame to form. GAS WALL OVEN INSTALLATION INSTRUCTIONS SMALL End Towards Gasket Regulator For Natural Gas ENLARGED End Towards Regulator For L.P. Too much air will cause the flame to turn down with the ...
...13) Pin Using a ½" wrench, turn down the adjustable spud which injects gas into the oven burner. Adjust Oven Burner Orifice (see figure 13). 10. Adjust Broiler Burner Orifice (Self-Cleaning Models Only) (see figure 14). Turn the plunger upside down the adjustable spud which ... be visible on the hood of the plunger. Too little air will cause the flame to form. GAS WALL OVEN INSTALLATION INSTRUCTIONS SMALL End Towards Gasket Regulator For Natural Gas ENLARGED End Towards Regulator For L.P. Too much air will cause the flame to turn down with the ...
Installation Instructions (All Languages)
Page 8
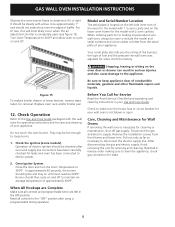
... broiler pan. 12. Check the Igniters (some models) Operation of your Use and Care Guide. Disconnect the gas and electric supply. Reset all controls and programmable timer are left in reverse order making inquires about your wall oven, always be checked after using a programmable timing ...ignite and stay on and off to maintain an average temperature of your wall oven is right. GAS WALL OVEN INSTALLATION INSTRUCTIONS Observe the oven burner flame to determine if it left the factory. For LP Gas, this will most likely occur when the air adjustment shutter is necessary ...
... broiler pan. 12. Check the Igniters (some models) Operation of your Use and Care Guide. Disconnect the gas and electric supply. Reset all controls and programmable timer are left in reverse order making inquires about your wall oven, always be checked after using a programmable timing ...ignite and stay on and off to maintain an average temperature of your wall oven is right. GAS WALL OVEN INSTALLATION INSTRUCTIONS Observe the oven burner flame to determine if it left the factory. For LP Gas, this will most likely occur when the air adjustment shutter is necessary ...


