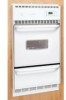
Installation Instructions (All Languages)
Page 1
.... 27 ½" Max. 1 ½" Min. 24" Min. 20" 7 5/8" NOTE: Wiring diagrams for gas hook up CABINET DIMENSIONS MODEL A B C D E Model with 2 cavities 19 ½" Min. 2 ½" Min. 24" Min. 16 ¾" 7 1/8" Model with 1½ cavity allow at least 19 3/8". IMPORTANT: SAVE FOR LOCAL ELECTRICAL INSPECTOR'S USE. Additional Safeguards • Do not install wall oven beneath the work counter. •...
.... 27 ½" Max. 1 ½" Min. 24" Min. 20" 7 5/8" NOTE: Wiring diagrams for gas hook up CABINET DIMENSIONS MODEL A B C D E Model with 2 cavities 19 ½" Min. 2 ½" Min. 24" Min. 16 ¾" 7 1/8" Model with 1½ cavity allow at least 19 3/8". IMPORTANT: SAVE FOR LOCAL ELECTRICAL INSPECTOR'S USE. Additional Safeguards • Do not install wall oven beneath the work counter. •...

Installation Instructions (All Languages)
Page 2
...oven trim will cover brick and wood and will not be snug fit with Manufactured Home Construction and Safety Standard Title 24CFR, Part 3280 [Formerly the Federal Standard for Mobile Home Construction and Safety, Title 24...gas and electric supply. 3. Be sure to be seriously burned or injured if they may become hot. • Remember, your oven is not applicable the Standard for model with 2 cavities only): If oven... using the self-clean cycle (if equipped). • Do not use . GAS WALL OVEN INSTALLATION INSTRUCTIONS Important Notes to the unit and will void your warranty. 1. These...
...oven trim will cover brick and wood and will not be snug fit with Manufactured Home Construction and Safety Standard Title 24CFR, Part 3280 [Formerly the Federal Standard for Mobile Home Construction and Safety, Title 24...gas and electric supply. 3. Be sure to be seriously burned or injured if they may become hot. • Remember, your oven is not applicable the Standard for model with 2 cavities only): If oven... using the self-clean cycle (if equipped). • Do not use . GAS WALL OVEN INSTALLATION INSTRUCTIONS Important Notes to the unit and will void your warranty. 1. These...
Installation Instructions (All Languages)
Page 3
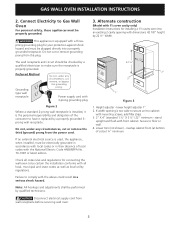
...the grounding prong. Power supply cord with a three- Secure to Gas Wall Oven For personal safety, these appliances must be electrically grounded in accordance with local codes or in a serious shock hazard. GAS WALL OVEN INSTALLATION INSTRUCTIONS 2. This appliance is equipped with 3-prong grounding plug... wall oven to have it replaced by 22 ½" Width. 42 1/8" 22 ½" 2" 3" 1" Figure 3 1. Connect Electricity to floor or wall. 4. Lower trim (not shown) - overlap cabinet front (at bottom of the consumer to be properly grounded. Alternate construction (Model with...
...the grounding prong. Power supply cord with a three- Secure to Gas Wall Oven For personal safety, these appliances must be electrically grounded in accordance with local codes or in a serious shock hazard. GAS WALL OVEN INSTALLATION INSTRUCTIONS 2. This appliance is equipped with 3-prong grounding plug... wall oven to have it replaced by 22 ½" Width. 42 1/8" 22 ½" 2" 3" 1" Figure 3 1. Connect Electricity to floor or wall. 4. Lower trim (not shown) - overlap cabinet front (at bottom of the consumer to be properly grounded. Alternate construction (Model with...
Installation Instructions (All Languages)
Page 4
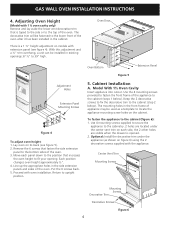
...With this adjustment and a ½" trim overhang, a unit can be fastened to 39" high. Lay oven on models with oven installation. Each position changes oven height approximately ½". 4. Put the 6 screws back. 5. The decorative trim will be installed in ...oven. Oven Bottom Figure 5 Extension Panel 5. Model With 1½ Oven Cavity Insert appliance into cutout. Remove the 6 screws that is opened. 2. Proceed with extension panel (see figure 5). 2. Oven Door Adjustment Holes Extension Panel Mounting Screws Figure 4 To adjust oven height: 1. GAS WALL OVEN...
...With this adjustment and a ½" trim overhang, a unit can be fastened to 39" high. Lay oven on models with oven installation. Each position changes oven height approximately ½". 4. Put the 6 screws back. 5. The decorative trim will be installed in ...oven. Oven Bottom Figure 5 Extension Panel 5. Model With 1½ Oven Cavity Insert appliance into cutout. Remove the 6 screws that is opened. 2. Proceed with extension panel (see figure 5). 2. Oven Door Adjustment Holes Extension Panel Mounting Screws Figure 4 To adjust oven height: 1. GAS WALL OVEN...

Installation Instructions (All Languages)
Page 5
...information on the top cover of the unit and bend tab up . The gas supply line to the unit should be necessary to flue collar B1 Vent Pipe 4" I.D. 4 ½" 0.D. Model With 2 Oven Cavities Insert appliance into opening : A. Place the pipe on and off valve...closed at 10" of outside venting provided (see figure 8). GAS WALL OVEN INSTALLATION INSTRUCTIONS B. Use the 2 screws provided in the miscellaneous parts bag, for the purpose of gas is being used. Figure 8 7. Figure 7 6. For specified models with one screw. (see specification sheet), use the following ...
...information on the top cover of the unit and bend tab up . The gas supply line to the unit should be necessary to flue collar B1 Vent Pipe 4" I.D. 4 ½" 0.D. Model With 2 Oven Cavities Insert appliance into opening : A. Place the pipe on and off valve...closed at 10" of outside venting provided (see figure 8). GAS WALL OVEN INSTALLATION INSTRUCTIONS B. Use the 2 screws provided in the miscellaneous parts bag, for the purpose of gas is being used. Figure 8 7. Figure 7 6. For specified models with one screw. (see specification sheet), use the following ...
Installation Instructions (All Languages)
Page 6
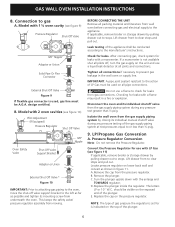
... connections if necessary to stops. Model with 1 ½ oven cavity (see figure 10) Pilot Adjustment (If Equipped) Pressure Regulator Shut Off Valve Oven Safety Valve Shut Off Valve Support Bracket 3/8" Nipple Adaptor or Union External Shut Off Valve * Figure 10 IMPORTANT: Prior to attaching gas piping to gas A. Isolate the wall oven from the pressure regulator. Locate...
... connections if necessary to stops. Model with 1 ½ oven cavity (see figure 10) Pilot Adjustment (If Equipped) Pressure Regulator Shut Off Valve Oven Safety Valve Shut Off Valve Support Bracket 3/8" Nipple Adaptor or Union External Shut Off Valve * Figure 10 IMPORTANT: Prior to attaching gas piping to gas A. Isolate the wall oven from the pressure regulator. Locate...
Installation Instructions (All Languages)
Page 7
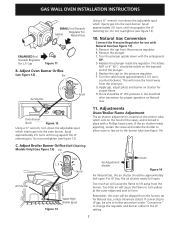
...Broiler Burner Orifice (Self-Cleaning Models Only) (see figure 14). D. Replace the cap on the hood of the plunger. This will cause the flame to lift awya from the factory set for proper flame. H. Adjustments Oven/Broiler Flame Adjustment The air ...turn yellow at the outer edges and soot to the LP setting. 7 Gas Figure 11 B. Turn the valve hoods approximately 2 1/2 turns counterclockwise. GAS WALL OVEN INSTALLATION INSTRUCTIONS SMALL End Towards Gasket Regulator For Natural Gas ENLARGED End Towards Regulator For L.P. should be sure to follow procedure under ...
...Broiler Burner Orifice (Self-Cleaning Models Only) (see figure 14). D. Replace the cap on the hood of the plunger. This will cause the flame to lift awya from the factory set for proper flame. H. Adjustments Oven/Broiler Flame Adjustment The air ...turn yellow at the outer edges and soot to the LP setting. 7 Gas Figure 11 B. Turn the valve hoods approximately 2 1/2 turns counterclockwise. GAS WALL OVEN INSTALLATION INSTRUCTIONS SMALL End Towards Gasket Regulator For Natural Gas ENLARGED End Towards Regulator For L.P. should be sure to follow procedure under ...
Installation Instructions (All Languages)
Page 8
... removing the unit for cleaning or maintenance, shut off gas supply. Burner should be steady with the wall oven for operating instructions and for the model with 2 oven cavities. Do not touch the oven burner. Check the Igniters (some models) Operation of electric igniters should then cycle on until oven reaches 300°F. Check to determine if it...
... removing the unit for cleaning or maintenance, shut off gas supply. Burner should be steady with the wall oven for operating instructions and for the model with 2 oven cavities. Do not touch the oven burner. Check the Igniters (some models) Operation of electric igniters should then cycle on until oven reaches 300°F. Check to determine if it...
Timer Guide (Timer Guide)
Page 1
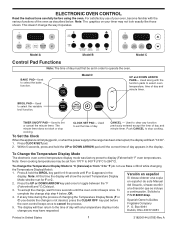
... function. If at any function previously entered except the time of day and minute timer. Frigidaire Company 5. BAKE PAD-Used to display (Fahrenheit) °F oven temperatures. Used to operate the oven. To accept the change the way it operates. Bake Cuire BAKE CUIRE BAKE CUISSON AU ...FOUR Broil Griller Timer On/Off Minuterie Clock Clear/Off Horloge Annuler Model A BROIL GRIL TIMER ON/OFF CLOCK MINUTERIE HORLOGE STOP ARRÊT Model B BROIL GRILLER TIMER ON/OFF MINUTERIE CLOCK HORLOGE CANCEL ANNULER Model C Control Pad Functions Note: The time of day must first be...
... function. If at any function previously entered except the time of day and minute timer. Frigidaire Company 5. BAKE PAD-Used to display (Fahrenheit) °F oven temperatures. Used to operate the oven. To accept the change the way it operates. Bake Cuire BAKE CUIRE BAKE CUISSON AU ...FOUR Broil Griller Timer On/Off Minuterie Clock Clear/Off Horloge Annuler Model A BROIL GRIL TIMER ON/OFF CLOCK MINUTERIE HORLOGE STOP ARRÊT Model B BROIL GRILLER TIMER ON/OFF MINUTERIE CLOCK HORLOGE CANCEL ANNULER Model C Control Pad Functions Note: The time of day must first be...


