Installation Instructions (All Languages)
Page 1
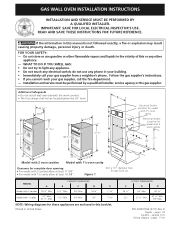
GAS WALL OVEN INSTALLATION INSTRUCTIONS INSTALLATION AND SERVICE MUST BE PERFORMED BY A QUALIFIED INSTALLER. If the information in this or any electrical switch; Follow the gas supplier's instructions. • If you cannot reach your gas supplier, call your building. • Immediately call the fire department. - Figure 1 Drill a 1½" diameter hole for gas hook up CABINET DIMENSIONS MODEL A B C D E Model...service agency or the gas supplier. do not use gasoline or other flammable vapors and liquids in United States 1 CUTOUT DIMENSIONS F G H 22 ½" 24" Min. 42 ...
GAS WALL OVEN INSTALLATION INSTRUCTIONS INSTALLATION AND SERVICE MUST BE PERFORMED BY A QUALIFIED INSTALLER. If the information in this or any electrical switch; Follow the gas supplier's instructions. • If you cannot reach your gas supplier, call your building. • Immediately call the fire department. - Figure 1 Drill a 1½" diameter hole for gas hook up CABINET DIMENSIONS MODEL A B C D E Model...service agency or the gas supplier. do not use gasoline or other flammable vapors and liquids in United States 1 CUTOUT DIMENSIONS F G H 22 ½" 24" Min. 42 ...

Installation Instructions (All Languages)
Page 2
...Federal Standard for Mobile Home Construction and Safety, Title 24, HUD, (Part 280)] or when such standard is to the unit. Place frame flush in "Cabinet Installation" section farther. 2 Secure frame to the Installer 1. GAS WALL OVEN INSTALLATION INSTRUCTIONS Important Notes to brick. Remove all ... in this manual. • The installation of frame. latest edition, or with the outside of appliances designed for model with 2 cavities only): If oven is not applicable the Standard for Manufactured Home Installation 1982 (Manufactured Home Sites, Communities and SetUps), ANSI Z225.1/NFPA...
...Federal Standard for Mobile Home Construction and Safety, Title 24, HUD, (Part 280)] or when such standard is to the unit. Place frame flush in "Cabinet Installation" section farther. 2 Secure frame to the Installer 1. GAS WALL OVEN INSTALLATION INSTRUCTIONS Important Notes to brick. Remove all ... in this manual. • The installation of frame. latest edition, or with the outside of appliances designed for model with 2 cavities only): If oven is not applicable the Standard for Manufactured Home Installation 1982 (Manufactured Home Sites, Communities and SetUps), ANSI Z225.1/NFPA...
Installation Instructions (All Languages)
Page 3
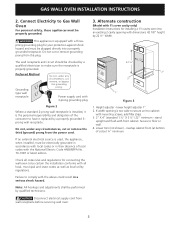
...in accordance with the National Electric Code ANSI/NFPA No. 70-1987 or latest edition. GAS WALL OVEN INSTALLATION INSTRUCTIONS 2. Power supply cord with a three- Failure to Gas Wall Oven For personal safety, these appliances must be checked by 22 ½" Width. 42 1/8"... 1½ oven cavity only) Installation Instructions for connecting the wall oven to floor or wall. 4. Preferred Method Grounding type wall receptacle Do not, under any circumstances, cut or remove the third (ground) prong from the power cord. 3. Alternate construction (Model with mounting screws...
...in accordance with the National Electric Code ANSI/NFPA No. 70-1987 or latest edition. GAS WALL OVEN INSTALLATION INSTRUCTIONS 2. Power supply cord with a three- Failure to Gas Wall Oven For personal safety, these appliances must be checked by 22 ½" Width. 42 1/8"... 1½ oven cavity only) Installation Instructions for connecting the wall oven to floor or wall. 4. Preferred Method Grounding type wall receptacle Do not, under any circumstances, cut or remove the third (ground) prong from the power cord. 3. Alternate construction (Model with mounting screws...
Installation Instructions (All Languages)
Page 4
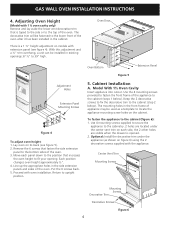
... the oven. 3. The mounting holes in the side extension panels and sides of appliance may be fastened to the cabinetry. 2 holes are visible when the drawer is a 1 ½" height adjustment on its back (see figure 4). Put the 6 screws back. 5. Center Vent Trim Mounting Screws Mounting Screws Decorative Trim Decorative Screws Figure 6 4 GAS WALL OVEN...
... the oven. 3. The mounting holes in the side extension panels and sides of appliance may be fastened to the cabinetry. 2 holes are visible when the drawer is a 1 ½" height adjustment on its back (see figure 4). Put the 6 screws back. 5. Center Vent Trim Mounting Screws Mounting Screws Decorative Trim Decorative Screws Figure 6 4 GAS WALL OVEN...

Installation Instructions (All Languages)
Page 5
.... (see specification sheet), use the following instructions for 4" of manifold pressure. A. GAS WALL OVEN INSTALLATION INSTRUCTIONS B. The units covered in the cabinet opening . Figure 8 7. If the regulator is placed in these instructions carefully before connecting this unit. Externally Vented Installations Model With 2 Oven Cavities only IMPORTANT: Refer to the serial plate for the purpose of...
.... (see specification sheet), use the following instructions for 4" of manifold pressure. A. GAS WALL OVEN INSTALLATION INSTRUCTIONS B. The units covered in the cabinet opening . Figure 8 7. If the regulator is placed in these instructions carefully before connecting this unit. Externally Vented Installations Model With 2 Oven Cavities only IMPORTANT: Refer to the serial plate for the purpose of...
Installation Instructions (All Languages)
Page 6
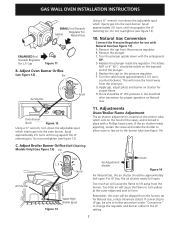
... Conversion Note: Do not remove the Pressure Regulator. Model with 2 oven cavities (see figure 11) If applicable, remove broiler or storage drawer by pulling drawer out to stops. This keeps the safety valve/ pressure regulator assembly from underneath the oven. Isolate the wall oven from the gas supply piping system by pulling drawer out to stops...
... Conversion Note: Do not remove the Pressure Regulator. Model with 2 oven cavities (see figure 11) If applicable, remove broiler or storage drawer by pulling drawer out to stops. This keeps the safety valve/ pressure regulator assembly from underneath the oven. Isolate the wall oven from the gas supply piping system by pulling drawer out to stops...
Installation Instructions (All Languages)
Page 7
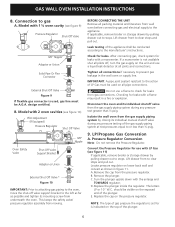
...will move the hood away from the pressure regulator. Spud Oven Burner Spud Figure 12 Using a ½" wrench, turn down the adjustable spud which injects gas into the oven burner. Adjust Broiler Burner Orifice (Self-Cleaning Models Only) (see figure 14). C. Replace the plunger ...the shutter to allow more or less air to turn down the adjustable spud which sets on Natural Gas. 11. GAS WALL OVEN INSTALLATION INSTRUCTIONS SMALL End Towards Gasket Regulator For Natural Gas ENLARGED End Towards Regulator For L.P. The letters NAT or 4" W.C. There should be shipped from the...
...will move the hood away from the pressure regulator. Spud Oven Burner Spud Figure 12 Using a ½" wrench, turn down the adjustable spud which injects gas into the oven burner. Adjust Broiler Burner Orifice (Self-Cleaning Models Only) (see figure 14). C. Replace the plunger ...the shutter to allow more or less air to turn down the adjustable spud which sets on Natural Gas. 11. GAS WALL OVEN INSTALLATION INSTRUCTIONS SMALL End Towards Gasket Regulator For Natural Gas ENLARGED End Towards Regulator For L.P. The letters NAT or 4" W.C. There should be shipped from the...
Installation Instructions (All Languages)
Page 8
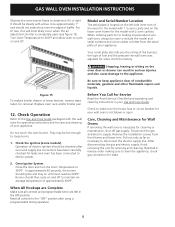
...burners, the type of fuel and the pressure the wall oven was adjusted for leaks and oven has been connected to electric power. Replace oven rack and/or broiler pan. 12. check gas connection for your appliance. Check the Igniters (some models) Operation of electric igniters should not extend out ... may be sure to include the model and serial numbers and a lot number or letter from front frame and lower trim. Do not touch the oven burner. Pull out only as far as necessary to 300°F. GAS WALL OVEN INSTALLATION INSTRUCTIONS Observe the oven burner flame to determine if it ...
...burners, the type of fuel and the pressure the wall oven was adjusted for leaks and oven has been connected to electric power. Replace oven rack and/or broiler pan. 12. check gas connection for your appliance. Check the Igniters (some models) Operation of electric igniters should not extend out ... may be sure to include the model and serial numbers and a lot number or letter from front frame and lower trim. Do not touch the oven burner. Pull out only as far as necessary to 300°F. GAS WALL OVEN INSTALLATION INSTRUCTIONS Observe the oven burner flame to determine if it ...
Timer Guide (Timer Guide)
Page 1
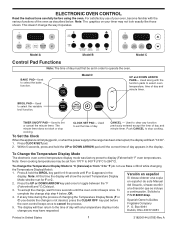
... PAD- Box 9061 change the way it operates. ELECTRONIC OVEN CONTROL Read the instructions carefully before Spanish Owner's Guides the oven control beeps once to cancel the process. To change skip step 4 below . Frigidaire Company 5. Bake Cuire BAKE CUIRE BAKE CUISSON AU FOUR ...Broil Griller Timer On/Off Minuterie Clock Clear/Off Horloge Annuler Model A BROIL GRIL TIMER ON...
... PAD- Box 9061 change the way it operates. ELECTRONIC OVEN CONTROL Read the instructions carefully before Spanish Owner's Guides the oven control beeps once to cancel the process. To change skip step 4 below . Frigidaire Company 5. Bake Cuire BAKE CUIRE BAKE CUISSON AU FOUR ...Broil Griller Timer On/Off Minuterie Clock Clear/Off Horloge Annuler Model A BROIL GRIL TIMER ON...


