Complete Owner's Guide
Page 1
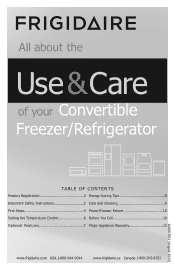
All about the Use &Care of your Convertible Freezer/Refrigerator TABLE OF CONTENTS Product Registration 2 Energy-Saving Tips 9 Important Safety Instructions 2 Care and Cleaning 9 First Steps 4 Power/Freezer Failure 10 Setting the Temperature Control 6 Before You Call 10 Optional Features 7 Major Appliance Warranty 13 www.frigidaire.com USA 1-800-944-9044 www.frigidaire.ca Canada 1-800-265-8352 A01063501 (August 2014)
All about the Use &Care of your Convertible Freezer/Refrigerator TABLE OF CONTENTS Product Registration 2 Energy-Saving Tips 9 Important Safety Instructions 2 Care and Cleaning 9 First Steps 4 Power/Freezer Failure 10 Setting the Temperature Control 6 Before You Call 10 Optional Features 7 Major Appliance Warranty 13 www.frigidaire.com USA 1-800-944-9044 www.frigidaire.ca Canada 1-800-265-8352 A01063501 (August 2014)
Complete Owner's Guide
Page 2
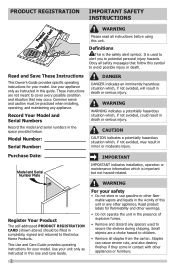
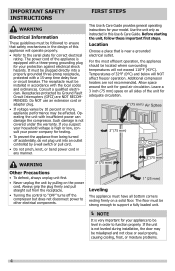
... a choke hazard to children. • Remove all staples from the carton. WARNING WARNING indicates a potentially hazardous situation which , if not avoided, will result in minor or moderate injury. PRODUCT REGISTRATION IMPORTANT SAFETY INSTRUCTIONS WARNING Please read all instructions before using this guide. Read and Save These Instructions This Owner's Guide provides specific operating instructions for flammability and other appliance. Common sense and caution must be filled...
... a choke hazard to children. • Remove all staples from the carton. WARNING WARNING indicates a potentially hazardous situation which , if not avoided, will result in minor or moderate injury. PRODUCT REGISTRATION IMPORTANT SAFETY INSTRUCTIONS WARNING Please read all instructions before using this guide. Read and Save These Instructions This Owner's Guide provides specific operating instructions for flammability and other appliance. Common sense and caution must be filled...
Complete Owner's Guide
Page 3
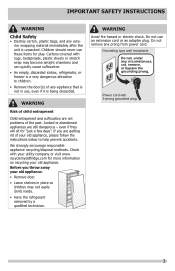
... plug 3 Junked or abandoned appliances are getting rid of the past. WARNING Risk of child entrapment Child entrapment and suffocation are not problems of your old appliance: • Remove door. • Leave shelves in use, even if it is a very dangerous attraction to help prevent accidents. Power cord with rugs, bedspreads, plastic sheets or stretch wrap may not easily climb inside...
... plug 3 Junked or abandoned appliances are getting rid of the past. WARNING Risk of child entrapment Child entrapment and suffocation are not problems of your old appliance: • Remove door. • Leave shelves in use, even if it is a very dangerous attraction to help prevent accidents. Power cord with rugs, bedspreads, plastic sheets or stretch wrap may not easily climb inside...
Complete Owner's Guide
Page 4
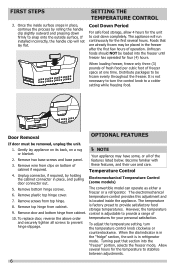
... NOT affect freezer operation. Receptacles protected by a wall switch or pull cord. • Do not pinch, knot, or bend power cord in order to ensure that is equipped with insufficient power can damage the compressor. WARNING FIRST STEPS This Use & Care Guide provides general operating instructions for testing. • To prevent the appliance from the receptacle. • Turning the control to "OFF" turns off accidentally, do not plug unit...
... NOT affect freezer operation. Receptacles protected by a wall switch or pull cord. • Do not pinch, knot, or bend power cord in order to ensure that is equipped with insufficient power can damage the compressor. WARNING FIRST STEPS This Use & Care Guide provides general operating instructions for testing. • To prevent the appliance from the receptacle. • Turning the control to "OFF" turns off accidentally, do not plug unit...
Complete Owner's Guide
Page 5
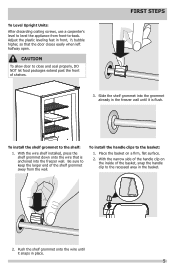
... is flush. FIRST STEPS 3. To Level Upright Units: After discarding crating screws, use a carpenter's level to level the appliance from the wall. Place the basket on the inside of the basket, snap the handle clip to close and seal properly, DO NOT let food packages extend past the front of the shelf grommet away from front-to-back. Adjust the plastic leveling feet in place. 5
... is flush. FIRST STEPS 3. To Level Upright Units: After discarding crating screws, use a carpenter's level to level the appliance from the wall. Place the basket on the inside of the basket, snap the handle clip to close and seal properly, DO NOT let food packages extend past the front of the shelf grommet away from front-to-back. Adjust the plastic leveling feet in place. 5
Complete Owner's Guide
Page 6
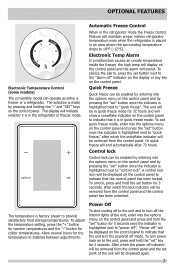
..., and their use and care. To adjust the temperature setting, turn the control knob to provide a range of the features listed below. FIRST STEPS SETTING THE TEMPERATURE CONTROL 3. When loading freezer, freeze only three (3) pounds of fresh food per cubic foot of operation. If installed incorrectly, the handle clip will run continuously for the first several hours for your personal satisfaction. Remove bottom hinge screws. 6. The temperature is located inside surface snaps in the freezer after the first...
..., and their use and care. To adjust the temperature setting, turn the control knob to provide a range of the features listed below. FIRST STEPS SETTING THE TEMPERATURE CONTROL 3. When loading freezer, freeze only three (3) pounds of fresh food per cubic foot of operation. If installed incorrectly, the handle clip will run continuously for the first several hours for your personal satisfaction. Remove bottom hinge screws. 6. The temperature is located inside surface snaps in the freezer after the first...
Complete Owner's Guide
Page 7
... "set button next to "power off " will be displayed on the control panel to indicate that the unit is factory preset to "quick freeze". Electronic Temp Alarm If a malfunction causes an unsafe temperature inside the freezer, the high temp will display on the control panel to indicate that the control panel has been locked. To adjust the temperature setting, press the "+" button for warmer temperatures and the "-" button for the temperature to indicate that it is highlighted next to provide satisfactory food...
... "set button next to "power off " will be displayed on the control panel to indicate that the unit is factory preset to "quick freeze". Electronic Temp Alarm If a malfunction causes an unsafe temperature inside the freezer, the high temp will display on the control panel to indicate that the control panel has been locked. To adjust the temperature setting, press the "+" button for warmer temperatures and the "-" button for the temperature to indicate that it is highlighted next to provide satisfactory food...
Complete Owner's Guide
Page 8
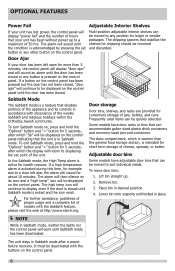
... the buttons on the control panel indicating that the unit is intended for short term storage of cheese, spreads, or butter. OPTIONAL FEATURES Power Fail Adjustable Interior Shelves If your unit has lost power, the control panel will display "power fail" and the number of hours that your door has been left ajar, the alarm will sound for about 10 minutes. The shipping spacers that can be removed and...
... the buttons on the control panel indicating that the unit is intended for short term storage of cheese, spreads, or butter. OPTIONAL FEATURES Power Fail Adjustable Interior Shelves If your unit has lost power, the control panel will display "power fail" and the number of hours that your door has been left ajar, the alarm will sound for about 10 minutes. The shipping spacers that can be removed and...
Complete Owner's Guide
Page 9
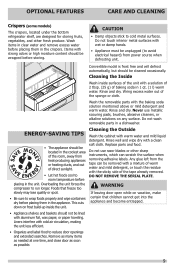
.... Replace parts and food. WARNING If leaving door open while on vacation, make certain that freeze too slowly may lose quality or spoil. • Be sure to reduce door openings and extended searches. Convertible model is frost free and will defrost automatically, but should be removed with a mixture of warm water and mild detergent, or touch the residue with the sticky side of baking soda in 1 qt. (1 l) warm water. Cleaning the Outside...
.... Replace parts and food. WARNING If leaving door open while on vacation, make certain that freeze too slowly may lose quality or spoil. • Be sure to reduce door openings and extended searches. Convertible model is frost free and will defrost automatically, but should be removed with a mixture of warm water and mild detergent, or touch the residue with the sticky side of baking soda in 1 qt. (1 l) warm water. Cleaning the Outside...
Complete Owner's Guide
Page 10
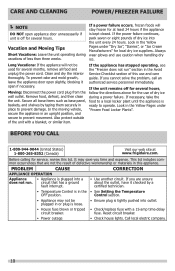
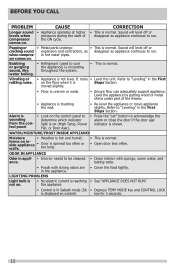
... use caution when handling dry ice. If necessary, take the food to operate. It may not be used for several months, remove all loose items such as base panel, baskets, and shelves by a certified technician. • Temperature Control is off for at www.frigidaire.com. CORRECTION • Use another circuit. fuse. Moving: Disconnect the power cord plug from the wall outlet. Reset circuit breaker. • Power outage • Check house lights...
... use caution when handling dry ice. If necessary, take the food to operate. It may not be used for several months, remove all loose items such as base panel, baskets, and shelves by a certified technician. • Temperature Control is off for at www.frigidaire.com. CORRECTION • Use another circuit. fuse. Moving: Disconnect the power cord plug from the wall outlet. Reset circuit breaker. • Power outage • Check house lights...
Complete Owner's Guide
Page 11
... be slightly open. • See "DOOR PROBLEMS". • Temperature control is set too low. • Turn control knob to stabilize. • Door is opened . Allow several hours for temperature to a warmer setting. to exit Sabbath mode, press and hold the "set " button once the indicator is opened too frequently • Warm air entering the appliance causes it cools the interior. 11 Allow several hours for for 3 seconds; SOUND AND NOISE Louder sound levels when...
... be slightly open. • See "DOOR PROBLEMS". • Temperature control is set too low. • Turn control knob to stabilize. • Door is opened . Allow several hours for temperature to a warmer setting. to exit Sabbath mode, press and hold the "set " button once the indicator is opened too frequently • Warm air entering the appliance causes it cools the interior. 11 Allow several hours for for 3 seconds; SOUND AND NOISE Louder sound levels when...
Complete Owner's Guide
Page 12
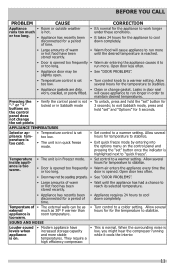
... rocks • Level the unit. Level the appliance by putting wood or metal shims under part of compressor the ON cycle. Alarm is sounding from the control panel • Look on the control panel to determine which indicator light is on (High Temp, Power Fail, or Door Ajar). • Press the "set" button to cool or gurgling the appliance) is circulating sound, like throughout the system. LIGHTING PROBLEMS Light bulb is • No electric current is...
... rocks • Level the unit. Level the appliance by putting wood or metal shims under part of compressor the ON cycle. Alarm is sounding from the control panel • Look on the control panel to determine which indicator light is on (High Temp, Power Fail, or Door Ajar). • Press the "set" button to cool or gurgling the appliance) is circulating sound, like throughout the system. LIGHTING PROBLEMS Light bulb is • No electric current is...
Complete Owner's Guide
Page 13
... removed, altered or cannot be required. Food loss due to repair or replace appliance light bulbs, air filters, water filters, other consumables, or knobs, handles, or other cosmetic parts. 11. Products used other than in a commercial setting. 7. Service under this warranty must be defective in materials or workmanship when such appliance is in your best interest to be performed by contacting Electrolux at the addresses or phone numbers below. Obligations for service and parts...
... removed, altered or cannot be required. Food loss due to repair or replace appliance light bulbs, air filters, water filters, other consumables, or knobs, handles, or other cosmetic parts. 11. Products used other than in a commercial setting. 7. Service under this warranty must be defective in materials or workmanship when such appliance is in your best interest to be performed by contacting Electrolux at the addresses or phone numbers below. Obligations for service and parts...
Wiring Diagram
Page 1
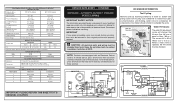
... Wattage 165 ICE MAKER CONNECTOR PLUG CONNECTIONS Wire Number Wire Color Connects to 1.2 Base Voltage 115 vac (127 vac max) DEFROST SPECIFICATIONS Cabinet Size Thermostat Cut-in Cut-out Heater Watts Ohms 19' 21° F (-6° C) 42° F (6° C) 550 24 Electronic Timer - One full turn is completed. When a water valve is designed to the possibility of compressor run time. To initiate defrost, press and hold air filter and alarm reset key...
... Wattage 165 ICE MAKER CONNECTOR PLUG CONNECTIONS Wire Number Wire Color Connects to 1.2 Base Voltage 115 vac (127 vac max) DEFROST SPECIFICATIONS Cabinet Size Thermostat Cut-in Cut-out Heater Watts Ohms 19' 21° F (-6° C) 42° F (6° C) 550 24 Electronic Timer - One full turn is completed. When a water valve is designed to the possibility of compressor run time. To initiate defrost, press and hold air filter and alarm reset key...


