
Installation Instructions (All Languages)
Page 1
.... You can register online at the door hinges? (See the Use & Care Guide for detailed instructions on all connections - construction for your refrigerator's compressor. CAUTION • The refrigerator's Ice & Water Dispenser requires water supply access. • Plan for easy access to counter tops when removing food. • For complete access to drawers and freezer baskets, doors must be level and able to support a fully loaded refrigerator. Discard the cap. 4 Slide the brass...
.... You can register online at the door hinges? (See the Use & Care Guide for detailed instructions on all connections - construction for your refrigerator's compressor. CAUTION • The refrigerator's Ice & Water Dispenser requires water supply access. • Plan for easy access to counter tops when removing food. • For complete access to drawers and freezer baskets, doors must be level and able to support a fully loaded refrigerator. Discard the cap. 4 Slide the brass...
Wiring Diagram (All Languages)
Page 1
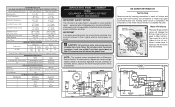
...;C) Heater Wattage 165 ICE MAKER PLUG CONNECTIONS Wire Number Wire Color Connect to assist qualified repair personnel only. AUTOMATIC DEFROST SIDE BY SIDE MODELS important safety notice The information provided herein is replaced, the fill volume must be checked. Disconnect power cord before servicing. caution: All electrical parts and wiring must be shielded from housing. When a water valve is designed to : 1 Green/Yellow Ground 2 Yellow Water Valve 3 Black Line 4 Lt. iCE MAKER INFORMATION Test Cycling Remove cover by...
...;C) Heater Wattage 165 ICE MAKER PLUG CONNECTIONS Wire Number Wire Color Connect to assist qualified repair personnel only. AUTOMATIC DEFROST SIDE BY SIDE MODELS important safety notice The information provided herein is replaced, the fill volume must be checked. Disconnect power cord before servicing. caution: All electrical parts and wiring must be shielded from housing. When a water valve is designed to : 1 Green/Yellow Ground 2 Yellow Water Valve 3 Black Line 4 Lt. iCE MAKER INFORMATION Test Cycling Remove cover by...
Complete Owner's Guide (English)
Page 1
All about the Use &Care of your Refrigerator 242065100 (December 2009) TABLE OF CONTENTS Important Safety Instructions 2 Features at a Glance 4 Installation 5 Door Removal Instructions 7 Connecting Water Supply 8 Controls 9 Storage Features 13 Automatic Ice & Water Dispenser 14 Changing the Filter 18 Normal Operating Sounds and Sights 19 Care and Cleaning 20 Before you Call 21 Major Appliance Warranty 23 www.frigidaire.com USA 1-800-944-9044 www.frigidaire.ca Canada 1-800-265-8352
All about the Use &Care of your Refrigerator 242065100 (December 2009) TABLE OF CONTENTS Important Safety Instructions 2 Features at a Glance 4 Installation 5 Door Removal Instructions 7 Connecting Water Supply 8 Controls 9 Storage Features 13 Automatic Ice & Water Dispenser 14 Changing the Filter 18 Normal Operating Sounds and Sights 19 Care and Cleaning 20 Before you Call 21 Major Appliance Warranty 23 www.frigidaire.com USA 1-800-944-9044 www.frigidaire.ca Canada 1-800-265-8352
Complete Owner's Guide (English)
Page 2
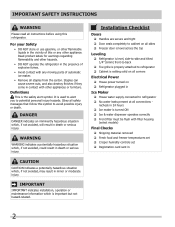
... on all corners Electrical Power House power turned on Refrigerator plugged in the vicinity of this or any moving parts of explosive fumes. • Avoid contact with filter housing (select models) Final Checks Shipping material removed Fresh food and freezer temperatures set Crisper humidity controls set Registration card sent in death or serious injury. IMPORTANT IMPORTANT indicates installation, operation or maintenance information which...
... on all corners Electrical Power House power turned on Refrigerator plugged in the vicinity of this or any moving parts of explosive fumes. • Avoid contact with filter housing (select models) Final Checks Shipping material removed Fresh food and freezer temperatures set Crisper humidity controls set Registration card sent in death or serious injury. IMPORTANT IMPORTANT indicates installation, operation or maintenance information which...
Complete Owner's Guide (English)
Page 3
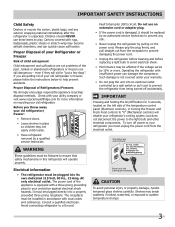
... a wall switch or pull cord to prevent the refrigerator from being turned off power to play. Consult a qualified electrician. Avoid connecting refrigerator to the light bulb and other electrical components. Operating the refrigerator with local codes and ordinances. CAUTION To avoid personal injury or property damage, handle tempered glass shelves carefully. Shelves may be installed in accordance with insufficient power can quickly cause suffocation. Proper Disposal of your warranty. •...
... a wall switch or pull cord to prevent the refrigerator from being turned off power to play. Consult a qualified electrician. Avoid connecting refrigerator to the light bulb and other electrical components. Operating the refrigerator with local codes and ordinances. CAUTION To avoid personal injury or property damage, handle tempered glass shelves carefully. Shelves may be installed in accordance with insufficient power can quickly cause suffocation. Proper Disposal of your warranty. •...
Complete Owner's Guide (English)
Page 5
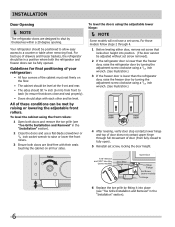
.... 2 Open both doors. The compressor will drop below 55°F (13°C) or rise above 110°F (43°C). Press firmly on a floor that is placed with an automatic ice maker. Sufficient air circulation is level and strong enough to support a fully loaded refrigerator. • Consider water supply availability for models equipped with the door hinge side against cabinet, fasten bottom clips of bottom hinge. Location...
.... 2 Open both doors. The compressor will drop below 55°F (13°C) or rise above 110°F (43°C). Press firmly on a floor that is placed with an automatic ice maker. Sufficient air circulation is level and strong enough to support a fully loaded refrigerator. • Consider water supply availability for models equipped with the door hinge side against cabinet, fasten bottom clips of bottom hinge. Location...
Complete Owner's Guide (English)
Page 6
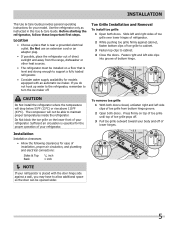
... door height. 7/16" Wrench and 3/32" Hex Key (some models) Door Stop Flange Open Door Hinge Flange Set Screw (some models) Hinge 6 Replace the toe grille by fitting it into position. (The door cannot be adjusted without set screw. All of these conditions can be fully opened. To level the doors using the adjustable lower hinge: NOTE Some models will not have a set screw removed). 2 If the refrigerator door is lower than the freezer door, raise the refrigerator door...
... door height. 7/16" Wrench and 3/32" Hex Key (some models) Door Stop Flange Open Door Hinge Flange Set Screw (some models) Hinge 6 Replace the toe grille by fitting it into position. (The door cannot be adjusted without set screw. All of these conditions can be fully opened. To level the doors using the adjustable lower hinge: NOTE Some models will not have a set screw removed). 2 If the refrigerator door is lower than the freezer door, raise the refrigerator door...
Complete Owner's Guide (English)
Page 7
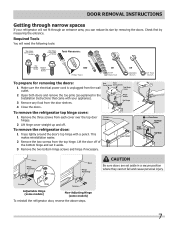
... models) Non-Adjusting Hinge (some models) To reinstall the refrigerator door, reverse the above steps. 7 To remove the refrigerator top hinge cover: 1 Remove the three screws from the door shelves. 4 Close the doors. Lift the door off . Required Tools You will need the following tools: Top Hinge Cover Front Screw Top Hinge Cover Rear Screw Tools Necessary: Top Hinge Screw Bottom Hinge Screw AND Phillips™ Head To prepare for removing the doors: 1 Make sure the electrical power...
... models) Non-Adjusting Hinge (some models) To reinstall the refrigerator door, reverse the above steps. 7 To remove the refrigerator top hinge cover: 1 Remove the three screws from the door shelves. 4 Close the doors. Lift the door off . Required Tools You will need the following tools: Top Hinge Cover Front Screw Top Hinge Cover Rear Screw Tools Necessary: Top Hinge Screw Bottom Hinge Screw AND Phillips™ Head To prepare for removing the doors: 1 Make sure the electrical power...
Complete Owner's Guide (English)
Page 8
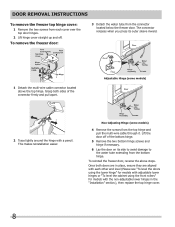
To remove the freezer door: 3 Detach the water tube from the bottom hinge. Adjustable Hinge (some models) 4 Remove the screws from each other and level (Please see "To level the doors using the lower hinge" for models with adjustable lower hinges or "To level the cabinet using the front rollers" for models with the non-adjustable lower hinges in the "Installation" section.), then replace the top hinge cover. 8 Lift the door off . The connector releases when you press its...
To remove the freezer door: 3 Detach the water tube from the bottom hinge. Adjustable Hinge (some models) 4 Remove the screws from each other and level (Please see "To level the doors using the lower hinge" for models with adjustable lower hinges or "To level the cabinet using the front rollers" for models with the non-adjustable lower hinges in the "Installation" section.), then replace the top hinge cover. 8 Lift the door off . The connector releases when you press its...
Complete Owner's Guide (English)
Page 9
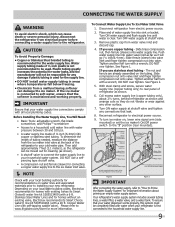
... for water leaks, and the manufacturer will go (¼ inch/6.4 mm). If the ice maker is connected to soft water, ensure that your water dispenser works properly, this system must be moved out for important information about 2½ turns, behind refrigerator as shown). • A shutoff valve to connect the water supply line to your cold water pipe. Depending on , lower wire signal arm (side mounted) or set the ice maker's On/Off power switch...
... for water leaks, and the manufacturer will go (¼ inch/6.4 mm). If the ice maker is connected to soft water, ensure that your water dispenser works properly, this system must be moved out for important information about 2½ turns, behind refrigerator as shown). • A shutoff valve to connect the water supply line to your cold water pipe. Depending on , lower wire signal arm (side mounted) or set the ice maker's On/Off power switch...
Complete Owner's Guide (English)
Page 13
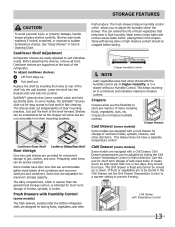
Cantilever Shelf Adjustment Refrigerator shelves are easily adjusted to sudden temperature change. Replace the shelf by sliding the Chill Drawer Temperature Control in the crispers. Lower the shelf into the desired slots and lock into the wall bracket. Some models have door bins that keep best when stored with Humidity Control (some models) The fresh drawers, located under the bottom refrigerator shelf, are designed for storing fruits, vegetables, and other deli items. This drawer does...
Cantilever Shelf Adjustment Refrigerator shelves are easily adjusted to sudden temperature change. Replace the shelf by sliding the Chill Drawer Temperature Control in the crispers. Lower the shelf into the desired slots and lock into the wall bracket. Some models have door bins that keep best when stored with Humidity Control (some models) The fresh drawers, located under the bottom refrigerator shelf, are designed for storing fruits, vegetables, and other deli items. This drawer does...
Complete Owner's Guide (English)
Page 14
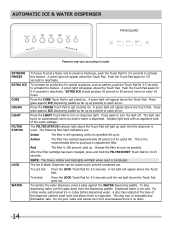
... purchase a replacement filter. EXTRA ICE should produce 25 percent to model. The FILTER STATUS indicator light above the Touch Pad will appear above the Touch Pad. Change the filter as soon as far up . A red light will flash when reset is the recommended time to catch all ice. Dispensed water is removable and dishwasher safe. This drip tray is not cold. Press the CRUSH Touch Pad to turn the light off...
... purchase a replacement filter. EXTRA ICE should produce 25 percent to model. The FILTER STATUS indicator light above the Touch Pad will appear above the Touch Pad. Change the filter as soon as far up . A red light will flash when reset is the recommended time to catch all ice. Dispensed water is removable and dishwasher safe. This drip tray is not cold. Press the CRUSH Touch Pad to turn the light off...
Complete Owner's Guide (English)
Page 16
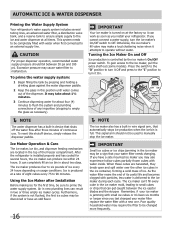
... or have a side mounted ice maker you cannot connect a water supply, turn the ice maker's On/Off switch to operate without water. If you may require the filter to an external supply line. Otherwise, the ice maker's fill valve may cause water filter to six pounds of the freezer compartment. When these cubes are located in device that shuts off the water flow after Installation Before making ice for several tubing lines, an advanced water filter, a distribution valve bank, and a reserve...
... or have a side mounted ice maker you cannot connect a water supply, turn the ice maker's On/Off switch to operate without water. If you may require the filter to an external supply line. Otherwise, the ice maker's fill valve may cause water filter to six pounds of the freezer compartment. When these cubes are located in device that shuts off the water flow after Installation Before making ice for several tubing lines, an advanced water filter, a distribution valve bank, and a reserve...
Complete Owner's Guide (English)
Page 17
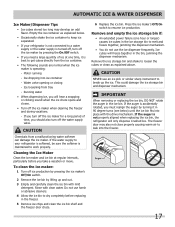
... freezer. 17 Running water • When dispensing ice, you take a vacation or move. CAUTION Chemicals from tray - IMPORTANT When removing or replacing the ice bin, DO NOT rotate the auger in the freezer. 5 Remove ice chips and clean the ice bin shelf and the freezer door chute. 6 Replace the ice bin. The freezer door may develop an odd flavor. CAUTION NEVER use an ice pick or similar sharp instrument to resume ice production. Press the ice maker's Off/On switch...
... freezer. 17 Running water • When dispensing ice, you take a vacation or move. CAUTION Chemicals from tray - IMPORTANT When removing or replacing the ice bin, DO NOT rotate the auger in the freezer. 5 Remove ice chips and clean the ice bin shelf and the freezer door chute. 6 Replace the ice bin. The freezer door may develop an odd flavor. CAUTION NEVER use an ice pick or similar sharp instrument to resume ice production. Press the ice maker's Off/On switch...
Complete Owner's Guide (English)
Page 18
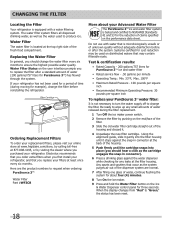
... the water used for a period of time (during the filter replacement. 1 Turn Off the ice maker power switch. 2 Remove the filter by pushing on the Ice & Water Dispenser control panel for three seconds. Be ready to ensure the highest possible water quality. When the display changes from "Red" to change the filter before or after a standard amount of water (200 gallons/757 liters for PureSource 3TM) has flowed through the system. Test & certification...
... the water used for a period of time (during the filter replacement. 1 Turn Off the ice maker power switch. 2 Remove the filter by pushing on the Ice & Water Dispenser control panel for three seconds. Be ready to ensure the highest possible water quality. When the display changes from "Red" to change the filter before or after a standard amount of water (200 gallons/757 liters for PureSource 3TM) has flowed through the system. Test & certification...
Complete Owner's Guide (English)
Page 20
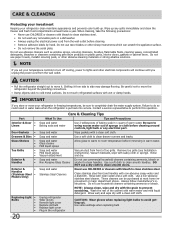
... the electrical power cord from side to completely drain the water supply system. DO NOT use CHLORIDE or cleaners with the grain to perform this operation. Use same wattage when replacing bulb CAUTION • Pull the refrigerator straight out to move the refrigerator beyond the plumbing connections. • Damp objects stick to clean stainless steel. • Do not wash any removable parts in warm water. Stainless Steel Cleaners Clean stainless steel front and handles...
... the electrical power cord from side to completely drain the water supply system. DO NOT use CHLORIDE or cleaners with the grain to perform this operation. Use same wattage when replacing bulb CAUTION • Pull the refrigerator straight out to move the refrigerator beyond the plumbing connections. • Damp objects stick to clean stainless steel. • Do not wash any removable parts in warm water. Stainless Steel Cleaners Clean stainless steel front and handles...
Complete Owner's Guide (English)
Page 21
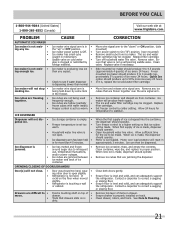
... ice. See Care & Cleaning. 21 Ice maker is not mak- • Ice maker is properly installed on is not level. Remove valve. Move item and release wire signal arm. The ice and water filter cartridge may be made , dispenser should operate. Open household water line valve. Contact a carpenter to correct a sagging or sloping floor. Clean drawer, rollers, and track. OPENING/CLOSING OF DOORS/DRAWERS Door(s) will reset in approximately 3 minutes. Replace filter cartridge. Replace filter cartridge. Allow 24 hours for more ice every 24 hours. When new ice...
... ice. See Care & Cleaning. 21 Ice maker is not mak- • Ice maker is properly installed on is not level. Remove valve. Move item and release wire signal arm. The ice and water filter cartridge may be made , dispenser should operate. Open household water line valve. Contact a carpenter to correct a sagging or sloping floor. Clean drawer, rollers, and track. OPENING/CLOSING OF DOORS/DRAWERS Door(s) will reset in approximately 3 minutes. Replace filter cartridge. Replace filter cartridge. Allow 24 hours for more ice every 24 hours. When new ice...
Complete Owner's Guide (English)
Page 22
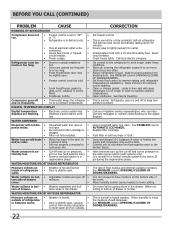
... RUNNING OF REFRIGERATOR Compressor does not run. • Freezer control is set to "OF" • or "0". • Refrigerator is in defrost cycle. • Refrigerator runs too much or too long. • Plug at a constant temperature. drain while in order to • cold water line. Reset circuit breaker. Keep food and contains from inside of refrigerator or between doors. • Door is normal. Clean or change gasket. Leaks in door seal will not dis- • Household water line valve is level. See Care & Cleaning...
... RUNNING OF REFRIGERATOR Compressor does not run. • Freezer control is set to "OF" • or "0". • Refrigerator is in defrost cycle. • Refrigerator runs too much or too long. • Plug at a constant temperature. drain while in order to • cold water line. Reset circuit breaker. Keep food and contains from inside of refrigerator or between doors. • Door is normal. Clean or change gasket. Leaks in door seal will not dis- • Household water line valve is level. See Care & Cleaning...
Complete Owner's Guide (English)
Page 23
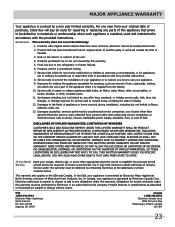
... parts other than genuine Electrolux parts or parts obtained from its original owner to repair or replace appliance light bulbs, air filters, water filters, other consumables, or knobs, handles, or other than in accordance with the provided instructions. DISCLAIMER OF IMPLIED WARRANTIES; If service is performed, it is shipped from the factory. 10. Electrolux authorizes no person to change without notice. Food loss due to any refrigerator or freezer...
... parts other than genuine Electrolux parts or parts obtained from its original owner to repair or replace appliance light bulbs, air filters, water filters, other consumables, or knobs, handles, or other than in accordance with the provided instructions. DISCLAIMER OF IMPLIED WARRANTIES; If service is performed, it is shipped from the factory. 10. Electrolux authorizes no person to change without notice. Food loss due to any refrigerator or freezer...
Product Specifications Sheet (English)
Page 2
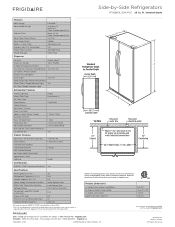
... Design Tall, 2-Paddle Number of Dispenser Buttons 5 Crushed Ice / Cube Ice / Chilled Water Yes / Yes / Yes Ice Option / Freeze Option Display On / Off Option Lock / Light Yes / Yes Temp / Door Ajar / Power Failure Alerts Water Filter Change Indicator Light Yes Air Filter Change Indicator Light Refrigerator Features Interior Lighting Water Filter Type Air Filter Type Fixed Shelves Sliding Shelves Cool Zone™ Drawer Wine / Can Rack Upper Crisper / Lower Crisper Humidity Controls Dairy Compartment Fixed Door Bins Adjustable Door Bins Non-Slip Bin Liner / Bottle Retainers...
... Design Tall, 2-Paddle Number of Dispenser Buttons 5 Crushed Ice / Cube Ice / Chilled Water Yes / Yes / Yes Ice Option / Freeze Option Display On / Off Option Lock / Light Yes / Yes Temp / Door Ajar / Power Failure Alerts Water Filter Change Indicator Light Yes Air Filter Change Indicator Light Refrigerator Features Interior Lighting Water Filter Type Air Filter Type Fixed Shelves Sliding Shelves Cool Zone™ Drawer Wine / Can Rack Upper Crisper / Lower Crisper Humidity Controls Dairy Compartment Fixed Door Bins Adjustable Door Bins Non-Slip Bin Liner / Bottle Retainers...


