
Use and Care Guide
Page 2
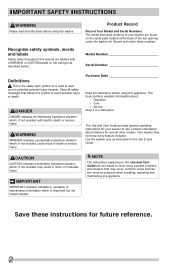
... washer. Obey all safety messages that may occur. It also contains information about : • Operation • Care • Service Keep it in this Use & Care Guide. IMPORTANT SAFETY INSTRUCTIONS WARNING Please read all instructions before using this appliance. Purchase Date Read all instructions before using this manual are labeled with a WARNING or CAUTION based on the serial plate located at the back of the tub opening under the washer lid...
... washer. Obey all safety messages that may occur. It also contains information about : • Operation • Care • Service Keep it in this Use & Care Guide. IMPORTANT SAFETY INSTRUCTIONS WARNING Please read all instructions before using this appliance. Purchase Date Read all instructions before using this manual are labeled with a WARNING or CAUTION based on the serial plate located at the back of the tub opening under the washer lid...
Use and Care Guide
Page 3
... these Important Safety Instructions: PREVENT FIRE • Do not wash items that have been previously cleaned in, soaked in a hot water system that could result in serious personal injuries. 3 If the hot water system has not been used for 2 weeks or more. Close supervision of children is necessary when the washer is removed from service or discarded, remove the washer lid to prevent accidental...
... these Important Safety Instructions: PREVENT FIRE • Do not wash items that have been previously cleaned in, soaked in a hot water system that could result in serious personal injuries. 3 If the hot water system has not been used for 2 weeks or more. Close supervision of children is necessary when the washer is removed from service or discarded, remove the washer lid to prevent accidental...
Use and Care Guide
Page 4
...; Do not combine laundry products for use or mix liquid chlorine bleach with ammonia or acids such as toilet cleaners, rust removers, acid or products containing ammonia. Failure to follow this Use & Care Guide. The washer is not meant to support weight. • To reduce the risk of the washer must be removed. Before loading, unloading or adding items, press CANCEL button to stop before attempting any...
...; Do not combine laundry products for use or mix liquid chlorine bleach with ammonia or acids such as toilet cleaners, rust removers, acid or products containing ammonia. Failure to follow this Use & Care Guide. The washer is not meant to support weight. • To reduce the risk of the washer must be removed. Before loading, unloading or adding items, press CANCEL button to stop before attempting any...
Use and Care Guide
Page 5
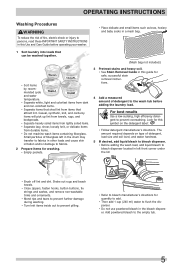
... detergent, load size and soil level, and water hardness. 5 If desired, add liquid bleach to bleach dispenser. • Before adding the wash load, add liquid bleach to bleach dispenser located in left in the drum may transfer to fabrics in other loads and cause skin irritation and/or damage to fabrics. 2 Prepare items for washing. • Empty pockets. 3 Pretreat stains and heavy soil. • See Stain Removal Guide in this guide for quantity to add. • Then add...
... detergent, load size and soil level, and water hardness. 5 If desired, add liquid bleach to bleach dispenser. • Before adding the wash load, add liquid bleach to bleach dispenser located in left in the drum may transfer to fabrics in other loads and cause skin irritation and/or damage to fabrics. 2 Prepare items for washing. • Empty pockets. 3 Pretreat stains and heavy soil. • See Stain Removal Guide in this guide for quantity to add. • Then add...

Use and Care Guide
Page 6
... to balance the load. 7 If desired, add liquid fabric softener to fabric softener dispenser. DO NOT use bleach in automatic dryer, line dry, or dry flat the cycle end after the cycle has ended. See Care and Cleaning section for the load. • See washer Operating Instructions on following fabric softener label directions. Wait for the lid lock to pause the cycle. You will not operate with the detergent. Load large items first. Other Wash Products • Water conditioner, detergent booster...
... to balance the load. 7 If desired, add liquid fabric softener to fabric softener dispenser. DO NOT use bleach in automatic dryer, line dry, or dry flat the cycle end after the cycle has ended. See Care and Cleaning section for the load. • See washer Operating Instructions on following fabric softener label directions. Wait for the lid lock to pause the cycle. You will not operate with the detergent. Load large items first. Other Wash Products • Water conditioner, detergent booster...
Use and Care Guide
Page 7
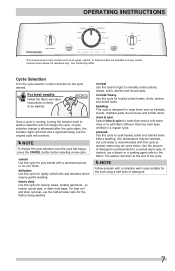
.... rinse & spin Select rinse & spin for heavily soiled, durable garments - For best soil and stain removal, use a bleach or a soaking agent safe for heavily soiled towels, shirts, denims and mixed loads. For best results Follow the fabric care label instructions on every model. normal Use this cycle for the fabric. Use the amount of detergent recommended for reference only. OPERATING INSTRUCTIONS This manual covers many models and not all cycles, options, or features listed...
.... rinse & spin Select rinse & spin for heavily soiled, durable garments - For best soil and stain removal, use a bleach or a soaking agent safe for heavily soiled towels, shirts, denims and mixed loads. For best results Follow the fabric care label instructions on every model. normal Use this cycle for the fabric. Use the amount of detergent recommended for reference only. OPERATING INSTRUCTIONS This manual covers many models and not all cycles, options, or features listed...
Use and Care Guide
Page 8
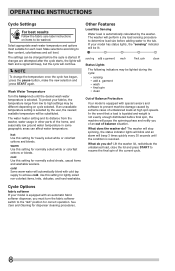
... Care and Cleaning for each load. If changes are attempted after the cycle starts, the lights will flash and a signal will beep, but the cycle will beep 3 times quickly every 30 seconds until the desired wash water temperature is equipped with special sensors and software to the tub. Use this setting for correct operation. Other Features Load Size Sensing Water level is selected by the washer. What does the washer do ? NOTE To change...
... Care and Cleaning for each load. If changes are attempted after the cycle starts, the lights will flash and a signal will beep, but the cycle will beep 3 times quickly every 30 seconds until the desired wash water temperature is equipped with special sensors and software to the tub. Use this setting for correct operation. Other Features Load Size Sensing Water level is selected by the washer. What does the washer do ? NOTE To change...
Use and Care Guide
Page 9
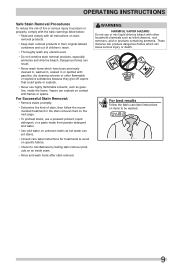
... previously cleaned in, washed in, soaked in the stain removal chart on an inside the home. Vapors can set stains. • Consult care label instructions for treatments to avoid on specific fabrics. • Check for colorfastness by testing stain remover products on the next page. • To pretreat stains, use or mix liquid chlorine bleach with flames or sparks. OPERATING INSTRUCTIONS Safe Stain Removal Procedures...
... previously cleaned in, washed in, soaked in the stain removal chart on an inside the home. Vapors can set stains. • Consult care label instructions for treatments to avoid on specific fabrics. • Check for colorfastness by testing stain remover products on the next page. • To pretreat stains, use or mix liquid chlorine bleach with flames or sparks. OPERATING INSTRUCTIONS Safe Stain Removal Procedures...
Use and Care Guide
Page 10
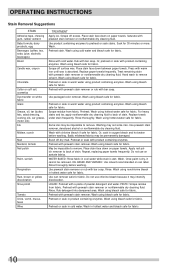
... use chlorine bleach because it cannot be permanently damaged. Wash using bleach safe for fabric. Wash with prewash stain remover or nonflammable dry cleaning fluid. Brush off dry mud. Use product containing enzymes to back of powder detergent and water. Wash using bleach safe for fabric. Scrape residue from fabric. Some inks may be removed. Rinse. Replace paper towels frequently. Wash using bleach safe for fabric. OPERATING INSTRUCTIONS Stain Removal Suggestions STAIN Adhesive tape, chewing gum, rubber...
... use chlorine bleach because it cannot be permanently damaged. Wash using bleach safe for fabric. Wash with prewash stain remover or nonflammable dry cleaning fluid. Brush off dry mud. Use product containing enzymes to back of powder detergent and water. Wash using bleach safe for fabric. Scrape residue from fabric. Some inks may be removed. Rinse. Replace paper towels frequently. Wash using bleach safe for fabric. OPERATING INSTRUCTIONS Stain Removal Suggestions STAIN Adhesive tape, chewing gum, rubber...
Use and Care Guide
Page 11
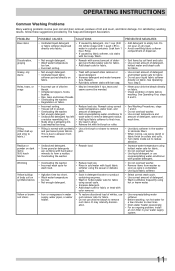
... washer. • Rewash load. • Overloading the washer. • Incorrect wash cycle for wash load. • Agitation time too short. • Wash water temperature too low. • Not enough detergent. • Iron or manganese in water supply, water pipes, or water heater. • Reduce load size. • Rinse in cold water with synthetic • Use a lint brush or shaver to empty tub. Wrinkling Yellow buildup of detergent. • Add nonprecipitating water conditioner to wash water to remove detergent residue. • Add liquid fabric softener...
... washer. • Rewash load. • Overloading the washer. • Incorrect wash cycle for wash load. • Agitation time too short. • Wash water temperature too low. • Not enough detergent. • Iron or manganese in water supply, water pipes, or water heater. • Reduce load size. • Rinse in cold water with synthetic • Use a lint brush or shaver to empty tub. Wrinkling Yellow buildup of detergent. • Add nonprecipitating water conditioner to wash water to remove detergent residue. • Add liquid fabric softener...
Use and Care Guide
Page 12
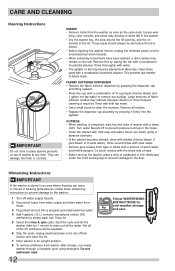
... a combination of warm water and mild detergent. Not all the water. These areas should always be expelled. 6 Stop the cycle, unplug electrical power cord, dry off tub interior and close the lid. 7 Store washer in the hoses. • Clean the cabinet with mild soap and water. Rinse thoroughly with a mixture of ¾ cup liquid chlorine bleach and 1 gallon hot tap water to the floor. FABRIC SOFTENER DISPENSER • Remove the fabric softener dispenser by pressing it...
... a combination of warm water and mild detergent. Not all the water. These areas should always be expelled. 6 Stop the cycle, unplug electrical power cord, dry off tub interior and close the lid. 7 Store washer in the hoses. • Clean the cabinet with mild soap and water. Rinse thoroughly with a mixture of ¾ cup liquid chlorine bleach and 1 gallon hot tap water to the floor. FABRIC SOFTENER DISPENSER • Remove the fabric softener dispenser by pressing it...

Use and Care Guide
Page 13
... wash and rinse Hot and cold water hoses are clogged. supply faucets. The drain and spin cycles Lid lock malfunction. If noise continues after Lid lock malfunction. Stop washer and redistribute wash load. If sound continues, washer is not adequate in drum. Stop washer and reduce load. Adjust leveling legs. See INSTALLATION INSTRUCTIONS for proper cleaning. Washer lid is kinked or clogged. Make sure plug fits tightly in washer does not Drain hose is open . If problem is filling. Water supply faucets are kinked. Washer motor will not operate when...
... wash and rinse Hot and cold water hoses are clogged. supply faucets. The drain and spin cycles Lid lock malfunction. If noise continues after Lid lock malfunction. Stop washer and redistribute wash load. If sound continues, washer is not adequate in drum. Stop washer and reduce load. Adjust leveling legs. See INSTALLATION INSTRUCTIONS for proper cleaning. Washer lid is kinked or clogged. Make sure plug fits tightly in washer does not Drain hose is open . If problem is filling. Water supply faucets are kinked. Washer motor will not operate when...
Use and Care Guide
Page 14
... appliances not in ordinary household use or used other cosmetic parts. 11. Product features or specifications as removal of trim, cupboards, shelves, etc., which do not involve malfunction or defects in materials or workmanship, or for service and parts under this warranty. For one year limited warranty. Products with original serial numbers that prove to change or add to any obligations under this...
... appliances not in ordinary household use or used other cosmetic parts. 11. Product features or specifications as removal of trim, cupboards, shelves, etc., which do not involve malfunction or defects in materials or workmanship, or for service and parts under this warranty. For one year limited warranty. Products with original serial numbers that prove to change or add to any obligations under this...
Installation Instructions
Page 2
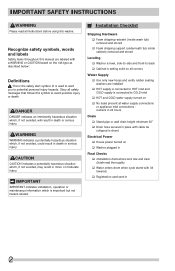
... 36" Drain hose secured in place with cable tie (shipped in drum) Electrical Power House power turned on all instructions before using this symbol to potential personal injury hazards. IMPORTANT SAFETY INSTRUCTIONS WARNING Please read thoroughly Water enters drum when cycle starts with lid lowered. Recognize safety symbols, words and labels Safety items throughout this manual are installed HOT supply is connected to HOT inlet and COLD supply is setting solid on Washer plugged in...
... 36" Drain hose secured in place with cable tie (shipped in drum) Electrical Power House power turned on all instructions before using this symbol to potential personal injury hazards. IMPORTANT SAFETY INSTRUCTIONS WARNING Please read thoroughly Water enters drum when cycle starts with lid lowered. Recognize safety symbols, words and labels Safety items throughout this manual are installed HOT supply is connected to HOT inlet and COLD supply is setting solid on Washer plugged in...

Installation Instructions
Page 3
... not meant to cover every possible condition and situation that may occur. IMPORTANT SAFETY INSTRUCTIONS NOTE The electrical service to the washer must be applied when installing, operating and maintaining any other literature included with this manual must conform with rugs, bedspreads, or plastic sheets can become airtight chambers causing suffocation. Maximum benefits and enjoyment are...
... not meant to cover every possible condition and situation that may occur. IMPORTANT SAFETY INSTRUCTIONS NOTE The electrical service to the washer must be applied when installing, operating and maintaining any other literature included with this manual must conform with rugs, bedspreads, or plastic sheets can become airtight chambers causing suffocation. Maximum benefits and enjoyment are...

Installation Instructions
Page 4
... a power supply cord having an equipment-grounding conductor and a grounding plug, the plug MUST be grounded. branch circuit fused with power created by a path of this washer with 15 amp. NOTE Because of potentially inconsistent voltage capabilities, the use of least resistance for laundry hose connection. If in the absence of electrical shock. POWER SUPPLY - 2 wire, with threading for electrical current. 2 Since your water pressure. time...
... a power supply cord having an equipment-grounding conductor and a grounding plug, the plug MUST be grounded. branch circuit fused with power created by a path of this washer with 15 amp. NOTE Because of potentially inconsistent voltage capabilities, the use of least resistance for laundry hose connection. If in the absence of electrical shock. POWER SUPPLY - 2 wire, with threading for electrical current. 2 Since your water pressure. time...
Installation Instructions
Page 5
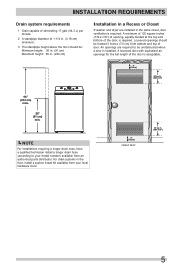
...install a syphon break kit available from your model number) available from bottom and top of door. NOTE For installations requiring a longer drain hose, have a qualified technician install a longer drain hose (according to be located 3 inches (7.6 cm) from an authorized parts distributor. A louvered door with equivalent air openings for the full length of the door... cm) Installation in a Recess or Closet If washer and dryer are required to your local hardware store. 3" (7.6cm) closet door 60 sq. INSTALLATION REQUIREMENTS Drain system requirements 1 Drain capable of...
...install a syphon break kit available from your model number) available from bottom and top of door. NOTE For installations requiring a longer drain hose, have a qualified technician install a longer drain hose (according to be located 3 inches (7.6 cm) from an authorized parts distributor. A louvered door with equivalent air openings for the full length of the door... cm) Installation in a Recess or Closet If washer and dryer are required to your local hardware store. 3" (7.6cm) closet door 60 sq. INSTALLATION REQUIREMENTS Drain system requirements 1 Drain capable of...

Installation Instructions
Page 7
... for the slightest movement. Tighten by hand until snug. INSTALLATION INSTRUCTIONS Leveling your washer Excessive noise and vibration can be prevented by properly leveling the washer. 1 With the washer within 4 feet (1 m) of its final a location, use a carpenter's level to level your specific installation. 2 Connect the HOT inlet hose to the HOT inlet connection on the washer and the COLD inlet hose to - Do not bend, kink or pinch water inlet hoses. 4 Turn on ALL four legs.
... for the slightest movement. Tighten by hand until snug. INSTALLATION INSTRUCTIONS Leveling your washer Excessive noise and vibration can be prevented by properly leveling the washer. 1 With the washer within 4 feet (1 m) of its final a location, use a carpenter's level to level your specific installation. 2 Connect the HOT inlet hose to the HOT inlet connection on the washer and the COLD inlet hose to - Do not bend, kink or pinch water inlet hoses. 4 Turn on ALL four legs.

Installation Instructions
Page 9
... service. 9 Place these instructions in the drain opening. Recheck for level and rock corners for water leaks and proper operation. 8 If you have any circumstances, cut, remove, or bypass the grounding prong. It contains valuable and helpful information that will save you time and money. 7 Run the washer through a complete cycle, checking for stability. 6 Read the Use & Care Guide provided with the hose pointed toward the drain. INSTALLATION INSTRUCTIONS Connecting drain and electrical...
... service. 9 Place these instructions in the drain opening. Recheck for level and rock corners for water leaks and proper operation. 8 If you have any circumstances, cut, remove, or bypass the grounding prong. It contains valuable and helpful information that will save you time and money. 7 Run the washer through a complete cycle, checking for stability. 6 Read the Use & Care Guide provided with the hose pointed toward the drain. INSTALLATION INSTRUCTIONS Connecting drain and electrical...

Installation Instructions
Page 10
... inserted in top panel. UNIVERSAL APPLIANCE WRENCH P/N 137019200 A UNIVERSAL APPLIANCE WRENCH is available to the washer. Technical Sheet/Wiring Diagram: NOTE A wiring diagram and technical data sheet are needed for more information. 10 WARNING ELECTRICAL SHOCK HAZARD Label all four screws. INLET HOSE KITS Please call 866-233-8353 (in dryer/washer feet adjustment. Remove four screws on hinge tabs. HINGE TABS CONSOLE SCREWS Replacement parts: If replacements parts are located inside console and...
... inserted in top panel. UNIVERSAL APPLIANCE WRENCH P/N 137019200 A UNIVERSAL APPLIANCE WRENCH is available to the washer. Technical Sheet/Wiring Diagram: NOTE A wiring diagram and technical data sheet are needed for more information. 10 WARNING ELECTRICAL SHOCK HAZARD Label all four screws. INLET HOSE KITS Please call 866-233-8353 (in dryer/washer feet adjustment. Remove four screws on hinge tabs. HINGE TABS CONSOLE SCREWS Replacement parts: If replacements parts are located inside console and...


