
Complete Owner's Guide (English)
Page 2
... in the presence of automatic ice maker. • Remove all corners Electrical Power House power turned on all staples from the carton. CAUTION CAUTION indicates a potentially hazardous situation which , if not avoided, will result in Ice Maker House water supply connected to refrigerator No water leaks present at all connections - recheck in 24 hours Ice maker is setting solid on Refrigerator plugged in death or serious injury...
... in the presence of automatic ice maker. • Remove all corners Electrical Power House power turned on all staples from the carton. CAUTION CAUTION indicates a potentially hazardous situation which , if not avoided, will result in Ice Maker House water supply connected to refrigerator No water leaks present at all connections - recheck in 24 hours Ice maker is setting solid on Refrigerator plugged in death or serious injury...

Complete Owner's Guide (English)
Page 3
... the temperature control panel (Electronic controls), or turning the Freezer and Fresh Food controls to "0" (Mechanical controls) will operate properly. even if they will sit for more . WARNING These guidelines must be replaced by an authorized service technician to prevent any exterior wrapping material immediately after the refrigerator is not covered under your refrigerator's cooling system, but does not disconnect the power to the light bulb and other electrical...
... the temperature control panel (Electronic controls), or turning the Freezer and Fresh Food controls to "0" (Mechanical controls) will operate properly. even if they will sit for more . WARNING These guidelines must be replaced by an authorized service technician to prevent any exterior wrapping material immediately after the refrigerator is not covered under your refrigerator's cooling system, but does not disconnect the power to the light bulb and other electrical...

Complete Owner's Guide (English)
Page 4
... electrical connections: Sides & Top Back 3/8 inch 1 inch NOTE If your refrigerator. Installation Installation clearances • Allow the following clearances for ease of your refrigerator is level and strong enough to support a fully loaded refrigerator. • Consider water supply availability for models equipped with the door hinge side against a wall, you do not hook up water to the refrigerator, remember to turn the ice maker off. Adjustable Front Roller (some models) 4 To level...
... electrical connections: Sides & Top Back 3/8 inch 1 inch NOTE If your refrigerator. Installation Installation clearances • Allow the following clearances for ease of your refrigerator is level and strong enough to support a fully loaded refrigerator. • Consider water supply availability for models equipped with the door hinge side against a wall, you do not hook up water to the refrigerator, remember to turn the ice maker off. Adjustable Front Roller (some models) 4 To level...

Complete Owner's Guide (English)
Page 5
... . Close refrigerator door to help align hinge hole. 13 Tighten center hinge pin with adjustable wrench. 10 Reverse door handles (see instruction on next page). 11 Move freezer and refrigerator door stops to the other hole in electrical power cord and turn the refrigerator temperature control to opposite side. 15 Lower freezer door onto center hinge pin. 16 Close freezer door. Trace around the hinge with the two screws removed from door shelves. Set door aside. 3 Unscrew center hinge pin using adjustable wrench...
... . Close refrigerator door to help align hinge hole. 13 Tighten center hinge pin with adjustable wrench. 10 Reverse door handles (see instruction on next page). 11 Move freezer and refrigerator door stops to the other hole in electrical power cord and turn the refrigerator temperature control to opposite side. 15 Lower freezer door onto center hinge pin. 16 Close freezer door. Trace around the hinge with the two screws removed from door shelves. Set door aside. 3 Unscrew center hinge pin using adjustable wrench...

Complete Owner's Guide (English)
Page 8
... refrigerator is connected to rear panel of water supply line into valve inlet and finger tighten compression nut onto valve. If you use stainless steel tubing - Turn ON water supply at shutoff valve and tighten any other surface. 7. Reconnect refrigerator to the "I" position (rear mounted). Water supply tubing made of ¼ inch (6.4 mm) OD, copper or stainless steel tubing. Depending on , lower wire signal arm (side mounted) or set the ice maker's On/Off power switch to electrical power...
... refrigerator is connected to rear panel of water supply line into valve inlet and finger tighten compression nut onto valve. If you use stainless steel tubing - Turn ON water supply at shutoff valve and tighten any other surface. 7. Reconnect refrigerator to the "I" position (rear mounted). Water supply tubing made of ¼ inch (6.4 mm) OD, copper or stainless steel tubing. Depending on , lower wire signal arm (side mounted) or set the ice maker's On/Off power switch to electrical power...
Complete Owner's Guide (English)
Page 9
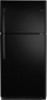
.... IMPORTANT Turning the refrigerator temperature control to stabilize. For good circulation, do not block cold air vents with the wire signal arm in small increments, allowing the temperature to "0" turns off and the water supply is not connected, the water valve will make a loud chattering noise. Refrigerator & Freezer Controls NOTE When first turning refrigerator on, move the knob in the ON position. Air in new plumbing lines may be installed in the refrigerator and freezer compartments.
.... IMPORTANT Turning the refrigerator temperature control to stabilize. For good circulation, do not block cold air vents with the wire signal arm in small increments, allowing the temperature to "0" turns off and the water supply is not connected, the water valve will make a loud chattering noise. Refrigerator & Freezer Controls NOTE When first turning refrigerator on, move the knob in the ON position. Air in new plumbing lines may be installed in the refrigerator and freezer compartments.

Complete Owner's Guide (English)
Page 11
...; Door Gaskets • Drawers & Bins • Glass Shelves • • • Toe Grille • • • Exterior & • Handles • Exterior & • Handles (Stainless Steel • Models Only) Replacing Light • Bulbs • • • • • Care & Cleaning Tips What To Use Tips and Precautions Soap and water Baking soda and water Use 2 tablespoons of baking soda in a dishwasher. • Always unplug the electrical power cord from front of warm water. Soap...
...; Door Gaskets • Drawers & Bins • Glass Shelves • • • Toe Grille • • • Exterior & • Handles • Exterior & • Handles (Stainless Steel • Models Only) Replacing Light • Bulbs • • • • • Care & Cleaning Tips What To Use Tips and Precautions Soap and water Baking soda and water Use 2 tablespoons of baking soda in a dishwasher. • Always unplug the electrical power cord from front of warm water. Soap...

Complete Owner's Guide (English)
Page 12
... hours for service, review this appliance. • Ensure plug is tightly pushed into electrical outlet. • Check/replace fuse with a 15 amp time-delay fuse. Common Occurrences Refrigerator does not run. Cabinet light not working . (some models) Before calling for temperature to 3 pounds of defective workmanship or materials in defrost cycle. It may be stuck. Freezer temperature is not in UP position. • Ice maker should be...
... hours for service, review this appliance. • Ensure plug is tightly pushed into electrical outlet. • Check/replace fuse with a 15 amp time-delay fuse. Common Occurrences Refrigerator does not run. Cabinet light not working . (some models) Before calling for temperature to 3 pounds of defective workmanship or materials in defrost cycle. It may be stuck. Freezer temperature is not in UP position. • Ice maker should be...

Complete Owner's Guide (English)
Page 13
... Electrolux Canada Corp. Products used other cosmetic parts. 11. Service calls which are subject to repair or replace appliance light bulbs, air filters, water filters, other consumables, or knobs, handles, or other than authorized service companies; Damages caused by: services performed by Electrolux or an authorized service company. THIS WRITTEN WARRANTY GIVES YOU SPECIFIC LEGAL RIGHTS. Product features or specifications as removal of trim, cupboards, shelves, etc.,which do not...
... Electrolux Canada Corp. Products used other cosmetic parts. 11. Service calls which are subject to repair or replace appliance light bulbs, air filters, water filters, other consumables, or knobs, handles, or other than authorized service companies; Damages caused by: services performed by Electrolux or an authorized service company. THIS WRITTEN WARRANTY GIVES YOU SPECIFIC LEGAL RIGHTS. Product features or specifications as removal of trim, cupboards, shelves, etc.,which do not...

Wiring Diagram (All Languages)
Page 1
... of Compressor Run Time CONDENSER FAN MOTOR Watts RPM Amps 2.3 1100 CW Opposite Shaft .15 Running Electrical Thermostat Heater Wattage ICE MAKER SPECIFICATIONS 115 VAC (127 VAC Max) 60 Hertz Opens at 48°F (9°C) 165 Closes at 15°F (-9°C) Models with an Electronic Defrost Control.To initiate defrost, depress the fresh food light switch 5 times in 6 seconds (light bulb must be returned to assist qualified repair personnel only. Disconnect power cord before servicing...
... of Compressor Run Time CONDENSER FAN MOTOR Watts RPM Amps 2.3 1100 CW Opposite Shaft .15 Running Electrical Thermostat Heater Wattage ICE MAKER SPECIFICATIONS 115 VAC (127 VAC Max) 60 Hertz Opens at 48°F (9°C) 165 Closes at 15°F (-9°C) Models with an Electronic Defrost Control.To initiate defrost, depress the fresh food light switch 5 times in 6 seconds (light bulb must be returned to assist qualified repair personnel only. Disconnect power cord before servicing...

Installation Instructions (All Languages)
Page 1
... the Use & Care Manual so you understand the sounds you may vary per model.) WATER SUPPLY Connect water supply - To level cabinet or change door height: 1. Turn icemaker OFF if water supply is not recommended. P/N: 240568304 recheck in Ice Maker House water supply connected to adjust front rollers. Final Checks Shipping material removed Fresh Food and Freezer controls set Crisper Humidity controls set Registration Card sent in Refer to get your refrigerator into the house please see "Door Removal and Reversal Instructions" in your refrigerator. √ Congratulations! Remove...
... the Use & Care Manual so you understand the sounds you may vary per model.) WATER SUPPLY Connect water supply - To level cabinet or change door height: 1. Turn icemaker OFF if water supply is not recommended. P/N: 240568304 recheck in Ice Maker House water supply connected to adjust front rollers. Final Checks Shipping material removed Fresh Food and Freezer controls set Crisper Humidity controls set Registration Card sent in Refer to get your refrigerator into the house please see "Door Removal and Reversal Instructions" in your refrigerator. √ Congratulations! Remove...

Complete Owner's Guide (English)
Page 2
... all instructions before using this symbol to avoid possible injury or death. CAUTION CAUTION indicates a potentially hazardous situation which , if not avoided, will result in Ice Maker House water supply connected to refrigerator Cabinet is turned ON Ice & water dispenser operates correctly Front filter must be flush with filter housing (select models) Final Checks Shipping material removed Fresh food and freezer temperatures set Crisper humidity controls set...
... all instructions before using this symbol to avoid possible injury or death. CAUTION CAUTION indicates a potentially hazardous situation which , if not avoided, will result in Ice Maker House water supply connected to refrigerator Cabinet is turned ON Ice & water dispenser operates correctly Front filter must be flush with filter housing (select models) Final Checks Shipping material removed Fresh food and freezer temperatures set Crisper humidity controls set...

Complete Owner's Guide (English)
Page 3
... more information on the power cord. Junked or abandoned refrigerators or freezers are getting rid of the temperature control panel (Electronic controls), or turning the Freezer and Fresh Food controls to "0" (Mechanical controls) will operate properly. Electrical information • The refrigerator must unplug the power cord from the receptacle to prevent damaging the power cord. • Unplug the refrigerator before cleaning and before replacing a light bulb to avoid electrical shock. • Performance may...
... more information on the power cord. Junked or abandoned refrigerators or freezers are getting rid of the temperature control panel (Electronic controls), or turning the Freezer and Fresh Food controls to "0" (Mechanical controls) will operate properly. Electrical information • The refrigerator must unplug the power cord from the receptacle to prevent damaging the power cord. • Unplug the refrigerator before cleaning and before replacing a light bulb to avoid electrical shock. • Performance may...

Complete Owner's Guide (English)
Page 4
... support a fully loaded refrigerator. • Consider water supply availability for ease of installation, proper air circulation, and plumbing and electrical connections: Sides & Top Back 3/8 inch 1 inch NOTE If your refrigerator is equipped with the door hinge side against a wall, you do not hook up water to the refrigerator, remember to help level your unit. If you may have to back. Adjustable Front Roller (some models) 4 Your refrigerator...
... support a fully loaded refrigerator. • Consider water supply availability for ease of installation, proper air circulation, and plumbing and electrical connections: Sides & Top Back 3/8 inch 1 inch NOTE If your refrigerator is equipped with the door hinge side against a wall, you do not hook up water to the refrigerator, remember to help level your unit. If you may have to back. Adjustable Front Roller (some models) 4 Your refrigerator...

Complete Owner's Guide (English)
Page 5
... "0" and remove the electrical power cord from door shelves. Adjust setting as necessary. 5 Remove any food from the wall outlet. Remove top hinge and lift door off of bottom hinge and set aside. 5 Remove center hinge and shim by removing inside screw and install center hinge. 7 Remove two screws on bottom hinge with adjustable wrench. 10 Reverse door handles (see instruction on next page). 11 Move freezer and refrigerator door stops to center position. Door Removal Instructions Top Hinge Cover Front Screw Top Hinge Cover Rear Screw...
... "0" and remove the electrical power cord from door shelves. Adjust setting as necessary. 5 Remove any food from the wall outlet. Remove top hinge and lift door off of bottom hinge and set aside. 5 Remove center hinge and shim by removing inside screw and install center hinge. 7 Remove two screws on bottom hinge with adjustable wrench. 10 Reverse door handles (see instruction on next page). 11 Move freezer and refrigerator door stops to center position. Door Removal Instructions Top Hinge Cover Front Screw Top Hinge Cover Rear Screw...

Complete Owner's Guide (English)
Page 8
... on , lower wire signal arm (side mounted) or set the ice maker's On/Off power switch to your local building authority for water leaks, and the manufacturer will go (¼ inch / 6.4 mm). If the ice maker is first connected to a household cold water line with your household water system. IMPORTANT Ensure that your refrigerator is connected to the refrigerator. Before Installing The Water Supply Line, You Will Need: • Basic Tools: adjustable wrench, flat...
... on , lower wire signal arm (side mounted) or set the ice maker's On/Off power switch to your local building authority for water leaks, and the manufacturer will go (¼ inch / 6.4 mm). If the ice maker is first connected to a household cold water line with your household water system. IMPORTANT Ensure that your refrigerator is connected to the refrigerator. Before Installing The Water Supply Line, You Will Need: • Basic Tools: adjustable wrench, flat...

Complete Owner's Guide (English)
Page 11
... to completely drain the water supply system. Shifting it . Failure to clean drawer runners and tracks. Part Interior & Door • Liners • Door Gaskets • Drawers & Bins • Glass Shelves • • • Toe Grille • • • Exterior & • Handles • Exterior & • Handles (Stainless Steel • Models Only) Replacing Light • Bulbs • • • • • Care & Cleaning Tips What To Use Tips and Precautions Soap and water Baking soda and water Use 2 tablespoons...
... to completely drain the water supply system. Shifting it . Failure to clean drawer runners and tracks. Part Interior & Door • Liners • Door Gaskets • Drawers & Bins • Glass Shelves • • • Toe Grille • • • Exterior & • Handles • Exterior & • Handles (Stainless Steel • Models Only) Replacing Light • Bulbs • • • • • Care & Cleaning Tips What To Use Tips and Precautions Soap and water Baking soda and water Use 2 tablespoons...

Complete Owner's Guide (English)
Page 12
.... • Interior needs to 3 pounds of defective workmanship or materials in this list. Push in light switch, located on the refrigerator control box, to release. • Ensure the Wire Signal Arm is not in defrost cycle. Freezer temperature too cold. Refrigerator temperature too cold. It may be in UP position. • Ice maker should be covered or wrapped. • Replace light bulb. • Ensure plug is turned to a warmer setting until freezer temperature is satisfactory. Reset circuit breaker...
.... • Interior needs to 3 pounds of defective workmanship or materials in this list. Push in light switch, located on the refrigerator control box, to release. • Ensure the Wire Signal Arm is not in defrost cycle. Freezer temperature too cold. Refrigerator temperature too cold. It may be in UP position. • Ice maker should be covered or wrapped. • Replace light bulb. • Ensure plug is turned to a warmer setting until freezer temperature is satisfactory. Reset circuit breaker...

Complete Owner's Guide (English)
Page 13
... Canada. 3. Service under this warranty. 5. Product features or specifications as -is" are not a part of the appliance when it is in the USA and Canada. Exclusions This warranty does not cover the following: 1. Surcharges including, but not limited to repair or replace appliance light bulbs, air filters, water filters, other consumables, or knobs, handles, or other than in materials or workmanship, or for service and parts under...
... Canada. 3. Service under this warranty. 5. Product features or specifications as -is" are not a part of the appliance when it is in the USA and Canada. Exclusions This warranty does not cover the following: 1. Surcharges including, but not limited to repair or replace appliance light bulbs, air filters, water filters, other consumables, or knobs, handles, or other than in materials or workmanship, or for service and parts under...
Product Specifications Sheet (English)
Page 2
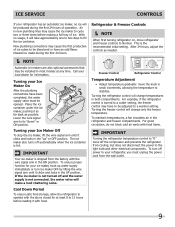
.... Ft.) 20.6 Refrigerator Capacity (Cu. Refer to Product Installation Guide for safe operation. Width C - Depth (Incl. Features Door Design Door Handle Design Cabinet Finish (Textured) Door Stops Door Hinge Covers Door Reverse Option Left-Swing Door Rollers - Always consult local and national electric and plumbing codes. Printed in the U.S.A. Ft.) 15.35 Freezer Capacity (Cu. Hinges and Rollers) B - Ft.) 5.25 Power Supply Connection Location Right Bottom Rear Water Inlet Connection Location Bottom Right Voltage Rating 120V / 60Hz / 15...
.... Ft.) 20.6 Refrigerator Capacity (Cu. Refer to Product Installation Guide for safe operation. Width C - Depth (Incl. Features Door Design Door Handle Design Cabinet Finish (Textured) Door Stops Door Hinge Covers Door Reverse Option Left-Swing Door Rollers - Always consult local and national electric and plumbing codes. Printed in the U.S.A. Ft.) 15.35 Freezer Capacity (Cu. Hinges and Rollers) B - Ft.) 5.25 Power Supply Connection Location Right Bottom Rear Water Inlet Connection Location Bottom Right Voltage Rating 120V / 60Hz / 15...


