
Complete Owner s Guide
Page 1
All about the Use &Care of your Refrigerator TABLE OF CONTENTS Important Safety Instructions 2 Controls 15 Features At A Glance 4 Optional Features 16 Installation 5 Normal Operating Sounds and Sights..........19 Door Removal/Reversal Instructions 7 Care and Cleaning 20 Handle Installation 10 Before you Call 22 Connecting Water Supply 12 Major Appliance Warranty 23 Ice Service 14 www.frigidaire.com USA 1-800-944-9044 www.frigidaire.ca Canada 1-800-265-8352 A07441202 (May 2017)
All about the Use &Care of your Refrigerator TABLE OF CONTENTS Important Safety Instructions 2 Controls 15 Features At A Glance 4 Optional Features 16 Installation 5 Normal Operating Sounds and Sights..........19 Door Removal/Reversal Instructions 7 Care and Cleaning 20 Handle Installation 10 Before you Call 22 Connecting Water Supply 12 Major Appliance Warranty 23 Ice Service 14 www.frigidaire.com USA 1-800-944-9044 www.frigidaire.ca Canada 1-800-265-8352 A07441202 (May 2017)

Complete Owner s Guide
Page 2
... the instructions below to help prevent accidents. 2 Final Checks Shipping material removed Refrigerator and freezer temperatures set Crisper humidity controls set Electrical Power House power turned on all sides Freezer door is level across the top Leveling Refrigerator is level, side-to-side and tilted ¼" (6mm) front-to-back Toe grille is properly attached to refrigerator Cabinet is turned ON Ice & water dispenser operates correctly...
... the instructions below to help prevent accidents. 2 Final Checks Shipping material removed Refrigerator and freezer temperatures set Crisper humidity controls set Electrical Power House power turned on all sides Freezer door is level across the top Leveling Refrigerator is level, side-to-side and tilted ¼" (6mm) front-to-back Toe grille is properly attached to refrigerator Cabinet is turned ON Ice & water dispenser operates correctly...

Complete Owner s Guide
Page 3
... installed in place so children may have a cooling system that safety mechanisms in this refrigerator will disable your old refrigerator/ freezer: • Remove doors. • Leave shelves in accordance with local codes and ordinances. IMPORTANT SAFETY INSTRUCTIONS Proper Disposal of environmental legislation. 3 Before you must be plugged directly into an electrical outlet controlled by a qualified service technician. To turn off accidentally. It must unplug the power...
... installed in place so children may have a cooling system that safety mechanisms in this refrigerator will disable your old refrigerator/ freezer: • Remove doors. • Leave shelves in accordance with local codes and ordinances. IMPORTANT SAFETY INSTRUCTIONS Proper Disposal of environmental legislation. 3 Before you must be plugged directly into an electrical outlet controlled by a qualified service technician. To turn off accidentally. It must unplug the power...
Complete Owner s Guide
Page 4
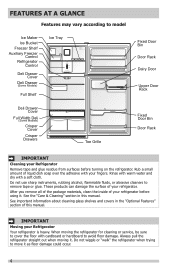
.... See the "Care & Cleaning" section in the "Optional Features" section of your Refrigerator Remove tape and glue residue from surfaces before using it . Do not wiggle or "walk" the refrigerator when trying to model Ice Maker Ice Bucket Freezer Shelf Auxiliary Freezer Control Refrigerator Control Deli Drawer Cover Deli Drawer (Some Models) Full Shelf Ice Tray Deli Drawer Cover Full Width Deli (Some Models) Crisper Cover Crisper Drawers Toe Grille Fixed Door Bin Door Rack Dairy Door Upper Door Rack Fixed Door Bin Door Rack IMPORTANT Cleaning your refrigerator before turning on the...
.... See the "Care & Cleaning" section in the "Optional Features" section of your Refrigerator Remove tape and glue residue from surfaces before using it . Do not wiggle or "walk" the refrigerator when trying to model Ice Maker Ice Bucket Freezer Shelf Auxiliary Freezer Control Refrigerator Control Deli Drawer Cover Deli Drawer (Some Models) Full Shelf Ice Tray Deli Drawer Cover Full Width Deli (Some Models) Crisper Cover Crisper Drawers Toe Grille Fixed Door Bin Door Rack Dairy Door Upper Door Rack Fixed Door Bin Door Rack IMPORTANT Cleaning your refrigerator before turning on the...
Complete Owner s Guide
Page 5
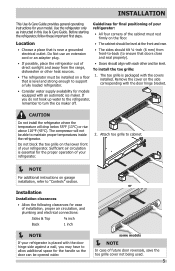
... support a fully loaded refrigerator. • Doors should be opened wider. Guidelines for the handle so the door can be level at the front and rear. • Choose a place that is near a grounded electrical outlet. Attach toe grille to cabinet. NOTE For additional instructions on the side corresponding with the door hinge bracket. • Consider water supply availability for your refrigerator. Remove the cover on garage installation...
... support a fully loaded refrigerator. • Doors should be opened wider. Guidelines for the handle so the door can be level at the front and rear. • Choose a place that is near a grounded electrical outlet. Attach toe grille to cabinet. NOTE For additional instructions on the side corresponding with the door hinge bracket. • Consider water supply availability for your refrigerator. Remove the cover on garage installation...
Complete Owner s Guide
Page 8
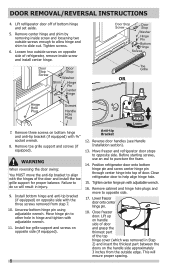
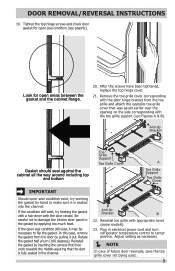
...-tip bracket to slide out. Close freezer door. Remove three screws on opposite side with adjustable wrench. 11. DOOR REMOVAL/REVERSAL INSTRUCTIONS 4. Position refrigerator door onto bottom hinge pin and screw center hinge pin through center hinge into top of bottom hinge and set aside. 5. Lower freezer door onto center hinge pin. 18. Reverse door handles (see Handle Installation section). 13. Move freezer and refrigerator door stops to other hole in hinge and tighten with the three screws...
...-tip bracket to slide out. Close freezer door. Remove three screws on opposite side with adjustable wrench. 11. DOOR REMOVAL/REVERSAL INSTRUCTIONS 4. Position refrigerator door onto bottom hinge pin and screw center hinge pin through center hinge into top of bottom hinge and set aside. 5. Lower freezer door onto center hinge pin. 18. Reverse door handles (see Handle Installation section). 13. Move freezer and refrigerator door stops to other hole in hinge and tighten with the three screws...
Complete Owner s Guide
Page 9
... Grille Support Toe Grille Cover IMPORTANT Should open seal condition still exist, it out. Plug in electrical power cord and turn (180 degrees). Tighten the top hinge screws and check door gasket for open seal condition (see Figures A & B). Reinstall the gasket by pulling it may be necessary to flip the gasket. Be careful not to damage the interior door panel or the gasket by hand to center position. Adjust setting...
... Grille Support Toe Grille Cover IMPORTANT Should open seal condition still exist, it out. Plug in electrical power cord and turn (180 degrees). Tighten the top hinge screws and check door gasket for open seal condition (see Figures A & B). Reinstall the gasket by pulling it may be necessary to flip the gasket. Be careful not to damage the interior door panel or the gasket by hand to center position. Adjust setting...
Complete Owner s Guide
Page 10
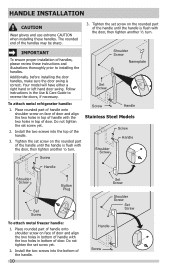
...; turn . Screw Screw Handle Stainless Steel Models Screw Handle Shoulder Screw Handle Shoulder Screw Button Plug Set Screw To attach metal freezer handle: 1. Follow instructions in top of door. Tighten the set screw on the rounded part of the handle. 10 Set Screw Shoulder Screw Set Screw Handle Screw Additionally, before installing the door handles, make sure the door swing is flush with the door, then tighten another ½ turn . Do not tighten the set screw yet. 2. Install...
...; turn . Screw Screw Handle Stainless Steel Models Screw Handle Shoulder Screw Handle Shoulder Screw Button Plug Set Screw To attach metal freezer handle: 1. Follow instructions in top of door. Tighten the set screw on the rounded part of the handle. 10 Set Screw Shoulder Screw Set Screw Handle Screw Additionally, before installing the door handles, make sure the door swing is flush with the door, then tighten another ½ turn . Do not tighten the set screw yet. 2. Install...
Complete Owner s Guide
Page 12
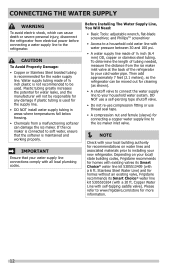
... personal injury, disconnect the refrigerator from electrical power before connecting a water supply line to the refrigerator. Please refer to www.frigidaire.com/store for the water supply line. CAUTION To Avoid Property Damage: • Copper or Stainless Steel braided tubing is not recommended to be used for the supply line. • DO NOT install water supply tubing in areas where temperatures fall below freezing. • Chemicals from the ice maker inlet valve at the back of...
... personal injury, disconnect the refrigerator from electrical power before connecting a water supply line to the refrigerator. Please refer to www.frigidaire.com/store for the water supply line. CAUTION To Avoid Property Damage: • Copper or Stainless Steel braided tubing is not recommended to be used for the supply line. • DO NOT install water supply tubing in areas where temperatures fall below freezing. • Chemicals from the ice maker inlet valve at the back of...
Complete Owner s Guide
Page 13
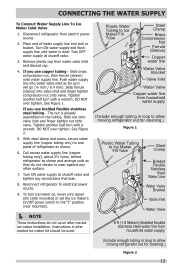
... wire signal arm (side mounted) or set the ice maker's On/Off power switch to electrical power source. 9. Slide brass compression nut, then ferrule (sleeve) onto water supply line. See Figure 1. If you use braided flexible stainless steel tubing - See Figure 2. 5. With steel clamp and screw, secure water supply line (copper tubing only) to allow moving refrigerator out for cleaning.) Figure 1 Plastic Water Tubing to Ice Maker Fill Tube Steel Clamp Braided Flexible Stainless Steel Water Line Water Valve Bracket Valve...
... wire signal arm (side mounted) or set the ice maker's On/Off power switch to electrical power source. 9. Slide brass compression nut, then ferrule (sleeve) onto water supply line. See Figure 1. If you use braided flexible stainless steel tubing - See Figure 2. 5. With steel clamp and screw, secure water supply line (copper tubing only) to allow moving refrigerator out for cleaning.) Figure 1 Plastic Water Tubing to Ice Maker Fill Tube Steel Clamp Braided Flexible Stainless Steel Water Line Water Valve Bracket Valve...
Complete Owner s Guide
Page 14
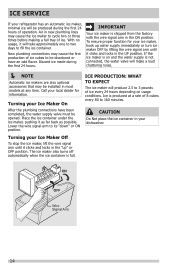
.... ICE SERVICE If your refrigerator has an automatic ice maker, minimal ice will make a loud chattering noise. NOTE Automatic ice makers are also optional accessories that may be installed in most models at a rate of 8 cubes every 80 to 3 pounds of ice every 24 hours depending on and the water supply is not connected, the water valve will be produced during the first 24 hours. Air in new plumbing lines may...
.... ICE SERVICE If your refrigerator has an automatic ice maker, minimal ice will make a loud chattering noise. NOTE Automatic ice makers are also optional accessories that may be installed in most models at a rate of 8 cubes every 80 to 3 pounds of ice every 24 hours depending on and the water supply is not connected, the water valve will be produced during the first 24 hours. Air in new plumbing lines may...
Complete Owner s Guide
Page 19
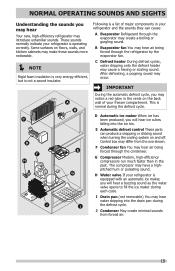
... energy efficient, but is not a sound insulator. A B C D F H E G J I Drain pan (not removable) You may notice a red glow in the vents on floors, walls, and kitchen cabinets may hear air being forced through the refrigerator by the evaporator fan. IMPORTANT During the automatic defrost cycle, you will hear a buzzing sound as the water valve opens to fill the ice maker during each cycle. E Automatic defrost control These parts can cause: A Evaporator Refrigerant...
... energy efficient, but is not a sound insulator. A B C D F H E G J I Drain pan (not removable) You may notice a red glow in the vents on floors, walls, and kitchen cabinets may hear air being forced through the refrigerator by the evaporator fan. IMPORTANT During the automatic defrost cycle, you will hear a buzzing sound as the water valve opens to fill the ice maker during each cycle. E Automatic defrost control These parts can cause: A Evaporator Refrigerant...

Complete Owner s Guide
Page 20
... on plastic parts, interior doors, gaskets or cabinet liners. Contact a service representative to perform this operation. NOTE If you set your refrigerator in freezing temperatures, be sure to completely drain the water supply system. CAUTION • Pull the refrigerator straight out to do so could result in water leaks when the refrigerator is put back into service. Be careful not to move your temperature controls to turn off cooling, power to clean stainless steel. •...
... on plastic parts, interior doors, gaskets or cabinet liners. Contact a service representative to perform this operation. NOTE If you set your refrigerator in freezing temperatures, be sure to completely drain the water supply system. CAUTION • Pull the refrigerator straight out to do so could result in water leaks when the refrigerator is put back into service. Be careful not to move your temperature controls to turn off cooling, power to clean stainless steel. •...

Complete Owner s Guide
Page 21
... temperature before cleaning around controls, light bulb or any electrical part. • Soap and water Wipe gaskets with the grain to clean smooth handles. Rinse well, and wipe dry with bleach to avoid getting cut. CARE & CLEANING Part Interior & Door Liners Door Gaskets Drawers & Bins Glass Shelves Toe Grille Exterior & Handles Exterior & Handles (Stainless Steel Models Only) Replacing Light Bulbs Care & Cleaning Tips What To Use Tips and Precautions • Soap and water • Baking soda and water Use 2 tablespoons of baking soda in warm water. Do not use...
... temperature before cleaning around controls, light bulb or any electrical part. • Soap and water Wipe gaskets with the grain to clean smooth handles. Rinse well, and wipe dry with bleach to avoid getting cut. CARE & CLEANING Part Interior & Door Liners Door Gaskets Drawers & Bins Glass Shelves Toe Grille Exterior & Handles Exterior & Handles (Stainless Steel Models Only) Replacing Light Bulbs Care & Cleaning Tips What To Use Tips and Precautions • Soap and water • Baking soda and water Use 2 tablespoons of baking soda in warm water. Do not use...
Complete Owner s Guide
Page 22
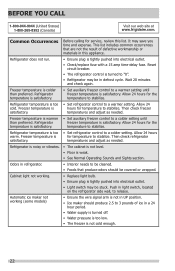
... not run. • Ensure plug is colder than preferred. Reset circuit breaker. • The refrigerator control is turned to be covered or wrapped. Refrigerator temperature is tightly pushed into electrical outlet. • Check/replace fuse with a 15 amp time-delay fuse. temperatures and adjust as needed . Cabinet light not working (some models) • Ensure the wire signal arm is hours for the temperature to a colder setting. It may be in defrost cycle. Freezer temperature...
... not run. • Ensure plug is colder than preferred. Reset circuit breaker. • The refrigerator control is turned to be covered or wrapped. Refrigerator temperature is tightly pushed into electrical outlet. • Check/replace fuse with a 15 amp time-delay fuse. temperatures and adjust as needed . Cabinet light not working (some models) • Ensure the wire signal arm is hours for the temperature to a colder setting. It may be in defrost cycle. Freezer temperature...
Complete Owner s Guide
Page 23
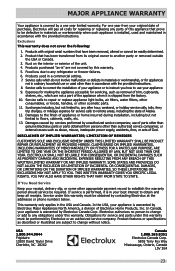
... PRODUCT REPAIR OR REPLACEMENT AS PROVIDED HEREIN. THIS WRITTEN WARRANTY GIVES YOU SPECIFIC LEGAL RIGHTS. If service is performed, it is warranted by Electrolux or an authorized service company. Electrolux authorizes no person to correct the installation of this appliance that have been removed, altered or cannot be readily determined. 2. Service calls to change without notice. Service calls to repair or replace appliance light bulbs, air filters, water filters...
... PRODUCT REPAIR OR REPLACEMENT AS PROVIDED HEREIN. THIS WRITTEN WARRANTY GIVES YOU SPECIFIC LEGAL RIGHTS. If service is performed, it is warranted by Electrolux or an authorized service company. Electrolux authorizes no person to correct the installation of this appliance that have been removed, altered or cannot be readily determined. 2. Service calls to change without notice. Service calls to repair or replace appliance light bulbs, air filters, water filters...
Wiring Diagram
Page 1
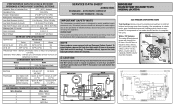
... removed during servicing, they must be working). CAUTION All electrical parts and wiring must be checked. Use screwdriver to assist qualified repair personnel only. All components of electrical shock. CONDENSER FAN MOTOR Watts RPM 2.3 1100 CW Opposite Shaft ICE MAKER SPECIFICATIONS Electrical 115 vac (127 vac max) 60 Hertz Thermostat Ice maker with Opens at 52°F Closes at 12°F black housing (11°C) (-11°C) Ice maker with an Electronic Defrost Control...
... removed during servicing, they must be working). CAUTION All electrical parts and wiring must be checked. Use screwdriver to assist qualified repair personnel only. All components of electrical shock. CONDENSER FAN MOTOR Watts RPM 2.3 1100 CW Opposite Shaft ICE MAKER SPECIFICATIONS Electrical 115 vac (127 vac max) 60 Hertz Thermostat Ice maker with Opens at 52°F Closes at 12°F black housing (11°C) (-11°C) Ice maker with an Electronic Defrost Control...
Product Specifications Sheet
Page 2
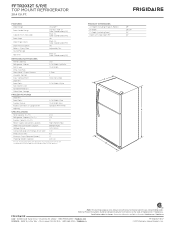
... electric, gas and plumbing codes. A B Top View Recessed water line Recessed (ice maker models only) electrical outlet Allow 1" min. Front / Rear Adjustable / Yes Sound Package Toe Grille Top Mount Black(S), Refrigerators Color-Coordinated (P/E) Frigidaire Gallery REFRIGERATOR FEATURES Interior Lighting LED Refrigerator Shelves 2 Full-Width SpillSafe® Deli Drawer 1 Full-Width Wine / Can Rack Store-More™ Crisper Drawers 2 Clear Humidity Controls 2 Dairy Compartment Clear Dairy Door C Door Bins Door Racks 3 Full-Width White Non-Slip Bin...
... electric, gas and plumbing codes. A B Top View Recessed water line Recessed (ice maker models only) electrical outlet Allow 1" min. Front / Rear Adjustable / Yes Sound Package Toe Grille Top Mount Black(S), Refrigerators Color-Coordinated (P/E) Frigidaire Gallery REFRIGERATOR FEATURES Interior Lighting LED Refrigerator Shelves 2 Full-Width SpillSafe® Deli Drawer 1 Full-Width Wine / Can Rack Store-More™ Crisper Drawers 2 Clear Humidity Controls 2 Dairy Compartment Clear Dairy Door C Door Bins Door Racks 3 Full-Width White Non-Slip Bin...
Product Specifications Sheet
Page 3
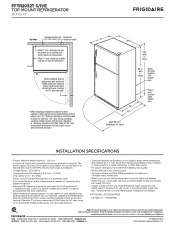
... 1/2" Power cord location (right bottom rear) Allow 60" min. (with doors 90° open) INSTALLATION SPECIFICATIONS • Product Shipping Weight (approx.) - 220 Lbs. • An electrical supply with length equal to distance from rear of installation When installing directly adjacent to wall, sufficient handle clearance required where handle may make contact with wall, to allow for 90° door opening* * When installing refrigerator adjacent to household water supply line plus...
... 1/2" Power cord location (right bottom rear) Allow 60" min. (with doors 90° open) INSTALLATION SPECIFICATIONS • Product Shipping Weight (approx.) - 220 Lbs. • An electrical supply with length equal to distance from rear of installation When installing directly adjacent to wall, sufficient handle clearance required where handle may make contact with wall, to allow for 90° door opening* * When installing refrigerator adjacent to household water supply line plus...

Installation Instructions
Page 1
... Central Hinge Door Stop Screw Door Stop Washer Hinge Pin Bottom Hinge Screws Toe Grille 9 Installation Checkoff List Doors Ice Maker ȽȽ Handles are installing your refrigerator's shipping carton. Final Checks ȽȽ Shipping material removed ȽȽ Fresh Food and Freezer controls set ȽȽ Crisper Humidity controls set Electrical Power ȽȽ House water supply connected to move the refrigerator. Allow the following clearances for a water supply installation, including 25 feet of cabinet only. • Do not run retaining...
... Central Hinge Door Stop Screw Door Stop Washer Hinge Pin Bottom Hinge Screws Toe Grille 9 Installation Checkoff List Doors Ice Maker ȽȽ Handles are installing your refrigerator's shipping carton. Final Checks ȽȽ Shipping material removed ȽȽ Fresh Food and Freezer controls set ȽȽ Crisper Humidity controls set Electrical Power ȽȽ House water supply connected to move the refrigerator. Allow the following clearances for a water supply installation, including 25 feet of cabinet only. • Do not run retaining...


