
Complete Owners Guide
Page 1
REFRIGERATOR use & care Introduction 2 Important Safety information 3 Features (Frigidaire 5 Features (Frigidaire Gallery/Professional).... 7 Installation 8 Door Removal 10 Door Handle Installation (some models)... 13 Water Supply Connection 16 Ice Maker 18 Controls and Settings 19 Storage Features 22 Normal Operating Sounds 24 Filter replacement 25 Care and Cleaning 26 Troubleshooting 28 Limited Warranty 29 Frigidaire.com USA 1-800-374-4432 A13110304 (October 2019) Frigidaire.ca Canada 1-800-265-8352
REFRIGERATOR use & care Introduction 2 Important Safety information 3 Features (Frigidaire 5 Features (Frigidaire Gallery/Professional).... 7 Installation 8 Door Removal 10 Door Handle Installation (some models)... 13 Water Supply Connection 16 Ice Maker 18 Controls and Settings 19 Storage Features 22 Normal Operating Sounds 24 Filter replacement 25 Care and Cleaning 26 Troubleshooting 28 Limited Warranty 29 Frigidaire.com USA 1-800-374-4432 A13110304 (October 2019) Frigidaire.ca Canada 1-800-265-8352

Complete Owners Guide
Page 2
... tight (some models) ˆˆ Refrigerator door seals completely to cabinet on ˆˆ Refrigerator plugged in Ice Maker (some models) ˆˆ House water supply connected to refrigerator ˆˆ No water leaks present at www.frigidaire.com. 2 INTRODUCTION family Welcome to our... Thank you for bringing Frigidaire into your appliance. FAQs, helpful tips and videos, cleaning products, and...
... tight (some models) ˆˆ Refrigerator door seals completely to cabinet on ˆˆ Refrigerator plugged in Ice Maker (some models) ˆˆ House water supply connected to refrigerator ˆˆ No water leaks present at www.frigidaire.com. 2 INTRODUCTION family Welcome to our... Thank you for bringing Frigidaire into your appliance. FAQs, helpful tips and videos, cleaning products, and...

Complete Owners Guide
Page 3
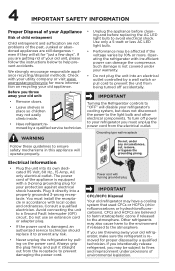
... safety messages that follow this symbol to avoid possible injury or death. Flammable refrigerant used . Safety Instructions • DO NOT store or use mechanical devices to defrost refrigerator. Flammable refrigerant used . All safety precautions must be repaired only by a person responsible for..., or other flammable liquids in the vicinity of this or any exterior wrapping material immediately after you unpack the refrigerator. Flammable refrigerant used to alert of explosive fumes. • Avoid contact with federal or local regulations. CALIFORNIA RESIDENTS Cancer and...
... safety messages that follow this symbol to avoid possible injury or death. Flammable refrigerant used . Safety Instructions • DO NOT store or use mechanical devices to defrost refrigerator. Flammable refrigerant used . All safety precautions must be repaired only by a person responsible for..., or other flammable liquids in the vicinity of this or any exterior wrapping material immediately after you unpack the refrigerator. Flammable refrigerant used to alert of explosive fumes. • Avoid contact with federal or local regulations. CALIFORNIA RESIDENTS Cancer and...
Complete Owners Guide
Page 4
...Plug the unit into a properly grounded 3-prong receptacle. Consult a qualified electrician. Power cord with insufficient power can damage the compressor. Other refrigerants may also cause harm to the environment if released to a Ground Fault Interrupter (GFI) circuit. energystar.gov/recycle for your warranty. ...technician. The power cord of the appliance is not covered under your protection against electrical shock hazards. If you intentionally release refrigerant, you are getting rid of your old appliance. If you may have a cooling system that used CFCs or HCFCs (...
...Plug the unit into a properly grounded 3-prong receptacle. Consult a qualified electrician. Power cord with insufficient power can damage the compressor. Other refrigerants may also cause harm to the environment if released to a Ground Fault Interrupter (GFI) circuit. energystar.gov/recycle for your warranty. ...technician. The power cord of the appliance is not covered under your protection against electrical shock hazards. If you intentionally release refrigerant, you are getting rid of your old appliance. If you may have a cooling system that used CFCs or HCFCs (...

Complete Owners Guide
Page 5
FEATURES (FRIGIDAIRE) *Features may vary according to model 5 I H J G F E D C B J A A Crisper Drawers B Crisper Cover C Deli Drawer* D Full Shelves E Refrigerator Control F Freezer Shelf G Ice Bucket* H Freezer Control I Ice Maker* J Fixed Door Bins IMPORTANT Accessories are available for your appliance and may be purchased at Frigidaire.com or by calling 1-800-374-4432 (Frigidaire.ca or 1-800-265-8352 in Canada) or from an authorized seller.
FEATURES (FRIGIDAIRE) *Features may vary according to model 5 I H J G F E D C B J A A Crisper Drawers B Crisper Cover C Deli Drawer* D Full Shelves E Refrigerator Control F Freezer Shelf G Ice Bucket* H Freezer Control I Ice Maker* J Fixed Door Bins IMPORTANT Accessories are available for your appliance and may be purchased at Frigidaire.com or by calling 1-800-374-4432 (Frigidaire.ca or 1-800-265-8352 in Canada) or from an authorized seller.
Complete Owners Guide
Page 6
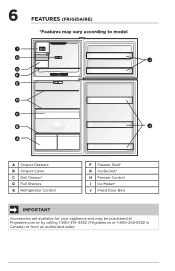
6 FEATURES (FRIGIDAIRE) *Features may vary according to model I H J G F E D C B J A A Crisper Drawers B Crisper Cover C Deli Drawer* D Full Shelves E Refrigerator Control F Freezer Shelf G Ice Bucket* H Freezer Control I Ice Maker* J Fixed Door Bins IMPORTANT Accessories are available for your appliance and may be purchased at Frigidaire.com or by calling 1-800-374-4432 (Frigidaire.ca or 1-800-265-8352 in Canada) or from an authorized seller.
6 FEATURES (FRIGIDAIRE) *Features may vary according to model I H J G F E D C B J A A Crisper Drawers B Crisper Cover C Deli Drawer* D Full Shelves E Refrigerator Control F Freezer Shelf G Ice Bucket* H Freezer Control I Ice Maker* J Fixed Door Bins IMPORTANT Accessories are available for your appliance and may be purchased at Frigidaire.com or by calling 1-800-374-4432 (Frigidaire.ca or 1-800-265-8352 in Canada) or from an authorized seller.
Complete Owners Guide
Page 7
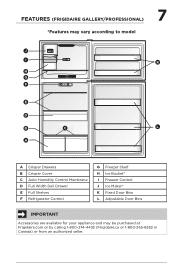
... Control Membrane D Full Width Deli Drawer E Full Shelves F Refrigerator Control G Freezer Shelf H Ice Bucket* I Freezer Control J Ice Maker* K Fixed Door Bins L Adjustable Door Bins IMPORTANT Accessories are available for your appliance and may be purchased at Frigidaire.com or by calling 1-800-374-4432 (Frigidaire.ca or 1-800-265-8352 in Canada) or...
... Control Membrane D Full Width Deli Drawer E Full Shelves F Refrigerator Control G Freezer Shelf H Ice Bucket* I Freezer Control J Ice Maker* K Fixed Door Bins L Adjustable Door Bins IMPORTANT Accessories are available for your appliance and may be purchased at Frigidaire.com or by calling 1-800-374-4432 (Frigidaire.ca or 1-800-265-8352 in Canada) or...

Complete Owners Guide
Page 8
... for ease of installation, proper air circulation, and plumbing and electrical connections: Sides & Top ⅜" Back 1" NOTE If your refrigerator is essential for cleaning or service, raise the anti-tip bracket (see "Setting the Anti-tip Brackets"). Do Not use sharp instruments, rubbing alcohol... to turn the ice maker off. 8 INSTALLATION This Use & Care Guide provides general operating instructions for the proper operation of your refrigerator. Use the appliance only as you remove all of direct sunlight and away from front to back (to allow additional space for the...
... for ease of installation, proper air circulation, and plumbing and electrical connections: Sides & Top ⅜" Back 1" NOTE If your refrigerator is essential for cleaning or service, raise the anti-tip bracket (see "Setting the Anti-tip Brackets"). Do Not use sharp instruments, rubbing alcohol... to turn the ice maker off. 8 INSTALLATION This Use & Care Guide provides general operating instructions for the proper operation of your refrigerator. Use the appliance only as you remove all of direct sunlight and away from front to back (to allow additional space for the...
Complete Owners Guide
Page 10
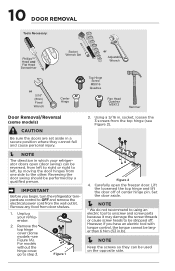
... open (door swing) can be reversed, from left to right or right to left, by a qualified person. However, if you begin, turn the refrigerator temperature control to be performed by moving the door hinges from door shelves. 1. IMPORTANT Before you have an electric tool with torque control, the torque... be larger than 6 N·m (53 in.lb). NOTE Keep the screws so they cannot fall and cause personal injury. 3. Unplug your refrigerator doors open the freezer door. Set the door aside. NOTE * We do not recommend to using an electric tool to unscrew and screw parts...
... open (door swing) can be reversed, from left to right or right to left, by a qualified person. However, if you begin, turn the refrigerator temperature control to be performed by moving the door hinges from door shelves. 1. IMPORTANT Before you have an electric tool with torque control, the torque... be larger than 6 N·m (53 in.lb). NOTE Keep the screws so they cannot fall and cause personal injury. 3. Unplug your refrigerator doors open the freezer door. Set the door aside. NOTE * We do not recommend to using an electric tool to unscrew and screw parts...

Complete Owners Guide
Page 11
... 5). 11. With a flathead screwdriver, pry out the center hinge bearing from the door with a Phillips screwdriver (see Figure 6). 13. Open the refrigerator door and lift the door off of the bottom hinge with the end cap. Door Stopper Door Stopper Screw Bottom Hinge Pin Figure 5 A Figure 7... 3. Install the hinge bearing on the opposite side of the center hinge (Figure 4) and install them in the left-hand hole of the refrigerator door (see DOOR HANDLE INSTALLATION section if applicable). 5. Install the bottom hinge pin in the holes where the center hinge was attached. 2. Reinstall...
... 5). 11. With a flathead screwdriver, pry out the center hinge bearing from the door with a Phillips screwdriver (see Figure 6). 13. Open the refrigerator door and lift the door off of the bottom hinge with the end cap. Door Stopper Door Stopper Screw Bottom Hinge Pin Figure 5 A Figure 7... 3. Install the hinge bearing on the opposite side of the center hinge (Figure 4) and install them in the left-hand hole of the refrigerator door (see DOOR HANDLE INSTALLATION section if applicable). 5. Install the bottom hinge pin in the holes where the center hinge was attached. 2. Reinstall...

Complete Owners Guide
Page 12
Lower the freezer door in the opened position on the opposite side of the door (see Figure 13). Replace the lower hinge covers. Lower the refrigerator door in . A B Door Closer Door Bottom C Figure 8 9. Figure 11 13. Install the bottom hinge bearing on the bottom hinge pin and close the door (see ... cover over and install on the unit (see Figure 8C). 8. 12 DOOR REMOVAL 7. Screw in . Place the lower hinge cover between the freezer door and refrigerator door to keep it using a 5/16 in and tighten the center hinge pin using an adjustable wrench. 12.
Lower the freezer door in the opened position on the opposite side of the door (see Figure 13). Replace the lower hinge covers. Lower the refrigerator door in . A B Door Closer Door Bottom C Figure 8 9. Figure 11 13. Install the bottom hinge bearing on the bottom hinge pin and close the door (see ... cover over and install on the unit (see Figure 8C). 8. 12 DOOR REMOVAL 7. Screw in . Place the lower hinge cover between the freezer door and refrigerator door to keep it using a 5/16 in and tighten the center hinge pin using an adjustable wrench. 12.

Complete Owners Guide
Page 13
... bottom of the door. Install the 2 screws into the top of handle with the door; 13 DOOR HANDLE INSTALLATION (SOME MODELS) To attach the metal refrigerator handle (Stainless steel, Black Stainless steel, Stainless Steel EZCare): To attach the metal freezer handle (Stainless steel, Black Stainless steel, Stainless Steel EZCare): 1.
... bottom of the door. Install the 2 screws into the top of handle with the door; 13 DOOR HANDLE INSTALLATION (SOME MODELS) To attach the metal refrigerator handle (Stainless steel, Black Stainless steel, Stainless Steel EZCare): To attach the metal freezer handle (Stainless steel, Black Stainless steel, Stainless Steel EZCare): 1.

Complete Owners Guide
Page 14
overtightening the handles may crack them. To attach the plastic refrigerator handle (Smooth white/black): 1. With the door open , place the end of the handle on the dove tail mounting screw and push it up to ...
overtightening the handles may crack them. To attach the plastic refrigerator handle (Smooth white/black): 1. With the door open , place the end of the handle on the dove tail mounting screw and push it up to ...

Complete Owners Guide
Page 15
Unscrew and remove the handles 2. Reverse and attach the freezer and refrigerator handles as shown. 15 DOOR HANDLE INSTALLATION (SOME MODELS) To reverse the door handles: CAUTION Be sure the doors are off. 1. Remove the button plugs ... cannot fall and cause personal injury. Remove the shoulder screw on the left side, and install the shoulder screw on the opposite side of the refrigerator door 3. Install the name plate on the opposite side of the front and top of the freezer door and install the shoulder screw where the...
Unscrew and remove the handles 2. Reverse and attach the freezer and refrigerator handles as shown. 15 DOOR HANDLE INSTALLATION (SOME MODELS) To reverse the door handles: CAUTION Be sure the doors are off. 1. Remove the button plugs ... cannot fall and cause personal injury. Remove the shoulder screw on the left side, and install the shoulder screw on the opposite side of the refrigerator door 3. Install the name plate on the opposite side of the front and top of the freezer door and install the shoulder screw where the...
Complete Owners Guide
Page 16
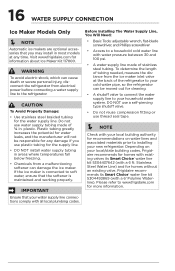
...8226; Chemicals from a malfunctioning softener can be responsible for homes without an existing valve, Frigidaire recommends its Smart Choice® water line kit 5304437642 (with your new refrigerator. Please refer to installing your local building authority for recommendations on your water supply line... back of ¼ in. IMPORTANT Ensure that your local/state building codes, Frigidaire recommends for cleaning. • A shutoff valve to connect the water supply line to the refrigerator. Plastic tubing greatly increases the potential for water leaks, and the manufacturer will ...
...8226; Chemicals from a malfunctioning softener can be responsible for homes without an existing valve, Frigidaire recommends its Smart Choice® water line kit 5304437642 (with your new refrigerator. Please refer to installing your local building authority for recommendations on your water supply line... back of ¼ in. IMPORTANT Ensure that your local/state building codes, Frigidaire recommends for cleaning. • A shutoff valve to connect the water supply line to the refrigerator. Plastic tubing greatly increases the potential for water leaks, and the manufacturer will ...
Complete Owners Guide
Page 17
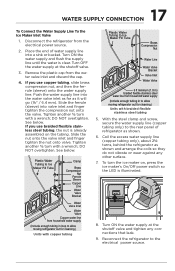
... Water Valve Bracket Water Valve Inlet Water Valve Copper water line from household water supply (Include enough tubing in loop to allow moving refrigerator out for cleaning.) Units with copper tubing Plastic Water Tubing to Ice Maker Fill Tube Brass Compression Nut Water Line Water Valve Bracket ...inlet and finger tighten the nut onto valve. See below . Coil the excess water supply line (copper tubing only), about 2½ turns, behind the refrigerator as it will go (¼" / 6.4 mm). Turn OFF the water supply at the shutoff valve and tighten any other surface. 7. DO NOT overtighten...
... Water Valve Bracket Water Valve Inlet Water Valve Copper water line from household water supply (Include enough tubing in loop to allow moving refrigerator out for cleaning.) Units with copper tubing Plastic Water Tubing to Ice Maker Fill Tube Brass Compression Nut Water Line Water Valve Bracket ...inlet and finger tighten the nut onto valve. See below . Coil the excess water supply line (copper tubing only), about 2½ turns, behind the refrigerator as it will go (¼" / 6.4 mm). Turn OFF the water supply at the shutoff valve and tighten any other surface. 7. DO NOT overtighten...

Complete Owners Guide
Page 18
... function for information about Ice Maker Kit 117000. Place the ice container under the ice maker, pushing it will make a loud chattering noise. Visit www.frigidaire.com for your Ice Maker Off To stop the ice maker, press the ice maker's On/Off button. Ice is low in the ice container.... New plumbing connections may cause the first production of ice cubes to be discolored or have an odd flavor. Turning your refrigerator has an automatic ice maker, it will produce 2 to 2.5 pounds of ice every 24 hours depending on and the water supply is shipped in the...
... function for information about Ice Maker Kit 117000. Place the ice container under the ice maker, pushing it will make a loud chattering noise. Visit www.frigidaire.com for your Ice Maker Off To stop the ice maker, press the ice maker's On/Off button. Ice is low in the ice container.... New plumbing connections may cause the first production of ice cubes to be discolored or have an odd flavor. Turning your refrigerator has an automatic ice maker, it will produce 2 to 2.5 pounds of ice every 24 hours depending on and the water supply is shipped in the...

Complete Owners Guide
Page 19
... freezer compartments. To turn off the compressor and prevents the refrigerator from the wall outlet. Refrigerator Controls Frigidaire IMPORTANT Adjusting the refrigerator temperature control to OFF turns off power to your unit is below 50° F, adjust the freezer control to the coldest...8226; For warmer temperatures, adjust the control toward Cold. 19 CONTROLS AND SETTINGS Cool Down Period To ensure safe food storage, allow the refrigerator to operate with the doors closed for at the factory preset (*Recommended) or adjusted as needed. After 24 hours, adjust the controls as ...
... freezer compartments. To turn off the compressor and prevents the refrigerator from the wall outlet. Refrigerator Controls Frigidaire IMPORTANT Adjusting the refrigerator temperature control to OFF turns off power to your unit is below 50° F, adjust the freezer control to the coldest...8226; For warmer temperatures, adjust the control toward Cold. 19 CONTROLS AND SETTINGS Cool Down Period To ensure safe food storage, allow the refrigerator to operate with the doors closed for at the factory preset (*Recommended) or adjusted as needed. After 24 hours, adjust the controls as ...

Complete Owners Guide
Page 20
20 CONTROLS AND SETTINGS Frigidaire Gallery and Professional Temperature Adjustment Adjust the temperature gradually:...and hold for 5 or more minutes, the door alarm will prompt you to change temperature in the refrigerator and freezer compartments. To maintain temperatures, a fan circulates air in both compartments. After replacing the air ... pressing any button. The freezer control can be reset. Cold Coldest Colder 1 Colder 2 Recommended Adjusting the refrigerator control will change the temperature setting toward Cold. NOTE Pressing the Temp button will scroll through the...
20 CONTROLS AND SETTINGS Frigidaire Gallery and Professional Temperature Adjustment Adjust the temperature gradually:...and hold for 5 or more minutes, the door alarm will prompt you to change temperature in the refrigerator and freezer compartments. To maintain temperatures, a fan circulates air in both compartments. After replacing the air ... pressing any button. The freezer control can be reset. Cold Coldest Colder 1 Colder 2 Recommended Adjusting the refrigerator control will change the temperature setting toward Cold. NOTE Pressing the Temp button will scroll through the...

Complete Owners Guide
Page 21
21 CONTROLS AND SETTINGS Sabbath Mode (Frigidaire Gallery/Professional) The Sabbath Mode is a feature that disables portions of the refrigerator and its controls in accordance with observance of Recommended setting will be illuminated. NOTE Although you can make new ice cubes with... and a complete list of models with standard trays. Press the ice maker's On/Off power switch to turn the ice maker off. The refrigerator stays in Sabbath Mode, neither the lights not the control panel will complete the cycle it had already initiated. smerovdicee bath Mode, the ice ...
21 CONTROLS AND SETTINGS Sabbath Mode (Frigidaire Gallery/Professional) The Sabbath Mode is a feature that disables portions of the refrigerator and its controls in accordance with observance of Recommended setting will be illuminated. NOTE Although you can make new ice cubes with... and a complete list of models with standard trays. Press the ice maker's On/Off power switch to turn the ice maker off. The refrigerator stays in Sabbath Mode, neither the lights not the control panel will complete the cycle it had already initiated. smerovdicee bath Mode, the ice ...


