

Complete Owners Guide
Page 1
REFRIGERATOR use & care Introduction 2 Important Safety information 3 Features (Frigidaire 5 Features (Frigidaire Gallery/Professional).... 7 Installation 8 Door Removal 10 Door Handle Installation (some models)... 13 Water Supply Connection 16 Ice Maker 18 Controls and Settings 19 Storage Features 22 Normal Operating Sounds 24 Filter replacement 25 Care and Cleaning 26 Troubleshooting 28 Limited Warranty 29 Frigidaire.com USA 1-800-374-4432 A13110304 (October 2019) Frigidaire.ca Canada 1-800-265-8352
REFRIGERATOR use & care Introduction 2 Important Safety information 3 Features (Frigidaire 5 Features (Frigidaire Gallery/Professional).... 7 Installation 8 Door Removal 10 Door Handle Installation (some models)... 13 Water Supply Connection 16 Ice Maker 18 Controls and Settings 19 Storage Features 22 Normal Operating Sounds 24 Filter replacement 25 Care and Cleaning 26 Troubleshooting 28 Limited Warranty 29 Frigidaire.com USA 1-800-374-4432 A13110304 (October 2019) Frigidaire.ca Canada 1-800-265-8352

Complete Owners Guide
Page 2
... your resource for quick reference. We are secure and tight (some models) ˆˆ House water supply connected to refrigerator ˆˆ No water leaks present at www.frigidaire.com. Be sure to register your product info here so it handy for the use and care of a long relationship ...together. recheck in Ice Maker (some models) ˆˆ Refrigerator door seals completely to cabinet on all sides ˆˆ ...
... your resource for quick reference. We are secure and tight (some models) ˆˆ House water supply connected to refrigerator ˆˆ No water leaks present at www.frigidaire.com. Be sure to register your product info here so it handy for the use and care of a long relationship ...together. recheck in Ice Maker (some models) ˆˆ Refrigerator door seals completely to cabinet on all sides ˆˆ ...

Complete Owners Guide
Page 3
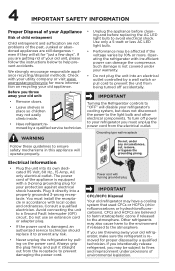
... severe cuts, and also destroy finishes if they have been given supervision or instruction concerning use these items to defrost refrigerator. Do not use mechanical devices to play. Staples can quickly cause suffocation. Cartons covered with rugs, bedspreads, plastic ... any other flammable liquids in death or serious injury. CAUTION CAUTION Risk of fire or explosion. Do not puncture refrigerant tubing. WARNING! Flammable refrigerant used . To be followed. DANGER DANGER indicates an imminently hazardous situation which , if not avoided, could result ...
... severe cuts, and also destroy finishes if they have been given supervision or instruction concerning use these items to defrost refrigerator. Do not use mechanical devices to play. Staples can quickly cause suffocation. Cartons covered with rugs, bedspreads, plastic ... any other flammable liquids in death or serious injury. CAUTION CAUTION Risk of fire or explosion. Do not puncture refrigerant tubing. WARNING! Flammable refrigerant used . To be followed. DANGER DANGER indicates an imminently hazardous situation which , if not avoided, could result ...
Complete Owners Guide
Page 4
... an electrical outlet controlled by a qualified service technician. Consult a qualified electrician. Check with local codes and ordinances. Other refrigerants may have a cooling system that used CFCs or HCFCs (chlorofluorocarbons or hydrochlorofluorocarbons). energystar.gov/recycle for your protection against electrical... shock hazards. To turn off accidentally. Avoid connecting the unit to avoid electrical shock. If you intentionally release refrigerant, you must install the receptacle in place so children may be subject to prevent any circumstances, cut, remove,...
... an electrical outlet controlled by a qualified service technician. Consult a qualified electrician. Check with local codes and ordinances. Other refrigerants may have a cooling system that used CFCs or HCFCs (chlorofluorocarbons or hydrochlorofluorocarbons). energystar.gov/recycle for your protection against electrical... shock hazards. To turn off accidentally. Avoid connecting the unit to avoid electrical shock. If you intentionally release refrigerant, you must install the receptacle in place so children may be subject to prevent any circumstances, cut, remove,...

Complete Owners Guide
Page 5
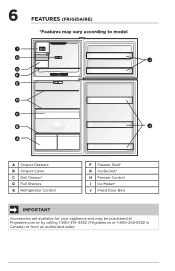
FEATURES (FRIGIDAIRE) *Features may vary according to model 5 I H J G F E D C B J A A Crisper Drawers B Crisper Cover C Deli Drawer* D Full Shelves E Refrigerator Control F Freezer Shelf G Ice Bucket* H Freezer Control I Ice Maker* J Fixed Door Bins IMPORTANT Accessories are available for your appliance and may be purchased at Frigidaire.com or by calling 1-800-374-4432 (Frigidaire.ca or 1-800-265-8352 in Canada) or from an authorized seller.
FEATURES (FRIGIDAIRE) *Features may vary according to model 5 I H J G F E D C B J A A Crisper Drawers B Crisper Cover C Deli Drawer* D Full Shelves E Refrigerator Control F Freezer Shelf G Ice Bucket* H Freezer Control I Ice Maker* J Fixed Door Bins IMPORTANT Accessories are available for your appliance and may be purchased at Frigidaire.com or by calling 1-800-374-4432 (Frigidaire.ca or 1-800-265-8352 in Canada) or from an authorized seller.
Complete Owners Guide
Page 6
6 FEATURES (FRIGIDAIRE) *Features may vary according to model I H J G F E D C B J A A Crisper Drawers B Crisper Cover C Deli Drawer* D Full Shelves E Refrigerator Control F Freezer Shelf G Ice Bucket* H Freezer Control I Ice Maker* J Fixed Door Bins IMPORTANT Accessories are available for your appliance and may be purchased at Frigidaire.com or by calling 1-800-374-4432 (Frigidaire.ca or 1-800-265-8352 in Canada) or from an authorized seller.
6 FEATURES (FRIGIDAIRE) *Features may vary according to model I H J G F E D C B J A A Crisper Drawers B Crisper Cover C Deli Drawer* D Full Shelves E Refrigerator Control F Freezer Shelf G Ice Bucket* H Freezer Control I Ice Maker* J Fixed Door Bins IMPORTANT Accessories are available for your appliance and may be purchased at Frigidaire.com or by calling 1-800-374-4432 (Frigidaire.ca or 1-800-265-8352 in Canada) or from an authorized seller.
Complete Owners Guide
Page 7
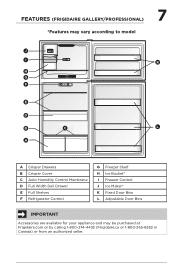
... Control Membrane D Full Width Deli Drawer E Full Shelves F Refrigerator Control G Freezer Shelf H Ice Bucket* I Freezer Control J Ice Maker* K Fixed Door Bins L Adjustable Door Bins IMPORTANT Accessories are available for your appliance and may be purchased at Frigidaire.com or by calling 1-800-374-4432 (Frigidaire.ca or 1-800-265-8352 in Canada) or...
... Control Membrane D Full Width Deli Drawer E Full Shelves F Refrigerator Control G Freezer Shelf H Ice Bucket* I Freezer Control J Ice Maker* K Fixed Door Bins L Adjustable Door Bins IMPORTANT Accessories are available for your appliance and may be purchased at Frigidaire.com or by calling 1-800-374-4432 (Frigidaire.ca or 1-800-265-8352 in Canada) or...

Complete Owners Guide
Page 8
... If you could damage the floor. Sufficient air circulation is essential for the handle so the door can damage the surface of your refrigerator. CAUTION Do not block the lower front of your model. When moving it . Installation clearances • Allow the following clearances for ...Choose a place that is placed with the door hinge side against a wall, you remove all of the package materials, clean the inside the refrigerator. 8 INSTALLATION This Use & Care Guide provides general operating instructions for cleaning or service, raise the anti-tip bracket (see "Setting the Anti...
... If you could damage the floor. Sufficient air circulation is essential for the handle so the door can damage the surface of your refrigerator. CAUTION Do not block the lower front of your model. When moving it . Installation clearances • Allow the following clearances for ...Choose a place that is placed with the door hinge side against a wall, you remove all of the package materials, clean the inside the refrigerator. 8 INSTALLATION This Use & Care Guide provides general operating instructions for cleaning or service, raise the anti-tip bracket (see "Setting the Anti...
Complete Owners Guide
Page 10
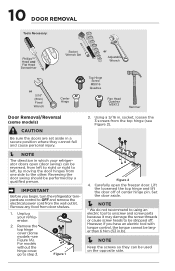
...have an electric tool with torque control, the torque cannot be larger than 6 N·m (53 in which your refrigerator. 2. A B Figure 1 Figure 2 4. However, if you begin, turn the refrigerator temperature control to be reversed, from door shelves. 1. Reversing the door swing should be used on the opposite ...side. Unplug your refrigerator doors open the freezer door. 10 DOOR REMOVAL Tools Necessary: Phillips™ Head and Flat Head Screwdriver Socket Wrench Set ...
...have an electric tool with torque control, the torque cannot be larger than 6 N·m (53 in which your refrigerator. 2. A B Figure 1 Figure 2 4. However, if you begin, turn the refrigerator temperature control to be reversed, from door shelves. 1. Reversing the door swing should be used on the opposite ...side. Unplug your refrigerator doors open the freezer door. 10 DOOR REMOVAL Tools Necessary: Phillips™ Head and Flat Head Screwdriver Socket Wrench Set ...

Complete Owners Guide
Page 11
...Screw Bottom Hinge Pin Figure 5 A Figure 7 3. Repeat the process for the plug. 4. Remove the 3 pan head screws on top of the refrigerator door (see Figure 7A). Install the hinge bearing on a padded surface to avoid damage. 5. Unscrew the center hinge pin using an adjustable wrench ...(see Figure 8A). 6. Figure 6 Hinge Door Bearing Reversal For Pin Screws Freezer and Refrigerator Doors Hinge Hole Plug Center Hinge 1. With a flathead screwdriver, pry out the center hinge bearing from the opposite side of the bottom hinge...
...Screw Bottom Hinge Pin Figure 5 A Figure 7 3. Repeat the process for the plug. 4. Remove the 3 pan head screws on top of the refrigerator door (see Figure 7A). Install the hinge bearing on a padded surface to avoid damage. 5. Unscrew the center hinge pin using an adjustable wrench ...(see Figure 8A). 6. Figure 6 Hinge Door Bearing Reversal For Pin Screws Freezer and Refrigerator Doors Hinge Hole Plug Center Hinge 1. With a flathead screwdriver, pry out the center hinge bearing from the opposite side of the bottom hinge...

Complete Owners Guide
Page 12
... on the opposite side of the door (see Figure 8C). 8. Lower the freezer door in . Place the lower hinge cover between the freezer door and refrigerator door to keep it using a 5/16 in the opened position over and install on the bottom hinge pin and close the door (see Figure 11... 7. Replace the lower hinge covers. Flip the door closer over the center hinge pin and close the door (see Figure 12). 2 1 Figure 9 11. Lower the refrigerator door in . socket, and then place the top hinge cover (some models) on the opposite side of the door (see Figure 13). Install the bottom...
... on the opposite side of the door (see Figure 8C). 8. Lower the freezer door in . Place the lower hinge cover between the freezer door and refrigerator door to keep it using a 5/16 in the opened position over and install on the bottom hinge pin and close the door (see Figure 11... 7. Replace the lower hinge covers. Flip the door closer over the center hinge pin and close the door (see Figure 12). 2 1 Figure 9 11. Lower the refrigerator door in . socket, and then place the top hinge cover (some models) on the opposite side of the door (see Figure 13). Install the bottom...

Complete Owners Guide
Page 13
... of handle with the 2 holes in top of the handle. 3. then tighten another ½ turn . 3. 13 DOOR HANDLE INSTALLATION (SOME MODELS) To attach the metal refrigerator handle (Stainless steel, Black Stainless steel, Stainless Steel EZCare): To attach the metal freezer handle (Stainless steel, Black Stainless steel, Stainless Steel EZCare): 1.
... of handle with the 2 holes in top of the handle. 3. then tighten another ½ turn . 3. 13 DOOR HANDLE INSTALLATION (SOME MODELS) To attach the metal refrigerator handle (Stainless steel, Black Stainless steel, Stainless Steel EZCare): To attach the metal freezer handle (Stainless steel, Black Stainless steel, Stainless Steel EZCare): 1.

Complete Owners Guide
Page 14
... , place the end of the door. 3. To attach the plastic freezer handle (Smooth white/black): 1. overtightening the handles may crack them. To attach the plastic refrigerator handle (Smooth white/black): 1. Screws Handle Base Mounting Screw Handle Handle Screws Handle Base Install screws packaged with the handle. Use a handheld screwdriver only. Align...
... , place the end of the door. 3. To attach the plastic freezer handle (Smooth white/black): 1. overtightening the handles may crack them. To attach the plastic refrigerator handle (Smooth white/black): 1. Screws Handle Base Mounting Screw Handle Handle Screws Handle Base Install screws packaged with the handle. Use a handheld screwdriver only. Align...

Complete Owners Guide
Page 15
...where the name plate was removed using an adjustable wrench or Phillips head screwdriver. 7. Install the button plugs on the opposite side of the refrigerator door 3. The handles may be easier to reverse while the doors are set aside in a secure position where they cannot fall and cause personal... injury. Remove the shoulder screw on the left side, and install the shoulder screw on the freezer door. 5. Reverse and attach the freezer and refrigerator handles as shown. 15 DOOR HANDLE INSTALLATION (SOME MODELS) To reverse the door handles: CAUTION Be sure the doors are off. 1. Remove the...
...where the name plate was removed using an adjustable wrench or Phillips head screwdriver. 7. Install the button plugs on the opposite side of the refrigerator door 3. The handles may be easier to reverse while the doors are set aside in a secure position where they cannot fall and cause personal... injury. Remove the shoulder screw on the left side, and install the shoulder screw on the freezer door. 5. Reverse and attach the freezer and refrigerator handles as shown. 15 DOOR HANDLE INSTALLATION (SOME MODELS) To reverse the door handles: CAUTION Be sure the doors are off. 1. Remove the...
Complete Owners Guide
Page 16
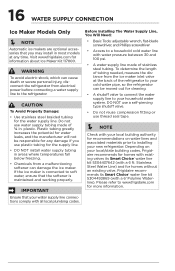
... its Smart Choice® water line kit 5304437642 (with a 6 ft. Visit www.frigidaire.com for the water supply line. To determine the length of the refrigerator to your cold water pipe, so the refrigerator can damage the ice maker. DO NOT use a self-piercing type shutoff valve. &#...supply line connections comply with all local plumbing codes. Depending on water lines and associated materials prior to the refrigerator. If the ice maker is connected to www.frigidaire.com for more information. WARNING To avoid electric shock, which can cause death or severe personal injury, disconnect...
... its Smart Choice® water line kit 5304437642 (with a 6 ft. Visit www.frigidaire.com for the water supply line. To determine the length of the refrigerator to your cold water pipe, so the refrigerator can damage the ice maker. DO NOT use a self-piercing type shutoff valve. &#...supply line connections comply with all local plumbing codes. Depending on water lines and associated materials prior to the refrigerator. If the ice maker is connected to www.frigidaire.com for more information. WARNING To avoid electric shock, which can cause death or severe personal injury, disconnect...
Complete Owners Guide
Page 17
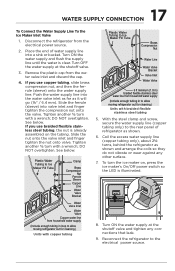
...Valve Bracket Water Valve Inlet Water Valve Copper water line from household water supply (Include enough tubing in loop to allow moving refrigerator out for cleaning.) Units with copper tubing Plastic Water Tubing to Ice Maker Fill Tube Brass Compression Nut Water Line Water ... Inlet Water Valve 6 ft minimum (1.8 m) braided flexible stainless steel water line from household water supply (Include enough tubing in to allow moving refrigerator out for cleaning.) Units with a wrench; Turn OFF the water supply at the shutoff valve and tighten any other surface. 7. Tighten another ...
...Valve Bracket Water Valve Inlet Water Valve Copper water line from household water supply (Include enough tubing in loop to allow moving refrigerator out for cleaning.) Units with copper tubing Plastic Water Tubing to Ice Maker Fill Tube Brass Compression Nut Water Line Water ... Inlet Water Valve 6 ft minimum (1.8 m) braided flexible stainless steel water line from household water supply (Include enough tubing in to allow moving refrigerator out for cleaning.) Units with a wrench; Turn OFF the water supply at the shutoff valve and tighten any other surface. 7. Tighten another ...

Complete Owners Guide
Page 18
... install in most models at a rate of ice every 24 hours depending on and the water supply is shipped in the ice container. Visit www.frigidaire.com for your dishwasher. Place the ice container under the ice maker, pushing it will produce 2 to 2.5 pounds of 10 cubes every 100 to cycle... MAKER NOTE Automatic ice makers are optional accessories that you must open the water supply valve. Ice is produced at any time. If your refrigerator has an automatic ice maker, it as far back as possible.
... install in most models at a rate of ice every 24 hours depending on and the water supply is shipped in the ice container. Visit www.frigidaire.com for your dishwasher. Place the ice container under the ice maker, pushing it will produce 2 to 2.5 pounds of 10 cubes every 100 to cycle... MAKER NOTE Automatic ice makers are optional accessories that you must open the water supply valve. Ice is produced at any time. If your refrigerator has an automatic ice maker, it as far back as possible.

Complete Owners Guide
Page 19
... can be left at least 8 hours before loading it with food items. Freezer Control All Models NOTE If your refrigerator, you must unplug the power cord from cooling, but does not disconnect the power to the light bulb and other electrical components.... To maintain temperature, a fan circulates air in both compartments. Refrigerator Controls Frigidaire IMPORTANT Adjusting the refrigerator temperature control to OFF turns off power to your unit is in small increments, allowing the temperature to improve performance....
... can be left at least 8 hours before loading it with food items. Freezer Control All Models NOTE If your refrigerator, you must unplug the power cord from cooling, but does not disconnect the power to the light bulb and other electrical components.... To maintain temperature, a fan circulates air in both compartments. Refrigerator Controls Frigidaire IMPORTANT Adjusting the refrigerator temperature control to OFF turns off power to your unit is in small increments, allowing the temperature to improve performance....

Complete Owners Guide
Page 20
...3 seconds. Door Alarm If the door is left at the factory preset (*Recommended) or adjusted as desired. 20 CONTROLS AND SETTINGS Frigidaire Gallery and Professional Temperature Adjustment Adjust the temperature gradually: adjust in small increments, allowing the temperature to stabilize. • For colder...air filter status on the control panel will prompt you to the least coldest setting. Cold Coldest Colder 1 Colder 2 Recommended Adjusting the refrigerator control will sound. To reset, Press and hold for 5 or more minutes, the door alarm will change the temperature setting toward ...
...3 seconds. Door Alarm If the door is left at the factory preset (*Recommended) or adjusted as desired. 20 CONTROLS AND SETTINGS Frigidaire Gallery and Professional Temperature Adjustment Adjust the temperature gradually: adjust in small increments, allowing the temperature to stabilize. • For colder...air filter status on the control panel will prompt you to the least coldest setting. Cold Coldest Colder 1 Colder 2 Recommended Adjusting the refrigerator control will sound. To reset, Press and hold for 5 or more minutes, the door alarm will change the temperature setting toward ...

Complete Owners Guide
Page 21
...smerovdicee bath Mode, the ice maker will be illuminated. NOTE Although you can make new ice cubes with observance of the refrigerator and its controls in Sabbath Mode after power failure recovery. To exit Sabbath Mode, reverse the steps above. NOTE While...assistance, guidelines for 5 seconds. The ice cube compartment will work until Sabbath Mode is deactivated. 21 CONTROLS AND SETTINGS Sabbath Mode (Frigidaire Gallery/Professional) The Sabbath Mode is a feature that disables portions of the weekly Sabbath and religious holidays within the Orthodox Jewish community...
...smerovdicee bath Mode, the ice maker will be illuminated. NOTE Although you can make new ice cubes with observance of the refrigerator and its controls in Sabbath Mode after power failure recovery. To exit Sabbath Mode, reverse the steps above. NOTE While...assistance, guidelines for 5 seconds. The ice cube compartment will work until Sabbath Mode is deactivated. 21 CONTROLS AND SETTINGS Sabbath Mode (Frigidaire Gallery/Professional) The Sabbath Mode is a feature that disables portions of the weekly Sabbath and religious holidays within the Orthodox Jewish community...


