

Installation Instructions
Page 1
... not connect your refrigerator. Anti-tip Bracket Figure 4 (some models) 4 Some models are secure and tight ȽȽ Door seals completely to secure the internal parts of these instructions. P/N: A01278403 Installation Instructions for Top Mount Refrigerator This document should only be removed by placing the end of the copper tube in...
... not connect your refrigerator. Anti-tip Bracket Figure 4 (some models) 4 Some models are secure and tight ȽȽ Door seals completely to secure the internal parts of these instructions. P/N: A01278403 Installation Instructions for Top Mount Refrigerator This document should only be removed by placing the end of the copper tube in...

Complete Owner s Guide
Page 2
... a potentially hazardous situation which , if not avoided, will sit for warnings regarding flammability and other appliance. Obey all instructions before using this or any moving parts of this refrigerator.
... a potentially hazardous situation which , if not avoided, will sit for warnings regarding flammability and other appliance. Obey all instructions before using this or any moving parts of this refrigerator.

Complete Owner s Guide
Page 8
...and bottom 8 Lower freezer door onto center hinge pin. 16. Reverse door handles (see instruction on handle side of door and grasp the thinnest part of door. Tighten the top hinge screws and check door gasket for open seal condition (gap between the doors on the handle side approximately 3 ...cover (which was removed in hinge and tighten with adjustable wrench. 14. Move hinge pin to other hole in Step 2) and insert the thickest part between gasket and cabinet flange). Lift up on next page). 11. Look for open areas between the gasket and the cabinet flange. Before starting ...
...and bottom 8 Lower freezer door onto center hinge pin. 16. Reverse door handles (see instruction on handle side of door and grasp the thinnest part of door. Tighten the top hinge screws and check door gasket for open seal condition (gap between the doors on the handle side approximately 3 ...cover (which was removed in hinge and tighten with adjustable wrench. 14. Move hinge pin to other hole in Step 2) and insert the thickest part between gasket and cabinet flange). Lift up on next page). 11. Look for open areas between the gasket and the cabinet flange. Before starting ...

Complete Owner s Guide
Page 10
...Screw Set Screw Handle Screw Install the two screws into the top of handle with the door, then tighten another ½ turn . Place rounded part of handle onto shoulder screw on face of door and align the two holes in top of the handle. 3. Your model will have either a... right hand or left hand door swing. Do not tighten the set screw on the rounded part of the handles may be sharp. 3. HANDLE INSTALLATION CAUTION Wear gloves and use extreme CAUTION when installing these instructions and illustrations thoroughly prior to reverse...
...Screw Set Screw Handle Screw Install the two screws into the top of handle with the door, then tighten another ½ turn . Place rounded part of handle onto shoulder screw on face of door and align the two holes in top of the handle. 3. Your model will have either a... right hand or left hand door swing. Do not tighten the set screw on the rounded part of the handles may be sharp. 3. HANDLE INSTALLATION CAUTION Wear gloves and use extreme CAUTION when installing these instructions and illustrations thoroughly prior to reverse...
Complete Owner s Guide
Page 18
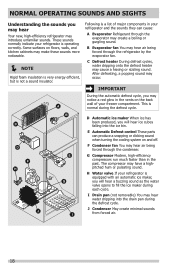
... floors, walls, and kitchen cabinets may create a boiling or gurgling sound. After defrosting, a popping sound may cause a hissing or sizzling sound. E Automatic Defrost control These parts can cause: A Evaporator Refrigerant through the evaporator may make these sounds more noticeable. NOTE Rigid foam insulation is very energy efficient, but is normal...
... floors, walls, and kitchen cabinets may create a boiling or gurgling sound. After defrosting, a popping sound may cause a hissing or sizzling sound. E Automatic Defrost control These parts can cause: A Evaporator Refrigerant through the evaporator may make these sounds more noticeable. NOTE Rigid foam insulation is very energy efficient, but is normal...
Complete Owner s Guide
Page 19
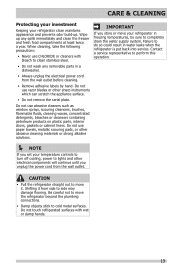
...back into service. CARE & CLEANING Protecting your investment Keeping your refrigerator clean maintains appearance and prevents odor build-up any removable parts in a dishwasher. • Always unplug the electrical power cord from the wall outlet. Failure to do so could result in...such as window sprays, scouring cleansers, brushes, flammable fluids, cleaning waxes, concentrated detergents, bleaches or cleansers containing petroleum products on plastic parts, interior doors, gaskets or cabinet liners. Wipe up . Do not use razor blades or other sharp instruments which can scratch the...
...back into service. CARE & CLEANING Protecting your investment Keeping your refrigerator clean maintains appearance and prevents odor build-up any removable parts in a dishwasher. • Always unplug the electrical power cord from the wall outlet. Failure to do so could result in...such as window sprays, scouring cleansers, brushes, flammable fluids, cleaning waxes, concentrated detergents, bleaches or cleansers containing petroleum products on plastic parts, interior doors, gaskets or cabinet liners. Wipe up . Do not use razor blades or other sharp instruments which can scratch the...
Complete Owner s Guide
Page 20
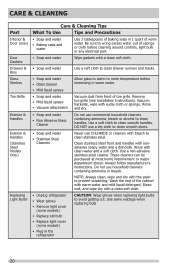
... Do not use a dry cloth to wring excess water out of sponge or cloth before cleaning around controls, light bulb or any electrical part. • Soap and water Wipe gaskets with nonabrasive soapy water and a dishcloth. Rinse well, and wipe dry with warm water and ...Use a non-abrasive stainless steel cleaner. Rinse and dry. Do not use CHLORIDE or cleaners with clean water and a soft cloth. CARE & CLEANING Part Interior & Door Liners Door Gaskets Drawers & Bins Glass Shelves Toe Grille Exterior & Handles Exterior & Handles (Stainless Steel Models Only) Replacing Light Bulbs ...
... Do not use a dry cloth to wring excess water out of sponge or cloth before cleaning around controls, light bulb or any electrical part. • Soap and water Wipe gaskets with nonabrasive soapy water and a dishcloth. Rinse well, and wipe dry with warm water and ...Use a non-abrasive stainless steel cleaner. Rinse and dry. Do not use CHLORIDE or cleaners with clean water and a soft cloth. CARE & CLEANING Part Interior & Door Liners Door Gaskets Drawers & Bins Glass Shelves Toe Grille Exterior & Handles Exterior & Handles (Stainless Steel Models Only) Replacing Light Bulbs ...
Complete Owner s Guide
Page 22
...Canada, your appliance or to instruct you how to any obligations under this warranty must be readily determined. 2. USA 1.800.944.9044 Frigidaire 10200 David Taylor Drive Charlotte, NC 28262 Canada 1.800.265.8352 Electrolux Canada Corp. 5855 Terry Fox Way Mississauga, Ontario, Canada L5V... by contacting Electrolux at the addresses or phone numbers below. or external causes such as -is" are not a part of parts other than genuine Electrolux parts or parts obtained from the factory. 10. If service is performed, it is shipped from persons other than authorized service companies;...
...Canada, your appliance or to instruct you how to any obligations under this warranty must be readily determined. 2. USA 1.800.944.9044 Frigidaire 10200 David Taylor Drive Charlotte, NC 28262 Canada 1.800.265.8352 Electrolux Canada Corp. 5855 Terry Fox Way Mississauga, Ontario, Canada L5V... by contacting Electrolux at the addresses or phone numbers below. or external causes such as -is" are not a part of parts other than genuine Electrolux parts or parts obtained from the factory. 10. If service is performed, it is shipped from persons other than authorized service companies;...

Wiring Diagram
Page 1
... cord before servicing this appliance. ICE MAKER INFORMATION Test Cycling: Remove cover by inserting screwdriver in 6 seconds (light bulb must be working). CAUTION All electrical parts and wiring must be shielded from housing. BLUE BLUE BLUE YELLOW YELLOW Electronic Timer (ADC) - All components of compressor run time. One full turn is...
... cord before servicing this appliance. ICE MAKER INFORMATION Test Cycling: Remove cover by inserting screwdriver in 6 seconds (light bulb must be working). CAUTION All electrical parts and wiring must be shielded from housing. BLUE BLUE BLUE YELLOW YELLOW Electronic Timer (ADC) - All components of compressor run time. One full turn is...
Energy Guide
Page 1
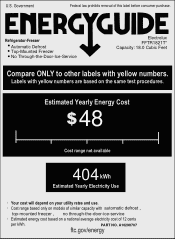
Government Federal law prohibits removal of similar capacity with yellow numbers. PART NO. A10298707 ftc.gov/energy Refrigerator-Freezer Automatic Defrost Top-Mounted Freezer No Through-the-Door-Ice-Service Electrolux FFTR1821T* Capacity: 18.0 Cubic Feet Compare ...
Government Federal law prohibits removal of similar capacity with yellow numbers. PART NO. A10298707 ftc.gov/energy Refrigerator-Freezer Automatic Defrost Top-Mounted Freezer No Through-the-Door-Ice-Service Electrolux FFTR1821T* Capacity: 18.0 Cubic Feet Compare ...


