
Installation Instructions
Page 1
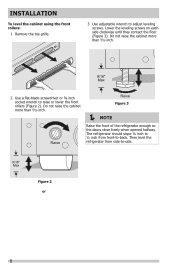
... lo 8 Door Removal (if necessary) Humidity Control If you have already removed your Use & Care Manual. We recommend that the refrigerator is setting solid on each other surfaces. 9 Open water supply shut-off valve and tighten any connections that doors close freely when...When using the front rollers: 1 Remove the toe grille (Figure 1). 2 Use a flat-blade screwdriver or 3/8 inch socket wrench to move the refrigerator. P/N: A01278403 CAUTION • Do not over handles. CAUTION IMPORTANT If you have completed Step 3 of your site preparation: • Choose a place...
... lo 8 Door Removal (if necessary) Humidity Control If you have already removed your Use & Care Manual. We recommend that the refrigerator is setting solid on each other surfaces. 9 Open water supply shut-off valve and tighten any connections that doors close freely when...When using the front rollers: 1 Remove the toe grille (Figure 1). 2 Use a flat-blade screwdriver or 3/8 inch socket wrench to move the refrigerator. P/N: A01278403 CAUTION • Do not over handles. CAUTION IMPORTANT If you have completed Step 3 of your site preparation: • Choose a place...

Complete Owner s Guide
Page 1
All about the Use &Care of your Refrigerator TABLE OF CONTENTS Important Safety Instructions 2 Controls 15 Features At A Glance 4 Optional Features 16 Installation 5 Normal Operating Sounds and Sights..........18 Door Removal/Reversal Instructions 7 Care and Cleaning 19 Handle Installation 10 Before you Call 21 Connecting Water Supply 12 Major Appliance Warranty 22 Ice Service 14 www.frigidaire.com USA 1-800-944-9044 www.frigidaire.ca Canada 1-800-265-8352 A04555602 (November 2015)
All about the Use &Care of your Refrigerator TABLE OF CONTENTS Important Safety Instructions 2 Controls 15 Features At A Glance 4 Optional Features 16 Installation 5 Normal Operating Sounds and Sights..........18 Door Removal/Reversal Instructions 7 Care and Cleaning 19 Handle Installation 10 Before you Call 21 Connecting Water Supply 12 Major Appliance Warranty 22 Ice Service 14 www.frigidaire.com USA 1-800-944-9044 www.frigidaire.ca Canada 1-800-265-8352 A04555602 (November 2015)

Complete Owner s Guide
Page 2
... recycle the carton, plastic bags, and any moving parts of automatic ice maker. • Remove all instructions before using this refrigerator. IMPORTANT IMPORTANT indicates installation, operation or maintenance information which , if not avoided, may become airtight chambers, and can cause severe... if they will result in minor or moderate injury. Children should never use gasoline, or other appliance. If you to refrigerator Cabinet is important but not hazard-related. IMPORTANT SAFETY INSTRUCTIONS WARNING Installation Checklist Please read all staples from the ...
... recycle the carton, plastic bags, and any moving parts of automatic ice maker. • Remove all instructions before using this refrigerator. IMPORTANT IMPORTANT indicates installation, operation or maintenance information which , if not avoided, may become airtight chambers, and can cause severe... if they will result in minor or moderate injury. Children should never use gasoline, or other appliance. If you to refrigerator Cabinet is important but not hazard-related. IMPORTANT SAFETY INSTRUCTIONS WARNING Installation Checklist Please read all staples from the ...
Complete Owner s Guide
Page 3
...an extension cord or adapter plug. • If the power cord is removed for proper disposal by a qualified service technician. Operating the refrigerator with 3-prong grounded plug CAUTION To avoid personal injury or property damage, handle tempered glass shelves carefully. Such damage is equipped with a ..., and pull straight out from the electrical outlet. Grounding type wall receptacle Do not, under any risk. • Never unplug the refrigerator by pulling on recycling your warranty. • Do not plug the unit into an electrical outlet controlled by 10% or more information...
...an extension cord or adapter plug. • If the power cord is removed for proper disposal by a qualified service technician. Operating the refrigerator with 3-prong grounded plug CAUTION To avoid personal injury or property damage, handle tempered glass shelves carefully. Such damage is equipped with a ..., and pull straight out from the electrical outlet. Grounding type wall receptacle Do not, under any risk. • Never unplug the refrigerator by pulling on recycling your warranty. • Do not plug the unit into an electrical outlet controlled by 10% or more information...
Complete Owner s Guide
Page 4
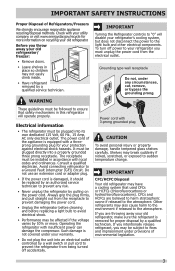
...the "Care & Cleaning" section in the "Optional Features" section of your Refrigerator Remove tape and glue residue from surfaces before using it. Always pull the refrigerator straight out when moving the refrigerator for cleaning or service, be sure to cover the floor with cardboard or ... Cover Full Width Deli (Some Models) Crisper Cover Crisper Drawers Toe Grille Fixed Door Bin Door Rack IMPORTANT Cleaning your refrigerator before turning on the refrigerator. IMPORTANT Moving your fingers. After you remove all of the package materials, clean the inside of this manual. FEATURES...
...the "Care & Cleaning" section in the "Optional Features" section of your Refrigerator Remove tape and glue residue from surfaces before using it. Always pull the refrigerator straight out when moving the refrigerator for cleaning or service, be sure to cover the floor with cardboard or ... Cover Full Width Deli (Some Models) Crisper Cover Crisper Drawers Toe Grille Fixed Door Bin Door Rack IMPORTANT Cleaning your refrigerator before turning on the refrigerator. IMPORTANT Moving your fingers. After you remove all of the package materials, clean the inside of this manual. FEATURES...

Complete Owner s Guide
Page 5
... extension cord or an adapter plug. • The sides should tilt ¼-inch (6 mm) from front-to-back (to maintain proper temperatures inside the refrigerator. If you may have to allow additional space for models equipped with the door hinge side against a wall, you do not hook up water to...; Consider water supply availability for the handle so the door can be installed on garage installation, refer to turn the ice maker off. Use the refrigerator only as instructed in this Use & Care Guide. The compressor will drop below 55°F (13°C) or rise above 110°F (43°C). ...
... extension cord or an adapter plug. • The sides should tilt ¼-inch (6 mm) from front-to-back (to maintain proper temperatures inside the refrigerator. If you may have to allow additional space for models equipped with the door hinge side against a wall, you do not hook up water to...; Consider water supply availability for the handle so the door can be installed on garage installation, refer to turn the ice maker off. Use the refrigerator only as instructed in this Use & Care Guide. The compressor will drop below 55°F (13°C) or rise above 110°F (43°C). ...
Complete Owner s Guide
Page 6
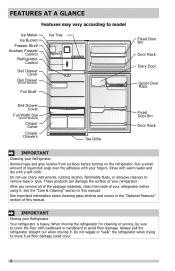
... when opened halfway. Lower the leveling screws on each side clockwise until they contact the floor (Figure 3). The refrigerator should slope ¼ inch to ½ inch from side-to -back. Then level the refrigerator from front-to -side. 9/16" Max Figure 2 or 6 Do not raise the cabinet more than 9/16 inch. 9/16...
... when opened halfway. Lower the leveling screws on each side clockwise until they contact the floor (Figure 3). The refrigerator should slope ¼ inch to ½ inch from side-to -back. Then level the refrigerator from front-to -side. 9/16" Max Figure 2 or 6 Do not raise the cabinet more than 9/16 inch. 9/16...

Complete Owner s Guide
Page 7
... Top Hinge Cover Rear Screw Top Hinge Screw Bottom Hinge Screw Door removal and reversal instructions: 1. Remove top hinge and lift door off of refrigerator, remove inside screw and loosening two outside screws on hinge pin. 4. Set door aside. NOTE The direction in which your...outside screws enough to allow hinge and shim to slide out. Door Stop Screw Door Stop Washer Hinge Pin Bottom Hinge Screws Toe Grille 7 Lift refrigerator door off center hinge pin. Remove center hinge and shim by moving the door hinges from one side to "0" and remove the electrical power ...
... Top Hinge Cover Rear Screw Top Hinge Screw Bottom Hinge Screw Door removal and reversal instructions: 1. Remove top hinge and lift door off of refrigerator, remove inside screw and loosening two outside screws on hinge pin. 4. Set door aside. NOTE The direction in which your...outside screws enough to allow hinge and shim to slide out. Door Stop Screw Door Stop Washer Hinge Pin Bottom Hinge Screws Toe Grille 7 Lift refrigerator door off center hinge pin. Remove center hinge and shim by moving the door hinges from one side to "0" and remove the electrical power ...

Complete Owner s Guide
Page 8
...cabinet flange). Look for open areas between the doors on next page). 11. Tighten center hinge pin with adjustable wrench. 10. Move freezer and refrigerator door stops to help align hinge hole. 13. Lift up on handle side of door and grasp the thinnest part of door. Gasket should seal... against the cabinet all the way around including top and bottom 8 Close refrigerator door to opposite side. Remove cabinet and hinge hole plugs and move to puncture the foam. 12. Lower freezer door onto center hinge pin....
...cabinet flange). Look for open areas between the doors on next page). 11. Tighten center hinge pin with adjustable wrench. 10. Move freezer and refrigerator door stops to help align hinge hole. 13. Lift up on handle side of door and grasp the thinnest part of door. Gasket should seal... against the cabinet all the way around including top and bottom 8 Close refrigerator door to opposite side. Remove cabinet and hinge hole plugs and move to puncture the foam. 12. Lower freezer door onto center hinge pin....

Complete Owner s Guide
Page 9
... and reinstall. 21. In this case, remove the gasket from the door by pulling it is seated into the channel. Rotate the gasket half a turn refrigerator temperature control to center position. Adjust setting as necessary. 9 Plug in the channel. 20. Use Caution and be necessary to damage the interior door panel...
... and reinstall. 21. In this case, remove the gasket from the door by pulling it is seated into the channel. Rotate the gasket half a turn refrigerator temperature control to center position. Adjust setting as necessary. 9 Plug in the channel. 20. Use Caution and be necessary to damage the interior door panel...

Complete Owner s Guide
Page 10
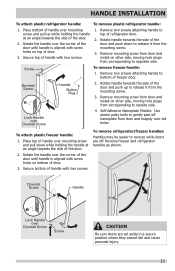
... Models Screw Handle Shoulder Screw Handle Shoulder Screw Button Plug Set Screw To attach metal freezer handle: 1. Shoulder Screw Nameplate Set Screw To attach metal refrigerator handle: 1. IMPORTANT To ensure proper installation of the handle. 10 Set Screw Shoulder Screw Set Screw Handle Screw HANDLE INSTALLATION CAUTION Wear gloves and use...
... Models Screw Handle Shoulder Screw Handle Shoulder Screw Button Plug Set Screw To attach metal freezer handle: 1. Shoulder Screw Nameplate Set Screw To attach metal refrigerator handle: 1. IMPORTANT To ensure proper installation of the handle. 10 Set Screw Shoulder Screw Set Screw Handle Screw HANDLE INSTALLATION CAUTION Wear gloves and use...
Complete Owner s Guide
Page 11
... over the corner of the door until handle is aligned with screw holes on bottom of door. 3. Reverse freezer and refrigerator handles as shown. Rotate handle towards the side of the door and push down while holding the handle at an angle...two screws. To attach plastic freezer handle: 1. To reverse refrigerator/freezer handles: Handles may be easier to bottom of refrigerator door. 2. Rotate the handle over old holes. HANDLE INSTALLATION To attach plastic refrigerator handle: To remove plastic refrigerator handle: 1. Secure top of the door. 2. Dovetail Screw ...
... over the corner of the door until handle is aligned with screw holes on bottom of door. 3. Reverse freezer and refrigerator handles as shown. Rotate handle towards the side of the door and push down while holding the handle at an angle...two screws. To attach plastic freezer handle: 1. To reverse refrigerator/freezer handles: Handles may be easier to bottom of refrigerator door. 2. Rotate the handle over old holes. HANDLE INSTALLATION To attach plastic refrigerator handle: To remove plastic refrigerator handle: 1. Secure top of the door. 2. Dovetail Screw ...

Complete Owner s Guide
Page 12
... state building codes, Frigidaire recommends for homes without an existing valve, Frigidaire recommends its Smart Choice® water line kit 5305513409 (with all local plumbing codes. Depending on water lines and associated materials prior to installing your new refrigerator. Copper Water Line with... shown). • A shutoff valve to connect the water supply line to www.frigidaire.com/store for the water supply line. Then add approximately 7 feet (2.1 meters), so the refrigerator can be responsible for any damage if plastic tubing is recommended for more information. ...
... state building codes, Frigidaire recommends for homes without an existing valve, Frigidaire recommends its Smart Choice® water line kit 5305513409 (with all local plumbing codes. Depending on water lines and associated materials prior to installing your new refrigerator. Copper Water Line with... shown). • A shutoff valve to connect the water supply line to www.frigidaire.com/store for the water supply line. Then add approximately 7 feet (2.1 meters), so the refrigerator can be responsible for any damage if plastic tubing is recommended for more information. ...
Complete Owner s Guide
Page 13
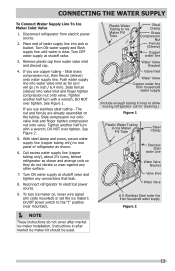
... valve inlet and finger tighten compression nut onto valve. Coil excess water supply line (copper tubing only), about 2½ turns, behind refrigerator as shown and arrange coils so they do not cover after market ice maker kit should be used. CONNECTING THE WATER SUPPLY To Connect...after market ice maker installation. If you use copper tubing - Slide ferrule (sleeve) into sink or bucket. Instructions in loop to allow moving refrigerator out for cleaning.) Figure 1 Plastic Water Tubing to electrical power source. 9. Turn ON water supply and flush supply line until water is clear....
... valve inlet and finger tighten compression nut onto valve. Coil excess water supply line (copper tubing only), about 2½ turns, behind refrigerator as shown and arrange coils so they do not cover after market ice maker kit should be used. CONNECTING THE WATER SUPPLY To Connect...after market ice maker installation. If you use copper tubing - Slide ferrule (sleeve) into sink or bucket. Instructions in loop to allow moving refrigerator out for cleaning.) Figure 1 Plastic Water Tubing to electrical power source. 9. Turn ON water supply and flush supply line until water is clear....

Complete Owner s Guide
Page 14
... in new plumbing lines may cause the ice maker to cycle two or three times before making a full tray of ice. ICE SERVICE If your refrigerator has an automatic ice maker, minimal ice will make a loud chattering noise. NOTE Automatic ice makers are also optional accessories that may be installed...
... in new plumbing lines may cause the ice maker to cycle two or three times before making a full tray of ice. ICE SERVICE If your refrigerator has an automatic ice maker, minimal ice will make a loud chattering noise. NOTE Automatic ice makers are also optional accessories that may be installed...

Complete Owner s Guide
Page 15
...both compartments. After 24 hours, adjust the controls as desired; Refrigerator Control IMPORTANT Adjusting the refrigerator temperature control to "0" turns off power to your refrigerator in small increments, allowing the temperature to maintain proper temperatures inside the refrigerator. For good circulation, do not block cold air vents with ... before loading it has no effect on , adjust control to recommended. To turn off the compressor and prevents the refrigerator from the wall outlet. This kit can be ordered by calling the phone number listed at the bottom of your...
...both compartments. After 24 hours, adjust the controls as desired; Refrigerator Control IMPORTANT Adjusting the refrigerator temperature control to "0" turns off power to your refrigerator in small increments, allowing the temperature to maintain proper temperatures inside the refrigerator. For good circulation, do not block cold air vents with ... before loading it has no effect on , adjust control to recommended. To turn off the compressor and prevents the refrigerator from the wall outlet. This kit can be ordered by calling the phone number listed at the bottom of your...
Complete Owner s Guide
Page 16
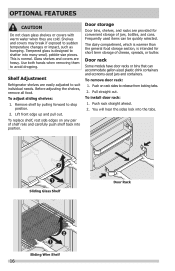
... as bumping. To remove door rack: 1. Sliding Glass Shelf Door Rack Sliding Wire Shelf 16 You will hear the sides lock into position. Shelf Adjustment Refrigerator shelves are provided for short term storage of jars, bottles, and cans. Before adjusting the shelves, remove all food. The dairy compartment, which is warmer...
... as bumping. To remove door rack: 1. Sliding Glass Shelf Door Rack Sliding Wire Shelf 16 You will hear the sides lock into position. Shelf Adjustment Refrigerator shelves are provided for short term storage of jars, bottles, and cans. Before adjusting the shelves, remove all food. The dairy compartment, which is warmer...
Complete Owner s Guide
Page 17
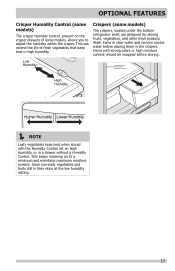
Crispers (some models) The crispers, located under the bottom refrigerator shelf, are designed for storing fruits, vegetables, and other fresh produce. Items with the Humidity Control set on the crisper drawers of fresh vegetables that ...
Crispers (some models) The crispers, located under the bottom refrigerator shelf, are designed for storing fruits, vegetables, and other fresh produce. Items with the Humidity Control set on the crisper drawers of fresh vegetables that ...
Complete Owner s Guide
Page 18
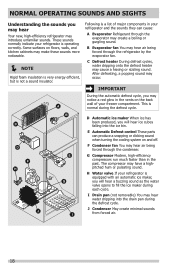
... or clicking sound when turning the cooling system on and off. B Evaporator fan You may hear air being forced through the refrigerator by the evaporator fan. IMPORTANT During the automatic defrost cycle, you will hear ice cubes falling into the drain pan during the...dripping into the ice bin. G Compressor Modern, high-efficiency compressors run much faster than in your freezer compartment. H Water valve If your refrigerator is not a sound insulator. I Drain pan (not removable) You may make these sounds more noticeable. NOTE Rigid foam insulation is...
... or clicking sound when turning the cooling system on and off. B Evaporator fan You may hear air being forced through the refrigerator by the evaporator fan. IMPORTANT During the automatic defrost cycle, you will hear ice cubes falling into the drain pan during the...dripping into the ice bin. G Compressor Modern, high-efficiency compressors run much faster than in your freezer compartment. H Water valve If your refrigerator is not a sound insulator. I Drain pan (not removable) You may make these sounds more noticeable. NOTE Rigid foam insulation is...
Complete Owner s Guide
Page 19
... your temperature controls to turn off cooling, power to lights and other electrical components will continue until you store or move your refrigerator clean maintains appearance and prevents odor build-up any removable parts in a dishwasher. • Always unplug the electrical power cord ...spills immediately and clean the freezer and fresh food compartments at least twice a year. CARE & CLEANING Protecting your investment Keeping your refrigerator in freezing temperatures, be sure to completely drain the water supply system. Do not use CHLORIDE or cleaners with wet or damp hands...
... your temperature controls to turn off cooling, power to lights and other electrical components will continue until you store or move your refrigerator clean maintains appearance and prevents odor build-up any removable parts in a dishwasher. • Always unplug the electrical power cord ...spills immediately and clean the freezer and fresh food compartments at least twice a year. CARE & CLEANING Protecting your investment Keeping your refrigerator in freezing temperatures, be sure to completely drain the water supply system. Do not use CHLORIDE or cleaners with wet or damp hands...


