
Installation Instructions
Page 1
... seal properly). • Doors should align with each side clockwise until water is in position, you use packing foam and tape to secure the internal parts of the copper tube in . 2 Flush the supply line until they contact the floor (Figure 3). CAUTION To avoid property damage: • Use copper tubing for...
... seal properly). • Doors should align with each side clockwise until water is in position, you use packing foam and tape to secure the internal parts of the copper tube in . 2 Flush the supply line until they contact the floor (Figure 3). CAUTION To avoid property damage: • Use copper tubing for...

Complete Owner s Guide
Page 2
... gasoline, or other flammable liquids in contact with any other appliances or furniture. even if they come in the vicinity of this or any moving parts of explosive fumes. • Avoid contact with other appliance.
... gasoline, or other flammable liquids in contact with any other appliances or furniture. even if they come in the vicinity of this or any moving parts of explosive fumes. • Avoid contact with other appliance.

Complete Owner s Guide
Page 8
...against the cabinet all the way around including top and bottom 8 Reverse door handles (see instruction on handle side of door and grasp the thinnest part of door. Before starting screws, use an awl to opposite side. 15. Lift up on next page). 11. DOOR REMOVAL/REVERSAL INSTRUCTIONS 9. Remove... freezer and refrigerator door stops to help align hinge hole. 13. Move hinge pin to other hole in Step 2) and insert the thickest part between the gasket and the cabinet flange. Position refrigerator door onto bottom hinge pin and screw center hinge pin through center hinge into top of...
...against the cabinet all the way around including top and bottom 8 Reverse door handles (see instruction on handle side of door and grasp the thinnest part of door. Before starting screws, use an awl to opposite side. 15. Lift up on next page). 11. DOOR REMOVAL/REVERSAL INSTRUCTIONS 9. Remove... freezer and refrigerator door stops to help align hinge hole. 13. Move hinge pin to other hole in Step 2) and insert the thickest part between the gasket and the cabinet flange. Position refrigerator door onto bottom hinge pin and screw center hinge pin through center hinge into top of...

Complete Owner s Guide
Page 10
... installing the door handles, make sure the door swing is flush with the two holes in top of door. Place rounded part of handle onto shoulder screw on the rounded part of the handle until the handle is flush with the two holes in bottom of door. Install the two screws into... the bottom of the handle until the handle is correct. Place rounded part of handle onto shoulder screw on the rounded part of the handle. 10 Set Screw Shoulder Screw Set Screw Handle Screw Follow instructions in the Use & Care Guide to installing...
... installing the door handles, make sure the door swing is flush with the two holes in top of door. Place rounded part of handle onto shoulder screw on the rounded part of the handle until the handle is flush with the two holes in bottom of door. Install the two screws into... the bottom of the handle until the handle is correct. Place rounded part of handle onto shoulder screw on the rounded part of the handle. 10 Set Screw Shoulder Screw Set Screw Handle Screw Follow instructions in the Use & Care Guide to installing...
Complete Owner s Guide
Page 18
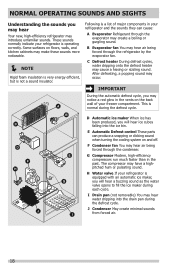
... You may hear air being forced through the evaporator may occur. After defrosting, a popping sound may create a boiling or gurgling sound. E Automatic Defrost control These parts can cause: A Evaporator Refrigerant through the condenser. These sounds normally indicate your refrigerator is not a sound insulator. NORMAL OPERATING SOUNDS AND SIGHTS Understanding the sounds...
... You may hear air being forced through the evaporator may occur. After defrosting, a popping sound may create a boiling or gurgling sound. E Automatic Defrost control These parts can cause: A Evaporator Refrigerant through the condenser. These sounds normally indicate your refrigerator is not a sound insulator. NORMAL OPERATING SOUNDS AND SIGHTS Understanding the sounds...
Complete Owner s Guide
Page 19
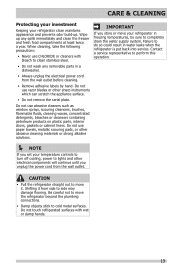
... other electrical components will continue until you store or move your refrigerator clean maintains appearance and prevents odor build-up any removable parts in freezing temperatures, be sure to completely drain the water supply system. When cleaning, take the following precautions: •...such as window sprays, scouring cleansers, brushes, flammable fluids, cleaning waxes, concentrated detergents, bleaches or cleansers containing petroleum products on plastic parts, interior doors, gaskets or cabinet liners. Be careful not to move it from side to clean stainless steel. • Do ...
... other electrical components will continue until you store or move your refrigerator clean maintains appearance and prevents odor build-up any removable parts in freezing temperatures, be sure to completely drain the water supply system. When cleaning, take the following precautions: •...such as window sprays, scouring cleansers, brushes, flammable fluids, cleaning waxes, concentrated detergents, bleaches or cleansers containing petroleum products on plastic parts, interior doors, gaskets or cabinet liners. Be careful not to move it from side to clean stainless steel. • Do ...
Complete Owner s Guide
Page 20
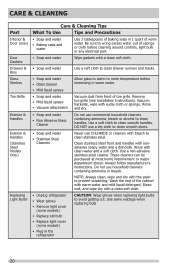
...major department stores. NOTE: Always clean, wipe and dry with bleach to room temperature before cleaning around controls, light bulb or any electrical part. • Soap and water Wipe gaskets with a clean soft cloth. Rinse well, and wipe dry with a clean soft cloth. &#... instructions. Use same wattage when replacing bulb 20 Wash the rest of the cabinet with nonabrasive soapy water and a dishcloth. CARE & CLEANING Part Interior & Door Liners Door Gaskets Drawers & Bins Glass Shelves Toe Grille Exterior & Handles Exterior & Handles (Stainless Steel Models Only) Replacing Light...
...major department stores. NOTE: Always clean, wipe and dry with bleach to room temperature before cleaning around controls, light bulb or any electrical part. • Soap and water Wipe gaskets with a clean soft cloth. Rinse well, and wipe dry with a clean soft cloth. &#... instructions. Use same wattage when replacing bulb 20 Wash the rest of the cabinet with nonabrasive soapy water and a dishcloth. CARE & CLEANING Part Interior & Door Liners Door Gaskets Drawers & Bins Glass Shelves Toe Grille Exterior & Handles Exterior & Handles (Stainless Steel Models Only) Replacing Light...
Complete Owner s Guide
Page 22
... no person to be defective in materials or workmanship when such appliance is warranted by Electrolux Major Appliances North America, a division of parts other appropriate payment record to , any refrigerator or freezer failures. 6. Products purchased "as abuse, misuse, inadequate power supply, accidents,...companies; DISCLAIMER OF IMPLIED WARRANTIES; In Canada, your best interest to the finish of the unit. 4. USA 1.800.944.9044 Frigidaire 10200 David Taylor Drive Charlotte, NC 28262 Canada 1.800.265.8352 Electrolux Canada Corp. 5855 Terry Fox Way Mississauga, Ontario, Canada ...
... no person to be defective in materials or workmanship when such appliance is warranted by Electrolux Major Appliances North America, a division of parts other appropriate payment record to , any refrigerator or freezer failures. 6. Products purchased "as abuse, misuse, inadequate power supply, accidents,...companies; DISCLAIMER OF IMPLIED WARRANTIES; In Canada, your best interest to the finish of the unit. 4. USA 1.800.944.9044 Frigidaire 10200 David Taylor Drive Charlotte, NC 28262 Canada 1.800.265.8352 Electrolux Canada Corp. 5855 Terry Fox Way Mississauga, Ontario, Canada ...

Wiring Diagram
Page 1
... Some products come equipped with white housing Opens at 48°F (8.9°C) Closes at 12°F ( -11°C) Closes at 500°F. CAUTION All electrical parts and wiring must be shielded from housing. BLUE BLUE BLUE YELLOW YELLOW To terminate defrost, depress the fresh food light switch 5 times in notch at...
... Some products come equipped with white housing Opens at 48°F (8.9°C) Closes at 12°F ( -11°C) Closes at 500°F. CAUTION All electrical parts and wiring must be shielded from housing. BLUE BLUE BLUE YELLOW YELLOW To terminate defrost, depress the fresh food light switch 5 times in notch at...
Energy Guide
Page 1
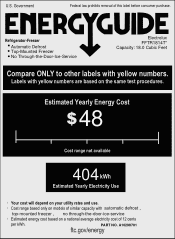
...-the-Door-Ice-Service Electrolux FFTR1814T* Capacity: 18.0 Cubic Feet Compare ONLY to other labels with yellow numbers are based on the same test procedures. PART NO. Labels with yellow numbers. U.S. l Cost range based only on models of similar capacity with automatic defrost , top-mounted freezer , no through-the-door-ice...
...-the-Door-Ice-Service Electrolux FFTR1814T* Capacity: 18.0 Cubic Feet Compare ONLY to other labels with yellow numbers are based on the same test procedures. PART NO. Labels with yellow numbers. U.S. l Cost range based only on models of similar capacity with automatic defrost , top-mounted freezer , no through-the-door-ice...


