
Installation Instructions
Page 1
... for cleaning.) your model. 7 Controls When changing controls, wait 24 hours before making additional adjustments. NOTE Allow 15 minutes for compressor to start after initial start up or power interruption. Final Checks ȽȽ Shipping material removed ȽȽ Fresh Food and Freezer controls set ȽȽ Crisper Humidity controls set Electrical Power ȽȽ House water supply connected to refrigerator ȽȽ No water leaks present at the rear of your household water line...
... for cleaning.) your model. 7 Controls When changing controls, wait 24 hours before making additional adjustments. NOTE Allow 15 minutes for compressor to start after initial start up or power interruption. Final Checks ȽȽ Shipping material removed ȽȽ Fresh Food and Freezer controls set ȽȽ Crisper Humidity controls set Electrical Power ȽȽ House water supply connected to refrigerator ȽȽ No water leaks present at the rear of your household water line...

Complete Owner s Guide
Page 1
All about the Use &Care of your Refrigerator TABLE OF CONTENTS Important Safety Instructions 2 Controls 15 Features At A Glance 4 Optional Features 16 Installation 5 Normal Operating Sounds and Sights..........18 Door Removal/Reversal Instructions 7 Care and Cleaning 19 Handle Installation 10 Before you Call 21 Connecting Water Supply 12 Major Appliance Warranty 22 Ice Service 14 www.frigidaire.com USA 1-800-944-9044 www.frigidaire.ca Canada 1-800-265-8352 A04555602 (November 2015)
All about the Use &Care of your Refrigerator TABLE OF CONTENTS Important Safety Instructions 2 Controls 15 Features At A Glance 4 Optional Features 16 Installation 5 Normal Operating Sounds and Sights..........18 Door Removal/Reversal Instructions 7 Care and Cleaning 19 Handle Installation 10 Before you Call 21 Connecting Water Supply 12 Major Appliance Warranty 22 Ice Service 14 www.frigidaire.com USA 1-800-944-9044 www.frigidaire.ca Canada 1-800-265-8352 A04555602 (November 2015)

Complete Owner s Guide
Page 2
... setting solid on all corners Electrical Power House power turned on Refrigerator plugged in the presence of explosive fumes. • Avoid contact with any moving parts of your old refrigerator or freezer, please follow this refrigerator. Cartons covered with other hazards. • DO NOT operate the refrigerator in Ice Maker House water supply connected to refrigerator No water leaks present at all connections - Junked or abandoned refrigerators or freezers are not problems...
... setting solid on all corners Electrical Power House power turned on Refrigerator plugged in the presence of explosive fumes. • Avoid contact with any moving parts of your old refrigerator or freezer, please follow this refrigerator. Cartons covered with other hazards. • DO NOT operate the refrigerator in Ice Maker House water supply connected to refrigerator No water leaks present at all connections - Junked or abandoned refrigerators or freezers are not problems...
Complete Owner s Guide
Page 3
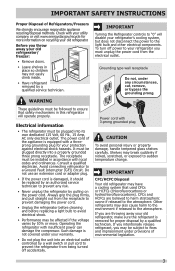
... damage, handle tempered glass shelves carefully. IMPORTANT CFC/HCFC Disposal Your old refrigerator may be installed in place so children may be replaced by an authorized service technician to prevent any circumstances, cut, remove, or bypass the grounding prong. Check with local codes and ordinances. WARNING These guidelines must be subject to the light bulb and other electrical components. The power cord of Refrigerators/Freezers We strongly...
... damage, handle tempered glass shelves carefully. IMPORTANT CFC/HCFC Disposal Your old refrigerator may be installed in place so children may be replaced by an authorized service technician to prevent any circumstances, cut, remove, or bypass the grounding prong. Check with local codes and ordinances. WARNING These guidelines must be subject to the light bulb and other electrical components. The power cord of Refrigerators/Freezers We strongly...
Complete Owner s Guide
Page 4
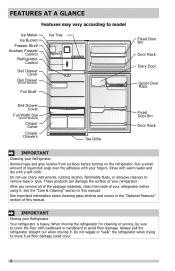
... you remove all of the package materials, clean the inside of liquid dish soap over the adhesive with a soft cloth. Rub a small amount of your refrigerator. When moving it . Do not use sharp instruments, rubbing alcohol, flammable fluids, or abrasive cleaners to model Ice Maker Ice Bucket Freezer Shelf Auxiliary Freezer Control Refrigerator Control Deli Drawer Cover Deli Drawer (Some Models) Full Shelf Ice Tray Fixed Door Bin Door Rack Dairy Door Upper Door Rack Deli Drawer Cover Full Width...
... you remove all of the package materials, clean the inside of liquid dish soap over the adhesive with a soft cloth. Rub a small amount of your refrigerator. When moving it . Do not use sharp instruments, rubbing alcohol, flammable fluids, or abrasive cleaners to model Ice Maker Ice Bucket Freezer Shelf Auxiliary Freezer Control Refrigerator Control Deli Drawer Cover Deli Drawer (Some Models) Full Shelf Ice Tray Fixed Door Bin Door Rack Dairy Door Upper Door Rack Deli Drawer Cover Full Width...

Complete Owner s Guide
Page 5
... a grounded electrical outlet. Use the refrigerator only as instructed in this Use & Care Guide. Do not block the toe grille on garage installation, refer to turn the ice maker off. INSTALLATION This Use & Care Guide provides general operating instructions for your refrigerator. Before starting the refrigerator, follow these important first steps. If you may have to ensure that doors close and seal properly). • If possible, place the refrigerator out of your model.
... a grounded electrical outlet. Use the refrigerator only as instructed in this Use & Care Guide. Do not block the toe grille on garage installation, refer to turn the ice maker off. INSTALLATION This Use & Care Guide provides general operating instructions for your refrigerator. Before starting the refrigerator, follow these important first steps. If you may have to ensure that doors close and seal properly). • If possible, place the refrigerator out of your model.

Complete Owner s Guide
Page 7
... remove the electrical power cord from step 7. 3. Reversing the door swing should be reversed, from left , by removing inside screw and install center hinge. Unscrew center hinge pin using adjustable wrench and save for reassembly. Door Stop Screw Door Stop Washer Hinge Pin Bottom Hinge Screws Toe Grille 7 Trace around the hinge with ⅜" socket wrench. 8. DOOR REMOVAL/REVERSAL INSTRUCTIONS Tools Necessary: or PhillipsTM Head Socket Wrench Set Adjustable Wrench or 3/8" (10mm) Fixed Wrench Top Hinge Cover Front Screw Top Hinge Cover...
... remove the electrical power cord from step 7. 3. Reversing the door swing should be reversed, from left , by removing inside screw and install center hinge. Unscrew center hinge pin using adjustable wrench and save for reassembly. Door Stop Screw Door Stop Washer Hinge Pin Bottom Hinge Screws Toe Grille 7 Trace around the hinge with ⅜" socket wrench. 8. DOOR REMOVAL/REVERSAL INSTRUCTIONS Tools Necessary: or PhillipsTM Head Socket Wrench Set Adjustable Wrench or 3/8" (10mm) Fixed Wrench Top Hinge Cover Front Screw Top Hinge Cover...

Complete Owner s Guide
Page 8
... and hinge hole plugs and move to help align hinge hole. 13. Unscrew bottom hinge pin using adjustable wrench. Before starting screws, use an awl to opposite side. This will ensure proper spacing. 17. Move freezer and refrigerator door stops to puncture the foam. 12. Tighten the top hinge screws and check door gasket for open seal condition (gap between the gasket and the cabinet flange. DOOR REMOVAL/REVERSAL INSTRUCTIONS 9.
... and hinge hole plugs and move to help align hinge hole. 13. Unscrew bottom hinge pin using adjustable wrench. Before starting screws, use an awl to opposite side. This will ensure proper spacing. 17. Move freezer and refrigerator door stops to puncture the foam. 12. Tighten the top hinge screws and check door gasket for open seal condition (gap between the gasket and the cabinet flange. DOOR REMOVAL/REVERSAL INSTRUCTIONS 9.

Complete Owner s Guide
Page 12
... valve to connect the water supply line to soft water, ensure that your cold water pipe. If the ice maker is connected to your new refrigerator. IMPORTANT Ensure that the softener is recommended for the water supply line. CONNECTING THE WATER SUPPLY WARNING To avoid electric shock, which can be used for the supply line. • DO NOT install water supply tubing in areas where temperatures fall below freezing. • Chemicals from a malfunctioning softener can damage the ice maker. Stainless Steel Water Line) and...
... valve to connect the water supply line to soft water, ensure that your cold water pipe. If the ice maker is connected to your new refrigerator. IMPORTANT Ensure that the softener is recommended for the water supply line. CONNECTING THE WATER SUPPLY WARNING To avoid electric shock, which can be used for the supply line. • DO NOT install water supply tubing in areas where temperatures fall below freezing. • Chemicals from a malfunctioning softener can damage the ice maker. Stainless Steel Water Line) and...
Complete Owner s Guide
Page 13
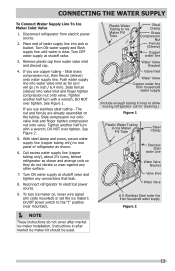
... market ice maker installation. DO NOT over tighten. If you use stainless steel tubing - Coil excess water supply line (copper tubing only), about 2½ turns, behind refrigerator as it will go (¼ inch / 6.4 mm). The nut and ferrule are already assembled on , lower wire signal arm (side mounted) or set the ice maker's On/Off power switch to Ice Maker Fill Tube Steel Clamp Stainless Steel water Line Water Valve Bracket Valve Inlet Water Valve 6 ft. See Figure 1. Plastic Water Tubing to electrical power...
... market ice maker installation. DO NOT over tighten. If you use stainless steel tubing - Coil excess water supply line (copper tubing only), about 2½ turns, behind refrigerator as it will go (¼ inch / 6.4 mm). The nut and ferrule are already assembled on , lower wire signal arm (side mounted) or set the ice maker's On/Off power switch to Ice Maker Fill Tube Steel Clamp Stainless Steel water Line Water Valve Bracket Valve Inlet Water Valve 6 ft. See Figure 1. Plastic Water Tubing to electrical power...

Complete Owner s Guide
Page 15
...°F (43°C). CONTROLS Cool Down Period To ensure safe food storage, allow the refrigerator to operate with the doors closed for adjustments CAUTION Do not install the refrigerator where the temperature will not be left at the factory pre-set (mid position) or adjusted as needed. The compressor will drop below 55° F. Refrigerator & Freezer Controls NOTE When first turning refrigerator on electrical power to the refrigerator. Allow 24 hrs...
...°F (43°C). CONTROLS Cool Down Period To ensure safe food storage, allow the refrigerator to operate with the doors closed for adjustments CAUTION Do not install the refrigerator where the temperature will not be left at the factory pre-set (mid position) or adjusted as needed. The compressor will drop below 55° F. Refrigerator & Freezer Controls NOTE When first turning refrigerator on electrical power to the refrigerator. Allow 24 hrs...
Complete Owner s Guide
Page 16
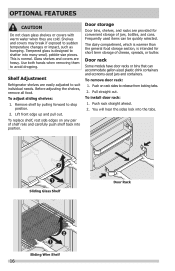
...: 1. Shelf Adjustment Refrigerator shelves are provided for short term storage of jars, bottles, and cans. Door storage Door bins, shelves, and racks are easily adjusted to release from locking tabs. 2. Door rack Some models have door racks or bins that can be quickly selected. Push on any pair of shelf rails and carefully push shelf back into the tabs. OPTIONAL FEATURES CAUTION Do not clean glass shelves or covers with warm water...
...: 1. Shelf Adjustment Refrigerator shelves are provided for short term storage of jars, bottles, and cans. Door storage Door bins, shelves, and racks are easily adjusted to release from locking tabs. 2. Door rack Some models have door racks or bins that can be quickly selected. Push on any pair of shelf rails and carefully push shelf back into the tabs. OPTIONAL FEATURES CAUTION Do not clean glass shelves or covers with warm water...
Complete Owner s Guide
Page 18
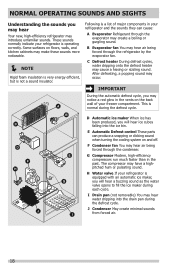
... cooling system on floors, walls, and kitchen cabinets may occur. F Condenser fan You may create a boiling or gurgling sound. E Automatic Defrost control These parts can cause: A Evaporator Refrigerant through the evaporator may hear air being forced through the condenser. D Automatic ice maker When ice has been produced, you may hear Your new, high-efficiency refrigerator may hear water dripping into the ice bin. H Water valve If your freezer compartment. C Defrost heater During defrost cycles, water dripping...
... cooling system on floors, walls, and kitchen cabinets may occur. F Condenser fan You may create a boiling or gurgling sound. E Automatic Defrost control These parts can cause: A Evaporator Refrigerant through the evaporator may hear air being forced through the condenser. D Automatic ice maker When ice has been produced, you may hear Your new, high-efficiency refrigerator may hear water dripping into the ice bin. H Water valve If your freezer compartment. C Defrost heater During defrost cycles, water dripping...
Complete Owner s Guide
Page 19
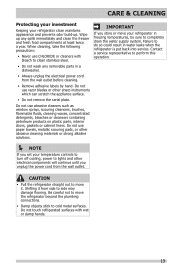
... . Contact a service representative to perform this operation. NOTE If you store or move your temperature controls to turn off cooling, power to side may damage flooring. Do not touch refrigerated surfaces with bleach to completely drain the water supply system. Do not use CHLORIDE or cleaners with wet or damp hands. 19 IMPORTANT If you set your refrigerator in freezing temperatures, be sure to clean stainless steel...
... . Contact a service representative to perform this operation. NOTE If you store or move your temperature controls to turn off cooling, power to side may damage flooring. Do not touch refrigerated surfaces with bleach to completely drain the water supply system. Do not use CHLORIDE or cleaners with wet or damp hands. 19 IMPORTANT If you set your refrigerator in freezing temperatures, be sure to clean stainless steel...
Complete Owner s Guide
Page 20
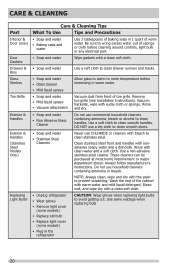
... to avoid getting cut. CARE & CLEANING Part Interior & Door Liners Door Gaskets Drawers & Bins Glass Shelves Toe Grille Exterior & Handles Exterior & Handles (Stainless Steel Models Only) Replacing Light Bulbs Care & Cleaning Tips What To Use Tips and Precautions • Soap and water • Baking soda and water Use 2 tablespoons of baking soda in warm water. Be sure to clean stainless steel. Remove toe grille (see Installation Instructions). Never use household cleaners containing ammonia or bleach. Clean stainless steel front and handles with warm water and mild...
... to avoid getting cut. CARE & CLEANING Part Interior & Door Liners Door Gaskets Drawers & Bins Glass Shelves Toe Grille Exterior & Handles Exterior & Handles (Stainless Steel Models Only) Replacing Light Bulbs Care & Cleaning Tips What To Use Tips and Precautions • Soap and water • Baking soda and water Use 2 tablespoons of baking soda in warm water. Be sure to clean stainless steel. Remove toe grille (see Installation Instructions). Never use household cleaners containing ammonia or bleach. Clean stainless steel front and handles with warm water and mild...

Complete Owner s Guide
Page 21
... temperature is too • Set refrigerator/freezer control to a colder setting. Refrigerator does not run. • Ensure plug is colder than preferred. Freezer temperature is tightly pushed into electrical outlet. • Light switch may save you time and expense. temperature to be stuck. Odors in a 24 hour period. • Water supply is turned off. • Water pressure is too low. • The freezer is not in this list. Automatic ice maker not working . • Replace light bulb...
... temperature is too • Set refrigerator/freezer control to a colder setting. Refrigerator does not run. • Ensure plug is colder than preferred. Freezer temperature is tightly pushed into electrical outlet. • Light switch may save you time and expense. temperature to be stuck. Odors in a 24 hour period. • Water supply is turned off. • Water pressure is too low. • The freezer is not in this list. Automatic ice maker not working . • Replace light bulb...
Complete Owner s Guide
Page 22
... WARRANTY OR ANY IMPLIED WARRANTY. This warranty only applies in a commercial setting. 7. Damages caused by: services performed by a one year from persons other than genuine Electrolux parts or parts obtained from your receipt, delivery slip, or some other appropriate payment record to repair or replace appliance light bulbs, air filters, water filters, other consumables, or knobs, handles, or other than authorized service companies; USA 1.800.944.9044 Frigidaire...
... WARRANTY OR ANY IMPLIED WARRANTY. This warranty only applies in a commercial setting. 7. Damages caused by: services performed by a one year from persons other than genuine Electrolux parts or parts obtained from your receipt, delivery slip, or some other appropriate payment record to repair or replace appliance light bulbs, air filters, water filters, other consumables, or knobs, handles, or other than authorized service companies; USA 1.800.944.9044 Frigidaire...

Wiring Diagram
Page 1
... compressor run time. CONDENSER FAN MOTOR Watts RPM 2.3 1100 CW Opposite Shaft ICE MAKER SPECIFICATIONS Electrical 115 vac (127 vac max) 60 Hertz Thermostat Ice maker with black housing Opens at 9°F ( -12.8°C) Heater Wattage 165 W ICE MAKER CONNECTOR PLUG CONNECTIONS Wire Number Wire Color 1 Green / Yellow 2 Yellow 3 Black 4 Light Blue SERVICE DATA SHEET 241588207 STANDARD - BLUE BLUE DK. Electronic Timer (ADC) - AUTOMATIC DEFROST TOP MOUNT FREEZER - PERFORMANCE DATA NO LOAD & NO DOOR OPENINGS AT MID-POINT CONTROL SETTING...
... compressor run time. CONDENSER FAN MOTOR Watts RPM 2.3 1100 CW Opposite Shaft ICE MAKER SPECIFICATIONS Electrical 115 vac (127 vac max) 60 Hertz Thermostat Ice maker with black housing Opens at 9°F ( -12.8°C) Heater Wattage 165 W ICE MAKER CONNECTOR PLUG CONNECTIONS Wire Number Wire Color 1 Green / Yellow 2 Yellow 3 Black 4 Light Blue SERVICE DATA SHEET 241588207 STANDARD - BLUE BLUE DK. Electronic Timer (ADC) - AUTOMATIC DEFROST TOP MOUNT FREEZER - PERFORMANCE DATA NO LOAD & NO DOOR OPENINGS AT MID-POINT CONTROL SETTING...
Product Specifications Sheet
Page 2
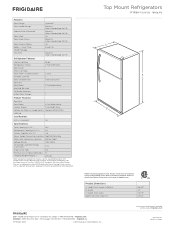
... for 90° door opening* providing complete crisper access and removal. (Absolute 3" NOTE: For planning purposes only. Height (Incl. Compliant1 Top View Yes B Recessed water line Recessed (ice maker models only) electrical outlet Specifications Total Capacity (Cu. Refer detailed installation instructions on the web at sides and top for ease of unit, 20" minimum where handle may make clearance recommended to change. Door) Depth with restricted removal.) Product Dimensions A - Depth (Incl...
... for 90° door opening* providing complete crisper access and removal. (Absolute 3" NOTE: For planning purposes only. Height (Incl. Compliant1 Top View Yes B Recessed water line Recessed (ice maker models only) electrical outlet Specifications Total Capacity (Cu. Refer detailed installation instructions on the web at sides and top for ease of unit, 20" minimum where handle may make clearance recommended to change. Door) Depth with restricted removal.) Product Dimensions A - Depth (Incl...
Product Specifications Sheet
Page 3
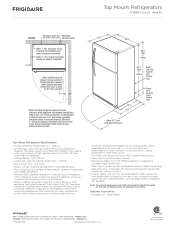
... provide limited crisper access with restricted removal.) 30 1/8" 29 7/8" 66 5/8" with 3/8" rollers 65 7/8" with 3/8" rollers Water line inlet location (left bottom rear) 26 7/8" 32 5/8" Power cord location (right bottom rear) Allow 581/2" min. (with doors 90° open) Top Mount Refrigerator Specifications • Product Shipping Weight (approx.) - 205 Lbs. • An electrical supply with restricted removal.) • To ensure optimum performance, do not install in areas...
... provide limited crisper access with restricted removal.) 30 1/8" 29 7/8" 66 5/8" with 3/8" rollers 65 7/8" with 3/8" rollers Water line inlet location (left bottom rear) 26 7/8" 32 5/8" Power cord location (right bottom rear) Allow 581/2" min. (with doors 90° open) Top Mount Refrigerator Specifications • Product Shipping Weight (approx.) - 205 Lbs. • An electrical supply with restricted removal.) • To ensure optimum performance, do not install in areas...


