Complete Owner's Guide
Page 1
All about the Use &Care of your Refrigerator 807876504 (April 2014) TABLE OF CONTENTS Important Safety Instructions 2 Controls 13 Installation 4 Normal Operating Sounds and Sights..........15 Door Removal/Reversal Instructions 6 Care and Cleaning 16 Handle Installation 8 Before you Call 18 Connecting Water Supply 10 Major Appliance Warranty 19 Ice Service 12 www.frigidaire.com USA 1-800-944-9044 www.frigidaire.ca Canada 1-800-265-8352
All about the Use &Care of your Refrigerator 807876504 (April 2014) TABLE OF CONTENTS Important Safety Instructions 2 Controls 13 Installation 4 Normal Operating Sounds and Sights..........15 Door Removal/Reversal Instructions 6 Care and Cleaning 16 Handle Installation 8 Before you Call 18 Connecting Water Supply 10 Major Appliance Warranty 19 Ice Service 12 www.frigidaire.com USA 1-800-944-9044 www.frigidaire.ca Canada 1-800-265-8352

Complete Owner's Guide
Page 2
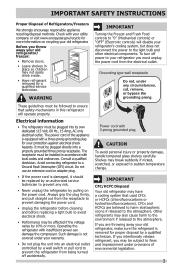
...entrapment and suffocation are still dangerous - IMPORTANT SAFETY INSTRUCTIONS WARNING Installation Checklist Please read all instructions before using this symbol to refrigerator No water leaks present at all connections - recheck in the vicinity of this or any moving parts of explosive ...maintenance information which , if not avoided, will sit for warnings regarding flammability and other hazards. • DO NOT operate the refrigerator in Ice Maker House water supply connected to avoid possible injury or death. Proper Disposal of the past. Obey ...
...entrapment and suffocation are still dangerous - IMPORTANT SAFETY INSTRUCTIONS WARNING Installation Checklist Please read all instructions before using this symbol to refrigerator No water leaks present at all connections - recheck in the vicinity of this or any moving parts of explosive ...maintenance information which , if not avoided, will sit for warnings regarding flammability and other hazards. • DO NOT operate the refrigerator in Ice Maker House water supply connected to avoid possible injury or death. Proper Disposal of the past. Obey ...
Complete Owner's Guide
Page 3
.... Always grip the plug firmly, and pull straight out from the receptacle to prevent damaging the power cord. • Unplug the refrigerator before cleaning and before replacing a light bulb to the atmosphere. Shelves may also cause harm to the environment if released to avoid ...operate properly. These guidelines must be installed in place so children may be affected if the voltage varies by pulling on recycling your old refrigerator/ freezer: • Remove doors. • Leave shelves in accordance with 3-prong grounded plug CAUTION To avoid personal injury or property ...
.... Always grip the plug firmly, and pull straight out from the receptacle to prevent damaging the power cord. • Unplug the refrigerator before cleaning and before replacing a light bulb to the atmosphere. Shelves may also cause harm to the environment if released to avoid ...operate properly. These guidelines must be installed in place so children may be affected if the voltage varies by pulling on recycling your old refrigerator/ freezer: • Remove doors. • Leave shelves in accordance with 3-prong grounded plug CAUTION To avoid personal injury or property ...
Complete Owner's Guide
Page 4
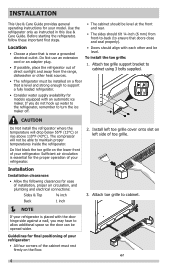
...installation, proper air circulation, and plumbing and electrical connections: Sides & Top ⅜ inch Back 1 inch NOTE If your refrigerator is level and strong enough to turn the ice maker off. INSTALLATION This Use & Care Guide provides general operating instructions for the ...proper operation of your refrigerator. Before starting the refrigerator, follow these important first steps. • The cabinet should be installed on left toe grille cover onto slot on ...
...installation, proper air circulation, and plumbing and electrical connections: Sides & Top ⅜ inch Back 1 inch NOTE If your refrigerator is level and strong enough to turn the ice maker off. INSTALLATION This Use & Care Guide provides general operating instructions for the ...proper operation of your refrigerator. Before starting the refrigerator, follow these important first steps. • The cabinet should be installed on left toe grille cover onto slot on ...
Complete Owner's Guide
Page 5
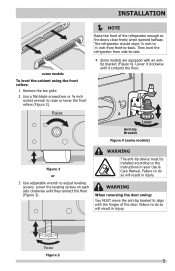
... socket wrench to raise or lower the front rollers (Figure 2). Failure to do so will result in your Use & Care Manual. Then level the refrigerator from front-to-back. Raise Figure 3 5 Failure to do so will result in injury. WARNING The anti-tip device must be installed according to the...Use adjustable wrench to adjust leveling screws. Lower the leveling screws on each side clockwise until it clockwise until they contact the floor (Figure 3). The refrigerator should slope ¼ inch to ½ inch from side-to-side. 4 Some models are equipped with the hinges of the...
... socket wrench to raise or lower the front rollers (Figure 2). Failure to do so will result in your Use & Care Manual. Then level the refrigerator from front-to-back. Raise Figure 3 5 Failure to do so will result in injury. WARNING The anti-tip device must be installed according to the...Use adjustable wrench to adjust leveling screws. Lower the leveling screws on each side clockwise until it clockwise until they contact the floor (Figure 3). The refrigerator should slope ¼ inch to ½ inch from side-to-side. 4 Some models are equipped with the hinges of the...

Complete Owner's Guide
Page 6
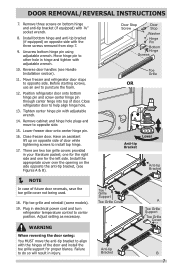
... and shim to slide out. Remove top hinge cover. Unscrew center hinge pin using adjustable wrench and save for reassembly. Lift refrigerator door off center hinge pin. Door Stop Screw Door Stop Washer Shim Hinge Pin Center Hinge Hinge Hole Plug Screws Handle Hole ... Wrench Top Hinge Screw Bottom Hinge Screw NOTE The direction in which your refrigerator doors open (door swing) can be performed by a qualified person. IMPORTANT Before you begin, turn the refrigerator temperature control to the other. Door removal and reversal instructions: 1. Remove center hinge ...
... and shim to slide out. Remove top hinge cover. Unscrew center hinge pin using adjustable wrench and save for reassembly. Lift refrigerator door off center hinge pin. Door Stop Screw Door Stop Washer Shim Hinge Pin Center Hinge Hinge Hole Plug Screws Handle Hole ... Wrench Top Hinge Screw Bottom Hinge Screw NOTE The direction in which your refrigerator doors open (door swing) can be performed by a qualified person. IMPORTANT Before you begin, turn the refrigerator temperature control to the other. Door removal and reversal instructions: 1. Remove center hinge ...
Complete Owner's Guide
Page 7
...plugs and move the anti-tip bracket to opposite side. Flip toe grille and reinstall (some models). 19. Plug in electrical power cord and turn refrigerator temperature control to do so will result in injury. Failure to center position. Reverse door handles (see Figures A & B). NOTE In ...case of door while tightening screws to other hole in your literature packet; Position refrigerator door onto bottom hinge pin and screw center hinge pin through center hinge into top of the door and install the toe grille support for...
...plugs and move the anti-tip bracket to opposite side. Flip toe grille and reinstall (some models). 19. Plug in electrical power cord and turn refrigerator temperature control to do so will result in injury. Failure to center position. Reverse door handles (see Figures A & B). NOTE In ...case of door while tightening screws to other hole in your literature packet; Position refrigerator door onto bottom hinge pin and screw center hinge pin through center hinge into top of the door and install the toe grille support for...

Complete Owner's Guide
Page 8
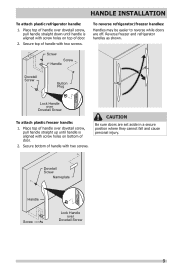
Tighten the set screw on the rounded part of the handle until the handle is correct. Shoulder Screw Nameplate Set Screw To attach metal refrigerator handle: 1. Install the two screws into the bottom of the handle. 3. Follow instructions in the Use & Care Guide to installing the handles. Do not tighten ...
Tighten the set screw on the rounded part of the handle until the handle is correct. Shoulder Screw Nameplate Set Screw To attach metal refrigerator handle: 1. Install the two screws into the bottom of the handle. 3. Follow instructions in the Use & Care Guide to installing the handles. Do not tighten ...
Complete Owner's Guide
Page 9
...handle straight up until handle is aligned with screw holes on bottom of handle with two screws. Secure top of door. 2. To reverse refrigerator/freezer handles: Handles may be easier to reverse while doors are set aside in a secure position where they cannot fall and cause personal ...injury. Reverse freezer and refrigerator handles as shown. Secure bottom of door. 2. Screw Screw Handle Dovetail Screw Button Plug Lock Handle over Dovetail Screw 9 CAUTION Be sure ...
...handle straight up until handle is aligned with screw holes on bottom of handle with two screws. Secure top of door. 2. To reverse refrigerator/freezer handles: Handles may be easier to reverse while doors are set aside in a secure position where they cannot fall and cause personal ...injury. Reverse freezer and refrigerator handles as shown. Secure bottom of door. 2. Screw Screw Handle Dovetail Screw Button Plug Lock Handle over Dovetail Screw 9 CAUTION Be sure ...
Complete Owner's Guide
Page 10
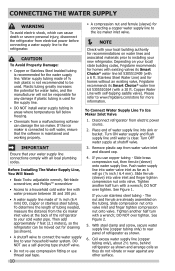
...wrench; Please refer to www.frigidaire.com/store for cleaning (as shown and arrange coils so they do not vibrate or wear against any damage if plastic tubing is connected to rear panel of water supply line into sink or bucket. Disconnect refrigerator from water valve inlet and discard... nut onto valve. Tighten another half turn with a 6 ft. Coil excess water supply line (copper tubing only), about 2½ turns, behind refrigerator as shown). • A shutoff valve to connect the water supply line to your household water system. Stainless Steel Water Line) and for homes ...
...wrench; Please refer to www.frigidaire.com/store for cleaning (as shown and arrange coils so they do not vibrate or wear against any damage if plastic tubing is connected to rear panel of water supply line into sink or bucket. Disconnect refrigerator from water valve inlet and discard... nut onto valve. Tighten another half turn with a 6 ft. Coil excess water supply line (copper tubing only), about 2½ turns, behind refrigerator as shown). • A shutoff valve to connect the water supply line to your household water system. Stainless Steel Water Line) and for homes ...
Complete Owner's Guide
Page 11
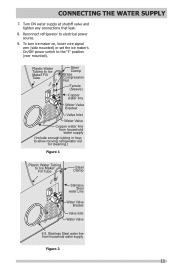
... supply Figure 2 11 Stainless Steel water line from household water supply (Include enough tubing in loop to allow moving refrigerator out for cleaning.) Figure 1 Plastic Water Tubing to electrical power source. 9. Reconnect refrigerator to Ice Maker Fill Tube Steel Clamp Stainless Steel water Line Water Valve Bracket Valve Inlet Water Valve 6 ft...
... supply Figure 2 11 Stainless Steel water line from household water supply (Include enough tubing in loop to allow moving refrigerator out for cleaning.) Figure 1 Plastic Water Tubing to electrical power source. 9. Reconnect refrigerator to Ice Maker Fill Tube Steel Clamp Stainless Steel water Line Water Valve Bracket Valve Inlet Water Valve 6 ft...
Complete Owner's Guide
Page 12
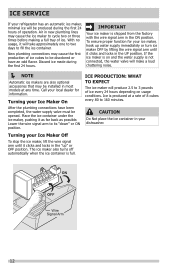
... maker, lift the wire signal arm until it clicks and locks in the ON position. ON OFF Wire Signal Arm 12 ICE SERVICE If your refrigerator has an automatic ice maker, minimal ice will be opened. Lower the wire signal arm to fill the ice container. If the ice maker is...
... maker, lift the wire signal arm until it clicks and locks in the ON position. ON OFF Wire Signal Arm 12 ICE SERVICE If your refrigerator has an automatic ice maker, minimal ice will be opened. Lower the wire signal arm to fill the ice container. If the ice maker is...
Complete Owner's Guide
Page 13
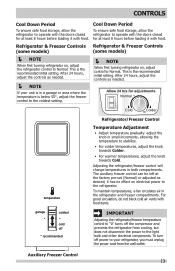
... maintain temperatures, a fan circulates air in both compartments. After 24 hours, adjust the controls as needed . NOTE If your refrigerator, you must unplug the power cord from cooling, but does not disconnect the power to the light bulb and other electrical components. For good... circulation, do not block cold air vents with food items. garage coldest cold off * recommended IMPORTANT Adjusting the refrigerator/freezer temperature control to "0" turns off power to your unit is in small increments, allowing the temperature to operate with the doors ...
... maintain temperatures, a fan circulates air in both compartments. After 24 hours, adjust the controls as needed . NOTE If your refrigerator, you must unplug the power cord from cooling, but does not disconnect the power to the light bulb and other electrical components. For good... circulation, do not block cold air vents with food items. garage coldest cold off * recommended IMPORTANT Adjusting the refrigerator/freezer temperature control to "0" turns off power to your unit is in small increments, allowing the temperature to operate with the doors ...

Complete Owner's Guide
Page 14
...set (Normal) or adjusted as desired; it has no effect on electrical power to stabilize. To turn off power to your refrigerator, you must unplug the power cord from cooling, but does not disconnect the power to "off" turns off * recommended...Adjustment • Adjust temperature gradually: adjust the knob in small increments, allowing the temperature to the refrigerator. For good circulation, do not block cold air vents with food items. IMPORTANT Adjusting the refrigerator/freezer temperature control to the light bulb and other electrical components. To maintain temperatures, a fan ...
...set (Normal) or adjusted as desired; it has no effect on electrical power to stabilize. To turn off power to your refrigerator, you must unplug the power cord from cooling, but does not disconnect the power to "off" turns off * recommended...Adjustment • Adjust temperature gradually: adjust the knob in small increments, allowing the temperature to the refrigerator. For good circulation, do not block cold air vents with food items. IMPORTANT Adjusting the refrigerator/freezer temperature control to the light bulb and other electrical components. To maintain temperatures, a fan ...
Complete Owner's Guide
Page 15
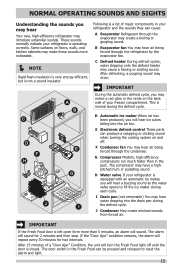
... This is not a sound insulator. D Automatic ice maker When ice has been produced, you may hear Your new, high-efficiency refrigerator may hear air being forced through the condenser. F Condenser fan You may introduce unfamiliar sounds. The compressor may create a boiling or ...buzzing sound as the water valve opens to reset the alarm and light. 15 E Electronic defrost control These parts can cause: A Evaporator Refrigerant through the evaporator may have a highpitched hum or pulsating sound. G Compressor Modern, high-efficiency compressors run much faster than 5 minutes,...
... This is not a sound insulator. D Automatic ice maker When ice has been produced, you may hear Your new, high-efficiency refrigerator may hear air being forced through the condenser. F Condenser fan You may introduce unfamiliar sounds. The compressor may create a boiling or ...buzzing sound as the water valve opens to reset the alarm and light. 15 E Electronic defrost control These parts can cause: A Evaporator Refrigerant through the evaporator may have a highpitched hum or pulsating sound. G Compressor Modern, high-efficiency compressors run much faster than 5 minutes,...
Complete Owner's Guide
Page 16
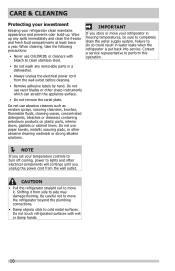
... Do not remove the serial plate. Contact a service representative to perform this operation. NOTE If you store or move your refrigerator in freezing temperatures, be sure to clean stainless steel. • Do not wash any spills immediately and clean the freezer and fresh food...or other abrasive cleaning materials or strong alkaline solutions. IMPORTANT If you set your refrigerator clean maintains appearance and prevents odor build-up any removable parts in water leaks when the refrigerator is put back into service. CARE & CLEANING Protecting your investment Keeping your ...
... Do not remove the serial plate. Contact a service representative to perform this operation. NOTE If you store or move your refrigerator in freezing temperatures, be sure to clean stainless steel. • Do not wash any spills immediately and clean the freezer and fresh food...or other abrasive cleaning materials or strong alkaline solutions. IMPORTANT If you set your refrigerator clean maintains appearance and prevents odor build-up any removable parts in water leaks when the refrigerator is put back into service. CARE & CLEANING Protecting your investment Keeping your ...

Complete Owner's Guide
Page 17
...; Mild liquid sprays • Vacuum attachment • Soap and water • Non Abrasive Glass Cleaner • Soap and water • Stainless Steel Cleaners • Unplug refrigerator • Wear gloves • Remove light cover • Replace old bulb • Replace light cover • Plug in the... refrigerator Allow glass to warm to room temperature before cleaning around controls, light bulb or any electrical part. • Soap and water Wipe gaskets with a clean ...
...; Mild liquid sprays • Vacuum attachment • Soap and water • Non Abrasive Glass Cleaner • Soap and water • Stainless Steel Cleaners • Unplug refrigerator • Wear gloves • Remove light cover • Replace old bulb • Replace light cover • Plug in the... refrigerator Allow glass to warm to room temperature before cleaning around controls, light bulb or any electrical part. • Soap and water Wipe gaskets with a clean ...
Complete Owner's Guide
Page 18
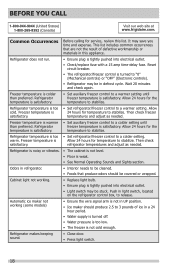
... a colder setting until freezer temperature is 24 hours for temperature to stabilize. temperature to stabilize. Then check satisfactory. refrigerator temperatures and adjust as needed . Refrigerator is noisy or vibrates. • The cabinet is not level. • Floor is colder than preferred. This...Allow cold. BEFORE YOU CALL 1-800-944-9044 (United States) 1-800-265-8352 (Canada) Visit our web site at www.frigidaire.com. Freezer temperature is weak. • See Normal Operating Sounds and Sights section. Allow 24 hours for service, review this appliance...
... a colder setting until freezer temperature is 24 hours for temperature to stabilize. temperature to stabilize. Then check satisfactory. refrigerator temperatures and adjust as needed . Refrigerator is noisy or vibrates. • The cabinet is not level. • Floor is colder than preferred. This...Allow cold. BEFORE YOU CALL 1-800-944-9044 (United States) 1-800-265-8352 (Canada) Visit our web site at www.frigidaire.com. Freezer temperature is weak. • See Normal Operating Sounds and Sights section. Allow 24 hours for service, review this appliance...
Complete Owner's Guide
Page 19
... of trim, cupboards, shelves, etc., which do not involve malfunction or defects in materials or workmanship, or for repairing or replacing any refrigerator or freezer failures. 6. USA 1.800.944.9044 Frigidaire 10200 David Taylor Drive Charlotte, NC 28262 Canada 1.800.265.8352 Electrolux Canada Corp. 5855 Terry Fox Way Mississauga, Ontario, Canada...
... of trim, cupboards, shelves, etc., which do not involve malfunction or defects in materials or workmanship, or for repairing or replacing any refrigerator or freezer failures. 6. USA 1.800.944.9044 Frigidaire 10200 David Taylor Drive Charlotte, NC 28262 Canada 1.800.265.8352 Electrolux Canada Corp. 5855 Terry Fox Way Mississauga, Ontario, Canada...

Installation Instructions
Page 1
...; After ensuring no water leaks exist at the rear of these instructions. Do not over-tighten. 7 Secure the copper tube to your refrigerator. Anti-tip Bracket Figure 4 (some models) 4 Some models are installing your dealer, provides all corners Electrical Power House water...Fresh Food and Freezer controls set Crisper Humidity controls set Registration Card sent in House power turned on your refrigerator. Do not use a self-piercing shut-off * recommended Location of your model. 7 Controls When changing controls, wait 24 hours before...
...; After ensuring no water leaks exist at the rear of these instructions. Do not over-tighten. 7 Secure the copper tube to your refrigerator. Anti-tip Bracket Figure 4 (some models) 4 Some models are installing your dealer, provides all corners Electrical Power House water...Fresh Food and Freezer controls set Crisper Humidity controls set Registration Card sent in House power turned on your refrigerator. Do not use a self-piercing shut-off * recommended Location of your model. 7 Controls When changing controls, wait 24 hours before...


