Complete Owner's Guide
Page 1
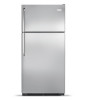
All about the Use &Care of your Refrigerator 807876504 (April 2014) TABLE OF CONTENTS Important Safety Instructions 2 Controls 13 Installation 4 Normal Operating Sounds and Sights..........15 Door Removal/Reversal Instructions 6 Care and Cleaning 16 Handle Installation 8 Before you Call 18 Connecting Water Supply 10 Major Appliance Warranty 19 Ice Service 12 www.frigidaire.com USA 1-800-944-9044 www.frigidaire.ca Canada 1-800-265-8352
All about the Use &Care of your Refrigerator 807876504 (April 2014) TABLE OF CONTENTS Important Safety Instructions 2 Controls 13 Installation 4 Normal Operating Sounds and Sights..........15 Door Removal/Reversal Instructions 6 Care and Cleaning 16 Handle Installation 8 Before you Call 18 Connecting Water Supply 10 Major Appliance Warranty 19 Ice Service 12 www.frigidaire.com USA 1-800-944-9044 www.frigidaire.ca Canada 1-800-265-8352

Complete Owner's Guide
Page 2
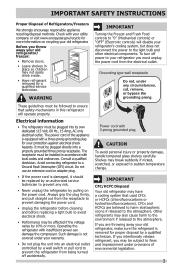
...injury or death. CAUTION CAUTION indicates a potentially hazardous situation which is the safety alert symbol. Proper Disposal of your Refrigerator or Freezer IMPORTANT IMPORTANT indicates installation, operation or maintenance information which , if not avoided, may become airtight chambers, ... flammability and other appliances or furniture. Obey all instructions before using this or any exterior wrapping material immediately after the refrigerator is turned ON Ice & water dispenser operates correctly Front filter must be flush with filter housing...
...injury or death. CAUTION CAUTION indicates a potentially hazardous situation which is the safety alert symbol. Proper Disposal of your Refrigerator or Freezer IMPORTANT IMPORTANT indicates installation, operation or maintenance information which , if not avoided, may become airtight chambers, ... flammability and other appliances or furniture. Obey all instructions before using this or any exterior wrapping material immediately after the refrigerator is turned ON Ice & water dispenser operates correctly Front filter must be flush with filter housing...
Complete Owner's Guide
Page 3
...your warranty. • Do not plug the unit into an electrical outlet controlled by a wall switch or pull cord to prevent the refrigerator from the electrical outlet. If you must unplug the power cord from being turned off power to sudden temperature change. CFCs and HCFCs ... grounding prong. Always grip the plug firmly, and pull straight out from the receptacle to prevent damaging the power cord. • Unplug the refrigerator before cleaning and before replacing a light bulb to avoid electrical shock. • Performance may also cause harm to the environment if released to...
...your warranty. • Do not plug the unit into an electrical outlet controlled by a wall switch or pull cord to prevent the refrigerator from the electrical outlet. If you must unplug the power cord from being turned off power to sudden temperature change. CFCs and HCFCs ... grounding prong. Always grip the plug firmly, and pull straight out from the receptacle to prevent damaging the power cord. • Unplug the refrigerator before cleaning and before replacing a light bulb to avoid electrical shock. • Performance may also cause harm to the environment if released to...
Complete Owner's Guide
Page 4
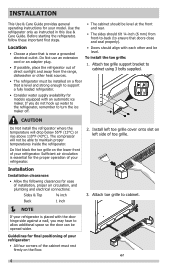
... on left side of toe grille. 3. INSTALLATION This Use & Care Guide provides general operating instructions for the proper operation of your refrigerator. or Before starting the refrigerator, follow these important first steps. • The cabinet should be level at the front and rear. • The sides should ... left toe grille cover onto slot on a floor that is essential for your model. Attach toe grille to support a fully loaded refrigerator. • Consider water supply availability for ease of direct sunlight and away from the range, dishwasher or other heat sources. • ...
... on left side of toe grille. 3. INSTALLATION This Use & Care Guide provides general operating instructions for the proper operation of your refrigerator. or Before starting the refrigerator, follow these important first steps. • The cabinet should be level at the front and rear. • The sides should ... left toe grille cover onto slot on a floor that is essential for your model. Attach toe grille to support a fully loaded refrigerator. • Consider water supply availability for ease of direct sunlight and away from the range, dishwasher or other heat sources. • ...
Complete Owner's Guide
Page 5
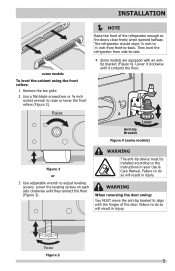
... slope ¼ inch to ½ inch from side-to-side. 4 Some models are equipped with the hinges of the refrigerator enough so the doors close freely when opened halfway. Raise Figure 3 5 Lower Anti-tip Bracket Figure 4 (some models To level the cabinet using the front ... screws. WARNING When reversing the door swing: You MUST move the anti-tip bracket to the instructions in your Use & Care Manual. Then level the refrigerator from front-to-back.
... slope ¼ inch to ½ inch from side-to-side. 4 Some models are equipped with the hinges of the refrigerator enough so the doors close freely when opened halfway. Raise Figure 3 5 Lower Anti-tip Bracket Figure 4 (some models To level the cabinet using the front ... screws. WARNING When reversing the door swing: You MUST move the anti-tip bracket to the instructions in your Use & Care Manual. Then level the refrigerator from front-to-back.

Complete Owner's Guide
Page 6
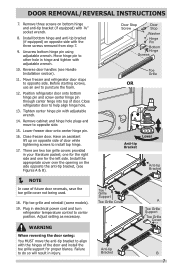
... from one side to the other. Remove top hinge cover. Unscrew center hinge pin using adjustable wrench and save for reassembly. Lift refrigerator door off center hinge pin. Trace around the hinge with a soft lead pencil. This makes reinstallation easier. Remove center hinge and ...be reversed, from left to right or right to left, by moving the door hinges from door shelves. IMPORTANT Before you begin, turn the refrigerator temperature control to "0" (Mechanical controls) or "OFF" (Electronic controls) and remove the electrical power cord from the wall outlet. Remove toe grille...
... from one side to the other. Remove top hinge cover. Unscrew center hinge pin using adjustable wrench and save for reassembly. Lift refrigerator door off center hinge pin. Trace around the hinge with a soft lead pencil. This makes reinstallation easier. Remove center hinge and ...be reversed, from left to right or right to left, by moving the door hinges from door shelves. IMPORTANT Before you begin, turn the refrigerator temperature control to "0" (Mechanical controls) or "OFF" (Electronic controls) and remove the electrical power cord from the wall outlet. Remove toe grille...
Complete Owner's Guide
Page 7
...bottom hinge pin and screw center hinge pin through center hinge into top of door while tightening screws to install top hinge. 17. Close refrigerator door to other hole in injury. Remove cabinet and hinge hole plugs and move the anti-tip bracket to opposite side. Adjust setting ...and anti-tip bracket (if equipped) with the hinges of future door reversals, save the toe grille cover not being used. 18. Move freezer and refrigerator door stops to align with ⅜" socket wrench. 8. Tighten center hinge pin with the three screws removed from step 7. 9. Unscrew bottom hinge pin...
...bottom hinge pin and screw center hinge pin through center hinge into top of door while tightening screws to install top hinge. 17. Close refrigerator door to other hole in injury. Remove cabinet and hinge hole plugs and move the anti-tip bracket to opposite side. Adjust setting ...and anti-tip bracket (if equipped) with the hinges of future door reversals, save the toe grille cover not being used. 18. Move freezer and refrigerator door stops to align with ⅜" socket wrench. 8. Tighten center hinge pin with the three screws removed from step 7. 9. Unscrew bottom hinge pin...

Complete Owner's Guide
Page 8
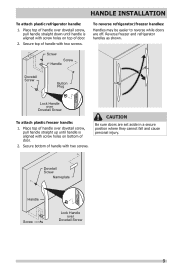
... Models Screw Handle Shoulder Screw Handle Shoulder Screw Button Plug Set Screw To attach metal freezer handle: 1. Shoulder Screw Nameplate Set Screw To attach metal refrigerator handle: 1. Place rounded part of handle onto shoulder screw on the rounded part of handles, please review these handles. Your model will have either a right...
... Models Screw Handle Shoulder Screw Handle Shoulder Screw Button Plug Set Screw To attach metal freezer handle: 1. Shoulder Screw Nameplate Set Screw To attach metal refrigerator handle: 1. Place rounded part of handle onto shoulder screw on the rounded part of handles, please review these handles. Your model will have either a right...
Complete Owner's Guide
Page 9
... plastic freezer handle: 1. CAUTION Be sure doors are off. Secure top of handle with two screws. Reverse freezer and refrigerator handles as shown. HANDLE INSTALLATION To attach plastic refrigerator handle: 1. To reverse refrigerator/freezer handles: Handles may be easier to reverse while doors are set aside in a secure position where they cannot fall...
... plastic freezer handle: 1. CAUTION Be sure doors are off. Secure top of handle with two screws. Reverse freezer and refrigerator handles as shown. HANDLE INSTALLATION To attach plastic refrigerator handle: 1. To reverse refrigerator/freezer handles: Handles may be easier to reverse while doors are set aside in a secure position where they cannot fall...
Complete Owner's Guide
Page 10
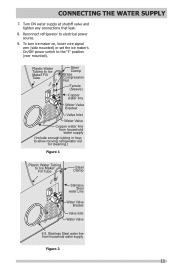
...the ice maker is maintained and working properly. Disconnect refrigerator from water valve inlet and discard cap. 4. Turn ON water supply and flush supply line until water is recommended for homes without an existing valve, Frigidaire recommends its Smart Choice® water line kit 5305513409 ... be responsible for any other surface. To determine the length of refrigerator as shown). • A shutoff valve to connect the water supply line to the refrigerator. Depending on your local/ state building codes, Frigidaire recommends for the supply line. • DO NOT install water ...
...the ice maker is maintained and working properly. Disconnect refrigerator from water valve inlet and discard cap. 4. Turn ON water supply and flush supply line until water is recommended for homes without an existing valve, Frigidaire recommends its Smart Choice® water line kit 5305513409 ... be responsible for any other surface. To determine the length of refrigerator as shown). • A shutoff valve to connect the water supply line to the refrigerator. Depending on your local/ state building codes, Frigidaire recommends for the supply line. • DO NOT install water ...
Complete Owner's Guide
Page 11
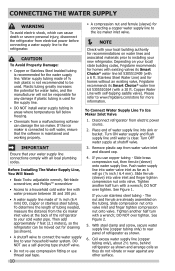
... Line Water Valve Bracket Valve Inlet Water Valve 6 ft. Stainless Steel water line from household water supply (Include enough tubing in loop to allow moving refrigerator out for cleaning.) Figure 1 Plastic Water Tubing to Ice Maker Fill Tube Steel Clamp Brass Compression Nut Ferrule (Sleeve) Copper water line Water Valve Bracket...
... Line Water Valve Bracket Valve Inlet Water Valve 6 ft. Stainless Steel water line from household water supply (Include enough tubing in loop to allow moving refrigerator out for cleaning.) Figure 1 Plastic Water Tubing to Ice Maker Fill Tube Steel Clamp Brass Compression Nut Ferrule (Sleeve) Copper water line Water Valve Bracket...
Complete Owner's Guide
Page 12
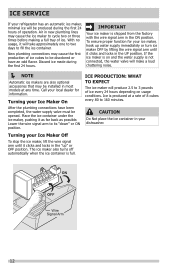
... until it clicks and locks in new plumbing lines may cause the first production of ice. Air in the UP position. ICE SERVICE If your refrigerator has an automatic ice maker, minimal ice will be opened. IMPORTANT Your ice maker is full. ON OFF Wire Signal Arm 12 With no usage...
... until it clicks and locks in new plumbing lines may cause the first production of ice. Air in the UP position. ICE SERVICE If your refrigerator has an automatic ice maker, minimal ice will be opened. IMPORTANT Your ice maker is full. ON OFF Wire Signal Arm 12 With no usage...
Complete Owner's Guide
Page 13
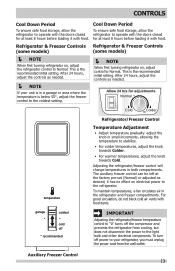
...knob towards Cold. For good circulation, do not block cold air vents with food. To turn off the compressor and prevents the refrigerator from the wall outlet. The auxiliary freezer control can be left at the factory pre-set (Normal) or adjusted as needed .... This is the recommended initial setting. Allow 24 hrs for adjustments Normal Cold Colder temperature Refrigerator/Freezer Control Temperature Adjustment • Adjust temperature gradually: adjust the knob in both compartments. CONTROLS Cool Down Period To ensure safe food...
...knob towards Cold. For good circulation, do not block cold air vents with food. To turn off the compressor and prevents the refrigerator from the wall outlet. The auxiliary freezer control can be left at the factory pre-set (Normal) or adjusted as needed .... This is the recommended initial setting. Allow 24 hrs for adjustments Normal Cold Colder temperature Refrigerator/Freezer Control Temperature Adjustment • Adjust temperature gradually: adjust the knob in both compartments. CONTROLS Cool Down Period To ensure safe food...

Complete Owner's Guide
Page 14
... To maintain temperatures, a fan circulates air in small increments, allowing the temperature to your refrigerator, you must unplug the power cord from cooling, but does not disconnect the power to the refrigerator. The auxiliary freezer control can be left at the factory pre-set (Normal) or adjusted... as desired; To turn off the compressor and prevents the refrigerator from the wall outlet. 14 it has no effect on electrical power to the light bulb and other electrical components. CONTROLS temperature coldest...
... To maintain temperatures, a fan circulates air in small increments, allowing the temperature to your refrigerator, you must unplug the power cord from cooling, but does not disconnect the power to the refrigerator. The auxiliary freezer control can be left at the factory pre-set (Normal) or adjusted... as desired; To turn off the compressor and prevents the refrigerator from the wall outlet. 14 it has no effect on electrical power to the light bulb and other electrical components. CONTROLS temperature coldest...
Complete Owner's Guide
Page 15
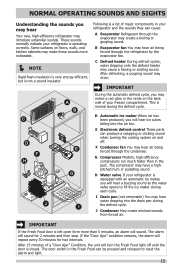
...the defrost heater may have a highpitched hum or pulsating sound. After defrosting, a popping sound may hear air being forced through the refrigerator by the evaporator fan. G Compressor Modern, high-efficiency compressors run much faster than 5 minutes, an alarm will sound. The alarm ...form more noticeable. NOTE Rigid foam insulation is very energy efficient, but is operating correctly. The door switch in your refrigerator is not a sound insulator. After 15 minutes of major components in the Fresh Food can produce a snapping or clicking sound when ...
...the defrost heater may have a highpitched hum or pulsating sound. After defrosting, a popping sound may hear air being forced through the refrigerator by the evaporator fan. G Compressor Modern, high-efficiency compressors run much faster than 5 minutes, an alarm will sound. The alarm ...form more noticeable. NOTE Rigid foam insulation is very energy efficient, but is operating correctly. The door switch in your refrigerator is not a sound insulator. After 15 minutes of major components in the Fresh Food can produce a snapping or clicking sound when ...
Complete Owner's Guide
Page 16
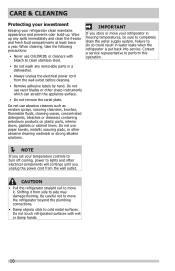
...interior doors, gaskets or cabinet liners. Shifting it . CARE & CLEANING Protecting your investment Keeping your refrigerator in water leaks when the refrigerator is put back into service. Do not touch refrigerated surfaces with bleach to side may damage flooring. Failure to move it from side to clean stainless ...to turn off cooling, power to lights and other electrical components will continue until you store or move the refrigerator beyond the plumbing connections. • Damp objects stick to completely drain the water supply system. CAUTION • Pull the...
...interior doors, gaskets or cabinet liners. Shifting it . CARE & CLEANING Protecting your investment Keeping your refrigerator in water leaks when the refrigerator is put back into service. Do not touch refrigerated surfaces with bleach to side may damage flooring. Failure to move it from side to clean stainless ...to turn off cooling, power to lights and other electrical components will continue until you store or move the refrigerator beyond the plumbing connections. • Damp objects stick to completely drain the water supply system. CAUTION • Pull the...

Complete Owner's Guide
Page 17
...; Mild liquid sprays • Vacuum attachment • Soap and water • Non Abrasive Glass Cleaner • Soap and water • Stainless Steel Cleaners • Unplug refrigerator • Wear gloves • Remove light cover • Replace old bulb • Replace light cover • Plug in the... refrigerator Allow glass to warm to clean handles. Wash the rest of toe grille. Rinse well, and wipe dry with sudsy cloth or sponge. CARE & CLEANING ...
...; Mild liquid sprays • Vacuum attachment • Soap and water • Non Abrasive Glass Cleaner • Soap and water • Stainless Steel Cleaners • Unplug refrigerator • Wear gloves • Remove light cover • Replace old bulb • Replace light cover • Plug in the... refrigerator Allow glass to warm to clean handles. Wash the rest of toe grille. Rinse well, and wipe dry with sudsy cloth or sponge. CARE & CLEANING ...
Complete Owner's Guide
Page 18
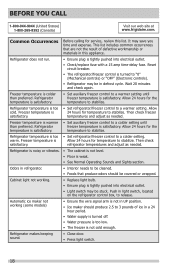
...-944-9044 (United States) 1-800-265-8352 (Canada) Visit our web site at www.frigidaire.com. Common Occurrences Before calling for temperature to a colder setting. It may save you time and expense. Wait 20 minutes and check again. Refrigerator temperature is satisfactory. • Set auxiliary freezer control to "0" (Mechanical controls) or "OFF...
...-944-9044 (United States) 1-800-265-8352 (Canada) Visit our web site at www.frigidaire.com. Common Occurrences Before calling for temperature to a colder setting. It may save you time and expense. Wait 20 minutes and check again. Refrigerator temperature is satisfactory. • Set auxiliary freezer control to "0" (Mechanical controls) or "OFF...
Complete Owner's Guide
Page 19
... obligations under this warranty. 5. THIS WRITTEN WARRANTY GIVES YOU SPECIFIC LEGAL RIGHTS. Obligations for service calls to change or add to any refrigerator or freezer failures. 6. USA 1.800.944.9044 Frigidaire 10200 David Taylor Drive Charlotte, NC 28262 Canada 1.800.265.8352 Electrolux Canada Corp. 5855 Terry Fox Way Mississauga, Ontario, Canada...
... obligations under this warranty. 5. THIS WRITTEN WARRANTY GIVES YOU SPECIFIC LEGAL RIGHTS. Obligations for service calls to change or add to any refrigerator or freezer failures. 6. USA 1.800.944.9044 Frigidaire 10200 David Taylor Drive Charlotte, NC 28262 Canada 1.800.265.8352 Electrolux Canada Corp. 5855 Terry Fox Way Mississauga, Ontario, Canada...

Installation Instructions
Page 1
...new appliance is larger than an entrance, consider two options: • Remove the entrance door if one exists. • Remove the refrigerator doors (see "Door Removal Instructions" in injury. Final Checks Shipping material removed Fresh Food and Freezer controls set...; A compression nut and ferrule (sleeve) for the water supply connection at the rear of these minimum guidelines in your refrigerator's compressor. 2 Transport Unpackaged Refrigerator To Site By now, you have already removed your model. 7 Controls When changing controls, wait 24 hours before making ...
...new appliance is larger than an entrance, consider two options: • Remove the entrance door if one exists. • Remove the refrigerator doors (see "Door Removal Instructions" in injury. Final Checks Shipping material removed Fresh Food and Freezer controls set...; A compression nut and ferrule (sleeve) for the water supply connection at the rear of these minimum guidelines in your refrigerator's compressor. 2 Transport Unpackaged Refrigerator To Site By now, you have already removed your model. 7 Controls When changing controls, wait 24 hours before making ...


