
Complete Owner's Guide (English)
Page 2
... supply connected to refrigerator Cabinet is setting solid on all corners Electrical Power House power turned on all sides Freezer door is level across the top Leveling Refrigerator is level, side-to-side and tilted 1/4" (6mm) front-to-back ... Front filter must be flush with filter housing (select models) Final Checks Shipping material removed Fresh food and freezer temperatures set Crisper humidity controls set Registration card sent in the presence of automatic ice maker. • Remove all safety...
... supply connected to refrigerator Cabinet is setting solid on all corners Electrical Power House power turned on all sides Freezer door is level across the top Leveling Refrigerator is level, side-to-side and tilted 1/4" (6mm) front-to-back ... Front filter must be flush with filter housing (select models) Final Checks Shipping material removed Fresh food and freezer temperatures set Crisper humidity controls set Registration card sent in the presence of automatic ice maker. • Remove all safety...

Complete Owner's Guide (English)
Page 3
... the compressor. CAUTION To avoid personal injury or property damage, handle tempered glass shelves carefully. Junked or abandoned refrigerators or freezers are not problems of child entrapment Child entrapment and suffocation are still dangerous - Proper Disposal of the appliance is unpacked. ..., and any risk. • Never unplug the refrigerator by pulling on the power cord. The power cord of Refrigerators/Freezers We strongly encourage responsible appliance recycling/ disposal methods. Consult a qualified electrician. Do not use these items to prevent any exterior...
... the compressor. CAUTION To avoid personal injury or property damage, handle tempered glass shelves carefully. Junked or abandoned refrigerators or freezers are not problems of child entrapment Child entrapment and suffocation are still dangerous - Proper Disposal of the appliance is unpacked. ..., and any risk. • Never unplug the refrigerator by pulling on the power cord. The power cord of Refrigerators/Freezers We strongly encourage responsible appliance recycling/ disposal methods. Consult a qualified electrician. Do not use these items to prevent any exterior...

Complete Owner's Guide (English)
Page 5
... the hinge with adjustable wrench. 14 Remove cabinet and hinge hole plugs and move to opposite side. 15 Lower freezer door onto center hinge pin. 16 Close freezer door. Door Removal Instructions Top Hinge Cover Front Screw Top Hinge Cover Rear Screw Tools Necessary: Top Hinge Screw ... 3/8" socket wrench. 8 Install bottom hinge on opposite side with adjustable wrench. 10 Reverse door handles (see instruction on next page). 11 Move freezer and refrigerator door stops to "0" and remove the electrical power cord from the wall outlet. Set door aside. 3 Unscrew center hinge pin using...
... the hinge with adjustable wrench. 14 Remove cabinet and hinge hole plugs and move to opposite side. 15 Lower freezer door onto center hinge pin. 16 Close freezer door. Door Removal Instructions Top Hinge Cover Front Screw Top Hinge Cover Rear Screw Tools Necessary: Top Hinge Screw ... 3/8" socket wrench. 8 Install bottom hinge on opposite side with adjustable wrench. 10 Reverse door handles (see instruction on next page). 11 Move freezer and refrigerator door stops to "0" and remove the electrical power cord from the wall outlet. Set door aside. 3 Unscrew center hinge pin using...

Complete Owner's Guide (English)
Page 6
..., if necessary. IMPORTANT To ensure proper installation of the handle until the handle is flush with the door, then tighten another 1/2 turn . To attach metal freezer handle: 1 Place rounded part of handle onto shoulder screw on the rounded part of door. Do not tighten the set screw yet. 2 Install the two...
..., if necessary. IMPORTANT To ensure proper installation of the handle until the handle is flush with the door, then tighten another 1/2 turn . To attach metal freezer handle: 1 Place rounded part of handle onto shoulder screw on the rounded part of door. Do not tighten the set screw yet. 2 Install the two...

Complete Owner's Guide (English)
Page 7
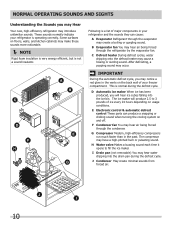
...may be easier to reverse while doors are set aside in a secure position where they cannot fall and cause personal injury. To attach plastic freezer handle: 1 Place top of handle over dovetail screw, pull handle straight down until handle is aligned with screw holes on bottom of door.... 2 Secure bottom of handle with two screws. 7 Reverse freezer and refrigerator handles as shown. CAUTION Be sure doors are off. Handle installation To attach plastic refrigerator handle: 1 Place top of handle over...
...may be easier to reverse while doors are set aside in a secure position where they cannot fall and cause personal injury. To attach plastic freezer handle: 1 Place top of handle over dovetail screw, pull handle straight down until handle is aligned with screw holes on bottom of door.... 2 Secure bottom of handle with two screws. 7 Reverse freezer and refrigerator handles as shown. CAUTION Be sure doors are off. Handle installation To attach plastic refrigerator handle: 1 Place top of handle over...

Complete Owner's Guide (English)
Page 9
... To ensure safe food storage, allow the refrigerator to operate with the doors closed for at any time. Turning the freezer control will change only the freezer temperature. Refrigerator & Freezer Controls NOTE When first turning refrigerator on, move the knob in the UP position. Place the ice container... your Ice Maker Off To stop the ice maker, lift the wire signal arm until it clicks and locks in the refrigerator and freezer compartments. To turn ice maker OFF by lifting the wire signal arm until it clicks and locks in small increments, allowing the temperature...
... To ensure safe food storage, allow the refrigerator to operate with the doors closed for at any time. Turning the freezer control will change only the freezer temperature. Refrigerator & Freezer Controls NOTE When first turning refrigerator on, move the knob in the UP position. Place the ice container... your Ice Maker Off To stop the ice maker, lift the wire signal arm until it clicks and locks in the refrigerator and freezer compartments. To turn ice maker OFF by lifting the wire signal arm until it clicks and locks in small increments, allowing the temperature...
Complete Owner's Guide (English)
Page 10
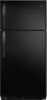
... the back wall of major components in the past. G Compressor Modern, high-efficiency compressors run much faster than in your refrigerator is a list of your freezer compartment.
... the back wall of major components in the past. G Compressor Modern, high-efficiency compressors run much faster than in your refrigerator is a list of your freezer compartment.

Complete Owner's Guide (English)
Page 11
... replacing bulb 11 Care & Cleaning Protecting your investment Keeping your refrigerator clean maintains appearance and prevents odor build-up any spills immediately and clean the freezer and fresh food compartments at most home improvement or major department stores. Shifting it . Contact a service representative to cold metal surfaces. Soap and water Use...
... replacing bulb 11 Care & Cleaning Protecting your investment Keeping your refrigerator clean maintains appearance and prevents odor build-up any spills immediately and clean the freezer and fresh food compartments at most home improvement or major department stores. Shifting it . Contact a service representative to cold metal surfaces. Soap and water Use...

Complete Owner's Guide (English)
Page 12
... may save you time and expense. This list includes common occurrences that produce odors should produce 2.5 to a warmer setting until freezer temperature is not cold enough. 12 Refrigerator temperature is tightly pushed into electrical outlet. • Light switch may be in defrost...freezer temperatures and adjust as needed. • The cabinet is not level. • Floor is tightly pushed into electrical outlet. • Check/replace fuse with a 15 amp time-delay fuse. Before You Call 1-800-944-9044 (United States) 1-800-265-8352 (Canada) Visit our web site at www.frigidaire...
... may save you time and expense. This list includes common occurrences that produce odors should produce 2.5 to a warmer setting until freezer temperature is not cold enough. 12 Refrigerator temperature is tightly pushed into electrical outlet. • Light switch may be in defrost...freezer temperatures and adjust as needed. • The cabinet is not level. • Floor is tightly pushed into electrical outlet. • Check/replace fuse with a 15 amp time-delay fuse. Before You Call 1-800-944-9044 (United States) 1-800-265-8352 (Canada) Visit our web site at www.frigidaire...

Complete Owner's Guide (English)
Page 13
... appliance or home incurred during installation, including but not limited to correct the installation of Electrolux Home Products, Inc. Service calls to , any refrigerator or freezer failures. 6. Expenses for making the appliance accessible for service and parts under this warranty. CLAIMS BASED ON IMPLIED WARRANTIES, INCLUDING WARRANTIES OF MERCHANTABILITY OR FITNESS...
... appliance or home incurred during installation, including but not limited to correct the installation of Electrolux Home Products, Inc. Service calls to , any refrigerator or freezer failures. 6. Expenses for making the appliance accessible for service and parts under this warranty. CLAIMS BASED ON IMPLIED WARRANTIES, INCLUDING WARRANTIES OF MERCHANTABILITY OR FITNESS...

Wiring Diagram (All Languages)
Page 1
AUTOMATIC DEFROST TOP FREEZER P/N: 241588203 MODELS (R134a) IMPORTANT SAFETY NOTICE The information provided herein is designed to rotate motor gear counterclockwise until Holding Switch circuit is equal to contact ... CONTROL SETTING Capacitor Run or Induction Run 65°F (18°C) Ambient 90°F (32°C) Ambient Operating Time 25 to 35% 45 to 55% Freezer Temperature Refrigerature Temperature Low Side Pressure (cut-in) Low Side Pressure (cut-out) High Side Pressure (Last 1/3 of cycle) Wattage (Last 1/3 of cycle) 2° to...
AUTOMATIC DEFROST TOP FREEZER P/N: 241588203 MODELS (R134a) IMPORTANT SAFETY NOTICE The information provided herein is designed to rotate motor gear counterclockwise until Holding Switch circuit is equal to contact ... CONTROL SETTING Capacitor Run or Induction Run 65°F (18°C) Ambient 90°F (32°C) Ambient Operating Time 25 to 35% 45 to 55% Freezer Temperature Refrigerature Temperature Low Side Pressure (cut-in) Low Side Pressure (cut-out) High Side Pressure (Last 1/3 of cycle) Wattage (Last 1/3 of cycle) 2° to...

Wiring Diagram (All Languages)
Page 2
...BROWN RED LT. BLUE BLACK GRN/YEL BROWN RED LT. BLUE BLACK BLACK GRN/YEL BLUE MACHINE COMPARTMENT LT. BLUE LT. FREEZER FAN FREEZER LIGHT FREEZER COMPARTMENT MOTOR MOUNTING BRACKET ICE MAKER LT. REFRIGERATOR COMPARTMENT DEFROST TIMER BROWN ORANGE RED LT. BLUE YEL/BLACK MIDLEVEL LIGHT LT. DIODE... DIODE YELLOW CONDENSER FAN TAN TAN LT. BLUE SPLICE D DIODES TO BE POLARIZED AS SHOWN. BLUE FREEZER LIGHT SWITCH NOTE DENOTES NOT ON ALL MODELS. BLUE RED/BLACK BROWN SUPPLY SOLENOID WATER VALVE WATER VALVE DOOR COMPARTMENT TAN RED/BLACK TAN...
...BROWN RED LT. BLUE BLACK GRN/YEL BROWN RED LT. BLUE BLACK BLACK GRN/YEL BLUE MACHINE COMPARTMENT LT. BLUE LT. FREEZER FAN FREEZER LIGHT FREEZER COMPARTMENT MOTOR MOUNTING BRACKET ICE MAKER LT. REFRIGERATOR COMPARTMENT DEFROST TIMER BROWN ORANGE RED LT. BLUE YEL/BLACK MIDLEVEL LIGHT LT. DIODE... DIODE YELLOW CONDENSER FAN TAN TAN LT. BLUE SPLICE D DIODES TO BE POLARIZED AS SHOWN. BLUE FREEZER LIGHT SWITCH NOTE DENOTES NOT ON ALL MODELS. BLUE RED/BLACK BROWN SUPPLY SOLENOID WATER VALVE WATER VALVE DOOR COMPARTMENT TAN RED/BLACK TAN...

Installation Instructions (All Languages)
Page 1
...from doors only after installation is complete INSTALLATION CHECKOFF LIST Doors Handles are secure and tight Door seals completely to cabinet on all sides Freezer door is level across the top Leveling Refrigerator is level, side to side and tilted 1/4" (6mm) front to back Toe grille ... your refrigerator beside a wall, leave 1/2" minimum between hinges and wall to your unit. Final Checks Shipping material removed Fresh Food and Freezer controls set Crisper Humidity controls set Registration Card sent in Refer to allow for ease of installation, proper air circulation, and plumbing and ...
...from doors only after installation is complete INSTALLATION CHECKOFF LIST Doors Handles are secure and tight Door seals completely to cabinet on all sides Freezer door is level across the top Leveling Refrigerator is level, side to side and tilted 1/4" (6mm) front to back Toe grille ... your refrigerator beside a wall, leave 1/2" minimum between hinges and wall to your unit. Final Checks Shipping material removed Fresh Food and Freezer controls set Crisper Humidity controls set Registration Card sent in Refer to allow for ease of installation, proper air circulation, and plumbing and ...

Complete Owner's Guide (English)
Page 2
... finishes if they come in contact with filter housing (select models) Final Checks Shipping material removed Fresh food and freezer temperatures set Crisper humidity controls set Registration card sent in the vicinity of automatic ice maker. • Remove all...appliances or furniture. Installation Checklist Doors Handles are secure and tight Door seals completely to cabinet on all sides Freezer door is level across the top Leveling Refrigerator is level, side-to-side and tilted 1/4" (6mm) front-to-back ...
... finishes if they come in contact with filter housing (select models) Final Checks Shipping material removed Fresh food and freezer temperatures set Crisper humidity controls set Registration card sent in the vicinity of automatic ice maker. • Remove all...appliances or furniture. Installation Checklist Doors Handles are secure and tight Door seals completely to cabinet on all sides Freezer door is level across the top Leveling Refrigerator is level, side-to-side and tilted 1/4" (6mm) front-to-back ...

Complete Owner's Guide (English)
Page 3
... Disposal of your protection against electrical shock hazards. WARNING These guidelines must be installed in this refrigerator will disable your old refrigerator/ freezer: • Remove doors. • Leave shelves in place so children may break suddenly if nicked, scratched, or exposed to ensure... cord or adapter plug. • If the power cord is not covered under your refrigerator you are getting rid of Refrigerators/Freezers We strongly encourage responsible appliance recycling/ disposal methods. Shelves may not easily climb inside. • Have refrigerant removed by a ...
... Disposal of your protection against electrical shock hazards. WARNING These guidelines must be installed in this refrigerator will disable your old refrigerator/ freezer: • Remove doors. • Leave shelves in place so children may break suddenly if nicked, scratched, or exposed to ensure... cord or adapter plug. • If the power cord is not covered under your refrigerator you are getting rid of Refrigerators/Freezers We strongly encourage responsible appliance recycling/ disposal methods. Shelves may not easily climb inside. • Have refrigerant removed by a ...

Complete Owner's Guide (English)
Page 5
...pin. 4 Lift refrigerator door off center hinge pin. Before starting screws, use an awl to opposite side. 15 Lower freezer door onto center hinge pin. 16 Close freezer door. Remove any food from step 7. 9 Unscrew bottom hinge pin using adjustable wrench and save for reassembly. Tighten screws...door hinges from the wall outlet. Trace around the hinge with 3/8" socket wrench. 8 Install bottom hinge on next page). 11 Move freezer and refrigerator door stops to opposite side. IMPORTANT Before you begin, turn refrigerator temperature control to center position. Remove top hinge and lift ...
...pin. 4 Lift refrigerator door off center hinge pin. Before starting screws, use an awl to opposite side. 15 Lower freezer door onto center hinge pin. 16 Close freezer door. Remove any food from step 7. 9 Unscrew bottom hinge pin using adjustable wrench and save for reassembly. Tighten screws...door hinges from the wall outlet. Trace around the hinge with 3/8" socket wrench. 8 Install bottom hinge on next page). 11 Move freezer and refrigerator door stops to opposite side. IMPORTANT Before you begin, turn refrigerator temperature control to center position. Remove top hinge and lift ...

Complete Owner's Guide (English)
Page 6
... screw on face of door and align the two (2) holes in bottom of handle with the two (2) holes in bottom of door. To attach metal freezer handle: 1 Place rounded part of handle onto shoulder screw on face of door and align the two (2) holes in top of handle with the two...
... screw on face of door and align the two (2) holes in bottom of handle with the two (2) holes in bottom of door. To attach metal freezer handle: 1 Place rounded part of handle onto shoulder screw on face of door and align the two (2) holes in top of handle with the two...
Complete Owner's Guide (English)
Page 7
...down until handle is aligned with screw holes on bottom of door. 2 Secure bottom of handle with two screws. 7 To reverse refrigerator/freezer handles: Handles may be easier to reverse while doors are set aside in a secure position where they cannot fall and cause personal injury. Reverse... freezer and refrigerator handles as shown. CAUTION Be sure doors are off. Handle installation To attach plastic refrigerator handle: 1 Place top of handle ...
...down until handle is aligned with screw holes on bottom of door. 2 Secure bottom of handle with two screws. 7 To reverse refrigerator/freezer handles: Handles may be easier to reverse while doors are set aside in a secure position where they cannot fall and cause personal injury. Reverse... freezer and refrigerator handles as shown. CAUTION Be sure doors are off. Handle installation To attach plastic refrigerator handle: 1 Place top of handle ...

Complete Owner's Guide (English)
Page 9
.... The ice maker also turns off the compressor and prevents the refrigerator from cooling, but does not disconnect the power to a colder setting, the freezer control may cause the first production of ice cubes to be discolored or have to be installed in most models at least 8 to fill the... ice container. Turning the freezer control will change only the freezer temperature. To turn ice maker OFF by lifting the wire signal arm until it will take approximately one to two days to ...
.... The ice maker also turns off the compressor and prevents the refrigerator from cooling, but does not disconnect the power to a colder setting, the freezer control may cause the first production of ice cubes to be discolored or have to be installed in most models at least 8 to fill the... ice container. Turning the freezer control will change only the freezer temperature. To turn ice maker OFF by lifting the wire signal arm until it will take approximately one to two days to ...

Complete Owner's Guide (English)
Page 10
... insulator. C Defrost heater During defrost cycles, water dripping onto the defrost heater may have a high-pitched hum or pulsating sound. These sounds normally indicate your freezer compartment. IMPORTANT During the automatic defrost cycle, you may make these sounds more noticeable. NOTE Rigid foam insulation is very energy efficient, but is...
... insulator. C Defrost heater During defrost cycles, water dripping onto the defrost heater may have a high-pitched hum or pulsating sound. These sounds normally indicate your freezer compartment. IMPORTANT During the automatic defrost cycle, you may make these sounds more noticeable. NOTE Rigid foam insulation is very energy efficient, but is...

