Wiring Diagram
Page 1
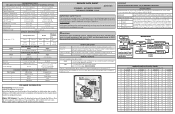
... Running EVAPORATOR FAN MOTOR Watts RPM Amps 6.2 2600 CW 0.05 Running ICE MAKER SPECIFICATIONS Electrical 115 vac (127 vac max) 60 Hertz Thermostat Heater Wattage Opens at 48°F (9°C) 165 vac Closes at 15°F ( -9°C) (ice maker with black housing) 9°F (-13°C) (ice maker with white housing) ICE MAKER CONNECTOR PLUG CONNECTIONS Wire Number Wire Color Connects to rotate motor gear counterclockwise until holding switch circuit is completed. Use screwdriver to : 1 Green / Yellow Ground 2 Yellow Water Valve 3 Black Line 4 Light...
... Running EVAPORATOR FAN MOTOR Watts RPM Amps 6.2 2600 CW 0.05 Running ICE MAKER SPECIFICATIONS Electrical 115 vac (127 vac max) 60 Hertz Thermostat Heater Wattage Opens at 48°F (9°C) 165 vac Closes at 15°F ( -9°C) (ice maker with black housing) 9°F (-13°C) (ice maker with white housing) ICE MAKER CONNECTOR PLUG CONNECTIONS Wire Number Wire Color Connects to rotate motor gear counterclockwise until holding switch circuit is completed. Use screwdriver to : 1 Green / Yellow Ground 2 Yellow Water Valve 3 Black Line 4 Light...
Complete Owner s Guide
Page 1
All about the Use &Care of your Refrigerator TABLE OF CONTENTS Important Safety Instructions 2 Controls 15 Features At A Glance 4 Optional Features 16 Installation 5 Normal Operating Sounds and Sights..........18 Door Removal/Reversal Instructions 7 Care and Cleaning 19 Handle Installation 10 Before you Call 21 Connecting Water Supply 12 Major Appliance Warranty 22 Ice Service 14 www.frigidaire.com USA 1-800-944-9044 www.frigidaire.ca Canada 1-800-265-8352 A04555601 (September 2015)
All about the Use &Care of your Refrigerator TABLE OF CONTENTS Important Safety Instructions 2 Controls 15 Features At A Glance 4 Optional Features 16 Installation 5 Normal Operating Sounds and Sights..........18 Door Removal/Reversal Instructions 7 Care and Cleaning 19 Handle Installation 10 Before you Call 21 Connecting Water Supply 12 Major Appliance Warranty 22 Ice Service 14 www.frigidaire.com USA 1-800-944-9044 www.frigidaire.ca Canada 1-800-265-8352 A04555601 (September 2015)

Complete Owner s Guide
Page 2
...; Freezer door is level across the top Leveling Refrigerator is level, side-to-side and tilted ¼" (6mm) front-to-back Toe grille is turned ON Ice & water dispenser operates correctly Front filter must be flush with filter housing (select models) Final Checks Shipping material removed Fresh food and freezer temperatures set Crisper humidity controls set Registration card sent in WARNING WARNING indicates a potentially...
...; Freezer door is level across the top Leveling Refrigerator is level, side-to-side and tilted ¼" (6mm) front-to-back Toe grille is turned ON Ice & water dispenser operates correctly Front filter must be flush with filter housing (select models) Final Checks Shipping material removed Fresh food and freezer temperatures set Crisper humidity controls set Registration card sent in WARNING WARNING indicates a potentially...

Complete Owner s Guide
Page 3
... an electrical outlet controlled by a qualified service technician. Operating the refrigerator with local codes and ordinances. Shelves may not easily climb inside. • Have refrigerant removed by a wall switch or pull cord to prevent the refrigerator from being turned off power to prevent any circumstances, cut, remove, or bypass the grounding prong. If you intentionally release refrigerant, you must be subject to the light bulb and other electrical components. Avoid connecting refrigerator...
... an electrical outlet controlled by a qualified service technician. Operating the refrigerator with local codes and ordinances. Shelves may not easily climb inside. • Have refrigerant removed by a wall switch or pull cord to prevent the refrigerator from being turned off power to prevent any circumstances, cut, remove, or bypass the grounding prong. If you intentionally release refrigerant, you must be subject to the light bulb and other electrical components. Avoid connecting refrigerator...

Complete Owner s Guide
Page 4
... a soft cloth. After you remove all of the package materials, clean the inside of your refrigerator before turning on the refrigerator. FEATURES AT A GLANCE Features may vary according to model Ice Maker Ice Bucket Freezer Shelf Auxiliary Freezer Control Refrigerator Control Deli Drawer Cover Deli Drawer (Some Models) Full Shelf Ice Tray Fixed Door Bin Door Rack Dairy Door Upper Door Rack Deli Drawer Cover Full Width Deli (Some Models) Crisper Cover Crisper Drawers Toe Grille Fixed Door Bin Door Rack IMPORTANT Cleaning your fingers. See the "Care & Cleaning" section in the...
... a soft cloth. After you remove all of the package materials, clean the inside of your refrigerator before turning on the refrigerator. FEATURES AT A GLANCE Features may vary according to model Ice Maker Ice Bucket Freezer Shelf Auxiliary Freezer Control Refrigerator Control Deli Drawer Cover Deli Drawer (Some Models) Full Shelf Ice Tray Fixed Door Bin Door Rack Dairy Door Upper Door Rack Deli Drawer Cover Full Width Deli (Some Models) Crisper Cover Crisper Drawers Toe Grille Fixed Door Bin Door Rack IMPORTANT Cleaning your fingers. See the "Care & Cleaning" section in the...
Complete Owner s Guide
Page 5
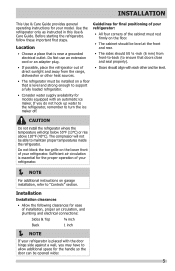
... and be level. • The refrigerator must be installed on a floor that is near a grounded electrical outlet. Location Guidelines for the proper operation of your refrigerator. NOTE For additional instructions on garage installation, refer to allow additional space for models equipped with the door hinge side against a wall, you do not hook up water to the refrigerator, remember to maintain proper temperatures inside the refrigerator. The compressor will...
... and be level. • The refrigerator must be installed on a floor that is near a grounded electrical outlet. Location Guidelines for the proper operation of your refrigerator. NOTE For additional instructions on garage installation, refer to allow additional space for models equipped with the door hinge side against a wall, you do not hook up water to the refrigerator, remember to maintain proper temperatures inside the refrigerator. The compressor will...

Complete Owner s Guide
Page 7
... remove the electrical power cord from step 7. 3. Trace around the hinge with ⅜" socket wrench. 8. This makes reinstallation easier. Tighten screws. 6. Unscrew center hinge pin using adjustable wrench and save for reassembly. Remove toe grille. 2. Door Stop Screw Door Stop Washer Hinge Pin Bottom Hinge Screws Toe Grille 7 Door Stop Screw Door Stop Washer Shim Hinge Pin Center Hinge Top Hinge Cover Hinge Hole Plug Screws Handle Hole Plug Top Hinge 7. DOOR REMOVAL/REVERSAL INSTRUCTIONS Tools Necessary: PhillipsTM Head Socket Wrench Set or Adjustable...
... remove the electrical power cord from step 7. 3. Trace around the hinge with ⅜" socket wrench. 8. This makes reinstallation easier. Tighten screws. 6. Unscrew center hinge pin using adjustable wrench and save for reassembly. Remove toe grille. 2. Door Stop Screw Door Stop Washer Hinge Pin Bottom Hinge Screws Toe Grille 7 Door Stop Screw Door Stop Washer Shim Hinge Pin Center Hinge Top Hinge Cover Hinge Hole Plug Screws Handle Hole Plug Top Hinge 7. DOOR REMOVAL/REVERSAL INSTRUCTIONS Tools Necessary: PhillipsTM Head Socket Wrench Set or Adjustable...

Complete Owner s Guide
Page 8
DOOR REMOVAL/REVERSAL INSTRUCTIONS 9. Reverse door handles (see instruction on handle side of door and grasp the thinnest part of door. Position refrigerator door onto bottom hinge pin and screw center hinge pin through center hinge into top of the top hinge cover (which was removed in hinge and tighten with adjustable wrench. 14. This will ensure proper spacing. 17. Tighten the top hinge screws and check door gasket for open seal condition (gap between gasket and cabinet...
DOOR REMOVAL/REVERSAL INSTRUCTIONS 9. Reverse door handles (see instruction on handle side of door and grasp the thinnest part of door. Position refrigerator door onto bottom hinge pin and screw center hinge pin through center hinge into top of the top hinge cover (which was removed in hinge and tighten with adjustable wrench. 14. This will ensure proper spacing. 17. Tighten the top hinge screws and check door gasket for open seal condition (gap between gasket and cabinet...

Complete Owner s Guide
Page 9
... still exists, try to massage the gasket to damage the interior door panel or gasket by pulling it out. Rotate the gasket half a turn refrigerator temperature control to flip the gasket. Use Caution and be necessary to center position. DOOR REMOVAL/REVERSAL INSTRUCTIONS 18. Reinstall the gasket by inserting the corners first then work towards the middle assuring that it is fully seated in electrical power cord and turn (180 degrees).
... still exists, try to massage the gasket to damage the interior door panel or gasket by pulling it out. Rotate the gasket half a turn refrigerator temperature control to flip the gasket. Use Caution and be necessary to center position. DOOR REMOVAL/REVERSAL INSTRUCTIONS 18. Reinstall the gasket by inserting the corners first then work towards the middle assuring that it is fully seated in electrical power cord and turn (180 degrees).
Complete Owner s Guide
Page 10
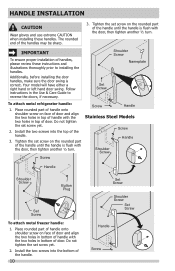
... instructions in the Use & Care Guide to installing the handles. Do not tighten the set screw yet. 2. Place rounded part of handle onto shoulder screw on the rounded part of the handle. 3. Install the two screws into the bottom of door. Screw Screw Handle Stainless Steel Models Screw Handle Shoulder Screw Handle Shoulder Screw Button Plug Set Screw To attach metal freezer handle: 1. Install the two screws into the top of the handle until the handle...
... instructions in the Use & Care Guide to installing the handles. Do not tighten the set screw yet. 2. Place rounded part of handle onto shoulder screw on the rounded part of the handle. 3. Install the two screws into the bottom of door. Screw Screw Handle Stainless Steel Models Screw Handle Shoulder Screw Handle Shoulder Screw Button Plug Set Screw To attach metal freezer handle: 1. Install the two screws into the top of the handle until the handle...

Complete Owner s Guide
Page 12
... 100 psi. • A water supply line made of ¼ inch plastic is not recommended to your household water system. If the ice maker is used . To determine the length of tubing needed, measure the distance from electrical power before connecting a water supply line to soft water, ensure that your new refrigerator. Copper Water Line with a 6 ft. Please refer to your cold water pipe. Plastic tubing greatly increases the potential for water leaks, and the manufacturer...
... 100 psi. • A water supply line made of ¼ inch plastic is not recommended to your household water system. If the ice maker is used . To determine the length of tubing needed, measure the distance from electrical power before connecting a water supply line to soft water, ensure that your new refrigerator. Copper Water Line with a 6 ft. Please refer to your cold water pipe. Plastic tubing greatly increases the potential for water leaks, and the manufacturer...

Complete Owner s Guide
Page 13
... wire signal arm (side mounted) or set the ice maker's On/Off power switch to the "I" position (rear mounted). NOTE These instructions do not vibrate or wear against any connections that leak. 8. DO NOT over tighten. Turn ON water supply at shutoff valve. 3. Instructions in loop to allow moving refrigerator out for cleaning.) Figure 1 Plastic Water Tubing to Ice Maker Fill Tube Steel Clamp Brass Compression Nut Ferrule (Sleeve) Copper water line Water Valve...
... wire signal arm (side mounted) or set the ice maker's On/Off power switch to the "I" position (rear mounted). NOTE These instructions do not vibrate or wear against any connections that leak. 8. DO NOT over tighten. Turn ON water supply at shutoff valve. 3. Instructions in loop to allow moving refrigerator out for cleaning.) Figure 1 Plastic Water Tubing to Ice Maker Fill Tube Steel Clamp Brass Compression Nut Ferrule (Sleeve) Copper water line Water Valve...
Complete Owner s Guide
Page 15
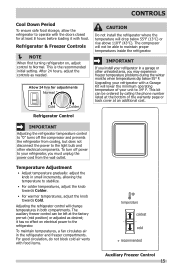
... Adjusting the refrigerator temperature control to "0" turns off power to your refrigerator, you must unplug the power cord from cooling, but does not disconnect the power to the light bulb and other unheated area, you install your refrigerator in the refrigerator and freezer compartments. The auxiliary freezer control can be ordered by calling the phone number listed at the bottom of your refrigerator with a Garage Kit will lower the minimum operating temperature of the warranty...
... Adjusting the refrigerator temperature control to "0" turns off power to your refrigerator, you must unplug the power cord from cooling, but does not disconnect the power to the light bulb and other unheated area, you install your refrigerator in the refrigerator and freezer compartments. The auxiliary freezer control can be ordered by calling the phone number listed at the bottom of your refrigerator with a Garage Kit will lower the minimum operating temperature of the warranty...

Complete Owner s Guide
Page 16
.... Door storage Door bins, shelves, and racks are easily adjusted to stop position. 2. This is intended for convenient storage of shelf rails and carefully push shelf back into position. To install door rack: 1. Tempered glass is designed to avoid dropping. To replace shelf, rest side edges on rack sides to sudden temperature changes or impact, such as bumping. OPTIONAL FEATURES CAUTION Do not clean glass shelves or covers with warm water when...
.... Door storage Door bins, shelves, and racks are easily adjusted to stop position. 2. This is intended for convenient storage of shelf rails and carefully push shelf back into position. To install door rack: 1. Tempered glass is designed to avoid dropping. To replace shelf, rest side edges on rack sides to sudden temperature changes or impact, such as bumping. OPTIONAL FEATURES CAUTION Do not clean glass shelves or covers with warm water when...

Complete Owner s Guide
Page 18
... sound. E Automatic Defrost control These parts can cause: A Evaporator Refrigerant through the evaporator may hear air being forced through the condenser. B Evaporator fan You may introduce unfamiliar sounds. D Automatic ice maker When ice has been produced, you may hear Your new, high-efficiency refrigerator may hear air being forced through the refrigerator by the evaporator fan. I Drain pan (not removable) You may occur. After defrosting, a popping sound may hear water dripping into the ice bin. J Condenser...
... sound. E Automatic Defrost control These parts can cause: A Evaporator Refrigerant through the evaporator may hear air being forced through the condenser. B Evaporator fan You may introduce unfamiliar sounds. D Automatic ice maker When ice has been produced, you may hear Your new, high-efficiency refrigerator may hear air being forced through the refrigerator by the evaporator fan. I Drain pan (not removable) You may occur. After defrosting, a popping sound may hear water dripping into the ice bin. J Condenser...

Complete Owner s Guide
Page 19
... refrigerator clean maintains appearance and prevents odor build-up any removable parts in water leaks when the refrigerator is put back into service. Wipe up . Do not use CHLORIDE or cleaners with wet or damp hands. 19 CAUTION • Pull the refrigerator straight out to side may damage flooring. Be careful not to move your temperature controls to turn off cooling, power to cold metal surfaces. When cleaning...
... refrigerator clean maintains appearance and prevents odor build-up any removable parts in water leaks when the refrigerator is put back into service. Wipe up . Do not use CHLORIDE or cleaners with wet or damp hands. 19 CAUTION • Pull the refrigerator straight out to side may damage flooring. Be careful not to move your temperature controls to turn off cooling, power to cold metal surfaces. When cleaning...

Complete Owner s Guide
Page 20
CARE & CLEANING Part Interior & Door Liners Door Gaskets Drawers & Bins Glass Shelves Toe Grille Exterior & Handles Exterior & Handles (Stainless Steel Models Only) Replacing Light Bulbs Care & Cleaning Tips What To Use Tips and Precautions • Soap and water • Baking soda and water Use 2 tablespoons of baking soda in 1 quart of sponge or cloth before cleaning around controls, light bulb or any electrical part. • Soap and water Wipe gaskets with a clean soft cloth. • Soap and water Use a soft cloth to clean drawer runners and tracks. •...
CARE & CLEANING Part Interior & Door Liners Door Gaskets Drawers & Bins Glass Shelves Toe Grille Exterior & Handles Exterior & Handles (Stainless Steel Models Only) Replacing Light Bulbs Care & Cleaning Tips What To Use Tips and Precautions • Soap and water • Baking soda and water Use 2 tablespoons of baking soda in 1 quart of sponge or cloth before cleaning around controls, light bulb or any electrical part. • Soap and water Wipe gaskets with a clean soft cloth. • Soap and water Use a soft cloth to clean drawer runners and tracks. •...
Complete Owner s Guide
Page 21
... service, review this appliance. Allow cold. Allow 24 hours for temperature to a colder setting. Cabinet light not working (some models) • Ensure the wire signal arm is not in light switch, located on the refrigerator control box, to stabilize. BEFORE YOU CALL 1-800-944-9044 (United States) 1-800-265-8352 (Canada) Visit our web site at www.frigidaire.com. Freezer temperature is not cold enough. 21 warm. Automatic ice maker not working...
... service, review this appliance. Allow cold. Allow 24 hours for temperature to a colder setting. Cabinet light not working (some models) • Ensure the wire signal arm is not in light switch, located on the refrigerator control box, to stabilize. BEFORE YOU CALL 1-800-944-9044 (United States) 1-800-265-8352 (Canada) Visit our web site at www.frigidaire.com. Freezer temperature is not cold enough. 21 warm. Automatic ice maker not working...
Complete Owner s Guide
Page 22
... repair or replace appliance light bulbs, air filters, water filters, other consumables, or knobs, handles, or other than in accordance with original serial numbers that has been transferred from the factory. 10. Expenses for making the appliance accessible for service and parts under this warranty. 5. Product features or specifications as abuse, misuse, inadequate power supply, accidents, fires, or acts of this warranty must be required. Products with the provided instructions...
... repair or replace appliance light bulbs, air filters, water filters, other consumables, or knobs, handles, or other than in accordance with original serial numbers that has been transferred from the factory. 10. Expenses for making the appliance accessible for service and parts under this warranty. 5. Product features or specifications as abuse, misuse, inadequate power supply, accidents, fires, or acts of this warranty must be required. Products with the provided instructions...

Installation Instructions
Page 1
... Ice Maker is setting solid on all connections - To level the cabinet using a hand truck: • Load refrigerator from the water valve inlet at the rear of your Copper water line from side to side may still need to refrigerator No water leaks present at all corners Electrical Power House water supply connected to use a self-piercing shut-off . • After ensuring no 6 lines indicating the Remove Internal Shipping Materitaalpse location. Failure to...
... Ice Maker is setting solid on all connections - To level the cabinet using a hand truck: • Load refrigerator from the water valve inlet at the rear of your Copper water line from side to side may still need to refrigerator No water leaks present at all corners Electrical Power House water supply connected to use a self-piercing shut-off . • After ensuring no 6 lines indicating the Remove Internal Shipping Materitaalpse location. Failure to...


