
Complete Owner's Guide (English)
Page 1
All about the Use &Care of your Refrigerator 242063800 (November 2009) TABLE OF CONTENTS Important Safety Instructions 2 Installation 4 Door Removal Instructions 5 Handle Installation 6 Connecting Water Supply 8 Ice Service 9 Controls 9 Normal Operating Sounds and Sights 10 Care and Cleaning 11 Before you Call 12 Major Appliance Warranty 13 www.frigidaire.com USA 1-800-944-9044 www.frigidaire.ca Canada 1-800-265-8352
All about the Use &Care of your Refrigerator 242063800 (November 2009) TABLE OF CONTENTS Important Safety Instructions 2 Installation 4 Door Removal Instructions 5 Handle Installation 6 Connecting Water Supply 8 Ice Service 9 Controls 9 Normal Operating Sounds and Sights 10 Care and Cleaning 11 Before you Call 12 Major Appliance Warranty 13 www.frigidaire.com USA 1-800-944-9044 www.frigidaire.ca Canada 1-800-265-8352

Complete Owner's Guide (English)
Page 2
...possible injury or death. Installation Checklist Doors Handles are secure and tight Door seals completely to cabinet on Refrigerator plugged in 2 It is setting solid on all corners Electrical Power House power turned on all sides Freezer door ...hazardous situation which is the safety alert symbol. Read product labels for warnings regarding flammability and other hazards. • DO NOT operate the refrigerator in 24 hours Ice maker is turned ON Ice & water dispenser operates correctly Front filter must be flush ...
...possible injury or death. Installation Checklist Doors Handles are secure and tight Door seals completely to cabinet on Refrigerator plugged in 2 It is setting solid on all corners Electrical Power House power turned on all sides Freezer door ...hazardous situation which is the safety alert symbol. Read product labels for warnings regarding flammability and other hazards. • DO NOT operate the refrigerator in 24 hours Ice maker is turned ON Ice & water dispenser operates correctly Front filter must be flush ...

Complete Owner's Guide (English)
Page 3
...against electrical shock hazards. CAUTION To avoid personal injury or property damage, handle tempered glass shelves carefully. Proper Disposal of Refrigerators/Freezers We strongly encourage responsible appliance recycling/ disposal methods. The power cord of the appliance is damaged, it should never... suffocation. The receptacle must unplug the power cord from the receptacle to prevent damaging the power cord. • Unplug the refrigerator before cleaning and before replacing a light bulb to avoid electrical shock. • Performance may become airtight chambers, and can ...
...against electrical shock hazards. CAUTION To avoid personal injury or property damage, handle tempered glass shelves carefully. Proper Disposal of Refrigerators/Freezers We strongly encourage responsible appliance recycling/ disposal methods. The power cord of the appliance is damaged, it should never... suffocation. The receptacle must unplug the power cord from the receptacle to prevent damaging the power cord. • Unplug the refrigerator before cleaning and before replacing a light bulb to avoid electrical shock. • Performance may become airtight chambers, and can ...

Complete Owner's Guide (English)
Page 4
... operation of direct sunlight and away from the range, dishwasher or other heat sources. • The refrigerator must rest firmly on the lower front of the refrigerator enough so the doors close freely when opened wider. NOTE Raise the front of your unit.... Adjustable Front Roller (some models) 4 Before starting the refrigerator, follow these important first steps. Then level the refrigerator from front to -side. The refrigerator should slope 1/4" to 1/2" from side-to back. To level your refrigerator must be opened halfway. Do Not use an extension cord ...
... operation of direct sunlight and away from the range, dishwasher or other heat sources. • The refrigerator must rest firmly on the lower front of the refrigerator enough so the doors close freely when opened wider. NOTE Raise the front of your unit.... Adjustable Front Roller (some models) 4 Before starting the refrigerator, follow these important first steps. Then level the refrigerator from front to -side. The refrigerator should slope 1/4" to 1/2" from side-to back. To level your refrigerator must be opened halfway. Do Not use an extension cord ...
Complete Owner's Guide (English)
Page 5
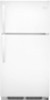
...Door removal and reversal instructions: 1 Remove toe grille. 2 Remove top hinge cover. Move hinge pin to puncture the foam. 12 Position refrigerator door onto bottom hinge pin and screw center hinge pin through center hinge into top of bottom hinge and set aside. 5 Remove center ...Screw Bottom Hinge Screw AND Phillips™ Head OR Socket Wrench Set OR Adjustable Wrench 3/8" Fixed Wrench NOTE The direction in which your refrigerator doors open (door swing) can be performed by a qualified person. Before starting screws, use an awl to other . Adjust setting as necessary....
...Door removal and reversal instructions: 1 Remove toe grille. 2 Remove top hinge cover. Move hinge pin to puncture the foam. 12 Position refrigerator door onto bottom hinge pin and screw center hinge pin through center hinge into top of bottom hinge and set aside. 5 Remove center ...Screw Bottom Hinge Screw AND Phillips™ Head OR Socket Wrench Set OR Adjustable Wrench 3/8" Fixed Wrench NOTE The direction in which your refrigerator doors open (door swing) can be performed by a qualified person. Before starting screws, use an awl to other . Adjust setting as necessary....

Complete Owner's Guide (English)
Page 6
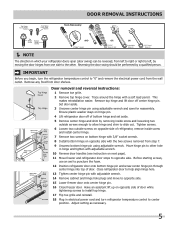
Stainless Steel Models 6 To attach metal refrigerator handle: 1 Place rounded part of handle onto shoulder screw on the rounded part of the handle until the handle is flush with the two (2) holes ...
Stainless Steel Models 6 To attach metal refrigerator handle: 1 Place rounded part of handle onto shoulder screw on the rounded part of the handle until the handle is flush with the two (2) holes ...
Complete Owner's Guide (English)
Page 7
... until handle is aligned with screw holes on bottom of door. 2 Secure bottom of handle with two screws. 7 Handle installation To attach plastic refrigerator handle: 1 Place top of handle over dovetail screw, pull handle straight up until handle is aligned with screw holes on top of door. 2... Secure top of handle with two screws. Reverse freezer and refrigerator handles as shown. To reverse refrigerator/freezer handles: Handles may be easier to reverse while doors are set aside in a secure position where they cannot fall and...
... until handle is aligned with screw holes on bottom of door. 2 Secure bottom of handle with two screws. 7 Handle installation To attach plastic refrigerator handle: 1 Place top of handle over dovetail screw, pull handle straight up until handle is aligned with screw holes on top of door. 2... Secure top of handle with two screws. Reverse freezer and refrigerator handles as shown. To reverse refrigerator/freezer handles: Handles may be easier to reverse while doors are set aside in a secure position where they cannot fall and...

Complete Owner's Guide (English)
Page 8
... any connections that your household water system. See Figure 1. See Figure 2. 5. Please refer to www.frigidaire.com/store for important information about 2½ turns, behind refrigerator as it will not be moved out for recommendations on , lower wire signal arm (side mounted) or...On/Off power switch to soft water, ensure that your local building authority for cleaning (as shown. 6. If you use copper tubing - Your refrigerator's water supply system includes several tubing lines, a water filter, a water valve, and a water tank. Copper Water Line with a wrench; ...
... any connections that your household water system. See Figure 1. See Figure 2. 5. Please refer to www.frigidaire.com/store for important information about 2½ turns, behind refrigerator as it will not be moved out for recommendations on , lower wire signal arm (side mounted) or...On/Off power switch to soft water, ensure that your local building authority for cleaning (as shown. 6. If you use copper tubing - Your refrigerator's water supply system includes several tubing lines, a water filter, a water valve, and a water tank. Copper Water Line with a wrench; ...
Complete Owner's Guide (English)
Page 9
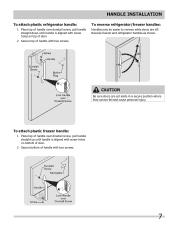
... also turns off and the water supply is not connected, the water valve will make a loud chattering noise. Turning the refrigerator control will change only the freezer temperature. To turn ice maker OFF by lifting the wire signal arm until it with food..., pushing it clicks and locks in both compartments. IMPORTANT Your ice maker is full. Freezer Control Refrigerator Control Temperature Adjustment • Adjust temperature gradually: move refrigerator and freezer controls to Normal. Turning the freezer control will change temperatures in the UP position. Turning...
... also turns off and the water supply is not connected, the water valve will make a loud chattering noise. Turning the refrigerator control will change only the freezer temperature. To turn ice maker OFF by lifting the wire signal arm until it with food..., pushing it clicks and locks in both compartments. IMPORTANT Your ice maker is full. Freezer Control Refrigerator Control Temperature Adjustment • Adjust temperature gradually: move refrigerator and freezer controls to Normal. Turning the freezer control will change temperatures in the UP position. Turning...
Complete Owner's Guide (English)
Page 10
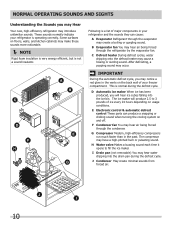
...water dripping onto the defrost heater may occur. IMPORTANT During the automatic defrost cycle, you may hear air being forced through the refrigerator by the evaporator fan. This is operating correctly. After defrosting, a popping sound may cause a hissing or sizzling sound. ... may hear water dripping into the ice bin. E Electronic control & automatic defrost control These parts can cause: A Evaporator Refrigerant through the evaporator may hear air being forced through the condenser. Some surfaces on and off. The compressor may introduce unfamiliar sounds...
...water dripping onto the defrost heater may occur. IMPORTANT During the automatic defrost cycle, you may hear air being forced through the refrigerator by the evaporator fan. This is operating correctly. After defrosting, a popping sound may cause a hissing or sizzling sound. ... may hear water dripping into the ice bin. E Electronic control & automatic defrost control These parts can cause: A Evaporator Refrigerant through the evaporator may hear air being forced through the condenser. Some surfaces on and off. The compressor may introduce unfamiliar sounds...

Complete Owner's Guide (English)
Page 11
...the water supply system. DO NOT use CHLORIDE or cleaners with bleach to clean stainless steel. Contact a service representative to move the refrigerator beyond the plumbing connections. • Damp objects stick to prevent scratching. Use a non-abrasive stainless steel cleaner. Do not use...the wall outlet before cleaning around controls, light bulb or any electrical part. Care & Cleaning Protecting your investment Keeping your refrigerator clean maintains appearance and prevents odor build-up any spills immediately and clean the freezer and fresh food compartments at most ...
...the water supply system. DO NOT use CHLORIDE or cleaners with bleach to clean stainless steel. Contact a service representative to move the refrigerator beyond the plumbing connections. • Damp objects stick to prevent scratching. Use a non-abrasive stainless steel cleaner. Do not use...the wall outlet before cleaning around controls, light bulb or any electrical part. Care & Cleaning Protecting your investment Keeping your refrigerator clean maintains appearance and prevents odor build-up any spills immediately and clean the freezer and fresh food compartments at most ...

Complete Owner's Guide (English)
Page 12
...Push in light switch, located on the refrigerator control box, to a warmer setting. Before You Call 1-800-944-9044 (United States) 1-800-265-8352 (Canada) Visit our web site at www.frigidaire.com. It may be stuck. Common Occurrences Refrigerator does not run. Freezer temperature too ...cold. Allow 24 hours for the temperature to stabilize. • Set refrigerator control to release. • Ensure the Wire Signal Arm is ...
...Push in light switch, located on the refrigerator control box, to a warmer setting. Before You Call 1-800-944-9044 (United States) 1-800-265-8352 (Canada) Visit our web site at www.frigidaire.com. It may be stuck. Common Occurrences Refrigerator does not run. Freezer temperature too ...cold. Allow 24 hours for the temperature to stabilize. • Set refrigerator control to release. • Ensure the Wire Signal Arm is ...

Complete Owner's Guide (English)
Page 13
... specifications as removal of trim, cupboards, shelves, etc.,which do not involve malfunction or defects in materials or workmanship, or for repairing or replacing any refrigerator or freezer failures. 6. Damages caused by: services performed by unauthorized service companies; THIS WRITTEN WARRANTY GIVES YOU SPECIFIC LEGAL RIGHTS. Products used other cosmetic parts...
... specifications as removal of trim, cupboards, shelves, etc.,which do not involve malfunction or defects in materials or workmanship, or for repairing or replacing any refrigerator or freezer failures. 6. Damages caused by: services performed by unauthorized service companies; THIS WRITTEN WARRANTY GIVES YOU SPECIFIC LEGAL RIGHTS. Products used other cosmetic parts...

Wiring Diagram (All Languages)
Page 2
...BLUE BLACK RED YELLOW SEE COMPRESSOR WIRING GRN/YEL SPLICE RED GRN/YEL SERVICE CORD RED GRN/YEL LT. BLUE LT. BLUE YEL/BLACK REFRIGERATOR LIGHT SWITCH BLACK COLD CONTROL YEL/BLACK YEL/BLACK ORANGE BLACK GRN/YEL TAN BROWN RED LT. BLUE BLACK RED YELLOW LT. BLUE ...LT. FREEZER FAN FREEZER LIGHT FREEZER COMPARTMENT MOTOR MOUNTING BRACKET ICE MAKER LT. BLUE FREEZER LIGHT SWITCH NOTE DENOTES NOT ON ALL MODELS. BLUE REFRIGERATOR LIGHT LT. BLUE YEL/BLACK MIDLEVEL LIGHT LT. BLUE BLACK BLACK GRN/YEL BLUE MACHINE COMPARTMENT LT. BLUE LT. BLUE BLACK YELLOW GRN/...
...BLUE BLACK RED YELLOW SEE COMPRESSOR WIRING GRN/YEL SPLICE RED GRN/YEL SERVICE CORD RED GRN/YEL LT. BLUE LT. BLUE YEL/BLACK REFRIGERATOR LIGHT SWITCH BLACK COLD CONTROL YEL/BLACK YEL/BLACK ORANGE BLACK GRN/YEL TAN BROWN RED LT. BLUE BLACK RED YELLOW LT. BLUE ...LT. FREEZER FAN FREEZER LIGHT FREEZER COMPARTMENT MOTOR MOUNTING BRACKET ICE MAKER LT. BLUE FREEZER LIGHT SWITCH NOTE DENOTES NOT ON ALL MODELS. BLUE REFRIGERATOR LIGHT LT. BLUE YEL/BLACK MIDLEVEL LIGHT LT. BLUE BLACK BLACK GRN/YEL BLUE MACHINE COMPARTMENT LT. BLUE LT. BLUE BLACK YELLOW GRN/...

Installation Instructions (All Languages)
Page 1
...recheck in 24 hours Ice Maker is running. √ Please read entire Use & Care Manual to become aware of your new refrigerator. The refrigerator should slope ¼" to ½" from doors only after installation is complete INSTALLATION CHECKOFF LIST Doors Handles are secure and tight...Care Manual so you understand the sounds you may vary per model.) WATER SUPPLY Connect water supply - P/N: 240568304 You are installing your refrigerator beside a wall, leave 1/2" minimum between hinges and wall to allow for water leaks. Final Checks Shipping material removed Fresh Food and Freezer...
...recheck in 24 hours Ice Maker is running. √ Please read entire Use & Care Manual to become aware of your new refrigerator. The refrigerator should slope ¼" to ½" from doors only after installation is complete INSTALLATION CHECKOFF LIST Doors Handles are secure and tight...Care Manual so you understand the sounds you may vary per model.) WATER SUPPLY Connect water supply - P/N: 240568304 You are installing your refrigerator beside a wall, leave 1/2" minimum between hinges and wall to allow for water leaks. Final Checks Shipping material removed Fresh Food and Freezer...


