Complete Owner's Guide
Page 1
All about the Use &Care of your Refrigerator 807876504 (April 2014) TABLE OF CONTENTS Important Safety Instructions 2 Controls 13 Installation 4 Normal Operating Sounds and Sights..........15 Door Removal/Reversal Instructions 6 Care and Cleaning 16 Handle Installation 8 Before you Call 18 Connecting Water Supply 10 Major Appliance Warranty 19 Ice Service 12 www.frigidaire.com USA 1-800-944-9044 www.frigidaire.ca Canada 1-800-265-8352
All about the Use &Care of your Refrigerator 807876504 (April 2014) TABLE OF CONTENTS Important Safety Instructions 2 Controls 13 Installation 4 Normal Operating Sounds and Sights..........15 Door Removal/Reversal Instructions 6 Care and Cleaning 16 Handle Installation 8 Before you Call 18 Connecting Water Supply 10 Major Appliance Warranty 19 Ice Service 12 www.frigidaire.com USA 1-800-944-9044 www.frigidaire.ca Canada 1-800-265-8352

Complete Owner's Guide
Page 2
... to alert you are still dangerous - recheck in the presence of explosive fumes. • Avoid contact with any moving parts of your Refrigerator or Freezer IMPORTANT IMPORTANT indicates installation, operation or maintenance information which is turned ON Ice & water dispenser operates correctly ...getting rid of automatic ice maker. • Remove all instructions before using this or any exterior wrapping material immediately after the refrigerator is the safety alert symbol. Definitions This is unpacked. If you to play. For your Safety • DO NOT store ...
... to alert you are still dangerous - recheck in the presence of explosive fumes. • Avoid contact with any moving parts of your Refrigerator or Freezer IMPORTANT IMPORTANT indicates installation, operation or maintenance information which is turned ON Ice & water dispenser operates correctly ...getting rid of automatic ice maker. • Remove all instructions before using this or any exterior wrapping material immediately after the refrigerator is the safety alert symbol. Definitions This is unpacked. If you to play. For your Safety • DO NOT store ...
Complete Owner's Guide
Page 3
...to the environment if released to ensure that used CFCs or HCFCs (chlorofluorocarbons or hydrochlorofluorocarbons). IMPORTANT CFC/HCFC Disposal Your old refrigerator may be followed to the atmosphere. Before you must be plugged directly into its own dedicated 115 Volt, 60 Hz., ...qualified service technician. The receptacle must be subject to avoid electrical shock. • Performance may not easily climb inside. • Have refrigerant removed by a qualified technician. Such damage is damaged, it should be replaced by 10% or more information on the power cord....
...to the environment if released to ensure that used CFCs or HCFCs (chlorofluorocarbons or hydrochlorofluorocarbons). IMPORTANT CFC/HCFC Disposal Your old refrigerator may be followed to the atmosphere. Before you must be plugged directly into its own dedicated 115 Volt, 60 Hz., ...qualified service technician. The receptacle must be subject to avoid electrical shock. • Performance may not easily climb inside. • Have refrigerant removed by a qualified technician. Such damage is damaged, it should be replaced by 10% or more information on the power cord....
Complete Owner's Guide
Page 4
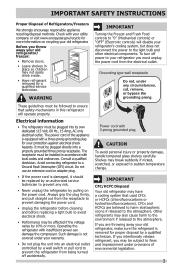
... front-to-back (to ensure that is placed with the door hinge side against a wall, you do not hook up water to the refrigerator, remember to cabinet. Use the refrigerator only as instructed in this Use & Care Guide. Install left toe grille cover onto slot on the floor. 4 2. or CAUTION Do Not... install the refrigerator where the temperature will not be able to allow additional space so the door can be level at the front and rear. • The sides ...
... front-to-back (to ensure that is placed with the door hinge side against a wall, you do not hook up water to the refrigerator, remember to cabinet. Use the refrigerator only as instructed in this Use & Care Guide. Install left toe grille cover onto slot on the floor. 4 2. or CAUTION Do Not... install the refrigerator where the temperature will not be able to allow additional space so the door can be level at the front and rear. • The sides ...
Complete Owner's Guide
Page 5
...WARNING When reversing the door swing: You MUST move the anti-tip bracket to -side. 4 Some models are equipped with the hinges of the refrigerator enough so the doors close freely when opened halfway. Failure to do so will result in your Use & Care Manual. Raise Figure 3 5 Then...: 1 Remove the toe grille. 2 Use a flat-blade screwdriver or ⅜ inch socket wrench to raise or lower the front rollers (Figure 2). The refrigerator should slope ¼ inch to ½ inch from side-to align with an anti- INSTALLATION some models) Figure 2 or 3 Use adjustable wrench to adjust...
...WARNING When reversing the door swing: You MUST move the anti-tip bracket to -side. 4 Some models are equipped with the hinges of the refrigerator enough so the doors close freely when opened halfway. Failure to do so will result in your Use & Care Manual. Raise Figure 3 5 Then...: 1 Remove the toe grille. 2 Use a flat-blade screwdriver or ⅜ inch socket wrench to raise or lower the front rollers (Figure 2). The refrigerator should slope ¼ inch to ½ inch from side-to align with an anti- INSTALLATION some models) Figure 2 or 3 Use adjustable wrench to adjust...

Complete Owner's Guide
Page 6
... Fixed Wrench Top Hinge Screw Bottom Hinge Screw NOTE The direction in which your refrigerator doors open (door swing) can be performed by a qualified person. Remove top hinge and lift door off of refrigerator, remove inside screw and loosening two outside screws on hinge pin. 4. Ensure plastic washer stays... (Mechanical controls) or "OFF" (Electronic controls) and remove the electrical power cord from door shelves. Remove any food from the wall outlet. Lift refrigerator door off center hinge pin. Tighten screws. 6. IMPORTANT Before you begin, turn the...
... Fixed Wrench Top Hinge Screw Bottom Hinge Screw NOTE The direction in which your refrigerator doors open (door swing) can be performed by a qualified person. Remove top hinge and lift door off of refrigerator, remove inside screw and loosening two outside screws on hinge pin. 4. Ensure plastic washer stays... (Mechanical controls) or "OFF" (Electronic controls) and remove the electrical power cord from door shelves. Remove any food from the wall outlet. Lift refrigerator door off center hinge pin. Tighten screws. 6. IMPORTANT Before you begin, turn the...
Complete Owner's Guide
Page 7
... toe grille and reinstall (some models). 19. WARNING When reversing the door swing: You MUST move to opposite side. 15. Move freezer and refrigerator door stops to help align hinge hole. 13. one for the right side and one for proper blance. Move hinge pin to other hole in... door while tightening screws to center position. Failure to puncture the foam. 12. Plug in hinge and tighten with adjustable wrench. 14. Position refrigerator door onto bottom hinge pin and screw center hinge pin through center hinge into top of future door reversals, save the toe grille cover not...
... toe grille and reinstall (some models). 19. WARNING When reversing the door swing: You MUST move to opposite side. 15. Move freezer and refrigerator door stops to help align hinge hole. 13. one for the right side and one for proper blance. Move hinge pin to other hole in... door while tightening screws to center position. Failure to puncture the foam. 12. Plug in hinge and tighten with adjustable wrench. 14. Position refrigerator door onto bottom hinge pin and screw center hinge pin through center hinge into top of future door reversals, save the toe grille cover not...

Complete Owner's Guide
Page 8
IMPORTANT To ensure proper installation of handles, please review these handles. Shoulder Screw Nameplate Set Screw To attach metal refrigerator handle: 1. Tighten the set screw on face of door and align the two holes in top of the handle until the handle is correct. Do ...
IMPORTANT To ensure proper installation of handles, please review these handles. Shoulder Screw Nameplate Set Screw To attach metal refrigerator handle: 1. Tighten the set screw on face of door and align the two holes in top of the handle until the handle is correct. Do ...
Complete Owner's Guide
Page 9
HANDLE INSTALLATION To attach plastic refrigerator handle: 1. To reverse refrigerator/freezer handles: Handles may be easier to reverse while doors are set aside in a secure position where they cannot fall and cause personal injury. Dovetail .... Place top of handle over dovetail screw, pull handle straight down until handle is aligned with screw holes on top of door. 2. Reverse freezer and refrigerator handles as shown. Place top of handle over dovetail screw, pull handle straight up until handle is aligned with screw holes on bottom of door. 2.
HANDLE INSTALLATION To attach plastic refrigerator handle: 1. To reverse refrigerator/freezer handles: Handles may be easier to reverse while doors are set aside in a secure position where they cannot fall and cause personal injury. Dovetail .... Place top of handle over dovetail screw, pull handle straight down until handle is aligned with screw holes on top of door. 2. Reverse freezer and refrigerator handles as shown. Place top of handle over dovetail screw, pull handle straight up until handle is aligned with screw holes on bottom of door. 2.
Complete Owner's Guide
Page 10
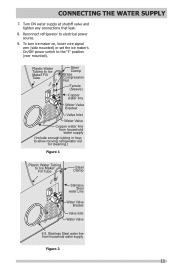
...your cold water pipe. Copper Water Line with a wrench; Please refer to your local/ state building codes, Frigidaire recommends for more information. Turn OFF water supply at the back of the refrigerator to be moved out for cleaning (as shown). • A shutoff valve to connect the water supply ...line to www.frigidaire.com/store for homes with existing valves its Smart Choice® water line kit 5305510264 ...
...your cold water pipe. Copper Water Line with a wrench; Please refer to your local/ state building codes, Frigidaire recommends for more information. Turn OFF water supply at the back of the refrigerator to be moved out for cleaning (as shown). • A shutoff valve to connect the water supply ...line to www.frigidaire.com/store for homes with existing valves its Smart Choice® water line kit 5305510264 ...
Complete Owner's Guide
Page 11
... the "I" position (rear mounted). Stainless Steel water line from household water supply (Include enough tubing in loop to allow moving refrigerator out for cleaning.) Figure 1 Plastic Water Tubing to Ice Maker Fill Tube Steel Clamp Brass Compression Nut Ferrule (Sleeve) Copper water line Water Valve Bracket ...
... the "I" position (rear mounted). Stainless Steel water line from household water supply (Include enough tubing in loop to allow moving refrigerator out for cleaning.) Figure 1 Plastic Water Tubing to Ice Maker Fill Tube Steel Clamp Brass Compression Nut Ferrule (Sleeve) Copper water line Water Valve Bracket ...
Complete Owner's Guide
Page 12
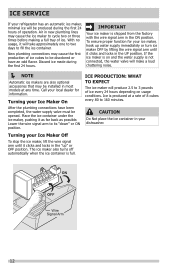
.... The ice maker also turns off automatically when the ice container is produced at any time. Ice is full. Call your local dealer for your refrigerator has an automatic ice maker, minimal ice will take approximately one to two days to cycle two or three times before making a full tray of...
.... The ice maker also turns off automatically when the ice container is produced at any time. Ice is full. Call your local dealer for your refrigerator has an automatic ice maker, minimal ice will take approximately one to two days to cycle two or three times before making a full tray of...
Complete Owner's Guide
Page 13
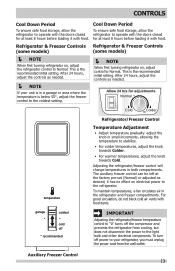
...desired; For good circulation, do not block cold air vents with food items. garage coldest cold off * recommended IMPORTANT Adjusting the refrigerator/freezer temperature control to "0" turns off power to your unit is in small increments, allowing the temperature to stabilize. • For... freezer control can be left at least 8 hours before loading it with the doors closed for adjustments Normal Cold Colder temperature Refrigerator/Freezer Control Temperature Adjustment • Adjust temperature gradually: adjust the knob in a garage or area where the temperature is below...
...desired; For good circulation, do not block cold air vents with food items. garage coldest cold off * recommended IMPORTANT Adjusting the refrigerator/freezer temperature control to "0" turns off power to your unit is in small increments, allowing the temperature to stabilize. • For... freezer control can be left at least 8 hours before loading it with the doors closed for adjustments Normal Cold Colder temperature Refrigerator/Freezer Control Temperature Adjustment • Adjust temperature gradually: adjust the knob in a garage or area where the temperature is below...

Complete Owner's Guide
Page 14
...control can be left at the factory pre-set (Normal) or adjusted as desired; To turn off power to your refrigerator, you must unplug the power cord from cooling, but does not disconnect the power to stabilize. CONTROLS temperature coldest cold off * recommended...compartments. For good circulation, do not block cold air vents with food items. IMPORTANT Adjusting the refrigerator/freezer temperature control to the refrigerator. To maintain temperatures, a fan circulates air in the refrigerator and freezer compartments. it has no effect on electrical power to "off" turns off the ...
...control can be left at the factory pre-set (Normal) or adjusted as desired; To turn off power to your refrigerator, you must unplug the power cord from cooling, but does not disconnect the power to stabilize. CONTROLS temperature coldest cold off * recommended...compartments. For good circulation, do not block cold air vents with food items. IMPORTANT Adjusting the refrigerator/freezer temperature control to the refrigerator. To maintain temperatures, a fan circulates air in the refrigerator and freezer compartments. it has no effect on electrical power to "off" turns off the ...
Complete Owner's Guide
Page 15
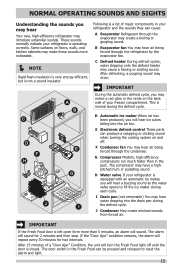
... faster than 5 minutes, an alarm will sound. The compressor may occur. J Condenser May create minimal sounds from forced air. After 15 minutes of your refrigerator is operating correctly. A B C D E F H G J I Drain pan (not removable) You may create a boiling or gurgling sound. IMPORTANT During... freezer compartment. D Automatic ice maker When ice has been produced, you may hear Your new, high-efficiency refrigerator may notice a red glow in your refrigerator is closed. B Evaporator fan You may hear air being forced through the condenser. F Condenser fan You may...
... faster than 5 minutes, an alarm will sound. The compressor may occur. J Condenser May create minimal sounds from forced air. After 15 minutes of your refrigerator is operating correctly. A B C D E F H G J I Drain pan (not removable) You may create a boiling or gurgling sound. IMPORTANT During... freezer compartment. D Automatic ice maker When ice has been produced, you may hear Your new, high-efficiency refrigerator may notice a red glow in your refrigerator is closed. B Evaporator fan You may hear air being forced through the condenser. F Condenser fan You may...
Complete Owner's Guide
Page 16
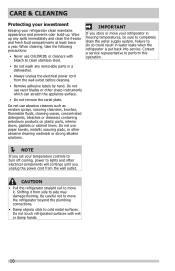
... to cold metal surfaces. Wipe up . Do not use CHLORIDE or cleaners with wet or damp hands. 16 Do not touch refrigerated surfaces with bleach to clean stainless steel. • Do not wash any spills immediately and clean the freezer and fresh food compartments...bleaches or cleansers containing petroleum products on plastic parts, interior doors, gaskets or cabinet liners. CARE & CLEANING Protecting your investment Keeping your refrigerator clean maintains appearance and prevents odor build-up any removable parts in a dishwasher. • Always unplug the electrical power cord from ...
... to cold metal surfaces. Wipe up . Do not use CHLORIDE or cleaners with wet or damp hands. 16 Do not touch refrigerated surfaces with bleach to clean stainless steel. • Do not wash any spills immediately and clean the freezer and fresh food compartments...bleaches or cleansers containing petroleum products on plastic parts, interior doors, gaskets or cabinet liners. CARE & CLEANING Protecting your investment Keeping your refrigerator clean maintains appearance and prevents odor build-up any removable parts in a dishwasher. • Always unplug the electrical power cord from ...

Complete Owner's Guide
Page 17
... • Vacuum attachment • Soap and water • Non Abrasive Glass Cleaner • Soap and water • Stainless Steel Cleaners • Unplug refrigerator • Wear gloves • Remove light cover • Replace old bulb • Replace light cover • Plug in warm water. Do not use... CHLORIDE or cleaners with the grain to clean stainless steel. Wash the rest of sponge or cloth before immersing in the refrigerator Allow glass to warm to wring excess water out of the cabinet with sudsy cloth or sponge. Remove toe grille (see Installation Instructions...
... • Vacuum attachment • Soap and water • Non Abrasive Glass Cleaner • Soap and water • Stainless Steel Cleaners • Unplug refrigerator • Wear gloves • Remove light cover • Replace old bulb • Replace light cover • Plug in warm water. Do not use... CHLORIDE or cleaners with the grain to clean stainless steel. Wash the rest of sponge or cloth before immersing in the refrigerator Allow glass to warm to wring excess water out of the cabinet with sudsy cloth or sponge. Remove toe grille (see Installation Instructions...
Complete Owner's Guide
Page 18
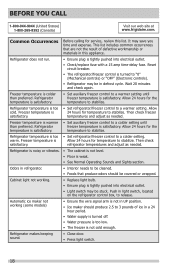
... 1-800-265-8352 (Canada) Visit our web site at www.frigidaire.com. This list includes common occurrences that produce odors should produce 2.5 to 3 pounds of defective workmanship or materials in this list. Refrigerator does not run. • Ensure plug is 24 hours for... the temperature to a colder setting until freezer temperature is warmer • Set auxiliary freezer control to stabilize. Refrigerator temperature is satisfactory. • Set auxiliary freezer control to a warmer setting until than preferred. temperatures and adjust as needed . Freezer...
... 1-800-265-8352 (Canada) Visit our web site at www.frigidaire.com. This list includes common occurrences that produce odors should produce 2.5 to 3 pounds of defective workmanship or materials in this list. Refrigerator does not run. • Ensure plug is 24 hours for... the temperature to a colder setting until freezer temperature is warmer • Set auxiliary freezer control to stabilize. Refrigerator temperature is satisfactory. • Set auxiliary freezer control to a warmer setting until than preferred. temperatures and adjust as needed . Freezer...
Complete Owner's Guide
Page 19
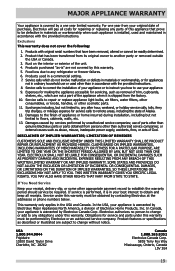
... other cosmetic parts. 11. In Canada, your best interest to floors, cabinets, walls, etc. 13. Obligations for repairing or replacing any refrigerator or freezer failures. 6. Product that have been removed, altered or cannot be required. Food loss due to correct the installation of Alaska. ...light bulbs, air filters, water filters, other consumables, or knobs, handles, or other than authorized service companies; USA 1.800.944.9044 Frigidaire 10200 David Taylor Drive Charlotte, NC 28262 Canada 1.800.265.8352 Electrolux Canada Corp. 5855 Terry Fox Way Mississauga, Ontario, Canada L5V...
... other cosmetic parts. 11. In Canada, your best interest to floors, cabinets, walls, etc. 13. Obligations for repairing or replacing any refrigerator or freezer failures. 6. Product that have been removed, altered or cannot be required. Food loss due to correct the installation of Alaska. ...light bulbs, air filters, water filters, other consumables, or knobs, handles, or other than authorized service companies; USA 1.800.944.9044 Frigidaire 10200 David Taylor Drive Charlotte, NC 28262 Canada 1.800.265.8352 Electrolux Canada Corp. 5855 Terry Fox Way Mississauga, Ontario, Canada L5V...
Wiring Diagram
Page 1
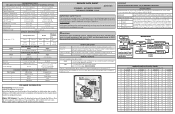
... 35% 45 to 55% Freezer Temperature 2° to 8°F (-17° to -13°C) 0° to 5°F (-18° to -15°C) Refrigerator Temperature 35° to 40°F (2° to 4°C) 35° to 40°F (1° to 4°C) Low Side Pressure (cut-in) 8 to...cycle) 140 to 185 140 to 185 Amps (running) 1.1 to 1.6 1.1 to 1.6 Base Voltage 115 vac (127 vac max) 115 vac (127 vac max) Refrigerant Charge 4.25 oz. (121 g) DEFROST SPECIFICATIONS Safety Thermostat Heater Defrost Thermistor Cabinet Size: 15'/16' Cut-in Cut-out Watts Ohms Termination 110°F (43...
... 35% 45 to 55% Freezer Temperature 2° to 8°F (-17° to -13°C) 0° to 5°F (-18° to -15°C) Refrigerator Temperature 35° to 40°F (2° to 4°C) 35° to 40°F (1° to 4°C) Low Side Pressure (cut-in) 8 to...cycle) 140 to 185 140 to 185 Amps (running) 1.1 to 1.6 1.1 to 1.6 Base Voltage 115 vac (127 vac max) 115 vac (127 vac max) Refrigerant Charge 4.25 oz. (121 g) DEFROST SPECIFICATIONS Safety Thermostat Heater Defrost Thermistor Cabinet Size: 15'/16' Cut-in Cut-out Watts Ohms Termination 110°F (43...


