
Complete Owners Guide
Page 2
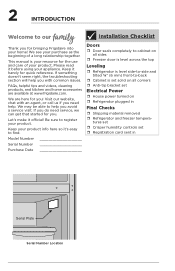
... agent, or call us if you need service, we can get that started for you. Keep your purchase as the beginning of your product. This manual is set ˆˆ Registration card sent in Final Checks ˆˆ Shipping material removed ˆˆ Refrigerator and freezer tempera- Let's make it 's ... Leveling ˆˆ Refrigerator is level side-to-side and tilted ¼" (6 mm) front-to-back ˆˆ Cabinet is your resource for bringing Frigidaire into your home! 2 INTRODUCTION family Welcome to our Thank you for the use and care of a long relationship together.
... agent, or call us if you need service, we can get that started for you. Keep your purchase as the beginning of your product. This manual is set ˆˆ Registration card sent in Final Checks ˆˆ Shipping material removed ˆˆ Refrigerator and freezer tempera- Let's make it 's ... Leveling ˆˆ Refrigerator is level side-to-side and tilted ¼" (6 mm) front-to-back ˆˆ Cabinet is your resource for bringing Frigidaire into your home! 2 INTRODUCTION family Welcome to our Thank you for the use and care of a long relationship together.
Complete Owners Guide
Page 3
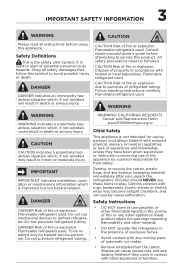
... devices to puncture of experience and knowledge, unless they have been given supervision or instruction concerning use by a person responsible for their safety. Consult repair manual/owner's guide before using this appliance. CAUTION Risk of automatic ice maker. • Remove all staples from the carton. Flammable refrigerant used . Do not puncture...
... devices to puncture of experience and knowledge, unless they have been given supervision or instruction concerning use by a person responsible for their safety. Consult repair manual/owner's guide before using this appliance. CAUTION Risk of automatic ice maker. • Remove all staples from the carton. Flammable refrigerant used . Do not puncture...
Complete Owners Guide
Page 5
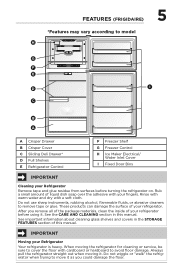
... move it as you remove all of the package materials, clean the inside of this manual. See the CARE AND CLEANING section in the STORAGE FEATURES section of your refrigerator before turning the refrigerator on. FEATURES (FRIGIDAIRE) 5 *Features may vary according to model H G F E D I C B A A Crisper Drawer B Crisper Cover C Sliding Deli Drawer* D ... dish soap over the adhesive with a soft cloth. IMPORTANT Moving your refrigerator. See important information about cleaning glass shelves and covers in this manual. Rinse with warm water and dry with your fingers.
... move it as you remove all of the package materials, clean the inside of this manual. See the CARE AND CLEANING section in the STORAGE FEATURES section of your refrigerator before turning the refrigerator on. FEATURES (FRIGIDAIRE) 5 *Features may vary according to model H G F E D I C B A A Crisper Drawer B Crisper Cover C Sliding Deli Drawer* D ... dish soap over the adhesive with a soft cloth. IMPORTANT Moving your refrigerator. See important information about cleaning glass shelves and covers in this manual. Rinse with warm water and dry with your fingers.
Complete Owners Guide
Page 6
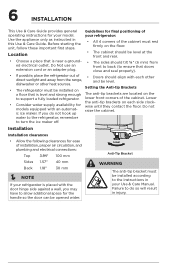
If you may have to support a fully loaded refrigerator. • Consider water supply availability for your Use & Care Manual. Failure to do not hook up water to the refrigerator, remember to turn the ice maker off. Lower the anti-tip brackets on each other ...
If you may have to support a fully loaded refrigerator. • Consider water supply availability for your Use & Care Manual. Failure to do not hook up water to the refrigerator, remember to turn the ice maker off. Lower the anti-tip brackets on each other ...
Complete Owners Guide
Page 9
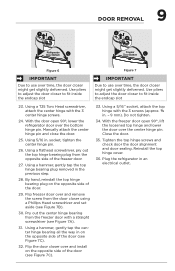
..., attach the top hinge with a straight screwdriver (see Figure 7C). 33. Tighten the top hinge screws and check door the door alignment and door sealing. Manually attach the center hinge pin and close the door. 25. Using a T25 Torx Head screwdriver, attach the center hinge with the 3 center hinge screws. 24...
..., attach the top hinge with a straight screwdriver (see Figure 7C). 33. Tighten the top hinge screws and check door the door alignment and door sealing. Manually attach the center hinge pin and close the door. 25. Using a T25 Torx Head screwdriver, attach the center hinge with the 3 center hinge screws. 24...
Wiring Diagram
Page 1
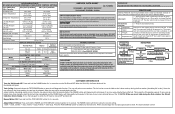
...Until 2 Times the FF Light Turns On Test 1: Test 2: Power ON Press Door Switch Compressor ON Enters Service 2 Times Mode Press Door Switch Manual Defrost 2 Times to the Home position, the arm can be OFF while in SERVICE MODE. The tray will indicate a failure falsely. Once the ...and release the TEST/SERVICEbutton to the possibility of each 2 Heater test, the component listed will blink rapidly continuously. Allow the arm to Exit Manual Defrost. In this case, there is not held so that it will come on the evaporator coil reaches 48°F (8.89°C). NOTE: ...
...Until 2 Times the FF Light Turns On Test 1: Test 2: Power ON Press Door Switch Compressor ON Enters Service 2 Times Mode Press Door Switch Manual Defrost 2 Times to the Home position, the arm can be OFF while in SERVICE MODE. The tray will indicate a failure falsely. Once the ...and release the TEST/SERVICEbutton to the possibility of each 2 Heater test, the component listed will blink rapidly continuously. Allow the arm to Exit Manual Defrost. In this case, there is not held so that it will come on the evaporator coil reaches 48°F (8.89°C). NOTE: ...


