Frigidaire FFTH122WA2 Support and Manuals
Get Help and Manuals for this Frigidaire item
View All Support Options Below
Free Frigidaire FFTH122WA2 manuals!
Problems with Frigidaire FFTH122WA2?
Ask a Question
Free Frigidaire FFTH122WA2 manuals!
Problems with Frigidaire FFTH122WA2?
Ask a Question
Popular Frigidaire FFTH122WA2 Manual Pages
Complete Owners Guide - Page 2
... for the model you intend to cover every possible condition and situation that the power supply cord is damaged, it cannot be replaced with a screen panel included, remove the screen completely before installation. If the window is drained from the product manufacturer. This could result in removing or reinstalling this manual and the installation instructions for...
Complete Owners Guide - Page 4

...noise may have a high pitched chatter during normal operation.
All rights reserved.
On all models, the serial plate is located on the base pan to eliminate the normal sounds, ...Today's high efficiency compressors may be filled in the space provided below the model and serial numbers.
Model No. Register Your Product
The self-addressed PRODUCT REGISTRATION CARD should be heard...
Complete Owners Guide - Page 5
... TEMP
RESET BUTTON SENSING INDICATOR
(some models)
TURNS UNIT ON OR OFF
SLEEP SETS MODE FEATURE
ADJUSTS TEMPERATURE
OR TIME
SETS FAN SPEED
ACTIVATES TIMER
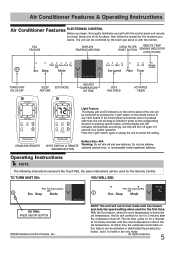
Light Feature:
The...& Operating Instructions
Air Conditioner Features ELECTRONIC CONTROL Before you begin, thoroughly familiarize yourself with the control panel and remote as the corresponding direction of pressing specific button, and...
Complete Owners Guide - Page 6

...when room temperature is reached.
This temperature will be selected manually. All rights reserved. Note: Tap or hold either up ...is a fixed combination of Cool mode and Auto fan speed setting.
If you want the display to read the actual room ...°C) and 86 °F (30 °C).
Operating Instructions
Operating Instructions
(continued) AUTO FEATURE:
YOU WILL SEE:
DO THIS: PRESS
MODE...
Complete Owners Guide - Page 7

... or to exhaust stale air on some models. (Remember to open the vent during cooling for maximum cooling efficiency.) You can be selected among four settings: Auto, Lo(Low), Med(Medium) ... OPERATE ON FAN ONLY:
Note: Fan starts at the slowest speed.
Operating Instructions
(continued)
TO ADJUST FAN SPEEDS:
Operating Instructions
YOU WILL SEE:
DO THIS: PRESS TO SELECT
TO USE AUTO FAN FEATURE...
Complete Owners Guide - Page 9

...Instructions
(continued)
TIMER: DELAY STOP/START FEATURE
Operating Instructions
YOU WILL SEE HOW MUCH TIME IS CHOSEN:
THEN DO THIS:
PRESS UP/DOWN BUTTONS
FIRST DO THIS:
PRESS TIMER BUTTON
REMOTE SENSING FEATURE (on some models... lf the unit does not receive the remote sensing signal during any time to set the desired temperature at any 7 minute interval, the Remote Sensing feature will only...
Complete Owners Guide - Page 10

...display reads "AS" , a sensor has failed. All rights reserved.
Operating Instructions
Operating Instructions
(continued) HEATING MODE(on some models):
YOU WILL SEE:
FAULT CODES:
DO THIS: PRESS
MODE BUTTON CHOOSE HEAT
Note: This feature can be ...Fahrenheit or degrees Celsius.
When the room set temperature is capable of FAN Speeds (Low speed only on to circulate and sample the room...
Complete Owners Guide - Page 11

...(6-WAY)
Air Directional Louvers
Air directional louvers control air flow direction.
Operating Instructions
Operating Instructions
(continued)
ADDITIONAL THINGS YOU SHOULD KNOW
Now that you have mastered the ...operating procedure, here are more features in your control that you to the same setting...
Complete Owners Guide - Page 13
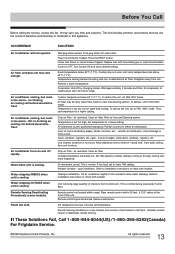
... bring air through cooling coils more frequently. Then, set to installation instructions or check with installer. Air conditioner cooling, but room is set to desired setting. Clean air filter. Air directional louvers positioned improperly.
Clean filter. Position louvers for service, review this appliance. Improper installation.
Temperature is too warm - Room too cold...
Complete Owners Guide - Page 14

... household use your appliance is " are incurred during installation, including but not limited to, any removal, transportation and reinstallation expenses which do not involve malfunction or defects in materials or workmanship, or for repairing or replacing any parts of this warranty must be readily determined.
2. Service calls to any refrigerator or freezer failures.
6. CLAIMS...
Installation Instructions - Page 1
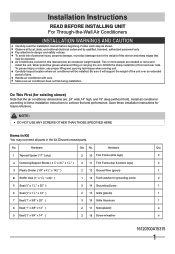
... 41 2" x 141 2 " )
2 12 Ground Wire (green)
1
4 Stuffer Seal (1" x 1 1 2 " x 84" )
1 13 Tooth washer for future reference. Installation Instructions
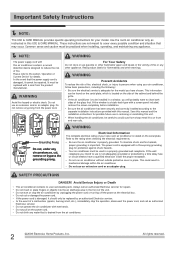
READ BEFORE INSTALLING UNIT For Through-the-Wall Air Conditioners
INSTALLATION WARNINGS AND CAUTION
Carefully read the installation manual before beginning. AVOID the sharp metal fins of time. Be sure it will be exposed.
No. No. Follow...
Installation Instructions - Page 2

Installation Instructions
Common Wall-Sleeve Dimensions
1.
Clean interior (do not disturb seals) 2. NOTE:
When installation is securely fastened in a clear area about 3 inches back from the chart below. Drill in wall. Wall Sleeve 3FBS
Fig.1
1/4" to 5/16"
Front
Wall sleeve to see that sleeve is complete, replacement unit must be attached to the sleeve, or...
Installation Instructions - Page 3
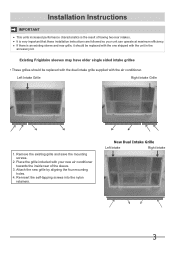
... intake grilles
• These grilles should be replaced with the dual intake grille supplied with your unit can operate at maximum efficiency. Remove the existing grille and save the mounting screws.
2. Installation Instructions
IMPORTANT
This units increased performance characteristics is very important that these installation instructions are followed so your new air conditioner...
Installation Instructions - Page 4

Holding the grille by securing with a leash. Installation Instructions
Grille Removal Important: Single intake grilles must be brought inside through the grille and secured with a knot.
Warning: When removing grilles, protect from cord or ...
Installation Instructions - Page 6
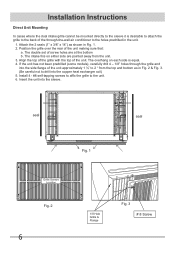
... at the bottom b. If the unit has not been predrilled (some models), carefully drill 4 - 1/8" holes through -the-wall air conditioner to the holes predrilled in the unit.
1. Install 4 - #8 self-tapping screws to affix the grille to drill into the sleeve. Installation Instructions
Direct Unit Mounting
In cases where the dual intake grille cannot be...
Frigidaire FFTH122WA2 Reviews
We have not received any reviews for Frigidaire yet.