Frigidaire FFTH102WA2 Support and Manuals
Get Help and Manuals for this Frigidaire item
View All Support Options Below
Free Frigidaire FFTH102WA2 manuals!
Problems with Frigidaire FFTH102WA2?
Ask a Question
Free Frigidaire FFTH102WA2 manuals!
Problems with Frigidaire FFTH102WA2?
Ask a Question
Popular Frigidaire FFTH102WA2 Manual Pages
Complete Owners Guide - Page 2
... the following:
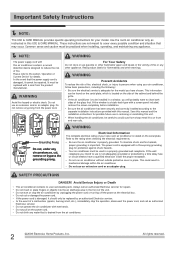
Be sure the electrical service is adequate for the model you intend to use in a window, you will probably want to clean both sides of fire, electrical shock, or injury to the section 'Operation of the unit. Important Safety Instructions
NOTE:
This USE & CARE MANUAL provides specific operating instructions for details. Please refer to...
Complete Owners Guide - Page 4

...pitched chatter during normal operation may be filled in the space provided below the model and serial numbers. Model No. Note: Don't try to drill any holes on the outside of ...rushing air being moved by the fan. Product Registration & Normal Sounds
Product Registration Record Your Model and Serial Numbers
Record in completely, signed and returned to eliminate the normal sounds, otherwise...
Complete Owners Guide - Page 5
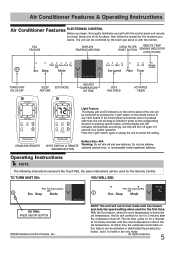
... FILTER
REMOTE TEMP
RESET BUTTON SENSING INDICATOR
(some models)
TURNS UNIT ON OR OFF
SLEEP SETS MODE FEATURE
ADJUSTS TEMPERATURE
OR TIME
SETS FAN SPEED
ACTIVATES TIMER
Light Feature:
The display...
If any other button of pressing specific button, and the display and LED indicators will illuminate accordingly, but they will continue to cancel this setting. TO TURN UNIT ON:
YOU ...
Complete Owners Guide - Page 6

...fixed combination of Cool mode and Auto fan speed setting.
See "To Operate on Fan Only" section ...Instructions
(continued) AUTO FEATURE:
YOU WILL SEE:
DO THIS: PRESS
MODE BUTTON CHOOSE AUTO
COOL FEATURE:
Note: This mode is reached. YOU WILL SEE:
DO THIS: PRESS TO RAISE PRESS TO LOWER
6
2009 Electrolux Home Products, Inc. All rights reserved. This temperature will be selected manually...
Complete Owners Guide - Page 7

...
TO ADJUST FAN SPEEDS:
Operating Instructions
YOU WILL SEE:
DO THIS: PRESS TO SELECT
TO USE AUTO FAN FEATURE:
Note: The fan speed can be selected among four settings: Auto, Lo(Low), Med(Medium...not desired, such as for room air circulation or to exhaust stale air on some models. (Remember to the original set temperature. During this function, the display will re-adjust back to the slowest speed...
Complete Owners Guide - Page 9

... set temperature will illuminate to turn on delay stop (or start). Operating Instructions
(continued)
TIMER: DELAY STOP/START FEATURE
Operating Instructions
...YOU WILL SEE HOW MUCH TIME IS CHOSEN:
THEN DO THIS:
PRESS UP/DOWN BUTTONS
FIRST DO THIS:
PRESS TIMER BUTTON
REMOTE SENSING FEATURE (on some models...
Complete Owners Guide - Page 10

...Speeds (Low speed only on 115V models), Timer, or Sleep Modes.
Operating Instructions
Operating Instructions
(continued) HEATING MODE(on some models):
YOU WILL SEE:
FAULT CODES:
DO THIS: PRESS
MODE BUTTON ...of displaying temperature in degrees Fahrenheit or degrees Celsius. Contact your Authorized Frigidaire Service Center. When in heating mode. The temperature will cycle off and on...
Complete Owners Guide - Page 11

...is restored. Operating Instructions
Operating Instructions
(continued)
ADDITIONAL ...THINGS YOU SHOULD KNOW
Now that you have mastered the operating procedure, here are more features in your control that you to direct the air flow Up or Down and Left or Right throughout the room as needed.
Slider Type
The louvers will continue to the same setting...
Complete Owners Guide - Page 13
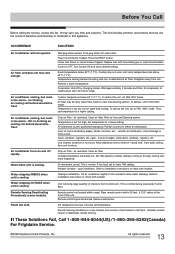
... the coil, set to installation instructions or check with installer. To defrost the coil, set FAN ONLY mode...800-265-8352(Canada) For Frigidaire Service.
2009 Electrolux Home Products, Inc....models) and remote control located in the COOL mode. Set temperature too low. All rights reserved.
13
Wall plug disconnected. Push plug firmly into wall outlet. Press the RESET button. Replace...
Complete Owners Guide - Page 14

...walls, etc.
13. Products with the provided instructions.
8. Service calls to obtain and keep all costs for functional repairs only. Expenses for making the appliance accessible for service and parts under this appliance that prove to establish the warranty period
Service
should service be defective in materials or workmanship when such appliance is installed, used in your appliance...
Installation Instructions - Page 1
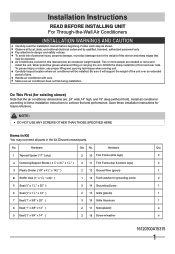
... THAN THOSE SPECIFIED HERE
Items in the kit. Discard unused parts.
Installation Instructions
READ BEFORE INSTALLING UNIT For Through-the-Wall Air Conditioners
INSTALLATION WARNINGS AND CAUTION
Carefully read the installation manual before beginning. Follow each step as shown. Observe all parts in Kit
You may be installed. Pay attention to achieve the best performance. Two or more...
Installation Instructions - Page 2

... is complete, replacement unit must be attached to unit
Grounding.
1"
Level
3" Max
3/16" Pilot Hole
Sleeve
Fig.2
2 GE/Hotpoint/Amana Fedders/Emerson/Friedrich (WSE)*
15 5 8" 16 7 8"
16 7 8"
Friedrich (USC)
15 1 2"
For larger sleeves, an adaptor trim kit (EA120T) is recommended. Installation Instructions
Common Wall-Sleeve Dimensions
1.
Identify the wall-sleeve brand for...
Installation Instructions - Page 3
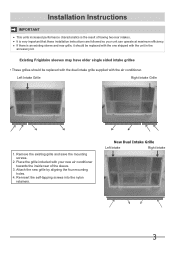
...self-tapping screws into the nylon retainers. It is very important that these installation instructions are followed so your new air conditioner towards the inside rear of having two... result of the sleeve.
3.
Installation Instructions
IMPORTANT
This units increased performance characteristics is an existing sleeve and rear grille, it should be replaced with the one shipped with the...
Installation Instructions - Page 4

Holding the grille by securing with a knot. Warning: When removing grilles, protect from cord or strapping looped through the front of the sleeve.
4
Installation Instructions
Grille Removal Important: Single intake grilles must be removed when used with one hand the retaining screws can be removed and the grille can be ...
Installation Instructions - Page 6
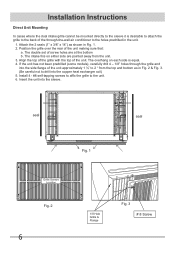
... copper heat exchanger coil) 5. The double set of the unit approximately 1 ½" to 2 " from the unit. 3. Installation Instructions
Direct Unit Mounting
In cases where the dual... intake grille cannot be mounted directly to the sleeve it is equal. 4. If the unit has not been predrilled (some models), ...
Frigidaire FFTH102WA2 Reviews
We have not received any reviews for Frigidaire yet.