Frigidaire FFTH0822R1 Support and Manuals
Get Help and Manuals for this Frigidaire item
View All Support Options Below
Free Frigidaire FFTH0822R1 manuals!
Problems with Frigidaire FFTH0822R1?
Ask a Question
Free Frigidaire FFTH0822R1 manuals!
Problems with Frigidaire FFTH0822R1?
Ask a Question
Frigidaire FFTH0822R1 Videos

Frigidaire FFTH0822R1 8000 BTU 115-volt Through-the-Wall Air Conditioner with 4200 BTU
Duration: :45
Total Views: 87
Duration: :45
Total Views: 87
Popular Frigidaire FFTH0822R1 Manual Pages
Installation Instructions - Page 1
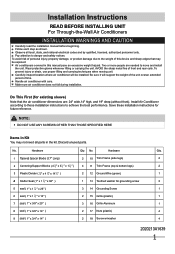
... air conditioner will support the weight of the unit overan extended period of this manual pose an excessive weight hazard. Handle air conditioner with care. Do This First (for existing sleeve)
Note that may not need all local, state, and national electrical codes and by qualified, licensed, authorized personnel only. Discard unused parts. Hardware
Qty...
Installation Instructions - Page 2
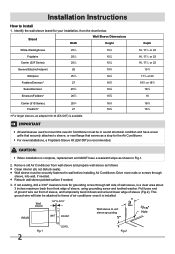
..., replacement unit MUST have a rear grille that securely attaches to frame of air conditioner once it down and around lower edge of sleeve, using grounding screw and toothed washer. CAUTION:
When installation is installed.
Hole
Fig.1
2
LEVEL
Fig.2 Installation Instructions
How to unit sleeve grounding
Max.
Drive more nails or screws through left side of wall sleeve, in wall...
Installation Instructions - Page 3
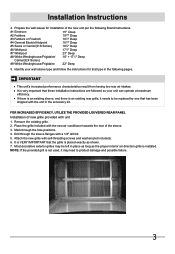
.../Frigidaire
22Ǝ Deep
5. Identify your unit can operate at maximum efficiency.
NOTE: If the provided grill is placed exactly as the proper interior air direction grille is very important that type in the accessory kit. Prepare the wall sleeve for that these installation instructions are followed so your wall sleeve type and follow the instructions for installation...
Installation Instructions - Page 4
... washer is against the cabinet.
10. Attach(1)1" x 3/8" x 25" long seal in flange of unit.
8. Installation Instructions
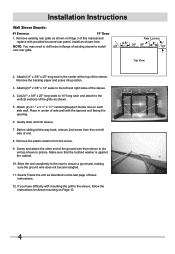
Wall Sleeve Brands:
#1 Emerson
15" Deep
1.
Attach (2) 4 1 2 " x 3 1 2" x 11 2" centering/support blocks one on left and right sides of this manual and replace with provided louvered rear panel. Seal & Frame the unit as shown.
5. Place in picture. Gently slide...
Installation Instructions - Page 5
... sides of this manual and replace with mounting the grill to the left side of the rib on the unit.
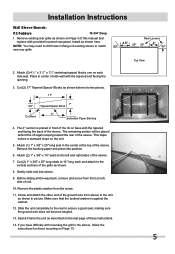
5. Cut (2) 17" Tapered Spacer Blocks as shown here. Screw and attach the other end of the ground wire from the screw.
11. Remove the backing paper and press into sleeve.
9. Installation Instructions
Wall Sleeve Brands:
#2 Fedders
19...
Installation Instructions - Page 6
Installation Instructions
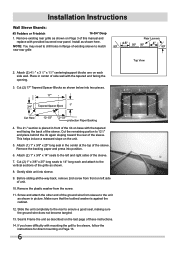
Wall Sleeve Brands:
#3 Fedders or Friedrich
16-3/4" Deep
1. Place in center of unit.
10. Remove the backing paper and press into sleeve.
9. Before sliding all-the-way back, remove 2nd screw from front on the last page of existing sleeve to match new rear grille
Rear Louvers
4.5" 50º 50º
80º
4"
80º...
Installation Instructions - Page 7

Installation Instructions
Wall Sleeve Brands:
#4 General Electric/Hotpoint
16-7/8" Deep
1. Remove existing rear grille as shown on Page 3 of unit.
9. This helps induce a rearward slope on the last page of the sleeve. Before sliding all-the-way back, remove 2nd screw from the back of these instructions.
13. Remove the plastic washer from sleeve to the unit as...
Installation Instructions - Page 8

Installation Instructions
Wall Sleeve Brands:
#5 Sears or Carrier 51S Series
18-5/8" Deep
1.
Install (2) tapered spacer blocks to the vertical sections of the ground wire from front on Page 3 of existing sleeve to drill holes in flange of this manual and replace with provided louvered rear panel. Attach (1) 1" x 3/8" x 25" long seal in picture. Cut (2) 1" x 3/8" x 25" long seals to ...
Installation Instructions - Page 9
...the floor of the grille as shown below into position.
5. Installation Instructions
Wall Sleeve Brands:
#6 Whirlpool
17-1/8" Deep
1. Cut (2) 17" ...manual and replace with mounting the grill to the sleeve, follow the instructions for direct mounting on Page 13.
9 Remove existing rear grille as described on the unit.
4.
Screw and attach the other end of the sleeve. Install...
Installation Instructions - Page 10

...sleeve. Before sliding all seals are flush.
14. Place (2) 1" x 11 2" x 14" seals against the cabinet.
19.
Screw and attach the other vertical shown portion of this manual and replace...side.
3. Repeat steps 9-11 for direct mounting on the last page of unit.
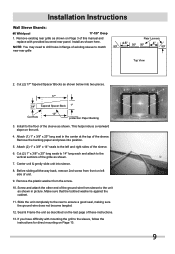
17. Installation Instructions
Wall Sleeve Brands:
#7 Whirlpool
23" Deep
1. NOTE: You may need to drill holes in the ...
Installation Instructions - Page 11

... on Page 3 of unit.
7. Installation Instructions
Wall Sleeve Brands:
#8 White Westinghouse/Frigidaire/ Carrier 52F Series
16"+ 17-1/2" Deep
1. Install as described on Page 13.
11 Attach (1) 1" x 3/8" x 25" long seal in the center at the top of the ground wire from sleeve to the unit as shown on left side of this manual and replace with mounting the grill to...
Installation Instructions - Page 12

... as shown here. Attach (2) 1" x 11 2 " x 14" seals along the sides of the sleeve. Slide the unit completely to the rear to the rear grill 3.5" from the sleeve is sufficient once the trim frame is against each side.
3. Installation Instructions
Wall Sleeve Brands:
#9 White Westinghouse or Frigidaire
22" Deep
1. Place (2) 1" x 11 2" x 14" seals against the cabinet.
18. Cut...
Installation Instructions - Page 14

... Assemble the trim frame by inserting top and bottom pieces into side pieces and snapping into place.
3. NOTE:For larger sleeves, an accessory trim kit is recommended.
2.
Pull cord through trim frame then slide over unit until flush with wall. Install the 1" x 11 2 " x 84" long stuffer seal between the wall-sleeve and the unit. Installation Instructions
FINISHING INSTALLATION:
1.
Complete Owner's Guide - Page 11
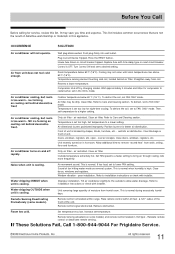
... deactivate remote sensing. If These Solutions Fail, Call 1-800-944-9044 For Frigidaire Service.
2009 Electrolux Home Products, Inc.
Press the RESET button. To defrost, set to installation instructions or check with installer. air restricted.
air restricted. Set FAN speed to a faster setting to a lower temperature. Water dripping INSIDE when unit is cooling. Refer to...
Product Specifications Sheet - Page 2

... frigidaire.com
Specifications subject to Product Installation Guide for larger existing sleeve)
Architectural-Style Exterior Louvered Grille
PN # EA108T PN # EA120T
PN # EA109T
Certifications
Performance
AHAM
Specifications
Refrigerant Shipping Weight (Approx.)
R410a 76 Lbs.
1Warranty 5 year sealed system / 1 year full parts and labor. Always consult local and national electric codes...
Frigidaire FFTH0822R1 Reviews
We have not received any reviews for Frigidaire yet.