

Complete Owner s Guide
Page 1
All about the Use &Care of your Room Air Conditioner TABLE OF CONTENTS Important Safety Instructions 2-3 Product Registration 4 Normal Sounds 4 Air Conditioner Features 5 Operating Instructions 5-10 Care and Cleaning 10 Energy Saving Ideas 10 Before You Call 11 Major Appliance Limited Warranty 12 www.frigidaire.com USA 1-800-944-9044 www.frigidaire.ca Canada 1-800-265-8352 16120300A04642 (June 2009)
All about the Use &Care of your Room Air Conditioner TABLE OF CONTENTS Important Safety Instructions 2-3 Product Registration 4 Normal Sounds 4 Air Conditioner Features 5 Operating Instructions 5-10 Care and Cleaning 10 Energy Saving Ideas 10 Before You Call 11 Major Appliance Limited Warranty 12 www.frigidaire.com USA 1-800-944-9044 www.frigidaire.ca Canada 1-800-265-8352 16120300A04642 (June 2009)
Complete Owner s Guide
Page 2
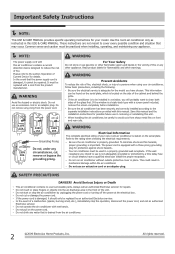
... the model you intend to the rating when checking the electrical requirements. Be sure the air conditioner has been securely and correctly installed according to the separate installation instructions provided with this USE & CARE MANUAL. The power cord is damaged, it should only be installed in removing or reinstalling this manual. Do not operate the air conditioner with a three-prong grounding plug for repairs. Important Safety Instructions NOTE: This USE & CARE MANUAL provides specific operating instructions...
... the model you intend to the rating when checking the electrical requirements. Be sure the air conditioner has been securely and correctly installed according to the separate installation instructions provided with this USE & CARE MANUAL. The power cord is damaged, it should only be installed in removing or reinstalling this manual. Do not operate the air conditioner with a three-prong grounding plug for repairs. Important Safety Instructions NOTE: This USE & CARE MANUAL provides specific operating instructions...
Complete Owner s Guide
Page 3
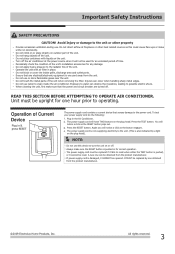
... fins of the unit when removing the filter. Do not use water to turn the unit on the plug head. Do not use or store flammable gases near the unit. Always make sure that any damage. Periodically check the condition of the unit. Avoid Injury or damage to the unit or other heat related sources as this device to clean inside the air conditioner. Plug in the Air Conditioner. Press the RESET button.
... fins of the unit when removing the filter. Do not use water to turn the unit on the plug head. Do not use or store flammable gases near the unit. Always make sure that any damage. Periodically check the condition of the unit. Avoid Injury or damage to the unit or other heat related sources as this device to clean inside the air conditioner. Plug in the Air Conditioner. Press the RESET button.
Complete Owner s Guide
Page 5
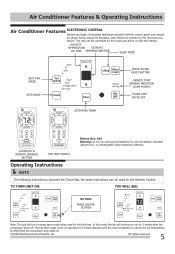
... reserved. 5 ADJUSTS TEMPERATURE DISPLAYS OR TIME TEMPERATURE/TIME SLEEP MODE SETS FAN SPEED SETS MODE ACTIVATES TIMER CHECK FILTER RESET BUTTON REMOTE TEMP SENSING INDICATOR (some models) TURNS UNIT ON OR OFF w/DISPLAY & REMOTE SENSING BUTTON FOR HEAT MODELS Battery Size: AAA Warning: Do not mix old and new batteries. Operating Instructions NOTE The following instructions represent the Touch Pad, the same instructions can be used for 1 minute after the compressor shuts off. Air Conditioner Features & Operating Instructions Air Conditioner Features ELECTRONIC CONTROL Before you...
... reserved. 5 ADJUSTS TEMPERATURE DISPLAYS OR TIME TEMPERATURE/TIME SLEEP MODE SETS FAN SPEED SETS MODE ACTIVATES TIMER CHECK FILTER RESET BUTTON REMOTE TEMP SENSING INDICATOR (some models) TURNS UNIT ON OR OFF w/DISPLAY & REMOTE SENSING BUTTON FOR HEAT MODELS Battery Size: AAA Warning: Do not mix old and new batteries. Operating Instructions NOTE The following instructions represent the Touch Pad, the same instructions can be used for 1 minute after the compressor shuts off. Air Conditioner Features & Operating Instructions Air Conditioner Features ELECTRONIC CONTROL Before you...
Complete Owner s Guide
Page 6
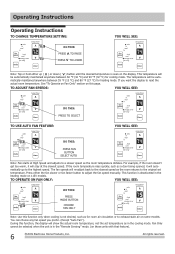
... THIS: PRESS FAN BUTTON SELECT AUTO Note: Fan starts at the slowest speed. Press either up ( ) or down ( ) button until the desired temperature is deactivated in the "Remote Sensing" mode. (on 115V models. All rights reserved. This function is seen on this function only when cooling is in the heating mode on those units with that feature). 6 2009 Electrolux Home Products, Inc. Operating Instructions Operating Instructions TO CHANGE TEMPERATURE SETTlNG: DO...
... THIS: PRESS FAN BUTTON SELECT AUTO Note: Fan starts at the slowest speed. Press either up ( ) or down ( ) button until the desired temperature is deactivated in the "Remote Sensing" mode. (on 115V models. All rights reserved. This function is seen on this function only when cooling is in the heating mode on those units with that feature). 6 2009 Electrolux Home Products, Inc. Operating Instructions Operating Instructions TO CHANGE TEMPERATURE SETTlNG: DO...
Complete Owner s Guide
Page 7
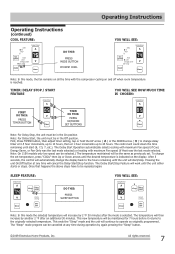
... TIMER button, then adjust timer setting, tap or hold the UP arrow ( ) or the DOWN arrow ( ) to 10 hours, then at any time during operation by another 2 °F after the mode is selected. The Delay Start Operation automatically selects cooling with maximum Fan speed (if Cool, Energy Saver, or Fan Only was the last mode selected) or heating with the compressor cycling on and off when room temperature is...
... TIMER button, then adjust timer setting, tap or hold the UP arrow ( ) or the DOWN arrow ( ) to 10 hours, then at any time during operation by another 2 °F after the mode is selected. The Delay Start Operation automatically selects cooling with maximum Fan speed (if Cool, Energy Saver, or Fan Only was the last mode selected) or heating with the compressor cycling on and off when room temperature is...
Complete Owner s Guide
Page 8
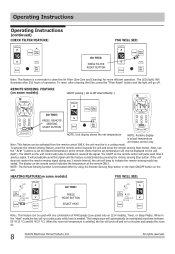
... LIGHT on 115V models), Timer, or Sleep Modes. Next, use the " " buttons to set temperature is satisfied, the fan will pulse to clean the Air Filter (See Care and Cleaning) for more efficient operation. To reset after 250 hours of FAN Speeds (Low speed only on the remote control will beep to circulate and sample the room air. 8 2009 Electrolux Home Products, Inc. Operating Instructions Operating Instructions (continued) CHECK FILTER FEATURE: YOU WILL SEE: DO THIS: PRESS FILTER RESET BUTTON...
... LIGHT on 115V models), Timer, or Sleep Modes. Next, use the " " buttons to set temperature is satisfied, the fan will pulse to clean the Air Filter (See Care and Cleaning) for more efficient operation. To reset after 250 hours of FAN Speeds (Low speed only on the remote control will beep to circulate and sample the room air. 8 2009 Electrolux Home Products, Inc. Operating Instructions Operating Instructions (continued) CHECK FILTER FEATURE: YOU WILL SEE: DO THIS: PRESS FILTER RESET BUTTON...
Complete Owner s Guide
Page 9
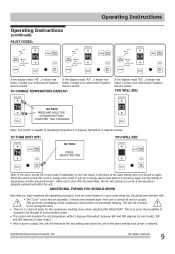
... "Cool" circuit has an automatic 3 minute time delayed start if the unit is turned on again, but the setting of the compressor and possible circuit breaker tripping. There is capable of having to roll through to run for the compressor shutting down when selecting FAN ONLY/HEAT. This is turned off in the Heat Mode, the fan will return to cover the possibility of displaying temperature in your Authorized Frigidaire Service...
... "Cool" circuit has an automatic 3 minute time delayed start if the unit is turned on again, but the setting of the compressor and possible circuit breaker tripping. There is capable of having to roll through to run for the compressor shutting down when selecting FAN ONLY/HEAT. This is turned off in the Heat Mode, the fan will return to cover the possibility of displaying temperature in your Authorized Frigidaire Service...
Complete Owner s Guide
Page 10
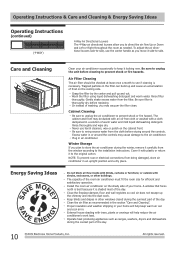
... air filter as needed. Air Filter Cleaning The air filter should be dusted with an oil-free cloth or washed with plastic or return it looking new. The cabinet and front may vacuum the filter clean. Winter Storage If you may be checked at least once a month to see if cleaning is thoroughly dry before wiping around the controls may cause damage to the air conditioner. Operating Instructions & Care and Cleaning & Energy...
... air filter as needed. Air Filter Cleaning The air filter should be dusted with an oil-free cloth or washed with plastic or return it looking new. The cabinet and front may vacuum the filter clean. Winter Storage If you may be checked at least once a month to see if cleaning is thoroughly dry before wiping around the controls may cause damage to the air conditioner. Operating Instructions & Care and Cleaning & Energy...
Complete Owner s Guide
Page 11
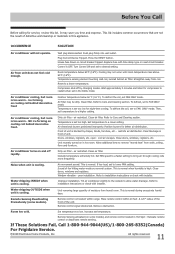
... fan hitting water-moisture removal system. Set temperature too low. Straighten away from humid room. Reset to remove "stored heat" from unit does not feel cold enough. Dirty air filter - Allow additional time to a lower temperature. Air conditioner turns on cooling coil behind decorative front. Water dripping INSIDE when unit is too warm - Close doors, windows and registers. Push plug firmly into wall outlet. Turn Control ON and set temperature to desired setting. Air from walls, ceiling, floor and furniture. Refer to installation instructions...
... fan hitting water-moisture removal system. Set temperature too low. Straighten away from humid room. Reset to remove "stored heat" from unit does not feel cold enough. Dirty air filter - Allow additional time to a lower temperature. Air conditioner turns on cooling coil behind decorative front. Water dripping INSIDE when unit is too warm - Close doors, windows and registers. Push plug firmly into wall outlet. Turn Control ON and set temperature to desired setting. Air from walls, ceiling, floor and furniture. Refer to installation instructions...
Complete Owner s Guide
Page 12
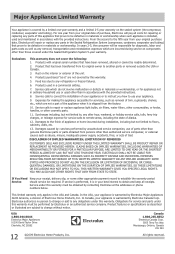
... obtained by unauthorized service companies; Products used and maintained in your original purchase date, Electrolux will repair or replace any removal, transportation and reinstallation expenses which are not a part of the appliance when it is in accordance with original serial numbers that prove to , any refrigerator or freezer failures. 6. Major Appliance Limited Warranty Your appliance is covered by a limited one year from your...
... obtained by unauthorized service companies; Products used and maintained in your original purchase date, Electrolux will repair or replace any removal, transportation and reinstallation expenses which are not a part of the appliance when it is in accordance with original serial numbers that prove to , any refrigerator or freezer failures. 6. Major Appliance Limited Warranty Your appliance is covered by a limited one year from your...
Installation Instructions
Page 1
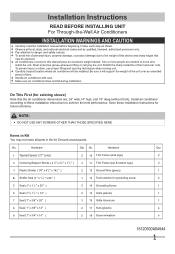
... product damage due to danger and safety notices. Air conditioners covered in the kit. Be sure it will be exposed. Install air conditioner according to these installation instructions for existing sleeve) Note that may not need all local, state, and national electrical codes and by qualified, licensed, authorized personnel only. AVOID the sharp metal fins of front and rear coils. Handle air conditioner with care. Discard unused parts...
... product damage due to danger and safety notices. Air conditioners covered in the kit. Be sure it will be exposed. Install air conditioner according to these installation instructions for existing sleeve) Note that may not need all local, state, and national electrical codes and by qualified, licensed, authorized personnel only. AVOID the sharp metal fins of front and rear coils. Handle air conditioner with care. Discard unused parts...
Installation Instructions
Page 2
... kit (EA120T) is securely fastened in Fig 1. • Remove old air conditioner from the front edge a 3/16" pilot hole for your installation, from the opening. Clean interior (do not disturb seals) 2. If a ground wire or mounting hole does not exist, drill a pilot hole for the air conditioner. Identify the wall-sleeve brand for the ground screw. Wall Sleeve Rear Fig.1 1/4" to 5/16" Front Wall sleeve to the air conditioner once installed. NOTE: When installation...
... kit (EA120T) is securely fastened in Fig 1. • Remove old air conditioner from the front edge a 3/16" pilot hole for your installation, from the opening. Clean interior (do not disturb seals) 2. If a ground wire or mounting hole does not exist, drill a pilot hole for the air conditioner. Identify the wall-sleeve brand for the ground screw. Wall Sleeve Rear Fig.1 1/4" to 5/16" Front Wall sleeve to the air conditioner once installed. NOTE: When installation...
Installation Instructions
Page 3
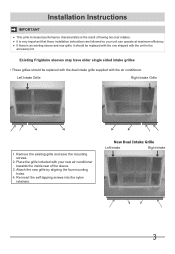
... new grille by aligning the four mounting holes. 4. New Dual Intake Grille Left Intake Right Intake 3 Left Intake Grille Right Intake Grille 1. Existing Frigidaire sleeves may have older single sided intake grilles • These grilles should be replaced with the dual intake grille supplied with the air conditioner. Remove the existing grille and save the mounting screws. 2. Re-insert the self-tapping screws into the nylon retainers. Installation Instructions IMPORTANT This units...
... new grille by aligning the four mounting holes. 4. New Dual Intake Grille Left Intake Right Intake 3 Left Intake Grille Right Intake Grille 1. Existing Frigidaire sleeves may have older single sided intake grilles • These grilles should be replaced with the dual intake grille supplied with the air conditioner. Remove the existing grille and save the mounting screws. 2. Re-insert the self-tapping screws into the nylon retainers. Installation Instructions IMPORTANT This units...

Installation Instructions
Page 5
... a non-directional air flow grille, such as shown below. Installation Instructions Alternate Installation Options Non-Directional Grilles When installing a through-the-wall unit into a sleeve that the dual intake grillet supplied with the unit, be possible to remove a non-Frigidaire grille and attach the dual intake grille directly to the unit before inserting the unit into the sleeve. (See section on the page titled "Direct Unit Mounting" 5 Instructions for direct attachment are shown on Direct Unit Mounting for instructions how...
... a non-directional air flow grille, such as shown below. Installation Instructions Alternate Installation Options Non-Directional Grilles When installing a through-the-wall unit into a sleeve that the dual intake grillet supplied with the unit, be possible to remove a non-Frigidaire grille and attach the dual intake grille directly to the unit before inserting the unit into the sleeve. (See section on the page titled "Direct Unit Mounting" 5 Instructions for direct attachment are shown on Direct Unit Mounting for instructions how...
Installation Instructions
Page 6
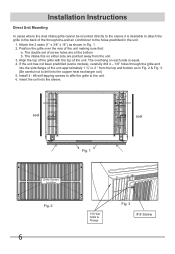
... unit making sure that: a. Installation Instructions Direct Unit Mounting In cases where the dual intake grille cannot be mounted directly to the sleeve it is equal. 4. If the unit has not been predrilled (some models), carefully drill 4 - 1/8" holes through -the-wall air conditioner to the holes predrilled in the unit. 1. Position the grille over the rear of the unit. The overhang on either side are at the bottom b. The double set...
... unit making sure that: a. Installation Instructions Direct Unit Mounting In cases where the dual intake grille cannot be mounted directly to the sleeve it is equal. 4. If the unit has not been predrilled (some models), carefully drill 4 - 1/8" holes through -the-wall air conditioner to the holes predrilled in the unit. 1. Position the grille over the rear of the unit. The overhang on either side are at the bottom b. The double set...

Installation Instructions
Page 7
... side wall with the new air conditioner towards the rear of the sleeve. 3. Attach(2)1" x 3/8" x 14" seals to the vertical sections of unit. 3. Place the grille included with the tapered end facing the opening. 5. Seal Installation 1. Cut(2)1" x 3/8" x 25" long seals to 14" long each side wall. Before sliding unit all the way back remove second screw from screw. 4. Slide unit completely to preparation instructions. 2. Mark...
... side wall with the new air conditioner towards the rear of the sleeve. 3. Attach(2)1" x 3/8" x 14" seals to the vertical sections of unit. 3. Place the grille included with the tapered end facing the opening. 5. Seal Installation 1. Cut(2)1" x 3/8" x 25" long seals to 14" long each side wall. Before sliding unit all the way back remove second screw from screw. 4. Slide unit completely to preparation instructions. 2. Mark...
Product Specifications Sheet
Page 1
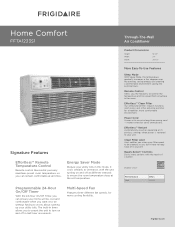
... set temperature. Ready-Select® Controls Easily select options with an extra long three-prong cord - The built-in timer allows you the flexibility to control the temperature and fan speed from anywhere in the room. Effortless™ Clean Filter Our antibacterial filter reduces bacteria, room odors and other airborne particles for more comfortable environment. Energy Saver Mode Reduce your utility bills in half-hour increments. Power Cord Comes...
... set temperature. Ready-Select® Controls Easily select options with an extra long three-prong cord - The built-in timer allows you the flexibility to control the temperature and fan speed from anywhere in the room. Effortless™ Clean Filter Our antibacterial filter reduces bacteria, room odors and other airborne particles for more comfortable environment. Energy Saver Mode Reduce your utility bills in half-hour increments. Power Cord Comes...
Product Specifications Sheet
Page 2
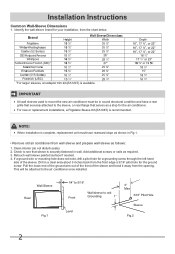
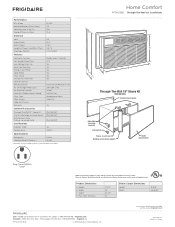
.... Always consult local and national electric codes. Product Dimensions A - Sleeve-to change. Width C - Ft.) Energy Efficiency Ratio 12,000 3.3 550 10.5 Electrical Volts Amps (Cool) Watts (Cool) Length of Power Cord (Min. / Max.) Plug Type (NEMA) Features Electronic Controls Fan Speeds (Cool / Fan) Low Voltage Start-Up Auto Cool Function Energy Saver Mode Sleep Mode Filter Check 24-Hour On / Off Timer Clean Air Ionizer Remote Control Air CFM (High / Med / Low) Air Direction Control Fresh Air / Exhaust Vent / Closed Filter Type Filter Access Slide-Out Chassis Warranty1 115...
.... Always consult local and national electric codes. Product Dimensions A - Sleeve-to change. Width C - Ft.) Energy Efficiency Ratio 12,000 3.3 550 10.5 Electrical Volts Amps (Cool) Watts (Cool) Length of Power Cord (Min. / Max.) Plug Type (NEMA) Features Electronic Controls Fan Speeds (Cool / Fan) Low Voltage Start-Up Auto Cool Function Energy Saver Mode Sleep Mode Filter Check 24-Hour On / Off Timer Clean Air Ionizer Remote Control Air CFM (High / Med / Low) Air Direction Control Fresh Air / Exhaust Vent / Closed Filter Type Filter Access Slide-Out Chassis Warranty1 115...
Product Specifications Sheet
Page 3
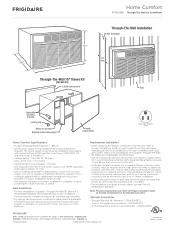
...-The-Wall 18" Sleeve Kit (PN # EA108T) Outside closure panel Wall Adjustable mounting brackets Locking clip Sleeve-to-unit seal Building construction support Inside closure panel Plug Type (NEMA) 5-15P Home Comfort Specifications • Product Shipping Weight (approx.) - 88 Lbs. • An electrical supply with grounded three-prong receptacle is installed. • For installation into larger existing sleeve, optional Trim Kit PN # EA120T available. The power supply circuit must be replaced with new unit's rear air-directional louvered grille...
...-The-Wall 18" Sleeve Kit (PN # EA108T) Outside closure panel Wall Adjustable mounting brackets Locking clip Sleeve-to-unit seal Building construction support Inside closure panel Plug Type (NEMA) 5-15P Home Comfort Specifications • Product Shipping Weight (approx.) - 88 Lbs. • An electrical supply with grounded three-prong receptacle is installed. • For installation into larger existing sleeve, optional Trim Kit PN # EA120T available. The power supply circuit must be replaced with new unit's rear air-directional louvered grille...


