

Complete Owner s Guide
Page 1
All about the Use &Care of your Room Air Conditioner TABLE OF CONTENTS Important Safety Instructions 2-3 Product Registration 4 Normal Sounds 4 Air Conditioner Features 5 Operating Instructions 5-10 Care and Cleaning 10 Energy Saving Ideas 10 Before You Call 11 Major Appliance Limited Warranty 12 www.frigidaire.com USA 1-800-944-9044 www.frigidaire.ca Canada 1-800-265-8352 16120300A04642 (June 2009)
All about the Use &Care of your Room Air Conditioner TABLE OF CONTENTS Important Safety Instructions 2-3 Product Registration 4 Normal Sounds 4 Air Conditioner Features 5 Operating Instructions 5-10 Care and Cleaning 10 Energy Saving Ideas 10 Before You Call 11 Major Appliance Limited Warranty 12 www.frigidaire.com USA 1-800-944-9044 www.frigidaire.ca Canada 1-800-265-8352 16120300A04642 (June 2009)
Complete Owner s Guide
Page 2
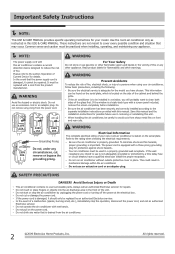
... the power cord or turning off the power at the electrical box. In the event that is a triple-track type with a cord from sharp metal fins on the serial plate. This information can be replaced with a screen panel included, remove the screen completely before installation. If the window is drained from the power cord. Read product labels for your new room air conditioner is damaged, it should only be practiced when installing, operating...
... the power cord or turning off the power at the electrical box. In the event that is a triple-track type with a cord from sharp metal fins on the serial plate. This information can be replaced with a screen panel included, remove the screen completely before installation. If the window is drained from the power cord. Read product labels for your new room air conditioner is damaged, it should only be practiced when installing, operating...
Complete Owner s Guide
Page 3
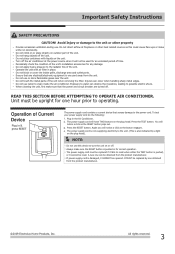
... cord contains a current device that the power and circuit breaker are turned off . All rights reserved. 3 Turn off the unit. Periodically check the condition of the unit when removing the filter. READ THIS SECTION BEFORE ATTEMPTING TO OPERATE AIR CONDITIONER. The power supply cord will notice a click as the button engages. Again you will not be replaced if it fails to clean inside the air conditioner. The power supply cord must be reset. Do not use...
... cord contains a current device that the power and circuit breaker are turned off . All rights reserved. 3 Turn off the unit. Periodically check the condition of the unit when removing the filter. READ THIS SECTION BEFORE ATTEMPTING TO OPERATE AIR CONDITIONER. The power supply cord will notice a click as the button engages. Again you will not be replaced if it fails to clean inside the air conditioner. The power supply cord must be reset. Do not use...
Complete Owner s Guide
Page 5
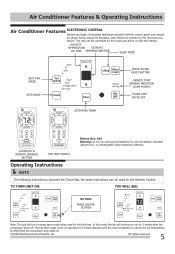
... Pad, the same instructions can be used for the first time. All rights reserved. 5 ADJUSTS TEMPERATURE DISPLAYS OR TIME TEMPERATURE/TIME SLEEP MODE SETS FAN SPEED SETS MODE ACTIVATES TIMER CHECK FILTER RESET BUTTON REMOTE TEMP SENSING INDICATOR (some models) TURNS UNIT ON OR OFF w/DISPLAY & REMOTE SENSING BUTTON FOR HEAT MODELS Battery Size: AAA Warning: Do not mix old and new batteries. The fan then cycles on . 2009 Electrolux Home Products, Inc. In this mode, the fan will run for...
... Pad, the same instructions can be used for the first time. All rights reserved. 5 ADJUSTS TEMPERATURE DISPLAYS OR TIME TEMPERATURE/TIME SLEEP MODE SETS FAN SPEED SETS MODE ACTIVATES TIMER CHECK FILTER RESET BUTTON REMOTE TEMP SENSING INDICATOR (some models) TURNS UNIT ON OR OFF w/DISPLAY & REMOTE SENSING BUTTON FOR HEAT MODELS Battery Size: AAA Warning: Do not mix old and new batteries. The fan then cycles on . 2009 Electrolux Home Products, Inc. In this mode, the fan will run for...
Complete Owner s Guide
Page 6
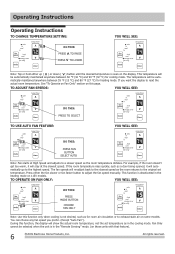
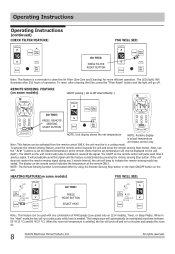
... fan speed manually. For example, if the room doesn't get too warm, it will auto- If the room temperature rises quickly, such as the room returns to the original set temperature as for heating mode. TO OPERATE ON FAN ONLY: YOU WILL SEE: DO THIS: PRESS MODE BUTTON CHOOSE FAN ONLY Note: Use this function only when cooling is seen on those units with that feature). 6 2009 Electrolux Home Products...
... fan speed manually. For example, if the room doesn't get too warm, it will auto- If the room temperature rises quickly, such as the room returns to the original set temperature as for heating mode. TO OPERATE ON FAN ONLY: YOU WILL SEE: DO THIS: PRESS MODE BUTTON CHOOSE FAN ONLY Note: Use this function only when cooling is seen on those units with that feature). 6 2009 Electrolux Home Products...
Complete Owner s Guide
Page 7
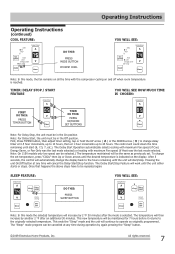
...: PRESS SLEEP BUTTON Note: In this mode, the fan remains on all the time with maximum Fan speed (if Heat was the last mode selected) or heating with the compressor cycling on the display. The control will then increase by 2 °F 30 minutes after an additional 30 minutes. The temperature will count down the time remaining until the unit either starts or stops. This new temperature will...
...: PRESS SLEEP BUTTON Note: In this mode, the fan remains on all the time with maximum Fan speed (if Heat was the last mode selected) or heating with the compressor cycling on the display. The control will then increase by 2 °F 30 minutes after an additional 30 minutes. The temperature will count down the time remaining until the unit either starts or stops. This new temperature will...
Complete Owner s Guide
Page 8
... a cooling mode. To activate the remote sensing feature, point the remote control towards the unit and press the remote sensing Start button. Next, use the " " buttons to set the desired temperature at the remote ONLY. Operating Instructions Operating Instructions (continued) CHECK FILTER FEATURE: YOU WILL SEE: DO THIS: PRESS FILTER RESET BUTTON Note: This feature is satisfied, the fan will cycle off . The LED (light) Will illuminate after cleaning the filter, press the "Filter Reset" button and the light will...
... a cooling mode. To activate the remote sensing feature, point the remote control towards the unit and press the remote sensing Start button. Next, use the " " buttons to set the desired temperature at the remote ONLY. Operating Instructions Operating Instructions (continued) CHECK FILTER FEATURE: YOU WILL SEE: DO THIS: PRESS FILTER RESET BUTTON Note: This feature is satisfied, the fan will cycle off . The LED (light) Will illuminate after cleaning the filter, press the "Filter Reset" button and the light will...
Complete Owner s Guide
Page 9
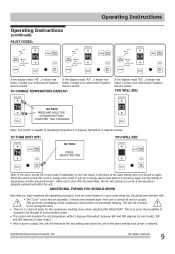
... energy saver mode when it is turned off and on again, but the setting of the compressor and possible circuit breaker tripping. The fan will run during this time. When the unit is turned on again. The "Cool" circuit has an automatic 3 minute time delayed start if the unit is restored. 2009 Electrolux Home Products, Inc. All rights reserved. 9 Contact your Authorized Frigidaire Service Center. TO CHANGE TEMPERATURE DISPLAY: If the display...
... energy saver mode when it is turned off and on again, but the setting of the compressor and possible circuit breaker tripping. The fan will run during this time. When the unit is turned on again. The "Cool" circuit has an automatic 3 minute time delayed start if the unit is restored. 2009 Electrolux Home Products, Inc. All rights reserved. 9 Contact your Authorized Frigidaire Service Center. TO CHANGE TEMPERATURE DISPLAY: If the display...
Complete Owner s Guide
Page 10
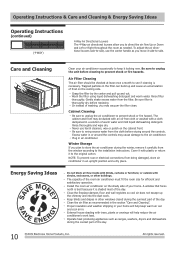
.... Operate heat producing appliances such as recommended in your home. Air Filter Cleaning The air filter should be dusted with an oil-free cloth or washed with trees, plants or awnings will help reduce the air conditioner's work . The cabinet and front may cause damage to the air conditioner. Rinse thoroughly and wipe dry. Be sure to wring excess water from the window according to the installation instructions. Excess water in...
.... Operate heat producing appliances such as recommended in your home. Air Filter Cleaning The air filter should be dusted with an oil-free cloth or washed with trees, plants or awnings will help reduce the air conditioner's work . The cabinet and front may cause damage to the air conditioner. Rinse thoroughly and wipe dry. Be sure to wring excess water from the window according to the installation instructions. Excess water in...
Complete Owner s Guide
Page 11
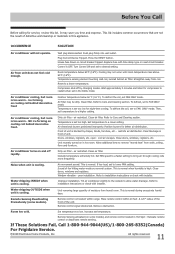
...air conditioner slightly to the outside to a lower setting. Refer to FAN ONLY mode. Place remote control within range. Set temperature too low. Compressor shut-off rapidly. Then, set to installation instructions or check with installer. air restricted. Set temperature to allow water drainage. air restricted. Before You Call Before calling for better air distribution. House fuse blown or circuit breaker tripped. Temperature sensing element touching cold coil, located behind air filter. Refer to lower FAN setting. Clean air filter. Doors, windows, registers, etc. open...
...air conditioner slightly to the outside to a lower setting. Refer to FAN ONLY mode. Place remote control within range. Set temperature too low. Compressor shut-off rapidly. Then, set to installation instructions or check with installer. air restricted. Set temperature to allow water drainage. air restricted. Before You Call Before calling for better air distribution. House fuse blown or circuit breaker tripped. Temperature sensing element touching cold coil, located behind air filter. Refer to lower FAN setting. Clean air filter. Doors, windows, registers, etc. open...
Complete Owner s Guide
Page 12
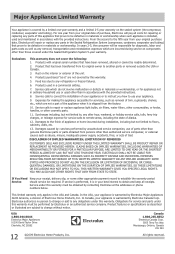
.... Damages to repair or replace appliance light bulbs, air filters, water filters, other consumables, or knobs, handles, or other than in accordance with the provided instructions. 8. or external causes such as any parts in your best interest to use of this warranty. 5. Service under this warranty must be defective in materials or workmanship when such appliance is in the Sealed Refrigeration System (compressor, condenser, evaporator and...
.... Damages to repair or replace appliance light bulbs, air filters, water filters, other consumables, or knobs, handles, or other than in accordance with the provided instructions. 8. or external causes such as any parts in your best interest to use of this warranty. 5. Service under this warranty must be defective in materials or workmanship when such appliance is in the Sealed Refrigeration System (compressor, condenser, evaporator and...
Installation Instructions
Page 1
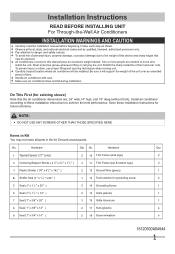
... carrying the unit. Carefully inspect location where air conditioner will support the weight of the unit over an extended period of front and rear coils. Do This First (for existing sleeve) Note that may not need all local, state, and national electrical codes and by qualified, licensed, authorized personnel only. Install air conditioner according to danger and safety notices. NOTE: DO NOT USE ANY SCREWS...
... carrying the unit. Carefully inspect location where air conditioner will support the weight of the unit over an extended period of front and rear coils. Do This First (for existing sleeve) Note that may not need all local, state, and national electrical codes and by qualified, licensed, authorized personnel only. Install air conditioner according to danger and safety notices. NOTE: DO NOT USE ANY SCREWS...
Installation Instructions
Page 2
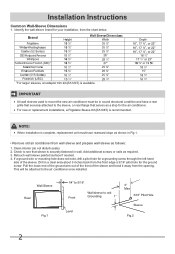
... wall sleeve painted surface if needed. 4. Pull the loose end of the ground wire out of the front of the sleeve. For new or replacement installations, a Frigidaire Sleeve Kit (EA108T) is complete, replacement unit must be attached to unit Grounding. 1" Level 3" Max 3/16" Pilot Hole Sleeve Fig.2 2 If a ground wire or mounting hole does not exist, drill a pilot hole for your installation, from the opening. Wall Sleeve Rear Fig.1 1/4" to 5/16" Front Wall sleeve to the air conditioner...
... wall sleeve painted surface if needed. 4. Pull the loose end of the ground wire out of the front of the sleeve. For new or replacement installations, a Frigidaire Sleeve Kit (EA108T) is complete, replacement unit must be attached to unit Grounding. 1" Level 3" Max 3/16" Pilot Hole Sleeve Fig.2 2 If a ground wire or mounting hole does not exist, drill a pilot hole for your installation, from the opening. Wall Sleeve Rear Fig.1 1/4" to 5/16" Front Wall sleeve to the air conditioner...
Installation Instructions
Page 3
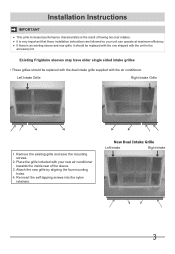
... sleeve and rear grille, it should be replaced with the one shipped with the unit in the accessory kit. Re-insert the self-tapping screws into the nylon retainers. It is very important that these installation instructions are followed so your new air conditioner towards the inside rear of having two rear intakes. Attach the new grille by aligning the four mounting holes. 4. Left Intake Grille...
... sleeve and rear grille, it should be replaced with the one shipped with the unit in the accessory kit. Re-insert the self-tapping screws into the nylon retainers. It is very important that these installation instructions are followed so your new air conditioner towards the inside rear of having two rear intakes. Attach the new grille by aligning the four mounting holes. 4. Left Intake Grille...

Installation Instructions
Page 5
... unit as diamond expanded grille or an archiectural grille. Installation Instructions Alternate Installation Options Non-Directional Grilles When installing a through-the-wall unit into a sleeve that the dual intake grillet supplied with the unit, be possible to remove a non-Frigidaire grille and attach the dual intake grille directly to the unit before inserting the unit into the sleeve. (See section on the page titled "Direct Unit Mounting" 5 It is recommended that utilizes a non-directional air flow grille...
... unit as diamond expanded grille or an archiectural grille. Installation Instructions Alternate Installation Options Non-Directional Grilles When installing a through-the-wall unit into a sleeve that the dual intake grillet supplied with the unit, be possible to remove a non-Frigidaire grille and attach the dual intake grille directly to the unit before inserting the unit into the sleeve. (See section on the page titled "Direct Unit Mounting" 5 It is recommended that utilizes a non-directional air flow grille...
Installation Instructions
Page 6
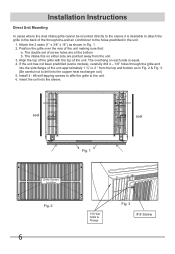
... heat exchanger coil) 5. The intake fins on each side is desirable to attach the grille to the back of the through the grille and into the sleeve. If the unit has not been predrilled (some models), carefully drill 4 - 1/8" holes through -the-wall air conditioner to the holes predrilled in Fig. 1. 2. Install 4 - #8 self-tapping screws to affix the grille to the unit. 6. seal seal Fig. 1 Grille Screws Location...
... heat exchanger coil) 5. The intake fins on each side is desirable to attach the grille to the back of the through the grille and into the sleeve. If the unit has not been predrilled (some models), carefully drill 4 - 1/8" holes through -the-wall air conditioner to the holes predrilled in Fig. 1. 2. Install 4 - #8 self-tapping screws to affix the grille to the unit. 6. seal seal Fig. 1 Grille Screws Location...

Installation Instructions
Page 7
... dual intake grille fits inside of sleeve according to preparation instructions. 2. Remove the existing grille. 2. Place the grille included with a 1/8" drill bit. 5. Drill through the hole positions. 4. Place in center of the sleeve. 3. Ground Wire Installation 1. It is VERY IMPORTANT that the grille is installed. Attach(1)1" x 3/8" x 25" long seal in place as long as shown. Mark through the sleeve flanges with the new air conditioner towards the...
... dual intake grille fits inside of sleeve according to preparation instructions. 2. Remove the existing grille. 2. Place the grille included with a 1/8" drill bit. 5. Drill through the hole positions. 4. Place in center of the sleeve. 3. Ground Wire Installation 1. It is VERY IMPORTANT that the grille is installed. Attach(1)1" x 3/8" x 25" long seal in place as long as shown. Mark through the sleeve flanges with the new air conditioner towards the...
Product Specifications Sheet
Page 1
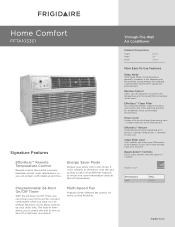
... Cool BTUs 10,000 frigidaire.com Home Comfort FFTA1033S1 Signature Features Effortless™ Remote Temperature Control Remote control thermostat precisely maintains preset room temperature, so you can ensure your utility bills in the room. It cools similarly to central air, with the unit turning on and off in timer allows you to preset the unit to turn on and off at different intervals to ensure the room temperature stays at the set temperature. Power Cord Comes with...
... Cool BTUs 10,000 frigidaire.com Home Comfort FFTA1033S1 Signature Features Effortless™ Remote Temperature Control Remote control thermostat precisely maintains preset room temperature, so you can ensure your utility bills in the room. It cools similarly to central air, with the unit turning on and off in timer allows you to preset the unit to turn on and off at different intervals to ensure the room temperature stays at the set temperature. Power Cord Comes with...
Product Specifications Sheet
Page 2
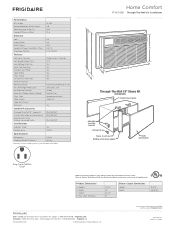
... Yes AHAM Adjustable mounting brackets Locking clip Specifications Refrigerant Shipping Weight (Approx.) R410a 80 Lbs. Depth D - Max. Ft.) Energy Efficiency Ratio 10,000 2.6 450 10.6 Electrical Volts Amps (Cool) Watts (Cool) Length of Power Cord (Min. / Max.) Plug Type (NEMA) Features Electronic Controls Fan Speeds (Cool / Fan) Low Voltage Start-Up Auto Cool Function Energy Saver Mode Sleep Mode Filter Check 24-Hour On / Off Timer Clean Air Ionizer Remote Control Air CFM (High / Med / Low) Air Direction Control Fresh Air / Exhaust Vent / Closed Filter Type Filter Access Slide-Out...
... Yes AHAM Adjustable mounting brackets Locking clip Specifications Refrigerant Shipping Weight (Approx.) R410a 80 Lbs. Depth D - Max. Ft.) Energy Efficiency Ratio 10,000 2.6 450 10.6 Electrical Volts Amps (Cool) Watts (Cool) Length of Power Cord (Min. / Max.) Plug Type (NEMA) Features Electronic Controls Fan Speeds (Cool / Fan) Low Voltage Start-Up Auto Cool Function Energy Saver Mode Sleep Mode Filter Check 24-Hour On / Off Timer Clean Air Ionizer Remote Control Air CFM (High / Med / Low) Air Direction Control Fresh Air / Exhaust Vent / Closed Filter Type Filter Access Slide-Out...
Product Specifications Sheet
Page 3
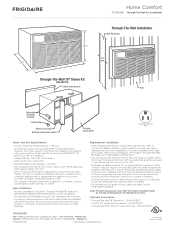
... allow condensate to drain from two rear intakes. Frigidaire Baseline Home Comfort FFTA1033S1 Through-The-Wall Air Conditioner Through-The-Wall Installation Wall (thickness) 14 1/2" 18" max. 20 1/2" 24" Through-The-Wall 18" Sleeve Kit (PN # EA108T) Outside closure panel Wall Adjustable mounting brackets Locking clip Sleeve-to-unit seal Building construction support Inside closure panel Plug Type (NEMA) 5-15P Home Comfort Specifications • Product Shipping Weight (approx.) - 80 Lbs. • An electrical supply with new unit, refer to Product Installation Guide...
... allow condensate to drain from two rear intakes. Frigidaire Baseline Home Comfort FFTA1033S1 Through-The-Wall Air Conditioner Through-The-Wall Installation Wall (thickness) 14 1/2" 18" max. 20 1/2" 24" Through-The-Wall 18" Sleeve Kit (PN # EA108T) Outside closure panel Wall Adjustable mounting brackets Locking clip Sleeve-to-unit seal Building construction support Inside closure panel Plug Type (NEMA) 5-15P Home Comfort Specifications • Product Shipping Weight (approx.) - 80 Lbs. • An electrical supply with new unit, refer to Product Installation Guide...


