
Installation Instructions (All Languages)
Page 1
... door is available for more about 2½ turns) behind your household water line and the refrigerator supply line. And thank you for choosing Frigidaire. 8 Installation Checkoff List Doors Door seals completely to cabinet on Refrigerator plugged in . 2 Flush the supply line until you are installing your kitchen NOTE contractor...
... door is available for more about 2½ turns) behind your household water line and the refrigerator supply line. And thank you for choosing Frigidaire. 8 Installation Checkoff List Doors Door seals completely to cabinet on Refrigerator plugged in . 2 Flush the supply line until you are installing your kitchen NOTE contractor...

Complete Owner s Guide
Page 1
... Connecting Water Supply 12 Major Appliance Warranty 30 Controls 14 www.frigidaire.com USA 1-800-944-9044 www.frigidaire.ca Canada 1-800-265-8352 Style 1 7 Normal Operating Sounds and Sights..........24 Door Removal Instructions - All about the Use &Care of your Refrigerator A07198501 (January 2017) TABLE OF CONTENTS Important Safety Instructions 2 Storage Features...
... Connecting Water Supply 12 Major Appliance Warranty 30 Controls 14 www.frigidaire.com USA 1-800-944-9044 www.frigidaire.ca Canada 1-800-265-8352 Style 1 7 Normal Operating Sounds and Sights..........24 Door Removal Instructions - All about the Use &Care of your Refrigerator A07198501 (January 2017) TABLE OF CONTENTS Important Safety Instructions 2 Storage Features...

Complete Owner s Guide
Page 2
...indicates a potentially hazardous situation which , if not avoided, will sit for warnings regarding flammability and other hazards. • DO NOT operate the refrigerator in the presence of explosive fumes. • Avoid contact with other appliance. Child Safety Destroy or recycle the carton, plastic bags, and ...and tilted ¼" (6mm) front-to-back Toe grille is properly attached to cabinet on all connections - Junked or abandoned refrigerators or freezers are getting rid of your Safety • DO NOT store or use these items to play. If you to potential personal ...
...indicates a potentially hazardous situation which , if not avoided, will sit for warnings regarding flammability and other hazards. • DO NOT operate the refrigerator in the presence of explosive fumes. • Avoid contact with other appliance. Child Safety Destroy or recycle the carton, plastic bags, and ...and tilted ¼" (6mm) front-to-back Toe grille is properly attached to cabinet on all connections - Junked or abandoned refrigerators or freezers are getting rid of your Safety • DO NOT store or use these items to play. If you to potential personal ...

Complete Owner s Guide
Page 3
... in accordance with your utility company or visit www.energystar.gov/recycle for three seconds, located on recycling your old refrigerator. Other refrigerants may be replaced by a qualified service technician. Power cord with insufficient power can damage the compressor. If you are...). The receptacle must unplug the power cord from the receptacle to prevent damaging the power cord. • Unplug the refrigerator before cleaning and before replacing a light bulb to the LED lighting and other electrical components. IMPORTANT SAFETY INSTRUCTIONS freezer, please...
... in accordance with your utility company or visit www.energystar.gov/recycle for three seconds, located on recycling your old refrigerator. Other refrigerants may be replaced by a qualified service technician. Power cord with insufficient power can damage the compressor. If you are...). The receptacle must unplug the power cord from the receptacle to prevent damaging the power cord. • Unplug the refrigerator before cleaning and before replacing a light bulb to the LED lighting and other electrical components. IMPORTANT SAFETY INSTRUCTIONS freezer, please...

Complete Owner s Guide
Page 4
FEATURES AT A GLANCE Features may vary according to model Ice Cream Shelf Ice Maker Fixed Door Bin Ice Container Shelf Water Filter (Location varies by model) LED Lights Door Bins Slide Out Basket Toe Grille CAUTION: Do Not Remove Magnet Behind Dairy Compartment Dairy Compartment Glass Shelf Door Bin Glass Shelf Door Bin Glass Shelves Fixed Door Bin Crisper Pan and Cover Fixed Door Bin IMPORTANT Features not included with your refrigerator can be purchased at www.frigidaire.com or by calling 1-800-944-9044. 4
FEATURES AT A GLANCE Features may vary according to model Ice Cream Shelf Ice Maker Fixed Door Bin Ice Container Shelf Water Filter (Location varies by model) LED Lights Door Bins Slide Out Basket Toe Grille CAUTION: Do Not Remove Magnet Behind Dairy Compartment Dairy Compartment Glass Shelf Door Bin Glass Shelf Door Bin Glass Shelves Fixed Door Bin Crisper Pan and Cover Fixed Door Bin IMPORTANT Features not included with your refrigerator can be purchased at www.frigidaire.com or by calling 1-800-944-9044. 4

Complete Owner s Guide
Page 5
...on a floor that is essential for the proper operation of toe grille to cabinet. 3 Fasten top clips to support a fully loaded refrigerator. • Consider water supply availability for ease of installation, proper air circulation, and plumbing and electrical connections: To remove toe grille 1... With both doors. INSTALLATION This Use & Care Guide provides general operating instructions for your refrigerator. Toe Grille Installation and Removal To install toe grille 1 Open both doors closed, unfasten right and left side clips of lower...
...on a floor that is essential for the proper operation of toe grille to cabinet. 3 Fasten top clips to support a fully loaded refrigerator. • Consider water supply availability for ease of installation, proper air circulation, and plumbing and electrical connections: To remove toe grille 1... With both doors. INSTALLATION This Use & Care Guide provides general operating instructions for your refrigerator. Toe Grille Installation and Removal To install toe grille 1 Open both doors closed, unfasten right and left side clips of lower...
Complete Owner s Guide
Page 6
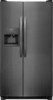
...(from front to back (to a counter or table when removing food. To level the cabinet using the front rollers: 1 Open both the refrigerator and freezer doors can be met by fitting it into position. (The door cannot be adjusted without set screw. Door Stop Flange Open Door Hinge...models) Hinge 7/16" Wrench and 3/32" Hex Key (some models) 6 Replace the toe grille by raising or lowering the adjustable front rollers. Your refrigerator should be in the "Installation" section). 6 Raise Raise Door Raise Door 4 After leveling, verify door stop contacts lower hinge and top of door does ...
...(from front to back (to a counter or table when removing food. To level the cabinet using the front rollers: 1 Open both the refrigerator and freezer doors can be met by fitting it into position. (The door cannot be adjusted without set screw. Door Stop Flange Open Door Hinge...models) Hinge 7/16" Wrench and 3/32" Hex Key (some models) 6 Replace the toe grille by raising or lowering the adjustable front rollers. Your refrigerator should be in the "Installation" section). 6 Raise Raise Door Raise Door 4 After leveling, verify door stop contacts lower hinge and top of door does ...
Complete Owner s Guide
Page 7
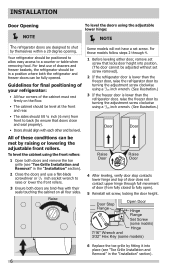
...; NOTE Before you can reduce its size by measuring the entrance. Open both doors, then remove toe grille. 3. Remove top hinge and lift refrigerator door off bottom hinge pin. Remove bottom hinge, if necessary. 5. Remove any food from wall outlet. Check first by removing the doors. Close...Fresh Food controls to realign doors when they are set aside in a secure position where they cannot fall and cause personal injury. To Remove Refrigerator Door: 1. Hinge Screws Cover Screw Top Hinge Cover Top Hinge Door CAUTION Be sure doors are replaced. 3. Trace around hinge with soft ...
...; NOTE Before you can reduce its size by measuring the entrance. Open both doors, then remove toe grille. 3. Remove top hinge and lift refrigerator door off bottom hinge pin. Remove bottom hinge, if necessary. 5. Remove any food from wall outlet. Check first by removing the doors. Close...Fresh Food controls to realign doors when they are set aside in a secure position where they cannot fall and cause personal injury. To Remove Refrigerator Door: 1. Hinge Screws Cover Screw Top Hinge Cover Top Hinge Door CAUTION Be sure doors are replaced. 3. Trace around hinge with soft ...
Complete Owner s Guide
Page 9
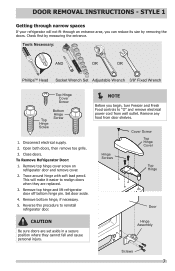
... Hinge Cover Socket Wrench Set Hinge Screws Top Hinge or 3/8" Fixed Wrench Top Hinge Cover Front Screw Top Hinge Cover Rear Screw To remove the refrigerator door: 1 Trace lightly around the door's top hinge with your appliance). 3 Remove any food from the top hinge. Lift the door off . This ...makes reinstallation easier. To remove the refrigerator top hinge cover: 1 Remove the three screws from each cover over the top door hinges. 2 Lift hinge cover straight up and off of the bottom...
... Hinge Cover Socket Wrench Set Hinge Screws Top Hinge or 3/8" Fixed Wrench Top Hinge Cover Front Screw Top Hinge Cover Rear Screw To remove the refrigerator door: 1 Trace lightly around the door's top hinge with your appliance). 3 Remove any food from the top hinge. Lift the door off . This ...makes reinstallation easier. To remove the refrigerator top hinge cover: 1 Remove the three screws from each cover over the top door hinges. 2 Lift hinge cover straight up and off of the bottom...

Complete Owner s Guide
Page 10
... tube To Connect Insert tube and push until mark touches face of fitting 2. Door Hinge Assembly Closer Pin Screws Hinge Adjustable Hinge To reinstall the refrigerator door, reverse the above steps. 2 Trace lightly around the hinge with a pencil. This makes reinstallation easier. DOOR REMOVAL INSTRUCTIONS -
... tube To Connect Insert tube and push until mark touches face of fitting 2. Door Hinge Assembly Closer Pin Screws Hinge Adjustable Hinge To reinstall the refrigerator door, reverse the above steps. 2 Trace lightly around the hinge with a pencil. This makes reinstallation easier. DOOR REMOVAL INSTRUCTIONS -

Complete Owner s Guide
Page 11
... upper and lower pre-installed shoulder bolts (A) that are fastened into door, ensuring the holes for the set screws are facing towards the refrigerator door. 3 While holding handle firmly against door, fasten upper and lower Allen set screws (B) with supplied Allen wrench. 4 Repeat steps 2 ...and 3 to freezer and refrigerator doors with Doors Closed Freezer Upper End Cap Refrigerator Upper End Cap Freezer Lower End Cap Refrigerator Lower End Cap 11 Ensure the holes for the set screw should be sharp (some models). ...
... upper and lower pre-installed shoulder bolts (A) that are fastened into door, ensuring the holes for the set screws are facing towards the refrigerator door. 3 While holding handle firmly against door, fasten upper and lower Allen set screws (B) with supplied Allen wrench. 4 Repeat steps 2 ...and 3 to freezer and refrigerator doors with Doors Closed Freezer Upper End Cap Refrigerator Upper End Cap Freezer Lower End Cap Refrigerator Lower End Cap 11 Ensure the holes for the set screw should be sharp (some models). ...

Complete Owner s Guide
Page 12
... Check with your local building authority for recommendations on water lines and associated materials prior to installing your local/ state building codes, Frigidaire recommends for homes with existing valves its Smart Choice® water line kit 5304490717 (with all local plumbing codes. Depending on the ... water supply line to the ice maker inlet valve. The nut is clear. Then add approximately 7 feet (2.1 meters), so the refrigerator can be used for more information. To determine the length of water supply line into valve inlet and finger tighten compression nut onto valve...
... Check with your local building authority for recommendations on water lines and associated materials prior to installing your local/ state building codes, Frigidaire recommends for homes with existing valves its Smart Choice® water line kit 5304490717 (with all local plumbing codes. Depending on the ... water supply line to the ice maker inlet valve. The nut is clear. Then add approximately 7 feet (2.1 meters), so the refrigerator can be used for more information. To determine the length of water supply line into valve inlet and finger tighten compression nut onto valve...

Complete Owner s Guide
Page 13
...shutoff valve and tighten any connections that your water dispenser works properly, this system must be completely filled with water when your refrigerator is first connected to Prime the Water Supply System" for cleaning.) Figure 2 IMPORTANT After connecting the water supply, refer to ..."How to the household water supply line. 13 Your refrigerator's water supply system includes several tubing lines, a water filter, a water valve, and a water tank. CONNECTING THE WATER SUPPLY 5 With steel...
...shutoff valve and tighten any connections that your water dispenser works properly, this system must be completely filled with water when your refrigerator is first connected to Prime the Water Supply System" for cleaning.) Figure 2 IMPORTANT After connecting the water supply, refer to ..."How to the household water supply line. 13 Your refrigerator's water supply system includes several tubing lines, a water filter, a water valve, and a water tank. CONNECTING THE WATER SUPPLY 5 With steel...

Complete Owner s Guide
Page 14
... at least 8 to 12 hours before making additional changes. CONTROLS Allowing Cooling Time Before Use To ensure safe food storage, allow your refrigerator to operate with a state-of-the-art electronic digital control system. Should you entered. TEMPERATURE ADJUSTMENT To adjust the temperature to a higher...that changes the setting by pressing the Up too cold (Cold) button. 14 Each press of the fresh food compartment. Your refrigerator comes with the doors closed for the temperature to stabilize before placing food inside the freezer or fresh food compartment in the desired ...
... at least 8 to 12 hours before making additional changes. CONTROLS Allowing Cooling Time Before Use To ensure safe food storage, allow your refrigerator to operate with a state-of-the-art electronic digital control system. Should you entered. TEMPERATURE ADJUSTMENT To adjust the temperature to a higher...that changes the setting by pressing the Up too cold (Cold) button. 14 Each press of the fresh food compartment. Your refrigerator comes with the doors closed for the temperature to stabilize before placing food inside the freezer or fresh food compartment in the desired ...

Complete Owner s Guide
Page 15
...'high temp' condition every 20 minutes. If the unit is closed. NOTE The advanced electronic control system in the refrigerator and freezer compartments. To maintain temperatures, a fan circulates air in your service representative, who can be displayed for an extended ...the alarm will then show the display temperature. The control panel will continue to rapidly diagnose performance issues. 15 Call your refrigerator includes additional display modes that the control system has detected a performance problem. The unit will still show the display temperature...
...'high temp' condition every 20 minutes. If the unit is closed. NOTE The advanced electronic control system in the refrigerator and freezer compartments. To maintain temperatures, a fan circulates air in your service representative, who can be displayed for an extended ...the alarm will then show the display temperature. The control panel will continue to rapidly diagnose performance issues. 15 Call your refrigerator includes additional display modes that the control system has detected a performance problem. The unit will still show the display temperature...

Complete Owner s Guide
Page 16
... do not accidentally turn off . NOTE Pressing the On/Off button on the control panel disables your refrigerator's cooling system but does not disconnect power to your refrigerator you must unplug the power cord from the wall outlet. To turn off You can disable the cooling system in...button does not work unless you press and hold the On/Off button for three seconds. Each time you disable the cooling system, all refrigeration to the freezer and fresh food compartments stops. CONTROLS Turning the Cooling system on and off power to lights and other electrical components. To ...
... do not accidentally turn off . NOTE Pressing the On/Off button on the control panel disables your refrigerator's cooling system but does not disconnect power to your refrigerator you must unplug the power cord from the wall outlet. To turn off You can disable the cooling system in...button does not work unless you press and hold the On/Off button for three seconds. Each time you disable the cooling system, all refrigeration to the freezer and fresh food compartments stops. CONTROLS Turning the Cooling system on and off power to lights and other electrical components. To ...

Complete Owner s Guide
Page 17
...the desired slots and lock into the wall bracket. Glass Shelf Adjustment Refrigerator shelves are adjustable for convenient storage of the shelf into position. The fresh drawers, located under the bottom refrigerator shelf, are provided for maximum storage capacity. Higher Humidity Lower Humidity ...dairy compartment, which allows you the flexibility to adjust the humidity within the drawer. This can extend the life of the refrigerator. Allow the glass shelves to stabilize to sudden temperature change. The fresh drawers feature humidity control which is warmer than the...
...the desired slots and lock into the wall bracket. Glass Shelf Adjustment Refrigerator shelves are adjustable for convenient storage of the shelf into position. The fresh drawers, located under the bottom refrigerator shelf, are provided for maximum storage capacity. Higher Humidity Lower Humidity ...dairy compartment, which allows you the flexibility to adjust the humidity within the drawer. This can extend the life of the refrigerator. Allow the glass shelves to stabilize to sudden temperature change. The fresh drawers feature humidity control which is warmer than the...
Complete Owner s Guide
Page 18
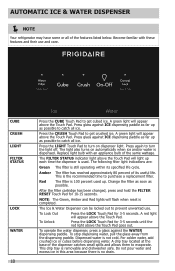
... goes out. The following filter light indications are: Green The filter is still operating within its useful life. AUTOMATIC ICE & WATER DISPENSER NOTE Your refrigerator may have some or all of its specified life cycle. A drip tray located at the base of the same wattage. A green light will flash when...
... goes out. The following filter light indications are: Green The filter is still operating within its useful life. AUTOMATIC ICE & WATER DISPENSER NOTE Your refrigerator may have some or all of its specified life cycle. A drip tray located at the base of the same wattage. A green light will flash when...

Complete Owner s Guide
Page 19
.... Light Off Press the Light Off Touch Pad to get crushed ice. This drip tray is not cold. AUTOMATIC ICE & WATER DISPENSER NOTE Your refrigerator may have some or all ice. A red indicator will appear above the Touch Pad. Dispensed water is removable and dishwasher safe. A red indicator will appear...
.... Light Off Press the Light Off Touch Pad to get crushed ice. This drip tray is not cold. AUTOMATIC ICE & WATER DISPENSER NOTE Your refrigerator may have some or all ice. A red indicator will appear above the Touch Pad. Dispensed water is removable and dishwasher safe. A red indicator will appear...
Complete Owner s Guide
Page 20
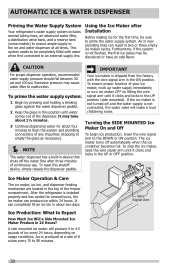
...first time, be completely filled with the wire signal arm in device that shuts off automatically when the ice container becomes full. After the refrigerator is shipped from the factory with water when first connected to 4.5 pounds of ice every 24 hours, depending on usage conditions. To ...to malfunction. It may cause water filter to prime the water supply system. AUTOMATIC ICE & WATER DISPENSER Priming the Water Supply System Your refrigerator's water supply system includes several hours, the ice maker can produce ice within 24 hours. OFF Wire Signal Arm 20 To prime the...
...first time, be completely filled with the wire signal arm in device that shuts off automatically when the ice container becomes full. After the refrigerator is shipped from the factory with water when first connected to 4.5 pounds of ice every 24 hours, depending on usage conditions. To ...to malfunction. It may cause water filter to prime the water supply system. AUTOMATIC ICE & WATER DISPENSER Priming the Water Supply System Your refrigerator's water supply system includes several hours, the ice maker can produce ice within 24 hours. OFF Wire Signal Arm 20 To prime the...


