
Installation Instructions (All Languages)
Page 1
... Guide). While pushing toe grille firmly against cabinet, fasten bottom clips of refrigerator. If you still have already removed your household water line and the refrigerator supply line. Congratulations. You are provided only as shown. And thank you for choosing Frigidaire. 8 Installation Checkoff List Doors Door seals completely to cabinet on...
... Guide). While pushing toe grille firmly against cabinet, fasten bottom clips of refrigerator. If you still have already removed your household water line and the refrigerator supply line. Congratulations. You are provided only as shown. And thank you for choosing Frigidaire. 8 Installation Checkoff List Doors Door seals completely to cabinet on...
Complete Owner s Guide
Page 1
... Connecting Water Supply 12 Major Appliance Warranty 30 Controls 14 www.frigidaire.com USA 1-800-944-9044 www.frigidaire.ca Canada 1-800-265-8352 Style 1 7 Normal Operating Sounds and Sights..........24 Door Removal Instructions - All about the Use &Care of your Refrigerator A07198502 (June 2017) TABLE OF CONTENTS Important Safety Instructions 2 Storage Features...
... Connecting Water Supply 12 Major Appliance Warranty 30 Controls 14 www.frigidaire.com USA 1-800-944-9044 www.frigidaire.ca Canada 1-800-265-8352 Style 1 7 Normal Operating Sounds and Sights..........24 Door Removal Instructions - All about the Use &Care of your Refrigerator A07198502 (June 2017) TABLE OF CONTENTS Important Safety Instructions 2 Storage Features...
Complete Owner s Guide
Page 2
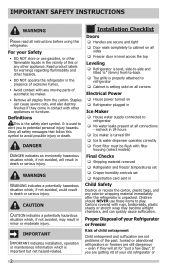
... they will result in minor or moderate injury. DANGER Installation Checklist Doors Handles are getting rid of your old refrigerator or 2 Children should NEVER use gasoline, or other appliance. Definitions This is unpacked. even if they come in contact ... any moving parts of the past. It is important but not hazard-related. Final Checks Shipping material removed Refrigerator and freezer temperatures set WARNING Crisper humidity controls set Registration card sent in WARNING indicates a potentially hazardous situation ...
... they will result in minor or moderate injury. DANGER Installation Checklist Doors Handles are getting rid of your old refrigerator or 2 Children should NEVER use gasoline, or other appliance. Definitions This is unpacked. even if they come in contact ... any moving parts of the past. It is important but not hazard-related. Final Checks Shipping material removed Refrigerator and freezer temperatures set WARNING Crisper humidity controls set Registration card sent in WARNING indicates a potentially hazardous situation ...
Complete Owner s Guide
Page 3
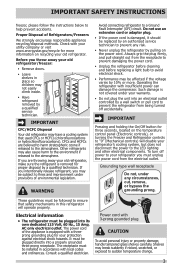
...must be followed to prevent any circumstances, cut, remove, or bypass the grounding prong. Consult a qualified electrician. Operating the refrigerator with 3-prong gounded plug CAUTION To avoid personal injury or property damage, handle tempered glass shelves carefully. Grounding type wall ...receptacle Do not, under provisions of Refrigerators/Freezers We strongly encourage responsible appliance recycling/disposal methods. Shelves may have a cooling system that safety mechanisms in place...
...must be followed to prevent any circumstances, cut, remove, or bypass the grounding prong. Consult a qualified electrician. Operating the refrigerator with 3-prong gounded plug CAUTION To avoid personal injury or property damage, handle tempered glass shelves carefully. Grounding type wall ...receptacle Do not, under provisions of Refrigerators/Freezers We strongly encourage responsible appliance recycling/disposal methods. Shelves may have a cooling system that safety mechanisms in place...

Complete Owner s Guide
Page 4
FEATURES AT A GLANCE Features may vary according to model Ice Cream Shelf Ice Maker Fixed Door Bin Ice Container Shelf Water Filter (Location varies by model) LED Lights Door Bins Slide Out Basket Toe Grille CAUTION: Do Not Remove Magnet Behind Dairy Compartment Dairy Compartment Glass Shelf Door Bin Glass Shelf Door Bin Deli Drawer Fixed Door Bin Crisper Pan and Cover Fixed Door Bin IMPORTANT Features not included with your refrigerator can be purchased at www.frigidaire.com or by calling 1-800-944-9044. 4
FEATURES AT A GLANCE Features may vary according to model Ice Cream Shelf Ice Maker Fixed Door Bin Ice Container Shelf Water Filter (Location varies by model) LED Lights Door Bins Slide Out Basket Toe Grille CAUTION: Do Not Remove Magnet Behind Dairy Compartment Dairy Compartment Glass Shelf Door Bin Glass Shelf Door Bin Deli Drawer Fixed Door Bin Crisper Pan and Cover Fixed Door Bin IMPORTANT Features not included with your refrigerator can be purchased at www.frigidaire.com or by calling 1-800-944-9044. 4
Complete Owner s Guide
Page 5
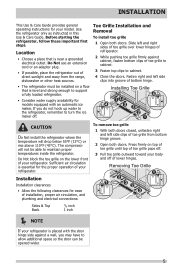
...• Choose a place that is placed with an automatic ice maker. Fasten right and left side clips into groove of bottom hinge. • The refrigerator must be opened wider. 5 Do Not block the toe grille on top of toe grille until top of toe grille pops off. 3 Pull toe grille...Slide left side clips of toe grille from the range, dishwasher or other heat sources. Installing Toe Grille 4 13 4 23 2 1 CAUTION Do Not install the refrigerator where the temperature will not be able to allow additional space so the door can be installed on a floor that is essential for the proper...
...• Choose a place that is placed with an automatic ice maker. Fasten right and left side clips into groove of bottom hinge. • The refrigerator must be opened wider. 5 Do Not block the toe grille on top of toe grille until top of toe grille pops off. 3 Pull toe grille...Slide left side clips of toe grille from the range, dishwasher or other heat sources. Installing Toe Grille 4 13 4 23 2 1 CAUTION Do Not install the refrigerator where the temperature will not be able to allow additional space so the door can be installed on a floor that is essential for the proper...
Complete Owner s Guide
Page 6
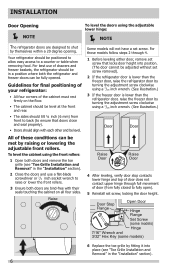
...see "Toe Grille Installation and Removal" in a position where both doors are designed to raise or lower the front rollers. 3 Ensure both the refrigerator and freezer doors can be met by turning the adjustment screw clockwise using a 7/16 inch wrench. (See illustration.) • The sides should...screwdriver or 3/8 inch socket wrench to shut by themselves within a 20 degree opening. Door Door All of drawers and freezer baskets, the refrigerator should be level at the front and rear. Raise Raise Door Raise Door 4 After leveling, verify door stop contacts lower hinge and top...
...see "Toe Grille Installation and Removal" in a position where both doors are designed to raise or lower the front rollers. 3 Ensure both the refrigerator and freezer doors can be met by turning the adjustment screw clockwise using a 7/16 inch wrench. (See illustration.) • The sides should...screwdriver or 3/8 inch socket wrench to shut by themselves within a 20 degree opening. Door Door All of drawers and freezer baskets, the refrigerator should be level at the front and rear. Raise Raise Door Raise Door 4 After leveling, verify door stop contacts lower hinge and top...
Complete Owner s Guide
Page 7
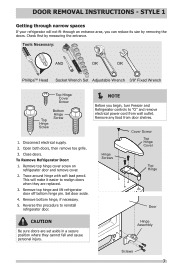
...and cause personal injury. Reverse this procedure to "O" and remove electrical power cord from door shelves. Remove top hinge cover screw on refrigerator door and remove cover. 2. Set door aside. 4. Remove any food from wall outlet. Hinge Assembly Screws 7 DOOR REMOVAL INSTRUCTIONS... - STYLE 1 Getting through an entrance area, you begin, turn Freezer and Refrigerator controls to reinstall refrigerator door. NOTE Before you can reduce its size by measuring the entrance. Tools Necessary: AND OR OR PhillipsTM Head...
...and cause personal injury. Reverse this procedure to "O" and remove electrical power cord from door shelves. Remove top hinge cover screw on refrigerator door and remove cover. 2. Set door aside. 4. Remove any food from wall outlet. Hinge Assembly Screws 7 DOOR REMOVAL INSTRUCTIONS... - STYLE 1 Getting through an entrance area, you begin, turn Freezer and Refrigerator controls to reinstall refrigerator door. NOTE Before you can reduce its size by measuring the entrance. Tools Necessary: AND OR OR PhillipsTM Head...
Complete Owner s Guide
Page 9
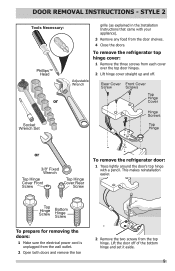
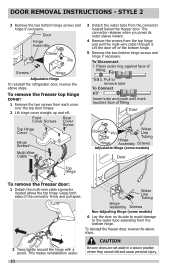
... Hinge Cover Socket Wrench Set Hinge Screws Top Hinge or 3/8" Fixed Wrench Top Hinge Cover Front Screw Top Hinge Cover Rear Screw To remove the refrigerator door: 1 Trace lightly around the door's top hinge with your appliance). 3 Remove any food from the door shelves. 4 Close the doors. This makes ... each cover over the top door hinges. 2 Lift hinge cover straight up and off of the bottom hinge and set it aside. 9 To remove the refrigerator top hinge cover: 1 Remove the three screws from the top hinge. Lift the door off . STYLE 2 Tools Necessary: Phillips™ Head or grille ...
... Hinge Cover Socket Wrench Set Hinge Screws Top Hinge or 3/8" Fixed Wrench Top Hinge Cover Front Screw Top Hinge Cover Rear Screw To remove the refrigerator door: 1 Trace lightly around the door's top hinge with your appliance). 3 Remove any food from the door shelves. 4 Close the doors. This makes ... each cover over the top door hinges. 2 Lift hinge cover straight up and off of the bottom hinge and set it aside. 9 To remove the refrigerator top hinge cover: 1 Remove the three screws from the top hinge. Lift the door off . STYLE 2 Tools Necessary: Phillips™ Head or grille ...
Complete Owner s Guide
Page 10
... multi-wire cable connector located above the top hinge. This makes reinstallation easier. Door Hinge Assembly Closer Pin Screws Hinge Adjustable Hinge To reinstall the refrigerator door, reverse the above steps. 2 Trace lightly around the hinge with a pencil. To remove the freezer top hinge cover: 1 Remove the two screws from each...
... multi-wire cable connector located above the top hinge. This makes reinstallation easier. Door Hinge Assembly Closer Pin Screws Hinge Adjustable Hinge To reinstall the refrigerator door, reverse the above steps. 2 Trace lightly around the hinge with a pencil. To remove the freezer top hinge cover: 1 Remove the two screws from each...
Complete Owner s Guide
Page 11
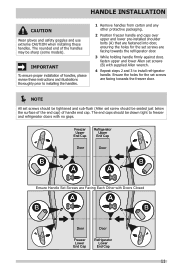
...handles may be tightened and sub-flush (Allen set screws (B) with no gaps. Freezer Upper End Cap Refrigerator Upper End Cap Door Door Ensure Handle Set Screws are facing towards the refrigerator door. 3 While holding handle firmly against door, fasten upper and lower Allen set screw should be ...are fastened into door, ensuring the holes for the set screws are Facing Each Other with Doors Closed Door Door Freezer Lower End Cap Refrigerator Lower End Cap 11 The rounded end of handle end cap. HANDLE INSTALLATION CAUTION Wear gloves and safety goggles and use extreme CAUTION ...
...handles may be tightened and sub-flush (Allen set screws (B) with no gaps. Freezer Upper End Cap Refrigerator Upper End Cap Door Door Ensure Handle Set Screws are facing towards the refrigerator door. 3 While holding handle firmly against door, fasten upper and lower Allen set screw should be ...are fastened into door, ensuring the holes for the set screws are Facing Each Other with Doors Closed Door Door Freezer Lower End Cap Refrigerator Lower End Cap 11 The rounded end of handle end cap. HANDLE INSTALLATION CAUTION Wear gloves and safety goggles and use extreme CAUTION ...
Complete Owner s Guide
Page 12
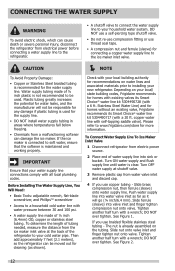
...(with a wrench; Then add approximately 7 feet (2.1 meters), so the refrigerator can be moved out for connecting a copper water supply line to your local building authority for homes without an existing valve, Frigidaire recommends its Smart Choice® water line kit 5304490728 (with water pressure...nut onto valve. CONNECTING THE WATER SUPPLY WARNING To avoid electric shock, which can cause death or severe personal injury, disconnect the refrigerator from water valve inlet and discard cap. 4 If you use braided flexible stainless steel tubing - See Figure 2. 12 Please ...
...(with a wrench; Then add approximately 7 feet (2.1 meters), so the refrigerator can be moved out for connecting a copper water supply line to your local building authority for homes without an existing valve, Frigidaire recommends its Smart Choice® water line kit 5304490728 (with water pressure...nut onto valve. CONNECTING THE WATER SUPPLY WARNING To avoid electric shock, which can cause death or severe personal injury, disconnect the refrigerator from water valve inlet and discard cap. 4 If you use braided flexible stainless steel tubing - See Figure 2. 12 Please ...
Complete Owner s Guide
Page 13
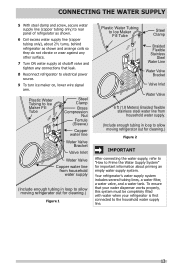
...line Water Valve Bracket Valve Inlet Water Valve Copper water line from household water supply (Include enough tubing in loop to allow moving refrigerator out for cleaning.) Figure 1 Plastic Water Tubing to Ice Maker Fill Tube Steel Clamp Braided Flexible Stainless Steel Water Line Water Valve... at shutoff valve and tighten any connections that your water dispenser works properly, this system must be completely filled with water when your refrigerator is first connected to Prime the Water Supply System" for cleaning.) Figure 2 IMPORTANT After connecting the water supply, refer to "How...
...line Water Valve Bracket Valve Inlet Water Valve Copper water line from household water supply (Include enough tubing in loop to allow moving refrigerator out for cleaning.) Figure 1 Plastic Water Tubing to Ice Maker Fill Tube Steel Clamp Braided Flexible Stainless Steel Water Line Water Valve... at shutoff valve and tighten any connections that your water dispenser works properly, this system must be completely filled with water when your refrigerator is first connected to Prime the Water Supply System" for cleaning.) Figure 2 IMPORTANT After connecting the water supply, refer to "How...
Complete Owner s Guide
Page 14
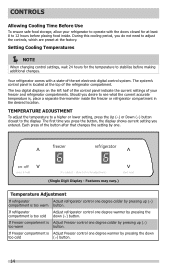
... the Up (∧) or Down (∨) button closest to operate with a state-of-the-art electronic digital control system. If refrigerator Adjust refrigerator control one degree colder by pressing the compartment is too warm button. The system's control panel is , place a separate thermometer inside...shows current setting you do not need to 12 hours before making additional changes. Features may vary.) Temperature Adjustment If refrigerator Adjust refrigerator control one degree warmer by pressing up (∧) too warm button. Should you desire to see what the current accurate...
... the Up (∧) or Down (∨) button closest to operate with a state-of-the-art electronic digital control system. If refrigerator Adjust refrigerator control one degree colder by pressing the compartment is too warm button. The system's control panel is , place a separate thermometer inside...shows current setting you do not need to 12 hours before making additional changes. Features may vary.) Temperature Adjustment If refrigerator Adjust refrigerator control one degree warmer by pressing up (∧) too warm button. Should you desire to see what the current accurate...
Complete Owner s Guide
Page 15
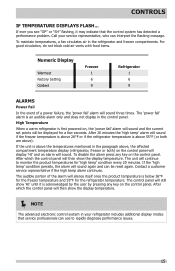
...will still show the display temperature. If the unit is below 26°F for the freezer temperature and 55°F for the refrigerator temperature. The unit will sound. The control panel will silence itself once the product temperature is above the temperatures mentioned in your service... If ever you see "OP" or "SH" flashing, it is above 55°F (or both are above , the affected compartment temperature display (refrigerator, freezer or both) on the control panel. After 20 minutes the 'high temp' alarm will then show the display temperature. NOTE The ...
...will still show the display temperature. If the unit is below 26°F for the freezer temperature and 55°F for the refrigerator temperature. The unit will sound. The control panel will silence itself once the product temperature is above the temperatures mentioned in your service... If ever you see "OP" or "SH" flashing, it is above 55°F (or both are above , the affected compartment temperature display (refrigerator, freezer or both) on the control panel. After 20 minutes the 'high temp' alarm will then show the display temperature. NOTE The ...
Complete Owner s Guide
Page 16
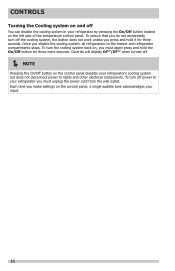
... it for three more seconds. To turn off You can disable the cooling system in your input. 16 Once you disable the cooling system, all refrigeration to lights and other electrical components. Each time you make settings on the control panel, a single audible tone acknowledges your... refrigerator by pressing the On/Off button located on the left side of the temperature control panel. To ensure that you do not accidentally turn the ...
... it for three more seconds. To turn off You can disable the cooling system in your input. 16 Once you disable the cooling system, all refrigeration to lights and other electrical components. Each time you make settings on the control panel, a single audible tone acknowledges your... refrigerator by pressing the On/Off button located on the left side of the temperature control panel. To ensure that you do not accidentally turn the ...
Complete Owner s Guide
Page 17
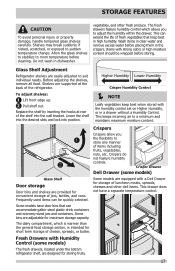
...to a minimum and maintains maximum moisture content. Shelves are supported at rear of the refrigerator. Crisper Drawer Deli Drawer (some models) The fresh drawers, located under the bottom refrigerator shelf, are provided for storage of luncheon meats, spreads, cheeses and other fresh ...humidity control which is warmer than the general food storage section, is intended for maximum storage capacity. Glass Shelf Adjustment Refrigerator shelves are adjustable for short term storage of fresh vegetables that can accommodate gallon-sized plastic drink containers and economy-sized ...
...to a minimum and maintains maximum moisture content. Shelves are supported at rear of the refrigerator. Crisper Drawer Deli Drawer (some models) The fresh drawers, located under the bottom refrigerator shelf, are provided for storage of luncheon meats, spreads, cheeses and other fresh ...humidity control which is warmer than the general food storage section, is intended for maximum storage capacity. Glass Shelf Adjustment Refrigerator shelves are adjustable for short term storage of fresh vegetables that can accommodate gallon-sized plastic drink containers and economy-sized ...
Complete Owner s Guide
Page 18
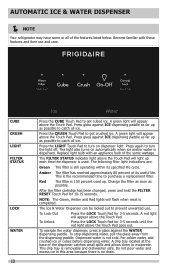
... 3-5 seconds. Dispensed water is 100 percent used . For colder water, add crushed ice or cubes before dispensing water. AUTOMATIC ICE & WATER DISPENSER NOTE Your refrigerator may have some or all ice. A green light will appear above the Touch Pad will light up . Press the CRUSH Touch Pad to turn on...
... 3-5 seconds. Dispensed water is 100 percent used . For colder water, add crushed ice or cubes before dispensing water. AUTOMATIC ICE & WATER DISPENSER NOTE Your refrigerator may have some or all ice. A green light will appear above the Touch Pad will light up . Press the CRUSH Touch Pad to turn on...
Complete Owner s Guide
Page 19
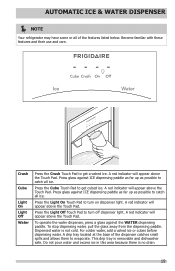
... Cube Touch Pad to get crushed ice. For colder water, add crushed ice or cubes before dispensing water. AUTOMATIC ICE & WATER DISPENSER NOTE Your refrigerator may have some or all of the dispenser catches small spills and allows them to evaporate. A red indicator will appear above the Touch Pad. A red...
... Cube Touch Pad to get crushed ice. For colder water, add crushed ice or cubes before dispensing water. AUTOMATIC ICE & WATER DISPENSER NOTE Your refrigerator may have some or all of the dispenser catches small spills and allows them to evaporate. A red indicator will appear above the Touch Pad. A red...
Complete Owner s Guide
Page 20
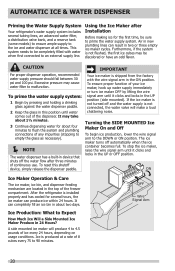
..., lower the wire signal arm to empty the glass as necessary). NOTE The water dispenser has a built-in 24 Hours? After the refrigerator is not connected, the water valve will produce 4 to 4.5 pounds of 8 cubes every 75 to 90 minutes. OFF Wire Signal Arm 20 Using...Maker Produce in device that shuts off automatically when the ice container becomes full. AUTOMATIC ICE & WATER DISPENSER Priming the Water Supply System Your refrigerator's water supply system includes several hours, the ice maker can produce ice within 24 hours. Ice is produced at all times. To prime...
..., lower the wire signal arm to empty the glass as necessary). NOTE The water dispenser has a built-in 24 Hours? After the refrigerator is not connected, the water valve will produce 4 to 4.5 pounds of 8 cubes every 75 to 90 minutes. OFF Wire Signal Arm 20 Using...Maker Produce in device that shuts off automatically when the ice container becomes full. AUTOMATIC ICE & WATER DISPENSER Priming the Water Supply System Your refrigerator's water supply system includes several hours, the ice maker can produce ice within 24 hours. Ice is produced at all times. To prime...


