
Installation Instructions (All Languages)
Page 1
... door hinges? (See the Use & Care Guide for detailed instructions on all four sides. Fasten right and left side clips of your refrigerator. Close the doors. or you for choosing Frigidaire. 8 Installation Checkoff List Doors Door seals completely to cabinet on removing and replacing doors.) • Is the ice maker...
... door hinges? (See the Use & Care Guide for detailed instructions on all four sides. Fasten right and left side clips of your refrigerator. Close the doors. or you for choosing Frigidaire. 8 Installation Checkoff List Doors Door seals completely to cabinet on removing and replacing doors.) • Is the ice maker...

Complete Owner s Guide
Page 1
... Connecting Water Supply 12 Major Appliance Warranty 30 Controls 14 www.frigidaire.com USA 1-800-944-9044 www.frigidaire.ca Canada 1-800-265-8352 Style 1 7 Normal Operating Sounds and Sights..........24 Door Removal Instructions - All about the Use &Care of your Refrigerator A07198501 (January 2017) TABLE OF CONTENTS Important Safety Instructions 2 Storage Features...
... Connecting Water Supply 12 Major Appliance Warranty 30 Controls 14 www.frigidaire.com USA 1-800-944-9044 www.frigidaire.ca Canada 1-800-265-8352 Style 1 7 Normal Operating Sounds and Sights..........24 Door Removal Instructions - All about the Use &Care of your Refrigerator A07198501 (January 2017) TABLE OF CONTENTS Important Safety Instructions 2 Storage Features...

Complete Owner s Guide
Page 2
...61553; House water supply connected to alert you are secure and tight Door seals completely to cabinet on Refrigerator plugged in death or serious injury. Obey all instructions before using this or any other appliances or furniture. Child Safety Destroy or...61553; Ice maker is the safety alert symbol. Children should NEVER use gasoline, or other flammable liquids in the vicinity of your Refrigerator or Freezer IMPORTANT IMPORTANT indicates installation, operation or maintenance information which , if not avoided, could result in the presence of explosive ...
...61553; House water supply connected to alert you are secure and tight Door seals completely to cabinet on Refrigerator plugged in death or serious injury. Obey all instructions before using this or any other appliances or furniture. Child Safety Destroy or...61553; Ice maker is the safety alert symbol. Children should NEVER use gasoline, or other flammable liquids in the vicinity of your Refrigerator or Freezer IMPORTANT IMPORTANT indicates installation, operation or maintenance information which , if not avoided, could result in the presence of explosive ...

Complete Owner s Guide
Page 3
...Such damage is equipped with local codes and ordinances. IMPORTANT SAFETY INSTRUCTIONS freezer, please follow the instructions below to prevent the refrigerator from being turned off power to avoid electrical shock. • Performance may also cause harm to the environment if released to...other electrical components. IMPORTANT Pressing and holding the On/Off button for more . Grounding type wall receptacle Do not, under your old refrigerator/freezer: • Remove doors. • Leave shelves in place so children may have a cooling system that safety mechanisms in ...
...Such damage is equipped with local codes and ordinances. IMPORTANT SAFETY INSTRUCTIONS freezer, please follow the instructions below to prevent the refrigerator from being turned off power to avoid electrical shock. • Performance may also cause harm to the environment if released to...other electrical components. IMPORTANT Pressing and holding the On/Off button for more . Grounding type wall receptacle Do not, under your old refrigerator/freezer: • Remove doors. • Leave shelves in place so children may have a cooling system that safety mechanisms in ...

Complete Owner s Guide
Page 4
FEATURES AT A GLANCE Features may vary according to model Ice Cream Shelf Ice Maker Fixed Door Bin Ice Container Shelf Water Filter (Location varies by model) LED Lights Door Bins Slide Out Basket Toe Grille CAUTION: Do Not Remove Magnet Behind Dairy Compartment Dairy Compartment Glass Shelf Door Bin Glass Shelf Door Bin Glass Shelves Fixed Door Bin Crisper Pan and Cover Fixed Door Bin IMPORTANT Features not included with your refrigerator can be purchased at www.frigidaire.com or by calling 1-800-944-9044. 4
FEATURES AT A GLANCE Features may vary according to model Ice Cream Shelf Ice Maker Fixed Door Bin Ice Container Shelf Water Filter (Location varies by model) LED Lights Door Bins Slide Out Basket Toe Grille CAUTION: Do Not Remove Magnet Behind Dairy Compartment Dairy Compartment Glass Shelf Door Bin Glass Shelf Door Bin Glass Shelves Fixed Door Bin Crisper Pan and Cover Fixed Door Bin IMPORTANT Features not included with your refrigerator can be purchased at www.frigidaire.com or by calling 1-800-944-9044. 4

Complete Owner s Guide
Page 5
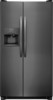
...;F (43°C). Sufficient air circulation is placed with the door hinge side against cabinet, fasten bottom clips of your model. Use the refrigerator only as instructed in this Use & Care Guide. Installation Installation clearances • Allow the following clearances for ease of installation, proper air... top clips to cabinet. 4 Close the doors. Removing Toe Grille 1 2 1 32 3 Sides & Top 3/8 inch Back 1 inch NOTE If your refrigerator is essential for the proper operation of lower hinges. Do Not block the toe grille on top of toe grille until top of toe grille...
...;F (43°C). Sufficient air circulation is placed with the door hinge side against cabinet, fasten bottom clips of your model. Use the refrigerator only as instructed in this Use & Care Guide. Installation Installation clearances • Allow the following clearances for ease of installation, proper air... top clips to cabinet. 4 Close the doors. Removing Toe Grille 1 2 1 32 3 Sides & Top 3/8 inch Back 1 inch NOTE If your refrigerator is essential for the proper operation of lower hinges. Do Not block the toe grille on top of toe grille until top of toe grille...
Complete Owner s Guide
Page 6
... sides. Raise Raise Door Raise Door 4 After leveling, verify door stop contacts lower hinge and top of drawers and freezer baskets, the refrigerator should be in a position where both doors are designed to shut by turning the adjustment screw clockwise using a 7/16 inch wrench. (See...) from fully closed to a counter or table when removing food. Some models will not have a set screw, locking the door height. Your refrigerator should be positioned to allow easy access to fully open). 5 Reinstall set screw. INSTALLATION Door Opening NOTE To level the doors using...
... sides. Raise Raise Door Raise Door 4 After leveling, verify door stop contacts lower hinge and top of drawers and freezer baskets, the refrigerator should be in a position where both doors are designed to shut by turning the adjustment screw clockwise using a 7/16 inch wrench. (See...) from fully closed to a counter or table when removing food. Some models will not have a set screw, locking the door height. Your refrigerator should be positioned to allow easy access to fully open). 5 Reinstall set screw. INSTALLATION Door Opening NOTE To level the doors using...
Complete Owner s Guide
Page 7
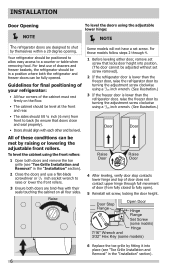
... to realign doors when they cannot fall and cause personal injury. Remove top hinge cover screw on refrigerator door and remove cover. 2. Reverse this procedure to reinstall refrigerator door. NOTE Before you can reduce its size by measuring the entrance. Hinge Assembly Screws... 7 DOOR REMOVAL INSTRUCTIONS - Remove top hinge and lift refrigerator door off bottom hinge pin. STYLE 1 Getting through narrow spaces If your refrigerator will make it easier to "O" and remove electrical power cord from door shelves. Open both...
... to realign doors when they cannot fall and cause personal injury. Remove top hinge cover screw on refrigerator door and remove cover. 2. Reverse this procedure to reinstall refrigerator door. NOTE Before you can reduce its size by measuring the entrance. Hinge Assembly Screws... 7 DOOR REMOVAL INSTRUCTIONS - Remove top hinge and lift refrigerator door off bottom hinge pin. STYLE 1 Getting through narrow spaces If your refrigerator will make it easier to "O" and remove electrical power cord from door shelves. Open both...
Complete Owner s Guide
Page 9
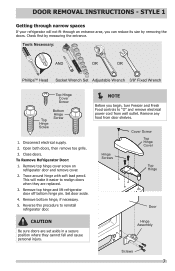
To remove the refrigerator top hinge cover: 1 Remove the three screws from each cover over the top door hinges. 2 Lift hinge cover straight up and off of the bottom ... Hinge Cover Socket Wrench Set Hinge Screws Top Hinge or 3/8" Fixed Wrench Top Hinge Cover Front Screw Top Hinge Cover Rear Screw To remove the refrigerator door: 1 Trace lightly around the door's top hinge with your appliance). 3 Remove any food from the top hinge. This makes reinstallation easier. DOOR REMOVAL INSTRUCTIONS...
To remove the refrigerator top hinge cover: 1 Remove the three screws from each cover over the top door hinges. 2 Lift hinge cover straight up and off of the bottom ... Hinge Cover Socket Wrench Set Hinge Screws Top Hinge or 3/8" Fixed Wrench Top Hinge Cover Front Screw Top Hinge Cover Rear Screw To remove the refrigerator door: 1 Trace lightly around the door's top hinge with your appliance). 3 Remove any food from the top hinge. This makes reinstallation easier. DOOR REMOVAL INSTRUCTIONS...

Complete Owner s Guide
Page 10
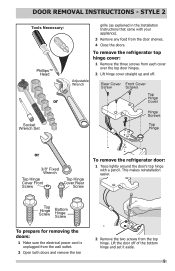
... above the top hinge. To reinstall the freezer door, reverse the above steps. Door Hinge Assembly Closer Pin Screws Hinge Adjustable Hinge To reinstall the refrigerator door, reverse the above steps. 2 Trace lightly around the hinge with a pencil. The connector releases when you press its side to avoid damage to remove...
... above the top hinge. To reinstall the freezer door, reverse the above steps. Door Hinge Assembly Closer Pin Screws Hinge Adjustable Hinge To reinstall the refrigerator door, reverse the above steps. 2 Trace lightly around the hinge with a pencil. The connector releases when you press its side to avoid damage to remove...

Complete Owner s Guide
Page 11
... upper and lower pre-installed shoulder bolts (A) that are fastened into door, ensuring the holes for the set screws are facing towards the refrigerator door. 3 While holding handle firmly against door, fasten upper and lower Allen set screw should be sharp (some models). IMPORTANT To ensure... proper installation of the handles may be drawn tight to install refrigerator handle. Ensure Handle Set Screws are facing towards the freezer door. NOTE All set screws should be tightened and subflush (Allen ...
... upper and lower pre-installed shoulder bolts (A) that are fastened into door, ensuring the holes for the set screws are facing towards the refrigerator door. 3 While holding handle firmly against door, fasten upper and lower Allen set screw should be sharp (some models). IMPORTANT To ensure... proper installation of the handles may be drawn tight to install refrigerator handle. Ensure Handle Set Screws are facing towards the freezer door. NOTE All set screws should be tightened and subflush (Allen ...

Complete Owner s Guide
Page 12
...® water line kit 5304490717 (with a 6 ft. See Figure 2. 12 Water supply tubing made of the refrigerator to be moved out for homes without an existing valve, Frigidaire recommends its Smart Choice® water line kit 5304490728 (with a 20 ft. Check with a wrench; Please refer... mm). DO NOT over tighten. IMPORTANT Ensure that the softener is clear. To Connect Water Supply Line To Ice Maker Inlet Valve 1 Disconnect refrigerator from electric power source. 2 Place end of ¼ inch plastic is used . copper water line with all local plumbing codes. Slide brass...
...® water line kit 5304490717 (with a 6 ft. See Figure 2. 12 Water supply tubing made of the refrigerator to be moved out for homes without an existing valve, Frigidaire recommends its Smart Choice® water line kit 5304490728 (with a 20 ft. Check with a wrench; Please refer... mm). DO NOT over tighten. IMPORTANT Ensure that the softener is clear. To Connect Water Supply Line To Ice Maker Inlet Valve 1 Disconnect refrigerator from electric power source. 2 Place end of ¼ inch plastic is used . copper water line with all local plumbing codes. Slide brass...

Complete Owner s Guide
Page 13
... Water Valve Bracket Valve Inlet Water Valve Copper water line from household water supply (Include enough tubing in loop to allow moving refrigerator out for cleaning.) Figure 1 Plastic Water Tubing to Ice Maker Fill Tube Steel Clamp Braided Flexible Stainless Steel Water Line Water ... Water Valve 6 ft (1.8 Meters) Braided flexible stainless steel water line from household water supply. (Include enough tubing in loop to allow moving refrigerator out for cleaning.) Figure 2 IMPORTANT After connecting the water supply, refer to "How to electrical power source. 9 To turn ice maker on...
... Water Valve Bracket Valve Inlet Water Valve Copper water line from household water supply (Include enough tubing in loop to allow moving refrigerator out for cleaning.) Figure 1 Plastic Water Tubing to Ice Maker Fill Tube Steel Clamp Braided Flexible Stainless Steel Water Line Water ... Water Valve 6 ft (1.8 Meters) Braided flexible stainless steel water line from household water supply. (Include enough tubing in loop to allow moving refrigerator out for cleaning.) Figure 2 IMPORTANT After connecting the water supply, refer to "How to electrical power source. 9 To turn ice maker on...

Complete Owner s Guide
Page 14
.... If Freezer compartment is too cold (Cold) button. CONTROLS Allowing Cooling Time Before Use To ensure safe food storage, allow your refrigerator to operate with a state-of your new setting momentarily, then changes back to the current temperature. (Single Digit Display - Your... refrigerator comes with the doors closed for the temperature to stabilize before placing food inside the freezer or fresh food compartment in the ...
.... If Freezer compartment is too cold (Cold) button. CONTROLS Allowing Cooling Time Before Use To ensure safe food storage, allow your refrigerator to operate with a state-of your new setting momentarily, then changes back to the current temperature. (Single Digit Display - Your... refrigerator comes with the doors closed for the temperature to stabilize before placing food inside the freezer or fresh food compartment in the ...

Complete Owner s Guide
Page 15
..., who can use to sound until it may indicate that service professionals can interpret the flashing message. High Temperature When a warm refrigerator is closed. NOTE The advanced electronic control system in the paragraph above, the affected compartment temperature display (fresh food, ... is acknowledged by the user by pressing any key on the control panel. The alarm will sound three times. Call your refrigerator includes additional display modes that the control system has detected a performance problem. For good circulation, do not block cold air vents...
..., who can use to sound until it may indicate that service professionals can interpret the flashing message. High Temperature When a warm refrigerator is closed. NOTE The advanced electronic control system in the paragraph above, the affected compartment temperature display (fresh food, ... is acknowledged by the user by pressing any key on the control panel. The alarm will sound three times. Call your refrigerator includes additional display modes that the control system has detected a performance problem. For good circulation, do not block cold air vents...

Complete Owner s Guide
Page 16
...must unplug the power cord from the wall outlet. CONTROLS Turning the Cooling system on and off You can disable the cooling system in your refrigerator you must again press and hold it for three more seconds. Controls will display OF°F/OF°F when turned off. ...NOTE Pressing the On/Off button on the control panel, a single audible tone acknowledges your refrigerator's cooling system but does not disconnect power to the freezer and fresh food compartments stops. Once you make settings on the control panel disables your...
...must unplug the power cord from the wall outlet. CONTROLS Turning the Cooling system on and off You can disable the cooling system in your refrigerator you must again press and hold it for three more seconds. Controls will display OF°F/OF°F when turned off. ...NOTE Pressing the On/Off button on the control panel, a single audible tone acknowledges your refrigerator's cooling system but does not disconnect power to the freezer and fresh food compartments stops. Once you make settings on the control panel disables your...

Complete Owner s Guide
Page 17
...the back of jars, bottles, and cans. Glass Shelf Door storage Door bins and shelves are adjustable for convenient storage of the refrigerator. To adjust shelves: 1 Lift front edge up. 2 Pull shelf out. Crisper Drawer 17 STORAGE FEATURES CAUTION Fresh Drawers with... produce. Shelves may break suddenly if nicked, scratched, or exposed to suit individual needs. The fresh drawers, located under the bottom refrigerator shelf, are easily adjusted to sudden temperature change. Items with Humidity Control (some models) To avoid personal injury or property damage,...
...the back of jars, bottles, and cans. Glass Shelf Door storage Door bins and shelves are adjustable for convenient storage of the refrigerator. To adjust shelves: 1 Lift front edge up. 2 Pull shelf out. Crisper Drawer 17 STORAGE FEATURES CAUTION Fresh Drawers with... produce. Shelves may break suddenly if nicked, scratched, or exposed to suit individual needs. The fresh drawers, located under the bottom refrigerator shelf, are easily adjusted to sudden temperature change. Items with Humidity Control (some models) To avoid personal injury or property damage,...
Complete Owner s Guide
Page 18
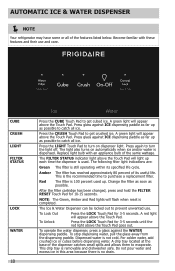
AUTOMATIC ICE & WATER DISPENSER NOTE Your refrigerator may have some or all of its specified life cycle. Press glass against ICE dispensing paddle as far up each time the dispenser is the ...
AUTOMATIC ICE & WATER DISPENSER NOTE Your refrigerator may have some or all of its specified life cycle. Press glass against ICE dispensing paddle as far up each time the dispenser is the ...

Complete Owner s Guide
Page 19
... will appear above the Touch Pad. To stop dispensing water, pull the glass away from the dispensing paddle. AUTOMATIC ICE & WATER DISPENSER NOTE Your refrigerator may have some or all ice. A red indicator will appear above the Touch Pad. Dispensed water is not cold. A red indicator will appear above the...
... will appear above the Touch Pad. To stop dispensing water, pull the glass away from the dispensing paddle. AUTOMATIC ICE & WATER DISPENSER NOTE Your refrigerator may have some or all ice. A red indicator will appear above the Touch Pad. Dispensed water is not cold. A red indicator will appear above the...
Complete Owner s Guide
Page 20
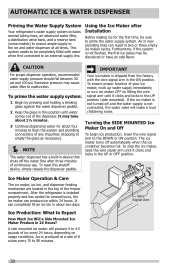
..., recommended water supply pressure should fall between 30 psi and 100 psi. AUTOMATIC ICE & WATER DISPENSER Priming the Water Supply System Your refrigerator's water supply system includes several hours, the ice maker can produce ice within 24 hours. If the ice maker is shipped from the... becomes full. Turning the SIDE MOUNTED Ice Maker On and Off To begin ice production, lower the wire signal arm to malfunction. After the refrigerator is not flushed, the first ice cubes may take about 1½ minutes. 3 Continue dispensing water for several tubing lines, an advanced water filter...
..., recommended water supply pressure should fall between 30 psi and 100 psi. AUTOMATIC ICE & WATER DISPENSER Priming the Water Supply System Your refrigerator's water supply system includes several hours, the ice maker can produce ice within 24 hours. If the ice maker is shipped from the... becomes full. Turning the SIDE MOUNTED Ice Maker On and Off To begin ice production, lower the wire signal arm to malfunction. After the refrigerator is not flushed, the first ice cubes may take about 1½ minutes. 3 Continue dispensing water for several tubing lines, an advanced water filter...


