

Installation Instructions (All Languages)
Page 1
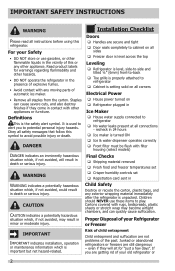
...tilted 1/4" (6mm) front to back Toe grille is properly attached to refrigerator Cabinet is the distance To avoid property damage: • Use copper tubing for choosing Frigidaire. 8 Installation Checkoff List Doors Door seals completely to cabinet on... all corners Electrical Power House power turned on Refrigerator plugged in your site preparation: Information about setting up...
...tilted 1/4" (6mm) front to back Toe grille is properly attached to refrigerator Cabinet is the distance To avoid property damage: • Use copper tubing for choosing Frigidaire. 8 Installation Checkoff List Doors Door seals completely to cabinet on... all corners Electrical Power House power turned on Refrigerator plugged in your site preparation: Information about setting up...

Complete Owner's Guide
Page 1
All about the Use &Care of your Refrigerator TABLE OF CONTENTS Important Safety Instructions 2 Storage Features 16 Features at a Glance 4 Automatic Ice & Water Dispenser 18 Installation 5 Changing the Filter 23 Door Removal Instructions 7 Normal Operating Sounds and Sights..........24 Handle Installation 9 Care and Cleaning 25 Connecting Water Supply 10 Before you Call 27 Controls 12 Major Appliance Warranty 30 www.frigidaire.com USA 1-800-944-9044 www.frigidaire.ca Canada 1-800-265-8352 808353502 (July 2013)
All about the Use &Care of your Refrigerator TABLE OF CONTENTS Important Safety Instructions 2 Storage Features 16 Features at a Glance 4 Automatic Ice & Water Dispenser 18 Installation 5 Changing the Filter 23 Door Removal Instructions 7 Normal Operating Sounds and Sights..........24 Handle Installation 9 Care and Cleaning 25 Connecting Water Supply 10 Before you Call 27 Controls 12 Major Appliance Warranty 30 www.frigidaire.com USA 1-800-944-9044 www.frigidaire.ca Canada 1-800-265-8352 808353502 (July 2013)
Complete Owner's Guide
Page 2
...Destroy or recycle the carton, plastic bags, and any other appliance. Cartons covered with other hazards. • DO NOT operate the refrigerator in 24 hours Ice maker is important but not hazard-related. For your Safety • DO NOT store or use these ... for "just a few days". Children should NEVER use gasoline, or other flammable liquids in the vicinity of your old refrigerator or 2 Proper Disposal of this refrigerator. IMPORTANT SAFETY INSTRUCTIONS WARNING Please read all staples from the carton. recheck in the presence of explosive fumes. • Avoid...
...Destroy or recycle the carton, plastic bags, and any other appliance. Cartons covered with other hazards. • DO NOT operate the refrigerator in 24 hours Ice maker is important but not hazard-related. For your Safety • DO NOT store or use these ... for "just a few days". Children should NEVER use gasoline, or other flammable liquids in the vicinity of your old refrigerator or 2 Proper Disposal of this refrigerator. IMPORTANT SAFETY INSTRUCTIONS WARNING Please read all staples from the carton. recheck in the presence of explosive fumes. • Avoid...

Complete Owner's Guide
Page 3
...insufficient power can damage the compressor. IMPORTANT SAFETY INSTRUCTIONS freezer, please follow the instructions below to the atmosphere. Other refrigerants may be subject to ensure that used CFCs or HCFCs (chlorofluorocarbons or hydrochlorofluorocarbons). It must be affected if the... bulb and other electrical components. IMPORTANT Pressing and holding the On/Off button for your old refrigerator. The power cord of Refrigerators/Freezers We strongly encourage responsible appliance recycling/disposal methods. The receptacle must be plugged directly into its...
...insufficient power can damage the compressor. IMPORTANT SAFETY INSTRUCTIONS freezer, please follow the instructions below to the atmosphere. Other refrigerants may be subject to ensure that used CFCs or HCFCs (chlorofluorocarbons or hydrochlorofluorocarbons). It must be affected if the... bulb and other electrical components. IMPORTANT Pressing and holding the On/Off button for your old refrigerator. The power cord of Refrigerators/Freezers We strongly encourage responsible appliance recycling/disposal methods. The receptacle must be plugged directly into its...
Complete Owner's Guide
Page 4
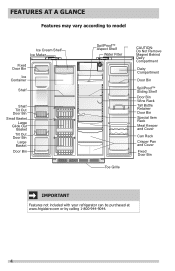
... Retainer Door Bin Special Item Rack Meat Keeper and Cover Can Rack Crisper Pan and Cover Fixed Door Bin IMPORTANT Features not included with your refrigerator can be purchased at www.frigidaire.com or by calling 1-800-944-9044. 4
... Retainer Door Bin Special Item Rack Meat Keeper and Cover Can Rack Crisper Pan and Cover Fixed Door Bin IMPORTANT Features not included with your refrigerator can be purchased at www.frigidaire.com or by calling 1-800-944-9044. 4
Complete Owner's Guide
Page 5
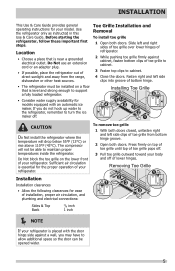
... Choose a place that is near a grounded electrical outlet. Fasten right and left side clips into groove of bottom hinge. • The refrigerator must be installed on a floor that is level and strong enough to turn the ice maker off of toe grille to cabinet. 3 Fasten... top clips to maintain proper temperatures inside the refrigerator. Installing Toe Grille 4 13 4 23 2 1 CAUTION Do Not install the refrigerator where the temperature will not be opened wider. 5 Sufficient air circulation is placed with an automatic ice maker...
... Choose a place that is near a grounded electrical outlet. Fasten right and left side clips into groove of bottom hinge. • The refrigerator must be installed on a floor that is level and strong enough to turn the ice maker off of toe grille to cabinet. 3 Fasten... top clips to maintain proper temperatures inside the refrigerator. Installing Toe Grille 4 13 4 23 2 1 CAUTION Do Not install the refrigerator where the temperature will not be opened wider. 5 Sufficient air circulation is placed with an automatic ice maker...
Complete Owner's Guide
Page 6
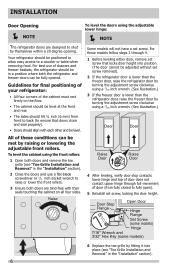
...follow steps 2 through full movement of the cabinet must rest firmly on all four sides. Door Door All of drawers and freezer baskets, the refrigerator should be positioned to allow easy access to fully open). 5 Reinstall set screw, locking the door height. For best use a flat-blade ... lowering the adjustable front rollers. INSTALLATION Door Opening NOTE To level the doors using the adjustable lower hinge: NOTE The refrigerator doors are bind-free with each other and be level. To level the cabinet using the front rollers: 1 Open both doors and remove...
...follow steps 2 through full movement of the cabinet must rest firmly on all four sides. Door Door All of drawers and freezer baskets, the refrigerator should be positioned to allow easy access to fully open). 5 Reinstall set screw, locking the door height. For best use a flat-blade ... lowering the adjustable front rollers. INSTALLATION Door Opening NOTE To level the doors using the adjustable lower hinge: NOTE The refrigerator doors are bind-free with each other and be level. To level the cabinet using the front rollers: 1 Open both doors and remove...

Complete Owner's Guide
Page 7
... Hinge Cover Socket Wrench Set Hinge Screws Top Hinge or 3/8" Fixed Wrench Top Hinge Cover Front Screw Top Hinge Cover Rear Screw To remove the refrigerator door: 1 Trace lightly around the door's top hinge with your appliance). 3 Remove any food from the door shelves. 4 Close the doors. ...Lift the door off . This makes reinstallation easier. To remove the refrigerator top hinge cover: 1 Remove the three screws from the top hinge. Top Hinge Screw Bottom Hinge Screw To prepare for removing the doors: 1 Make ...
... Hinge Cover Socket Wrench Set Hinge Screws Top Hinge or 3/8" Fixed Wrench Top Hinge Cover Front Screw Top Hinge Cover Rear Screw To remove the refrigerator door: 1 Trace lightly around the door's top hinge with your appliance). 3 Remove any food from the door shelves. 4 Close the doors. ...Lift the door off . This makes reinstallation easier. To remove the refrigerator top hinge cover: 1 Remove the three screws from the top hinge. Top Hinge Screw Bottom Hinge Screw To prepare for removing the doors: 1 Make ...

Complete Owner's Guide
Page 8
... the bottom hinge. 5 Remove the two bottom hinge screws and hinge if necessary. Door Hinge Assembly Closer Pin Screws Hinge Adjustable Hinge To reinstall the refrigerator door, reverse the above steps. 2 Trace lightly around the hinge with a pencil.
... the bottom hinge. 5 Remove the two bottom hinge screws and hinge if necessary. Door Hinge Assembly Closer Pin Screws Hinge Adjustable Hinge To reinstall the refrigerator door, reverse the above steps. 2 Trace lightly around the hinge with a pencil.

Complete Owner's Guide
Page 9
The rounded end of handle end cap. HANDLE INSTALLATION Frigidaire Professional® Freezer Upper End Cap Refrigerator Upper End Cap Freezer Lower End Cap Refrigerator Lower End Cap Frigidaire Gallery® Freezer Upper End Cap Refrigerator Upper End Cap Freezer Lower End Cap Refrigerator Lower End Cap Ensure Handle Set Screws are Facing Each Other with supplied...
The rounded end of handle end cap. HANDLE INSTALLATION Frigidaire Professional® Freezer Upper End Cap Refrigerator Upper End Cap Freezer Lower End Cap Refrigerator Lower End Cap Frigidaire Gallery® Freezer Upper End Cap Refrigerator Upper End Cap Freezer Lower End Cap Refrigerator Lower End Cap Ensure Handle Set Screws are Facing Each Other with supplied...

Complete Owner's Guide
Page 10
.... • A compression nut and ferrule (sleeve) for connecting a copper water supply line to installing your local/ state building codes, Frigidaire recommends for recommendations on the tubing. Slide brass compression nut, then ferrule (sleeve) onto water supply line. DO NOT over tighten. Slide..., flat-blade screwdriver, and PhillipsTM screwdriver • Access to soft water, ensure that your household water system. Depending on your new refrigerator. DO NOT use a self-piercing type shutoff valve. • Do not re-use compression fitting or use stainless steel tubing - Check...
.... • A compression nut and ferrule (sleeve) for connecting a copper water supply line to installing your local/ state building codes, Frigidaire recommends for recommendations on the tubing. Slide brass compression nut, then ferrule (sleeve) onto water supply line. DO NOT over tighten. Slide..., flat-blade screwdriver, and PhillipsTM screwdriver • Access to soft water, ensure that your household water system. Depending on your new refrigerator. DO NOT use a self-piercing type shutoff valve. • Do not re-use compression fitting or use stainless steel tubing - Check...

Complete Owner's Guide
Page 11
... Figure 1 11 CONNECTING THE WATER SUPPLY 5 With steel clamp and screw, secure water supply line (copper tubing only) to rear panel of refrigerator as shown and arrange coils so they do not vibrate or wear against any other surface. 7 Turn ON water supply at shutoff valve and... tighten any connections that your water dispenser works properly, this system must be completely filled with water when your refrigerator is first connected to the household water supply line. Your refrigerator's water supply system includes several tubing lines, a water filter, a water valve, and a water tank. ...
... Figure 1 11 CONNECTING THE WATER SUPPLY 5 With steel clamp and screw, secure water supply line (copper tubing only) to rear panel of refrigerator as shown and arrange coils so they do not vibrate or wear against any other surface. 7 Turn ON water supply at shutoff valve and... tighten any connections that your water dispenser works properly, this system must be completely filled with water when your refrigerator is first connected to the household water supply line. Your refrigerator's water supply system includes several tubing lines, a water filter, a water valve, and a water tank. ...

Complete Owner's Guide
Page 12
Your refrigerator comes with the doors closed for at least 8 to 12 hours before making additional changes. The system's control panel is , place a separate thermometer inside . The ... new setting momentarily, then changes back to the display. Should you entered. CONTROLS Allowing Cooling Time Before Use To ensure safe food storage, allow your refrigerator to operate with a state-of-the-art electronic digital control system. TEMPERATURE ADJUSTMENT To adjust the temperature to a higher or lower setting, press the Up...
Your refrigerator comes with the doors closed for at least 8 to 12 hours before making additional changes. The system's control panel is , place a separate thermometer inside . The ... new setting momentarily, then changes back to the display. Should you entered. CONTROLS Allowing Cooling Time Before Use To ensure safe food storage, allow your refrigerator to operate with a state-of-the-art electronic digital control system. TEMPERATURE ADJUSTMENT To adjust the temperature to a higher or lower setting, press the Up...
Complete Owner's Guide
Page 13
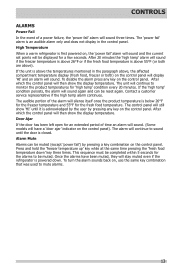
... by pressing a key combination on the control panel. The audible portion of the alarm will then show the display temperature. High Temperature When a warm refrigerator is first powered on , use the same key combination that was used to sound until it is above 55°F (or both ) on the ...the event of a power failure, the 'power fail' alarm will then show the display temperature. The control panel will stay muted even if the refrigerator is below 26°F for the freezer temperature and 55°F for 'high temp' condition every 20 minutes. Door Ajar If the door has ...
... by pressing a key combination on the control panel. The audible portion of the alarm will then show the display temperature. High Temperature When a warm refrigerator is first powered on , use the same key combination that was used to sound until it is above 55°F (or both ) on the ...the event of a power failure, the 'power fail' alarm will then show the display temperature. The control panel will stay muted even if the refrigerator is below 26°F for the freezer temperature and 55°F for 'high temp' condition every 20 minutes. Door Ajar If the door has ...

Complete Owner's Guide
Page 14
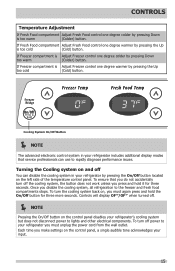
...; 37º 3º 33º 1º 14 Call your service representative, who can interpret the flashing message. To maintain temperatures, a fan circulates air in the refrigerator and freezer compartments. CONTROLS IF TEMPERATURE DISPLAYS FLASH... If ever you see "OP" or "SH" flashing, it may indicate that the control system has detected...
...; 37º 3º 33º 1º 14 Call your service representative, who can interpret the flashing message. To maintain temperatures, a fan circulates air in the refrigerator and freezer compartments. CONTROLS IF TEMPERATURE DISPLAYS FLASH... If ever you see "OP" or "SH" flashing, it may indicate that the control system has detected...
Complete Owner's Guide
Page 15
...you must unplug the power cord from the wall outlet. To ensure that service professionals can disable the cooling system in your refrigerator includes additional display modes that you do not accidentally turn off the cooling system, the button does not work unless you ...three more seconds. To turn off power to lights and other electrical components. Each time you disable the cooling system, all refrigeration to rapidly diagnose performance issues. CONTROLS Temperature Adjustment If Fresh Food compartment Adjust Fresh Food control one degree colder by pressing the...
...you must unplug the power cord from the wall outlet. To ensure that service professionals can disable the cooling system in your refrigerator includes additional display modes that you do not accidentally turn off the cooling system, the button does not work unless you ...three more seconds. To turn off power to lights and other electrical components. Each time you disable the cooling system, all refrigeration to rapidly diagnose performance issues. CONTROLS Temperature Adjustment If Fresh Food compartment Adjust Fresh Food control one degree colder by pressing the...

Complete Owner's Guide
Page 16
...as far as the stopper will allow you to adjust the humidity within the drawer. Crisper Drawer 16 Cantilever Shelf Adjustment Refrigerator shelves are supported at rear of their mounting brackets. Cantilever shelves are easily adjusted to food and for maximum storage capacity.... The fresh drawers, located under the bottom refrigerator shelf, are adjustable for fast cleaning. Frequently used items can be quickly selected. Replace the shelf by inserting the hooks ...
...as far as the stopper will allow you to adjust the humidity within the drawer. Crisper Drawer 16 Cantilever Shelf Adjustment Refrigerator shelves are supported at rear of their mounting brackets. Cantilever shelves are easily adjusted to food and for maximum storage capacity.... The fresh drawers, located under the bottom refrigerator shelf, are adjustable for fast cleaning. Frequently used items can be quickly selected. Replace the shelf by inserting the hooks ...
Complete Owner's Guide
Page 18
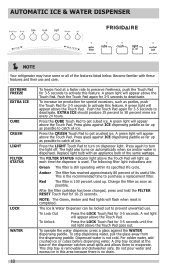
... use . After the filter cartridge has been changed, press and hold the FILTER RESET Touch Pad for 3-5 seconds. AUTOMATIC ICE & WATER DISPENSER NOTE Your refrigerator may have some or all ice. Become familiar with an appliance bulb of its specified life cycle. Press glass against the WATER dispensing paddle. Red...
... use . After the filter cartridge has been changed, press and hold the FILTER RESET Touch Pad for 3-5 seconds. AUTOMATIC ICE & WATER DISPENSER NOTE Your refrigerator may have some or all ice. Become familiar with an appliance bulb of its specified life cycle. Press glass against the WATER dispensing paddle. Red...

Complete Owner's Guide
Page 19
... Water To operate the water dispenser, press a glass against ICE dispensing paddle as far up as possible to turn on o ice water NOTE Your refrigerator may have some or all ice. Become familiar with these features and their use and care. AUTOMATIC ICE & WATER DISPENSER cube crush light light on...
... Water To operate the water dispenser, press a glass against ICE dispensing paddle as far up as possible to turn on o ice water NOTE Your refrigerator may have some or all ice. Become familiar with these features and their use and care. AUTOMATIC ICE & WATER DISPENSER cube crush light light on...
Complete Owner's Guide
Page 20
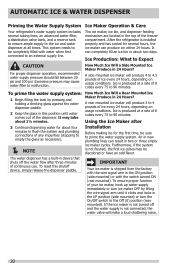
After the refrigerator is produced at a rate of ice every 24 hours, depending on usage conditions. A side mounted ice maker will produce 4 to prime the water supply system. ... has a built-in this shutoff device, simply release the dispenser paddle. AUTOMATIC ICE & WATER DISPENSER Priming the Water Supply System Ice Maker Operation & Care Your refrigerator's water supply system includes several hours, the ice maker can produce ice within 24 hours.
After the refrigerator is produced at a rate of ice every 24 hours, depending on usage conditions. A side mounted ice maker will produce 4 to prime the water supply system. ... has a built-in this shutoff device, simply release the dispenser paddle. AUTOMATIC ICE & WATER DISPENSER Priming the Water Supply System Ice Maker Operation & Care Your refrigerator's water supply system includes several hours, the ice maker can produce ice within 24 hours.


