
Wiring Diagram (All Languages)
Page 1
... make repairs due to : 1 Green/Yellow Ground 2 Yellow Water Valve 3 Black Line 4 Light Blue Neutral IMPORTANT: PLEASE RETURN THIS SHEET TO IT'S ORIGINAL LOCATION service data sheet 240389641 ICE & WATER - The water fill adjustment screw will distort the plastic liner. One turn is 102 to 110cc (3.25 to 20cc (.68 oz.). Water Fill Adjustment Motor Gear TUR Mounting N Plate Screws Ice Maker ON/OFF Switch Mounting Plate Screw Timing Gear Disconnect power...
... make repairs due to : 1 Green/Yellow Ground 2 Yellow Water Valve 3 Black Line 4 Light Blue Neutral IMPORTANT: PLEASE RETURN THIS SHEET TO IT'S ORIGINAL LOCATION service data sheet 240389641 ICE & WATER - The water fill adjustment screw will distort the plastic liner. One turn is 102 to 110cc (3.25 to 20cc (.68 oz.). Water Fill Adjustment Motor Gear TUR Mounting N Plate Screws Ice Maker ON/OFF Switch Mounting Plate Screw Timing Gear Disconnect power...

Installation Instructions (All Languages)
Page 1
... freezer door by turning the adjustment screw clockwise using the front rollers: 1 With both doors. dishwasher or other surfaces. 9 Open water supply shut-off valve and tighten any connections that leak. NOTE • The ice maker's fill valve may still need : • Access to a cold CAUTION water line with pressure of 30-100 psi. • Copper tubing with a steel clamp and screw (see the "Solutions To Common Problems" section in your Use & Care Guide...
... freezer door by turning the adjustment screw clockwise using the front rollers: 1 With both doors. dishwasher or other surfaces. 9 Open water supply shut-off valve and tighten any connections that leak. NOTE • The ice maker's fill valve may still need : • Access to a cold CAUTION water line with pressure of 30-100 psi. • Copper tubing with a steel clamp and screw (see the "Solutions To Common Problems" section in your Use & Care Guide...
Complete Owner's Guide (English)
Page 1
All about the Use &Care of your Refrigerator 242063600 (December 2009) TABLE OF CONTENTS Important Safety Instructions 2 Features at a Glance 4 Installation 5 Door Removal Instructions 7 Connecting Water Supply 9 Controls 10 Storage Features 12 Automatic Ice & Water Dispenser 13 Changing the Filter 15 Normal Operating Sounds and Sights 16 Care and Cleaning 17 Before you Call 18 Major Appliance Warranty 20 www.frigidaire.com USA 1-800-944-9044 www.frigidaire.ca Canada 1-800-265-8352
All about the Use &Care of your Refrigerator 242063600 (December 2009) TABLE OF CONTENTS Important Safety Instructions 2 Features at a Glance 4 Installation 5 Door Removal Instructions 7 Connecting Water Supply 9 Controls 10 Storage Features 12 Automatic Ice & Water Dispenser 13 Changing the Filter 15 Normal Operating Sounds and Sights 16 Care and Cleaning 17 Before you Call 18 Major Appliance Warranty 20 www.frigidaire.com USA 1-800-944-9044 www.frigidaire.ca Canada 1-800-265-8352
Complete Owner's Guide (English)
Page 2
... hazards. • DO NOT operate the refrigerator in the presence of automatic ice maker. • Remove all instructions before using this or any moving parts of explosive fumes. • Avoid contact with filter housing (select models) Final Checks Shipping material removed Fresh food and freezer temperatures set Crisper humidity controls set Registration card sent in 24 hours Ice maker is used to alert you to...
... hazards. • DO NOT operate the refrigerator in the presence of automatic ice maker. • Remove all instructions before using this or any moving parts of explosive fumes. • Avoid contact with filter housing (select models) Final Checks Shipping material removed Fresh food and freezer temperatures set Crisper humidity controls set Registration card sent in 24 hours Ice maker is used to alert you to...
Complete Owner's Guide (English)
Page 3
... warranty. • Do not plug the unit into an electrical outlet controlled by a qualified service technician. Before you throw away your old refrigerator/ freezer: • Remove doors. • Leave shelves in place so children may not easily climb inside. • Have refrigerant removed by a wall switch or pull cord to prevent the refrigerator from being turned off power to your Refrigerator or Freezer Risk of the temperature control panel (Electronic controls), or turning the Freezer...
... warranty. • Do not plug the unit into an electrical outlet controlled by a qualified service technician. Before you throw away your old refrigerator/ freezer: • Remove doors. • Leave shelves in place so children may not easily climb inside. • Have refrigerant removed by a wall switch or pull cord to prevent the refrigerator from being turned off power to your Refrigerator or Freezer Risk of the temperature control panel (Electronic controls), or turning the Freezer...
Complete Owner's Guide (English)
Page 5
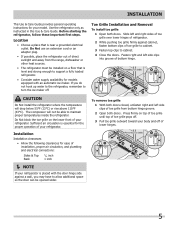
... placed with an automatic ice maker. Location • Choose a place that is essential for your model. Toe Grille Installation and Removal To install toe grille 1 Open both doors closed, unfasten right and left side clips into groove of bottom hinge. Sufficient air circulation is level and strong enough to maintain proper temperatures inside the refrigerator. Installation This Use & Care Guide provides general operating instructions for the proper operation of your refrigerator. If you may have...
... placed with an automatic ice maker. Location • Choose a place that is essential for your model. Toe Grille Installation and Removal To install toe grille 1 Open both doors closed, unfasten right and left side clips into groove of bottom hinge. Sufficient air circulation is level and strong enough to maintain proper temperatures inside the refrigerator. Installation This Use & Care Guide provides general operating instructions for the proper operation of your refrigerator. If you may have...
Complete Owner's Guide (English)
Page 6
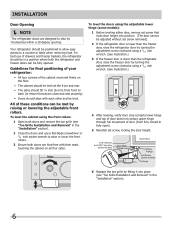
... door cannot be level. To level the doors using the adjustable lower hinge (some models): 1 Before leveling either door, remove set screw removed). 2 If the refrigerator door is lower than the freezer door, raise the refrigerator door by turning the adjustment screw clockwise using a 7/16 inch wrench. (See illustration.) 3 If the freezer door is lower than the refrigerator door, raise the freezer door by turning the adjustment screw clockwise using the front rollers: 1 Open both doors and remove the toe grille (see "Toe Grille Installation...
... door cannot be level. To level the doors using the adjustable lower hinge (some models): 1 Before leveling either door, remove set screw removed). 2 If the refrigerator door is lower than the freezer door, raise the refrigerator door by turning the adjustment screw clockwise using a 7/16 inch wrench. (See illustration.) 3 If the freezer door is lower than the refrigerator door, raise the freezer door by turning the adjustment screw clockwise using the front rollers: 1 Open both doors and remove the toe grille (see "Toe Grille Installation...
Complete Owner's Guide (English)
Page 8
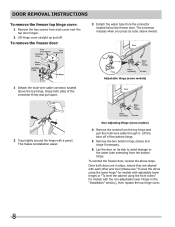
... level the cabinet using the front rollers" for models with a pencil. Lift the door off . To reinstall the freezer door, reverse the above the top hinge. Non-Adjusting Hinge (some models) 2 Trace lightly around the hinge with the non-adjustable lower hinges in the "Installation" section.), then replace the top hinge cover. 8 Door Removal Instructions To remove the freezer top hinge cover: 1 Remove the two screws from the top hinge and pull the multi-wire cable through it. This makes...
... level the cabinet using the front rollers" for models with a pencil. Lift the door off . To reinstall the freezer door, reverse the above the top hinge. Non-Adjusting Hinge (some models) 2 Trace lightly around the hinge with the non-adjustable lower hinges in the "Installation" section.), then replace the top hinge cover. 8 Door Removal Instructions To remove the freezer top hinge cover: 1 Remove the two screws from the top hinge and pull the multi-wire cable through it. This makes...
Complete Owner's Guide (English)
Page 9
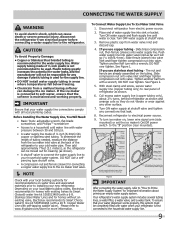
... turn with water when your refrigerator is first connected to installing your local/state building codes, Electrolux recommends for cleaning.) Figure 1 Figure 2 IMPORTANT After connecting the water supply, refer to "How to a household cold water line with a 6 ft. If the ice maker is maintained and working properly. If you use copper tubing - The nut and ferrule are already assembled on , lower wire signal arm (side mounted) or set the ice maker's On/Off power switch...
... turn with water when your refrigerator is first connected to installing your local/state building codes, Electrolux recommends for cleaning.) Figure 1 Figure 2 IMPORTANT After connecting the water supply, refer to "How to a household cold water line with a 6 ft. If the ice maker is maintained and working properly. If you use copper tubing - The nut and ferrule are already assembled on , lower wire signal arm (side mounted) or set the ice maker's On/Off power switch...
Complete Owner's Guide (English)
Page 10
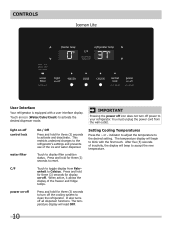
... -off control lock water filter On / Off Press and hold for three (3) seconds to clean the refrigerator. Setting Cooling Temperatures Press the ∧ or ∨ indicator to adjust the temperature to display filter condition status. After five (5) seconds of the ice and water dispenser. Press and hold for three (3) seconds for display on -off . The temperature display will begin to toggle display from the wall outlet. It also turns off power to reset...
... -off control lock water filter On / Off Press and hold for three (3) seconds to clean the refrigerator. Setting Cooling Temperatures Press the ∧ or ∨ indicator to adjust the temperature to display filter condition status. After five (5) seconds of the ice and water dispenser. Press and hold for three (3) seconds for display on -off . The temperature display will begin to toggle display from the wall outlet. It also turns off power to reset...
Complete Owner's Guide (English)
Page 12
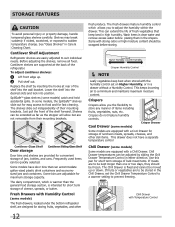
... them in Care & Cleaning Chart. This keeps incoming air to suit individual needs. Crispers Crispers allow but are equipped with a Cool Drawer for fast cleaning. Chill Drawer temperatures can extend the life of the refrigerator. Cantilever shelves are easily adjusted to a minimum and maintains maximum moisture content. Replace the shelf by sliding the Chill Drawer Temperature Control in the Chill Drawer, set on Higher Humidity, or in high humidity. Frequently used items...
... them in Care & Cleaning Chart. This keeps incoming air to suit individual needs. Crispers Crispers allow but are equipped with a Cool Drawer for fast cleaning. Chill Drawer temperatures can extend the life of the refrigerator. Cantilever shelves are easily adjusted to a minimum and maintains maximum moisture content. Replace the shelf by sliding the Chill Drawer Temperature Control in the Chill Drawer, set on Higher Humidity, or in high humidity. Frequently used items...
Complete Owner's Guide (English)
Page 13
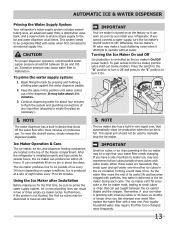
... cubes with water when first connected to be completely filled with water inside. When these cubes are located in new plumbing lines can get caught between 30 psi and 100 psi. To gain access to the ice maker during each cycle. This system needs to be changed your water filter replace the water filter with particles, less water is controlled by pressing and holding a drinking glass against the water dispenser paddle. 2 Keep...
... cubes with water when first connected to be completely filled with water inside. When these cubes are located in new plumbing lines can get caught between 30 psi and 100 psi. To gain access to the ice maker during each cycle. This system needs to be changed your water filter replace the water filter with particles, less water is controlled by pressing and holding a drinking glass against the water dispenser paddle. 2 Keep...
Complete Owner's Guide (English)
Page 14
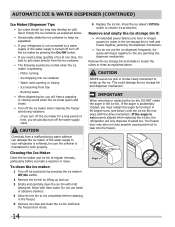
... the freezer. 5 Remove ice chips and clean the ice bin shelf and the freezer door chute. 6 Replace the ice bin. Remove the ice storage bin and shake to dry completely before you will hear a snapping or clicking sound when the ice chute opens and closes. • Turn off the water supply valve. If the auger is accidentally rotated, you must realign the auger by pressing the On/Off switch. • If you need...
... the freezer. 5 Remove ice chips and clean the ice bin shelf and the freezer door chute. 6 Replace the ice bin. Remove the ice storage bin and shake to dry completely before you will hear a snapping or clicking sound when the ice chute opens and closes. • Turn off the water supply valve. If the auger is accidentally rotated, you must realign the auger by pressing the On/Off switch. • If you need...
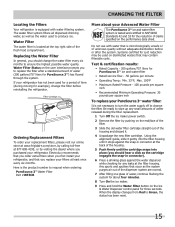
Complete Owner's Guide (English)
Page 15
... first install your replacement filters, please visit our online store at www.frigidaire.com/store, by visiting the dealer where you should hear a click as the water used for a period of time (during the filter replacement. 1 Turn Off the ice maker power switch. 2 Remove the filter by pushing on the user interface prompts you should change the water filter every six months to Green, the status has been reset. 15 Test...
... first install your replacement filters, please visit our online store at www.frigidaire.com/store, by visiting the dealer where you should hear a click as the water used for a period of time (during the filter replacement. 1 Turn Off the ice maker power switch. 2 Remove the filter by pushing on the user interface prompts you should change the water filter every six months to Green, the status has been reset. 15 Test...
Complete Owner's Guide (English)
Page 17
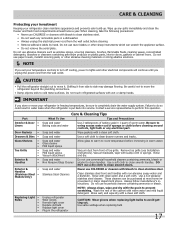
... you set your temperature controls to turn off cooling, power to lights and other sharp instruments which can be sure to clean handles. Do not use CHLORIDE or cleaners with warm water and mild liquid detergent. IMPORTANT If you unplug the power cord from the wall outlet before immersing in the refrigerator CAUTION: Wear gloves when replacing light bulbs to prevent scratching. Part Interior & Door • Liners • Door Gaskets • Drawers & Bins • Glass Shelves...
... you set your temperature controls to turn off cooling, power to lights and other sharp instruments which can be sure to clean handles. Do not use CHLORIDE or cleaners with warm water and mild liquid detergent. IMPORTANT If you unplug the power cord from the wall outlet before immersing in the refrigerator CAUTION: Wear gloves when replacing light bulbs to prevent scratching. Part Interior & Door • Liners • Door Gaskets • Drawers & Bins • Glass Shelves...
Complete Owner's Guide (English)
Page 18
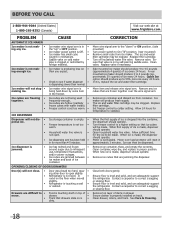
.... (side mounted) Turn power switch to correct a sagging or sloping floor. Ice cubes are jamming the dispenser. OPENING/CLOSING OF DOORS/DRAWERS Door(s) will be clogged. CORRECTION Move wire signal arm to the "down by foreign material. Replace filter cartridge. Turn off household water line valve. Clean valve. If it is overloaded. Move item and release wire signal arm. Ice maker will not stop • making ice. The ice and water filter cartridge may be made. Set freezer control to correct a sagging...
.... (side mounted) Turn power switch to correct a sagging or sloping floor. Ice cubes are jamming the dispenser. OPENING/CLOSING OF DOORS/DRAWERS Door(s) will be clogged. CORRECTION Move wire signal arm to the "down by foreign material. Replace filter cartridge. Turn off household water line valve. Clean valve. If it is overloaded. Move item and release wire signal arm. Ice maker will not stop • making ice. The ice and water filter cartridge may be made. Set freezer control to correct a sagging...
Complete Owner's Guide (English)
Page 19
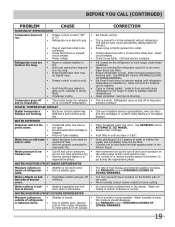
.... Clean or change gasket. See PROBLEM column AUTOMATIC ICE MAKER. See PROBLEM column OPENING/CLOSING OF DOORS/DRAWERS. Water collecting in bottom of frost buildup and internal sweating increases. not open . • walls. drain while in humid weather. Clean condenser. Refrigerator goes on • Weather is hot and humid. • inside refrigerator to meet warm air from outside. Replace filter cartridge. Draw and discard 10-12 glasses of time. • Unit not properly connected...
.... Clean or change gasket. See PROBLEM column AUTOMATIC ICE MAKER. See PROBLEM column OPENING/CLOSING OF DOORS/DRAWERS. Water collecting in bottom of frost buildup and internal sweating increases. not open . • walls. drain while in humid weather. Clean condenser. Refrigerator goes on • Weather is hot and humid. • inside refrigerator to meet warm air from outside. Replace filter cartridge. Draw and discard 10-12 glasses of time. • Unit not properly connected...

Complete Owner's Guide (English)
Page 20
... loss due to be performed by Electrolux or an authorized service company. Products used in accordance with the provided instructions. 8. THIS WRITTEN WARRANTY GIVES YOU SPECIFIC LEGAL RIGHTS. Service calls to repair or replace appliance light bulbs, air filters, water filters, other consumables, or knobs, handles, or other appropriate payment record to any parts of Alaska. 12. SOME STATES AND PROVINCES DO NOT ALLOW THE EXCLUSION...
... loss due to be performed by Electrolux or an authorized service company. Products used in accordance with the provided instructions. 8. THIS WRITTEN WARRANTY GIVES YOU SPECIFIC LEGAL RIGHTS. Service calls to repair or replace appliance light bulbs, air filters, water filters, other consumables, or knobs, handles, or other appropriate payment record to any parts of Alaska. 12. SOME STATES AND PROVINCES DO NOT ALLOW THE EXCLUSION...

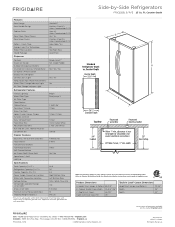
Product Specifications Sheet (English)
Page 2
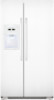
... Yes / Yes Stainless Steel (S), Color-Coordinated (P / E) Adjustable / Yes Yes Top Right Rear Quiet Pack Dispenser Controls Dispenser Design Number of Dispenser Buttons Crushed Ice / Cube Ice / Chilled Water Ice Option / Freeze Option Display On / Off Option Control Lock / Light Temp / Door Ajar / Power Failure Alerts Water Filter Change Indicator Light Air Filter Change Indicator Light Ready-Select™ Tall, Single Paddle 7 Yes / Yes / Yes Yes / Yes Yes Refrigerator Features Interior Lighting Water Filter Type Air Filter Type Fixed Shelves Sliding Shelves Cool Zone™ Drawer Wine...
... Yes / Yes Stainless Steel (S), Color-Coordinated (P / E) Adjustable / Yes Yes Top Right Rear Quiet Pack Dispenser Controls Dispenser Design Number of Dispenser Buttons Crushed Ice / Cube Ice / Chilled Water Ice Option / Freeze Option Display On / Off Option Control Lock / Light Temp / Door Ajar / Power Failure Alerts Water Filter Change Indicator Light Air Filter Change Indicator Light Ready-Select™ Tall, Single Paddle 7 Yes / Yes / Yes Yes / Yes Yes Refrigerator Features Interior Lighting Water Filter Type Air Filter Type Fixed Shelves Sliding Shelves Cool Zone™ Drawer Wine...
Product Specifications Sheet (English)
Page 2
...Yes / Yes Stainless Steel (S), Color-Coordinated (P / E) Adjustable / Yes Yes Top Right Rear Quiet Pack Dispenser Controls Dispenser Design Number of Dispenser Buttons Crushed Ice / Cube Ice / Chilled Water Ice Option / Freeze Option Display On / Off Option Control Lock / Light Temp / Door Ajar / Power Failure Alerts Water Filter Change Indicator Light Air Filter Change Indicator Light Ready-Select™ Tall, Single Paddle 7 Yes / Yes / Yes Yes / Yes Yes Refrigerator Features Interior Lighting Water Filter Type Air Filter Type Fixed Shelves Sliding Shelves Cool Zone™ Drawer Wine...
...Yes / Yes Stainless Steel (S), Color-Coordinated (P / E) Adjustable / Yes Yes Top Right Rear Quiet Pack Dispenser Controls Dispenser Design Number of Dispenser Buttons Crushed Ice / Cube Ice / Chilled Water Ice Option / Freeze Option Display On / Off Option Control Lock / Light Temp / Door Ajar / Power Failure Alerts Water Filter Change Indicator Light Air Filter Change Indicator Light Ready-Select™ Tall, Single Paddle 7 Yes / Yes / Yes Yes / Yes Yes Refrigerator Features Interior Lighting Water Filter Type Air Filter Type Fixed Shelves Sliding Shelves Cool Zone™ Drawer Wine...


